Use NCache Install Scripts with Microsoft Azure
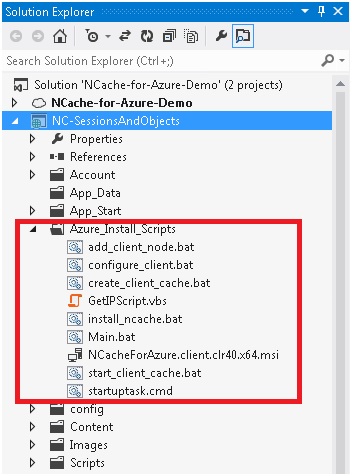
Web Roles are designed for the fast provisioning and de-provisioning of your cloud applications. You can have NCache installed automatically with the deployment of a Web Role. To do this you need to download the NCache NuGet package that contains all the install scripts that will be needed during the deployment of the Web Role. Please click here for more information on how to download the NCache NuGet Package.

For the installation of NCache in Azure during the deployment of the Web Role the first script that is run is startuptask.cmd which in turn calls other scripts, performing the following tasks:
- Install NCache
- Add client node
- Create client cache if it has been configured
- Check if client cache is InProc or OutProc. If it is OutProc, then start it
There are some startup environment variables used in these scripts which must be defined first. For that, the following code should be inserted in the ServiceDefinition.csdef file of your web role.
<Startup>
 <Task commandLine="Azure_Install_Scripts\startuptask.cmd"
       executionContext="elevated"
       taskType="simple">
  <Environment>

   <!--Check whether Azure project is running in emulated environment or not.
   If this role is running in emulated environment, then startup scripts will
   be avoided-->
   <Variable name="EMULATED">
    <RoleInstanceValue xpath="/RoleEnvironment/Deployment/@emulated" />
   </Variable>

   <!--Specify path for NCache Azure Client Setup for installation on
   client role-->
   <Variable name="NCache.SetupPath"
             value="" />

   <!--Specify cache name to add current role as client node of specified
   cluster cache-->
   <Variable name="NCache.CacheName"
             value="test" />

   <!--Specify cache server IP for communication with cache.
   For multiple servers, specify comma separated IPs as specified in example.
   For public port, specify ports with server as "10.0.0.4:8270,10.0.0.5:8271"-->
   <Variable name="NCache.CacheServers"
             value="23.97.66.31:8250,23.97.66.31:8251" />

   <!--Specify "true" if you want to create a client cache on this role
   otherwise "false"-->
   <Variable name="NCache.CreateClientCache"
             value="true" />

   <!--Specify client cache name if you want to configure client cache on
   this role-->
   <Variable name="NCache.ClientCacheName"
             value="myclientcache" />

   <!--Specify client cache size. (Compulsory option for configuring
   client cache)-->
   <Variable name="NCache.ClientCacheSize"
             value="250" />

   <!--Specify "true" if your client role is outside the virtual network of
   your cache. Your public endpoints will be used for communication with the
   server from current client role. If your client role is within the same virtual
   network as your cache, then specify "false"-->
   <Variable name="NCache.UseEndPoint"
             value="true" />

   <!--Specify startup task log path-->
   <Variable name="NCache.LogPath"
             value="" />

   <!-- Specify if client cache is inproc or not-->
   <Variable name="NCache.IsInproc"
             value="false" />
  </Environment>
 </Task>
</Startup>
Refer to ReadMe file
A Readme.txt file is provided with the NuGet package which explains web.config changes for the NCache in Azure session store provider, and NCache in Azure client.ncconf changes for connecting to an already configured cache in your environment. This information can be used as a reference for when NCache in Azure configurations need to be changed.