| < Previous page | Next page > |
Quickly Configure and use NCache
Here are some basic steps you should follow to ensure a smooth installation, configuration, and use of NCache.
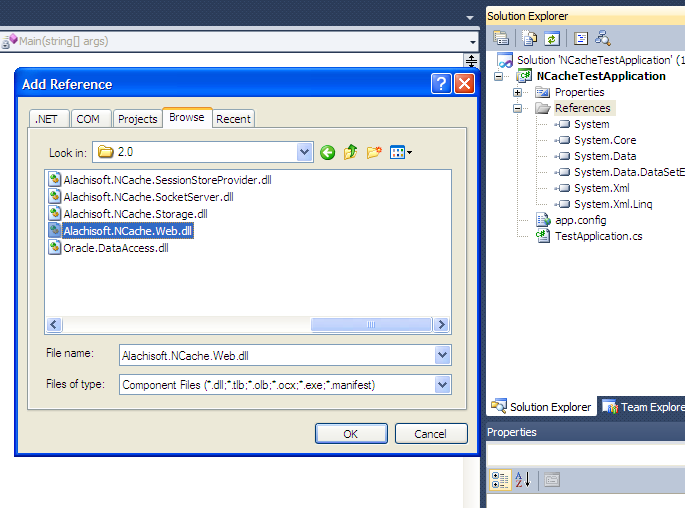
Add Reference issue of Visual Studio 2010
If your development environment is Visual Studio 2010, you may not be able to see the NCache .NET assemblies in the "Add Reference" dialog box under ".NET" tab. However, you can add reference to the NCache assemblies by using the "Browse" tab. You can find all these assembly files in [NCache Installed folder]/bin/assembly/
1. Install NCache on Cache Server and Remote Client Machines
Install NCache on all remote client and cache server machines. If you have a separate caching tier, you'll have remote clients. Otherwise, cache will be hosted on your application server.
You can install either 32-bit or 64-version of NCache. 64-bit cache servers work fine with 32-bit clients.
2. Configure Servers for Multiple Network Cards (optional)
If your cache servers (including your app servers if you're hosting cache on them) have multiple network cards, then you must bind NCache to a specific card. You need to specify the following in "Alachisoft.NCache.Service.exe.config" in "NCache/bin/service" folder:
<appSettings>
...
<add key="NCacheServer.BindToClusterIP" value="20.200.20.200" />
<add key="NCacheServer.BindToClientServerIP" value="20.200.20.200" />
...
</appSettings>
You can also bind Client/Server communication to a different network card than the Clustering network card, if you have multiple network cards. Or, you can bind both to the same card (as shown above).
3. Open Firewall TCP Port for Clients (optional)
If there is a firewall between your remote clients and the cache servers, then you must open a TCP port (default 9800) for the remote clients to talk to the cache servers. If you want to change this from 9800 to another port, then you must make changes in all remote client and all cache server machines. On the remote clients, you need to change the "port" value in "client.ncconf" as following:
<configuration>
<ncache-server port = "9800" client-request-timeout = "90" connection-retries = "1" retry-interval = "0" connection-timeout = "5"/>
</configuration>
And, you need to change the "NCacheServer.Port" value in "Alachisoft.NCache.Service.exe.config" file located in "NCache/bin/service" folder on all cache servers as following:
<appSettings>
...
<add key="NCacheServer.Port" value="9800" />
...
</appSettings>
All remote clients by default talk to NCache servers on TCP port 9800. So, if there is a firewall between the remote clients and the cache server, then you must open TCP port 9800 in your firewall.
4. Open Firewall TCP Port for Cache Cluster (optional)
If you have a situation where there is a firewall between the cache servers and the cluster must be formed across this firewall, then you must open at least two TCP ports (bi-directional) in this firewall. This port is the Cluster Port specified by you while creating a new clustered cache. For example:
Cluster Port: 7800
Port Range: 1
Open ports 7800. If Port Range is 2, then open 7800 and 7801.
5. Create New Clustered Cache
Run NCache Manager from ONLY ONE location (preferably from one of your cache servers), and create a new clustered cache. You can choose to create one of the following types of caches:
For starters, we recommend to create a Replicated Cache. Later on, you can decide whether a different caching topology meets your requirements better or not. For now, we want to go through the entire process quickly.
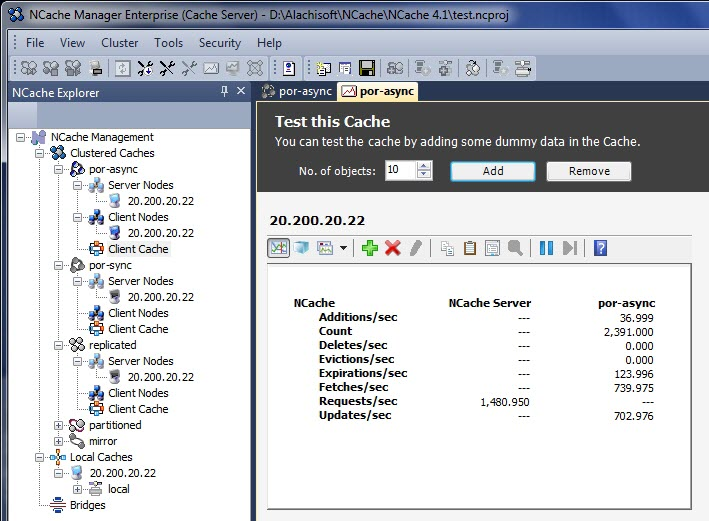
6. Test Cache Cluster from Statistics Window
Once you have created a clustered cache, you should test to make it sure that it works fine. Here are the steps to test the cluster from within NCache Manager.
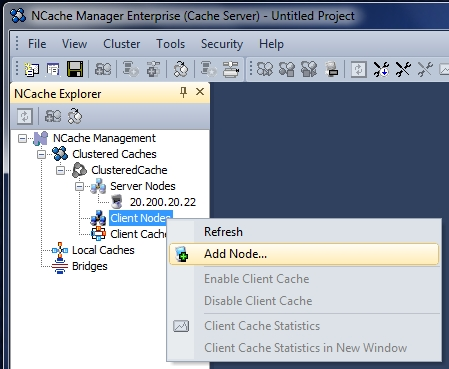
7. Remote Client Machines
NCache provides remote client management through NCache Manager. By right click on the Client Nodes, context menu will appear having "Add Node" option as shown in figure. Using this option you can add and configure a single or multiple client nodes in a clustered cache.
8. Ensure All Objects are Serializable
Whether you're using NCache for ASP.NET Sessions or for object caching, you must ensure that all .NET objects are serializable. This is true even for those .NET objects which are being stored in your Session. Here is how to ensure that:
[Serializable]
class Product
{
...
}
9. Modify "web.config" for ASP.NET Sessions
If you're using NCache for ASP.NET Sessions, you need to modify your "web.config". For .NET 1.1, you need to specify an HttpModule (see online help and "samples" for example). And, for .NET 2.0 or later, you need to add a custom Session State Provider (SSP) to your "web.config" as following:
For Enterprise and Professional Edition:-
<compilation defaultLanguage ="C#" debug="true" >
<assemblies>
<add assembly="Alachisoft.NCache.SessionStoreProvider,
Version=x.x.x.x,Culture=neutral,
PublicKeyToken=CFF5926ED6A53769"/>
</assemblies>
</compilation>
For Open Source Edition:-
<compilation defaultLanguage ="C#" debug="true" >
<assemblies>
<add assembly="Alachisoft.NCache.SessionStoreProvider,
Version=x.x.x.x,Culture=neutral,
PublicKeyToken=1448e8d1123e9096"/>
</assemblies>
</compilation>
<sessionState cookieless = "false" regenerateExpiredSessionId = "true" mode = "Custom" customProvider = "NCacheSessionProvider" timeout = "20">
<providers>
<add name = "NCacheSessionProvider" type = "Alachisoft.NCache.Web.SessionState.NSessionStoreProvider" sessionAppId = "NCacheTest" cacheName = "myTestCache" writeExceptionsToEventLog = "false"/>
</providers>
</sessionState>
Please read online help for more details on each of the above properties. For now, just make sure that cacheName="myTestCache" reflects name of the cache you've created.
10. Configure Visual Studio Project for Object Caching
If you're using NCache for ASP.NET Sessions only, then you do not need to do anything here. However, if you're using NCache for object caching where you'll be making NCache API calls, then you need to do the following in your Visual Studio project and also your C# or VB.NET source code.
You can test NCache using the following code example:
Cache cache = NCache.InitializeCache("myCache");
cache.Add("Customer:David:1001","Data");
cache.Get("Customer:David:1001");
cache.Dispose();
11. Run Application and Monitor from NCache Manager
You're now ready to run your application. Once you do, you can watch the cache performance from the Statistics window in NCache Manager. Below is an example:
 |

