Create Caches
The NCache Open Source allows you to create a local cache (standalone cache).
For other caching topologies, please download and use the NCache Enterprise. See more details on edition comparison between NCache Open Source, Professional, and Enterprise. We’ll create a Local Cache here.
Prerequisite
- For .NET, make sure the NCache Service (NCacheSvc) is started. If it is not, type the following command in PowerShell (run as admin):
Start-Service -Name NCacheSvc
Step 1: Modify config.ncconf to Create Local Cache
Do the following (please note that %NCHOME% is where NCache is installed):
Open %NCHOME%\config\config.ncconf file.
Copy/paste the entire
<cache-config>section from the example below to the<configuration>section of config.ncconf file.Make sure your
cache-nameis unique within config.ncconf which contains multiple cache definitions.Copy the following config.ncconf to the cache servers.
<cache-config cache-name="myCache">
  <cache-settings inproc="False" last-modified="" auto-start="False" data-format="Serialized" serialization="Binary">
    <logging enable-logs="True" trace-errors="True" trace-notices="False" trace-warnings="False" trace-debug="False" log-path=""/>
    <performance-counters enable-counters="True" snmp-port="0"/>
    <compression enable-compression="False" threshold="100kb"/>
    <cache-notifications item-remove="False" item-add="False" item-update="False" cache-clear="False"/>
    <cleanup interval="15sec"/>
    <storage type="heap" cache-size="1024mb"/>
    <eviction-policy enabled-eviction="True" default-priority="normal" policy="lru" eviction-ratio="5%"/>
    <cache-topology topology="local-cache"/>
    <client-death-detection enable="False" grace-interval="60sec"/>
    <data-load-balancing enabled="False" auto-balancing-threshold="60%" auto-balancing-interval="30sec"/>
    <expiration-policy enabled="False">
      <absolute-expiration longer-enabled="False" longer-value="0" default-enabled="False" default-value="0"/>
      <sliding-expiration longer-enabled="False" longer-value="0" default-enabled="False" default-value="0"/>
    </expiration-policy>
    <tasks-config max-tasks="10" chunk-size="100" communicate-stats="False" queue-size="10" max-avoidable-exceptions="10"/>
  </cache-settings>
</cache-config>
Step 2: Restart NCache Service on Each Cache Server
For the configuration changes made to take effect, restart the NCache Service:
Make sure you have enough privileges to restart the service. If the user is not the part of the Administrator's group, make sure to run PowerShell as administrator, otherwise, you might get an error message that "Cannot open ncachesvc service on computer".
Execute the following command in PowerShell to restart NCache Service:
Restart-Service -Name NCacheSvc
Step 3: Verify Cache Creation on All Cache Servers
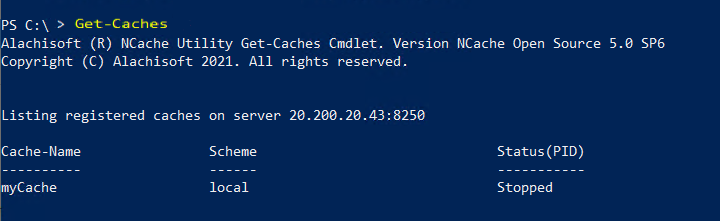
To verify that you’ve created the cache successfully, please type the following command in PowerShell on all cache servers:
Get-Caches
This command displays all the registered caches on that server. If you have successfully configured your cache, the list should contain myCache with status 'Stopped'. If you can't see myCache in the list, you must have made some mistake in STEP 1 or you have not restarted NCache service as explained in STEP 2.
Step 4: Start Cache on Each Cache Server
To start the cache, please type the following command in PowerShell on the cache server.
Start-Cache –Name myCache
Successful cache creation will be prompted on the screen.
Step 5: Verify Cache is Started
To verify whether the cache has started, run the following command in PowerShell:
Get-Caches -Detail
This command gives a detailed status of all caches registered on the cache server. You should see that myCache has a IP address of the cache server listed with it. The output also displays the Item Count, which at this stage should be 0.
See Also
Monitor Caches in PerfMon
Use NCache from .NET Application
Use NCache for ASP.NET Sessions
NCache Programmer's Guide
NCache PowerShell Guide