View State Caching for ASP.NET Performance Optimization
The ASP.NET View State is a built-in feature that manages client-side state by preserving page and control values between complete round trips for client requests. This gives a state full programming capability over a stateless protocol such as HTTP.
This state is stored in a hidden field on the page as an encoded Base64 string, as part of every response sent to the client. It is returned to the server by the client as part of a post back.
<input id = "__VIEWSTATE"
       type = "hidden"
       name = "__VIEWSTATE"
       value = "/wEPDwUJNzg0MDMxMDA1D2QWAmYPZBYCZg9kFgQCAQ9kFgICBQ9kFgJmD2QWAgIBD
              xYCHhNQcm2aW91c0NvbnRyb2xNb2RlCymIAU1pY3Jvc29mdC5TaGFyZVBvaW50Lld
              lYkNvbnRyb2xzLlNQQ29udHJbE1vZDA1XzRlMjJfODM3Y19kOWQ1ZTc2YmY1M2IPD
2...=="/>Although, very useful, the ASP.NET View State comes with a few issues that you need to resolve. They are discussed below.
- ASP.NET View State is often heavy: When your ASP.NET application has a lot of rich and heavy controls and widgets on its pages, a lot of data is traveling back and forth between your browser and the web server. This heavy payload results in performance degradation of ASP.NET application and high bandwidth cost.
- ASP.NET View State poses security risks: It can also pose a security risk when sending confidential data as part of the view state to the client. This data is vulnerable to attacks and attackers can tamper with it. You can encrypt the ASP.NET View State data but this is again going to have a performance cost to it.
NCache for ASP.NET View State
One way you can resolve these ASP.NET View State issues is by storing the actual ASP.NET View State on the web server and sending a unique token (or ID) in its place to the browser. So the browser can send this token back to the web server next time. The web server then uses this token to find the right ASP.NET View State in its store. Below is such an example of a token being used.
<input type = "hidden"
       name = "__VIEWSTATE"
       id = "__VIEWSTATE"
       value = "vs:cf8c8d3927ad4c1a84da7f891bb89185" />
Although, the ASP.NET View State can be stored on the web server, it's not ideal when your ASP.NET application is running in a load-balanced web farm since the next HTTP request might go to another web server. Therefore, you must store the ASP.NET View State in a shared store that is accessible from all the web servers.

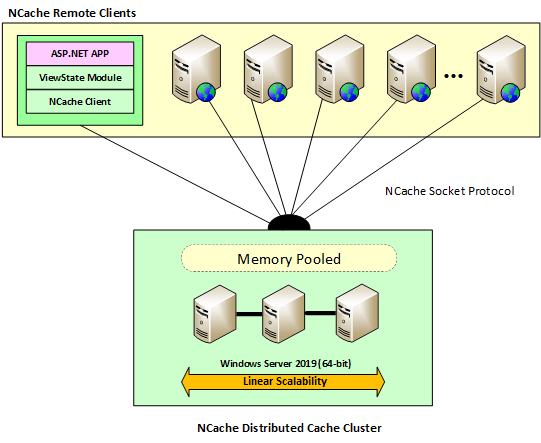
The best place to store ASP.NET View State on the server is in a distributed cache. This way, not only can you have a common store for all web servers, but you also have an extremely fast and scalable in-memory store as compared to SQL Server database or other storage options.
NCache is an extremely fast and scalable distributed cache for .NET, Java, Python, and Node.js. It also lets you store ASP.NET View State to solve the issues described above.
Configure ASP.NET View State in NCache
To configure ASP.NET View State, you need to install the AspNet.ViewState.NCache NuGet package as a prerequisite. Then you need to configure the app_browser file with NCache Plug page adapters. Next, you need to configure the web.config file in your application to register the View State for configuration and specify the settings for the previously registered config section. Refer to the NCache ASP.NET View State docs for step-by-step configuration.
If the same cache is being used for View State caching and other data, you can fetch the View State data by using the NC_ASP.net_viewstate_data tag as:
Hashtable allViewStateData = cache.SearchService.GetByTag(new Tag("NC_ASP.net_viewstate_data"));Benefits of Caching ASP.NET View State on the Server
You gain the following benefits by caching your ASP.NET View State in NCache.
- Improve ASP.NET Performance: NCache reduces the request/response payload which improves the overall request time.
- Reduce Bandwidth Cost: Smaller payloads also mean a significant reduction in bandwidth consumption cost. This could save you a lot of money.
- Security: Now that the ASP.NET View State encoded string is not sent to the browser, there are no longer any security risks.
- Fast & Scalable ASP.NET View State Storage: NCache is an extremely fast and scalable distributed cache. This means that ASP.NET never faces any scalability bottlenecks due to ASP.NET View State storage.
- ASP.NET View State Reliability through Replication: NCache replicates all data in the distributed cache intelligently. This means you don't lose any ASP.NET View State even if a cache server goes down.
Advanced ASP.NET View State Caching Features in NCache
NCache provides you a rich set of features for caching and managing the ASP.NET View State. Below is a list of them.
- Minimum size threshold: NCache allows you to specify a minimum size of ASP.NET View State, i.e., viewstateThreshold. Any View State smaller than this is not cached. This enables you to only cache heavy View State.
- Link ASP.NET View State with Session State: You can link an ASP.NET View State with your Session State (expireViewstateWithSession). This way, when the user session expires, all view states are automatically removed from the cache.
- Page-level max count threshold: You can configure how many view states to retain for a given page using FIFO. This way, the oldest view state is removed whenever a new view state is created for this page. This optimizes your memory consumption in the cache server by avoiding storage of unnecessary view states.
- Session level max count threshold: Similar to the page level, you can specify the maximum view state count for a user session in a FIFO manner with maxViewstatesPerSession. This way, the oldest view state is removed whenever a new view state is created.
- Page-level and session-level settings: You can specify all of the above settings differently for each page or keep them common to all sessions.
Summary
As you have seen, NCache allows you to cache ASP.NET View State on the server to optimize your ASP.NET performance. It also provides you with a rich set of features for managing your ASP.NET View State more efficiently in the cache. This enables you to develop complex applications and use these features to handle diverse scenarios.