Using NCache in EF Core with Oracle
Hi everyone, I'm Sean, and today I'm going to show you how you can integrate NCache into your existing Entity Framework Core applications that are configured with an Oracle database. We're going to do this as a hands-on demonstration where we're going to work with a sample application that I've already configured for this demo, and we're going to integrate NCache into it. So that's pretty exciting stuff we have lined up. Let me show you how we're going to be doing it.
Sample EF Core Application
So, the first thing I have here is the sample application itself. So, you can see here, I have the sample application, and I'm fetching some orders, customers, and products here. And I have this configured to work with an Oracle database, which I can show you here. If we go to the context, you can see that I have this UseOracle method here to work with my Oracle database.
protected override void OnConfiguring(DbContextOptionsBuilder optionsBuilder)
{
optionsBuilder.UseOracle("Data Source=(DESCRIPTION =(ADDRESS = (PROTOCOL = TCP)(HOST = 20.200.20.112)(PORT = 1521))(CONNECT_DATA =(SERVER = DEDICATED)(SERVICE_NAME = NorthWindDB)));User Id=SYS;Password=MyPassword;DBA Privilege=SYSDBA;");
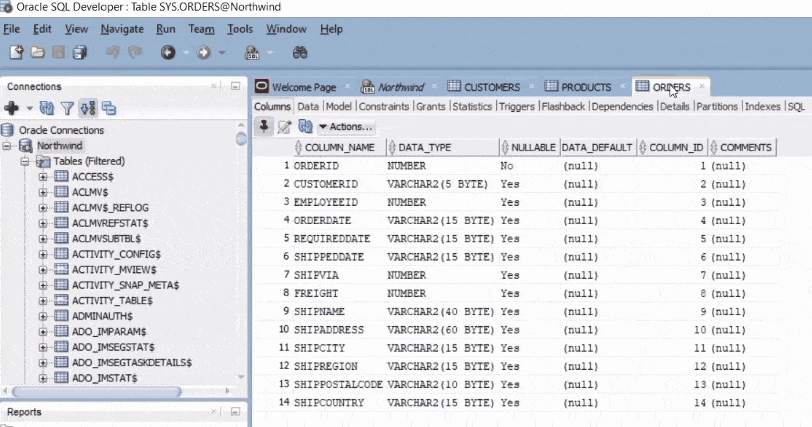
}So, before we actually run this program, let me take you to the database and show you what we're working with. So, I'm working with the Northwind database in Oracle. And since we have a lot of tables, I've opened up the ones I'm working with here so we can see them. The first one is ORDERS, and we can see these properties here for the orders that we're going to be working with. Then, let's take a look at our PRODUCTS. So, these are the product properties that we will be getting or fetching in our application. And then, the third table is CUSTOMERS, and we can see the properties of our customers right here. And that pretty much is all the tables that we're going to be working with.
So now, let's actually query these tables and take a look at what we have inside. So, you can see that I have 77 products in my Northwind database, and these are all the products right here. So, that's all well and good. Now, let's take a look at the CUSTOMERS, customers, and enter, and if I scroll all the way down — perfect! So, we can see that I have 89 customers in my Northwind database, and all of those customers are right here as you can see in front of you.
Now, let's take a look at our orders. Now, there's going to be a lot of orders, let's scroll to the bottom — perfect! So, we can see that we have 830 orders in our database. That's a lot of orders, and we can see all of these orders over here. So, we're going to be making some fetching through some criteria in the application, and we're going to go through that now.
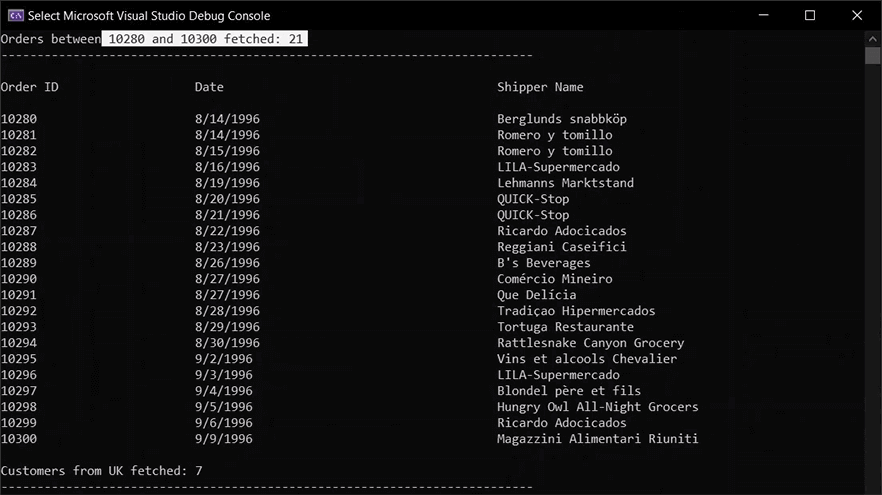
So now that the application has run, we can see perfectly. Now let me scroll up here that we can fetch these products between ID 25 and 50. So, we have 26 products; customers who are from the UK, so we have seven customers; and orders between 10280 and 10300, so we have these 21 orders — perfect!
NCache Setup for EF Core
So, now that we know that the sample is working, we can move on to configuring NCache in our Entity Framework Core application. So, configuring our application to work with NCache is as simple as five steps that we're going to be doing in this demonstration.
- Install NCache EF Core Nuget Package
- Add NCache EntityFrameworkCore Namespace
- Specify Cache Configurations in DbContext
- Make Models Serializable
- Use NCache EF Core Extension Methods
Install NCache EF Core Nuget Package
So, let's start with the first step here, which is to install the NCache Entity Framework Core NuGet Package into our application. So, if I head over to the NuGet Packages in my application, we're looking for the EntityFrameworkCore.NCache NuGet Package, which is right here. I have this installed in my application, so we can see that here. And I'm running version 5.3.2.1, which corresponds to NCache version 5.3 SP2. So, that's perfect. Now, let's go ahead and close this tab and move on to the next step.
Add NCache EntityFrameworkCore Namespace
So, the next step is to add the NCache Entity Framework Core namespace into the application. So, let's open up the code again and go into our program here. And just going to add:
using Alachisoft.NCache.EntityFrameworkCorePerfect! So, I'm just going to save this, go over to model context, and paste it here — perfect! So, now that that's done, we can go to the next step, which is to specify the cache configurations in the database context.
Specify Cache Configurations in Database Context
So, I'm going to scroll down to my on configuring method, and I'm going to add the name of the cache that we're going to work with and I'm going to pass the NCache configuration. So, this is going to be my 'efcoreoraclecache' — perfect! And I have to add the NCacheConfiguration.Configure the name of the cache along with the DependencyType, which is going to be Oracle — perfect! And that's pretty much all I have to do here.
...
protected override void OnConfiguring(DbContextOptionsBuilder optionsBuilder)
{
string cache = "efcoreoraclecache";
NCacheConfiguration.Configure(cache, DependencyType.Oracle);
optionsBuilder.UseOracle("Data Source=(DESCRIPTION =(ADDRESS = (PROTOCOL = TCP)(HOST = 20.200.20.112)(PORT = 1521))(CONNECT_DATA =(SERVER = DEDICATED)(SERVICE_NAME = NorthWindDB)));User Id=SYS;Password=MyPassword;DBA Privilege=SYSDBA;");
}
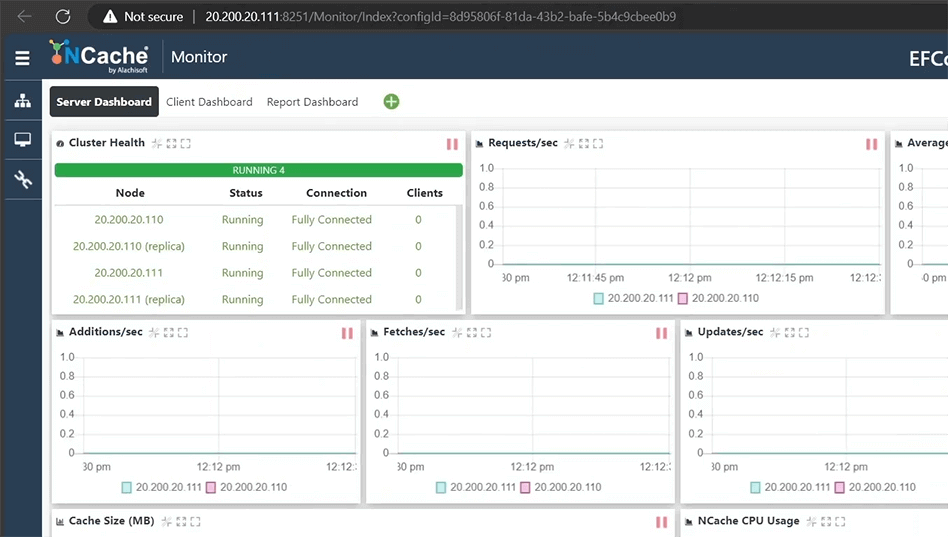
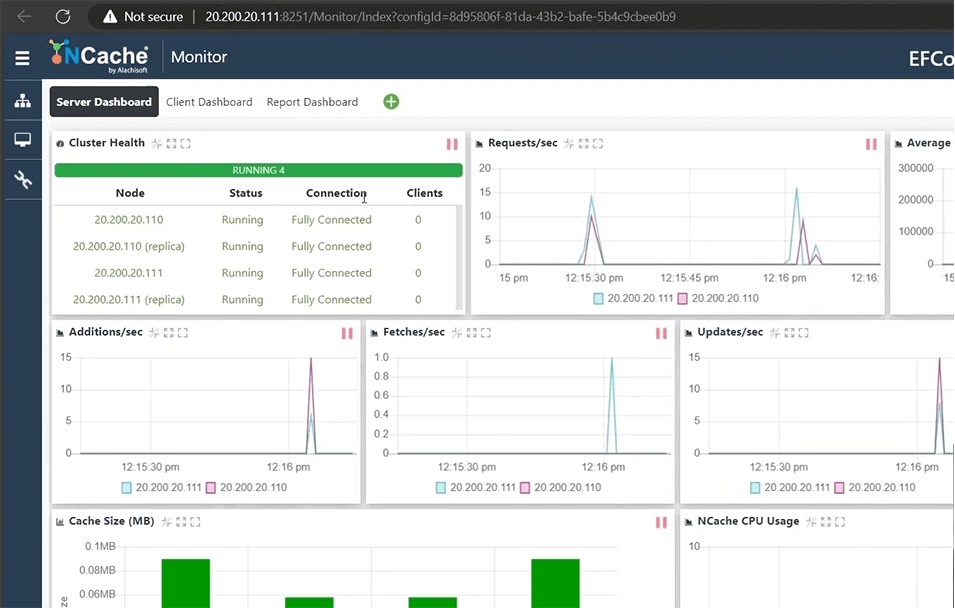
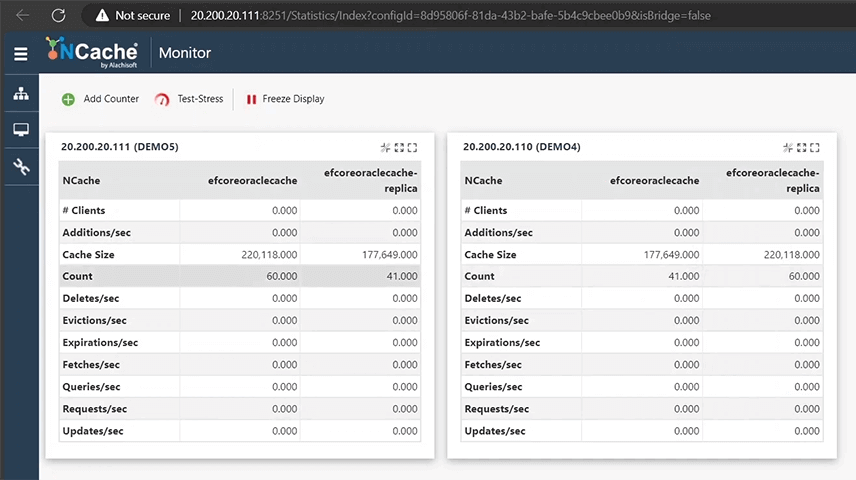
...Now let's take a look at the cache we are going to work with. So you can see that I have my EFCoreOracleCache configured right here on these two demo machines. And let's take a look at the details of this cache. So, from here, if we want to monitor this cache, we can click on this monitor button. That's going to take us to the monitor here that shows us the health of our cache, and we can see that it's good, and it's clean, and we have a healthy cache to work with.
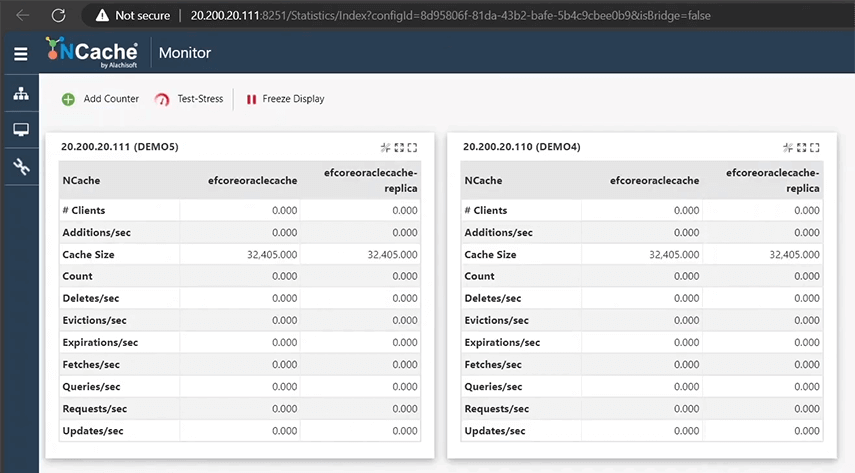
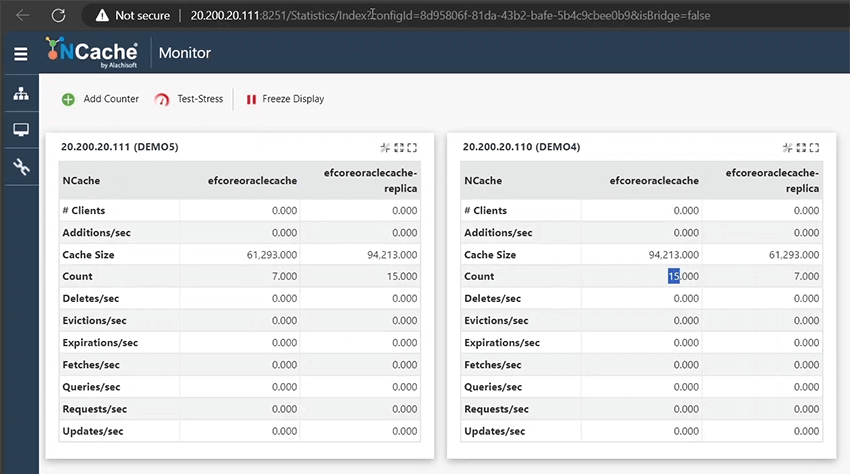
If we go back to our details and click on statistics, that will bring us to this page here that shows us the statistics of our cache. Now, if we go back to our monitor, go back to our application, and open up the next step.
Make Models Serializable
So, the next step is to make our models serializable. Perfect. So now I'm going to head over to my customer model. So that is going to be over there. Perfect. And I'm just going to add [Serializable] over here. Perfect. So now that that's done, I can move over to my order. And you can see that's already marked as [Serializable]. And my product, which again is already marked as [Serializable]. So all my models are serializable, and we're good to go here. So now we can move on to the next step.
Use NCache EF Core Extension Methods
The next step is to use the NCache Entity Framework Core extension methods within our application. And I'm just going to take a pause here because the extension methods that we choose to use will depend on the type of data that we are actually caching.
So there are two types of data that we can cache: the first type being transactional, and the second type being reference. What these types are and how you're supposed to handle them is something we'll get into just shortly. So let's talk about the first one. Perfect.
Handling Transactional Data
So, the first type of data you can handle is transactional data. Now, transactional data is data that has a read intensive as well as a write intensive use case. So a good example of this would be flight data where every day you have so many flights and that data is being written to the database every day, and it is also being fetched from the database every day. So that is a very read and write intensive use case which qualifies that data to be transactional. In our case, a similar use case can be mapped to our orders. So we can consider our orders to be our transactional data. So when we're talking about handling transactional data in Entity Framework Core with NCache, we will use the FromCache() extension method.
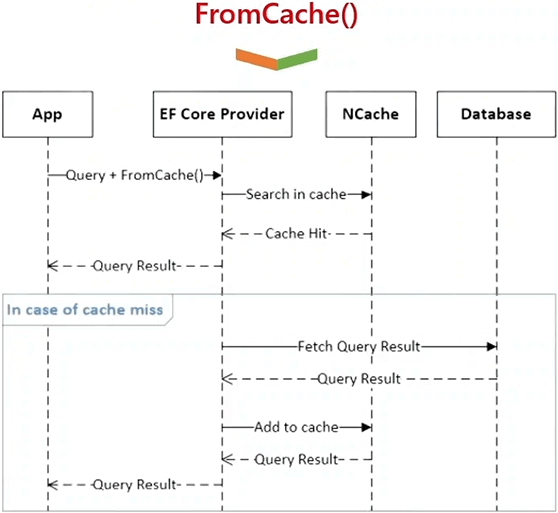
Now, when you associate this extension method ahead of your existing queries, the first time you run it, will run like a standard query. Your application is going to go to the database and fetch the entities from there. However, this time your application is going to cache them into your clustered cache, and so the next time your application tries to fetch those entities, it won't make that trip all the way to the back-end database, and instead it's going to bring those entities from the clustered cache back into your application. So let's take a look at how this method works.
So if I come over to my application, over here I'm fetching my orders. So I'm just going to add some order caching options. So I'm going to add order_caching_options here, and these are going to be ‘new CachingOptions’. So I'm going to specify my store type in here to say that I want to fetch a single collection of all my orders. So StoreAs.Collection and then populate that into my cache. Also, I'm going to add an absolute expiration for 10 minutes to this data because when you're dealing with transactional data, this data changes frequently so you want to refresh it as regularly as possible. So I'm just going to put this expiration for 10 minutes so that after 10 minutes, this data set refreshes within the cache. So now I'm going to add the .FromCache() extension method and add my order_caching_options inside, and that is perfect. This is absolutely perfect, and this is all we need to do.
using OracleEFCore.Models;
using Alachisoft.NCache.EntityFrameworkCore;
namespace OracleEFCore
{
internal class Program
{
static void Main(string[] args)
{
using (var context = new Models.ModelContext())
{
//-----Orders-----
var order_caching_options = new CachingOptions()
{
StoreAs = StoreAs.Collection
};
order_caching_options.SetAbsoluteExpiration(DateTime.Now.AddMinutes(10));
int upper_orderid = 10300;
int lower_orderid = 10280;
var order_resultset = context.Orders
.Where(o => o.Orderid >= lower_orderid && o.Orderid <= upper_orderid)
.FromCache(order_caching_options)
.ToList();
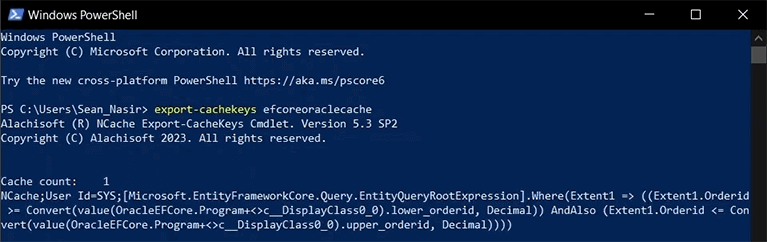
...Now, let's go ahead and run the sample and let's take a look at what we get. Perfect. So the sample is run, there's no changes in here so I can just close this here, and now we can take a look at these requests that we got on our cache. And we can see that this count has gone up as well. So now let's export the cache keys for this cache and take a look at the collection that we've just added into our clustered cache. Perfect. So you can see this collection that has been added into the cache. That's awesome.
But say now that I didn't want to put a single collection into the cache and instead I wanted each order as a separate entity. Well, in that case, I can just specify the store as type to be separate entities.
//-----Orders-----
var order_caching_options = new CachingOptions()
{
   StoreAs = StoreAs.SeparateEntities
};
Now when I run this application again, it is going to put all of my orders as separate entities into the cache. So now that the application is run, let's close it. We can see that the count's gone all the way up and we can see these additions that have been performed and these requests. If I head over to the statistics, we can see this count of 7 and this count of 15. Perfect.
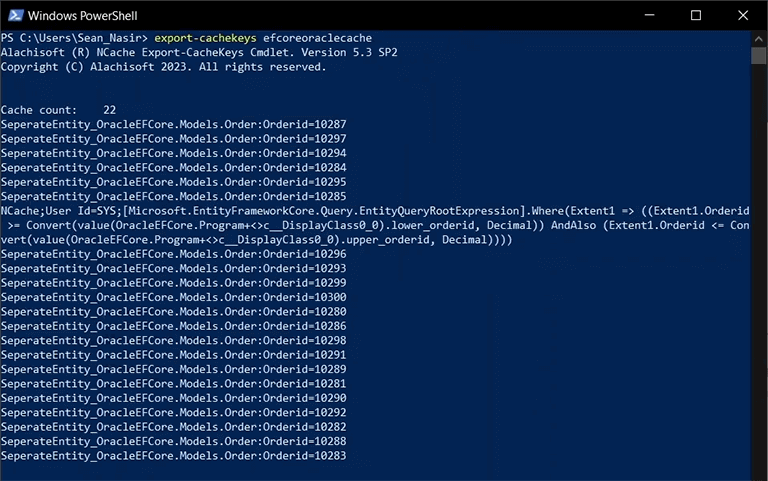
Now, let's export the cache keys and take a look at the keys that we have within our cache. Perfect. So we have these 22 keys or items within our cache, and all our orders are cached separately. That pretty much sums up how the 'FromCache()' extension method is used.
Handling Reference Data
Now let's talk about how you can handle reference data. So reference data is data that has a very read intensive use case but is not updated as frequently as transactional data. A good example of this would be a product catalog. So when you have products in stock or a product catalog, you're not updating that catalog extremely frequently. Your products would change maybe once or twice a month. So you're more likely just reading that data from the database and not really updating that data within the database extremely frequently. So it makes sense to bring that data from the database into a clustered cache and then to read that data from a high-speed in-memory clustered cache or data store rather than to go to the database. And this will provide your application with high performance and scalability from in-memory distributed caching.
So when you're working with reference data, the first method you would use is the LoadIntoCache() method. Now the load into cache method simply takes the results of the query that you have run in Entity Framework Core and cache those results into the cluster cache. Now, the load into cache method can be set to run at an interval when you expect data to be updated.
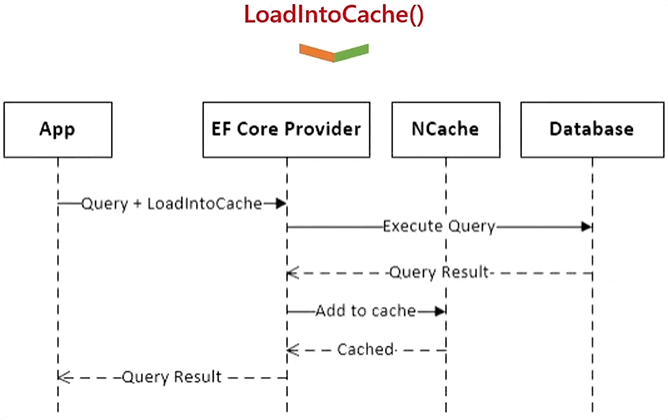
So say, for example, the product catalog that we have updates every week. We can set this method to run every week so that it keeps refreshing the data in the cache and you always have fresh data present within the cache.
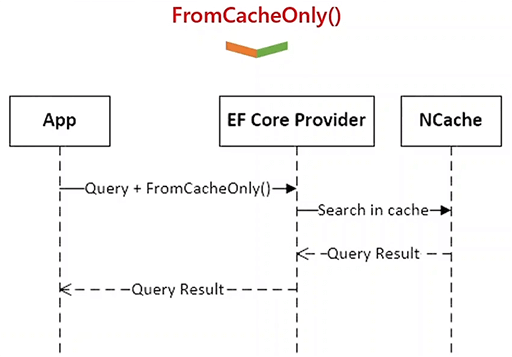
So now that you have your entire data set within the cache let's take a look at the third extension method, which is the FromCacheOnly() extension method. Now, the FromCacheOnly() extension method is a really cool extension method that makes it so that you only ever go from your application to the clustered cache to fetch your data rather than going to the back-end database. You will never, ever go to the backed database when you are using the FromCacheOnly() extension method.
So, when you use this method in tandem with the LoadIntoCache() method, you have a really powerful set of tools that are making sure your clustered cache remains up to date and synchronized with your database, and that you are fetching your data only from within your clustered cache.
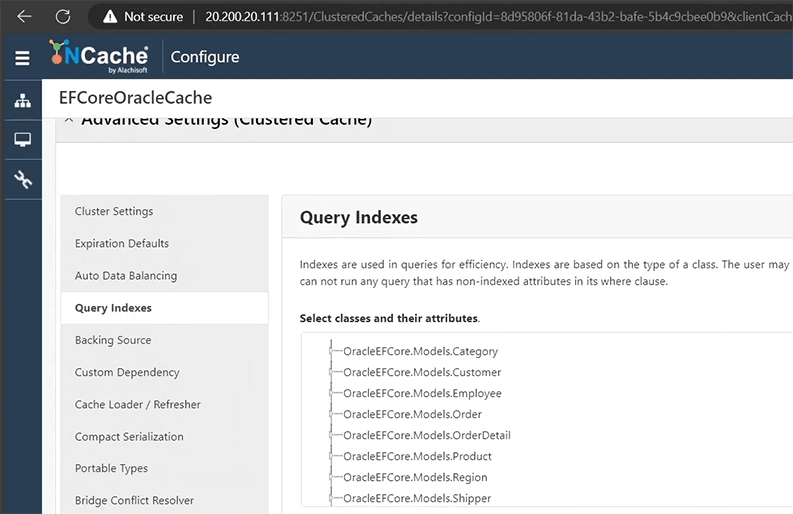
Now, let's take a look at how we would use these methods. So when you're working with these methods, the first thing we have to do is make our query indexes on these models here. If we go into customer, one way to do this is to add the [QueryIndexable] tag on top of the 'Customer' over here. So, we can see this 'QueryIndexable[]' tag here, and this brings in this library. However, in my case, I don't need to do this, so I'm just going to comment this out. The reason being that if I go to my clustered cache and to the details, let's scroll down to the query indexes tab over here, and you can see that I've added all my query indexes into the cache already. So, since I've added these, I don't need to dynamically define these.
Now that our query indexes are good to go, I have this piece of code here that is loading all my products into the cache from the database. So, I'm just going to go ahead and uncomment this piece of code. Perfect!
// ------------------------Load ALL Products Into Cache------------------------
...
var products_caching_option = new CachingOptions
{
StoreAs = StoreAs.SeparateEntities
};
products_caching_option.SetAbsoluteExpiration(DateTime.Now.AddDays(10));
var all_products = (from products in context.Products
select products)
.LoadIntoCache(products_caching_option)
.ToList();
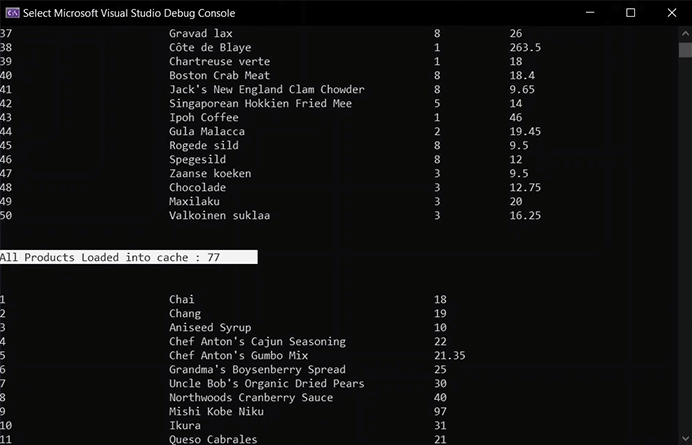
Console.WriteLine($"\n\nAll Products Loaded into cache : {all_products.Count}\n\n");
all_products.ForEach(product =>
{
Console.WriteLine(String.Format("{0,-25} {1,-40} {2,-10}", $"{product.Productid}", $"{product.Productname}", $"{product.Unitprice}"));
});
...And all that this code is doing is it is setting that I want to put my products into separate entities and I want to add them with an expiration of 10 days. Then, this LoadIntoCache() method is loading the products into the cache. Now, let's run this and take a look at the results that it fetches. Perfect! So now, if we scroll up here, there we go! We can see that we loaded all products into the cache, these 77 products.
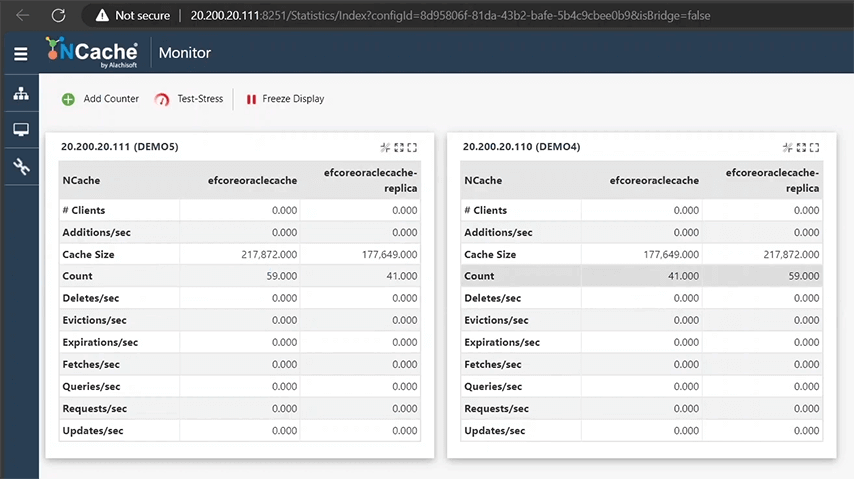
And then, if we can see these requests that have come into the cache, these additions that have been performed, and this count that has gone all the way up. If we open our statistics, we can see we have 59 items on one partition and 41 on the other.
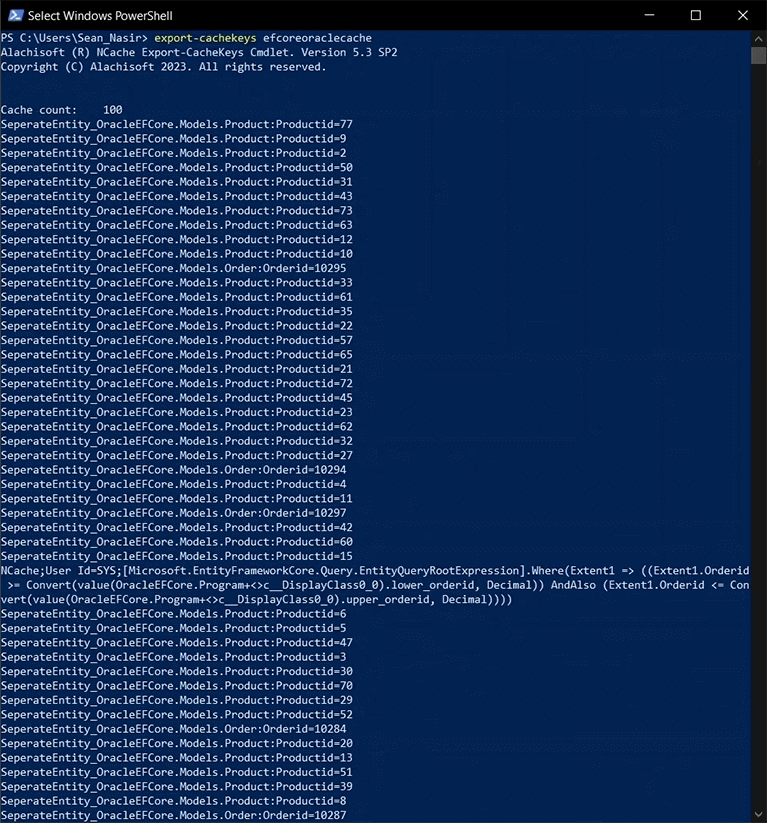
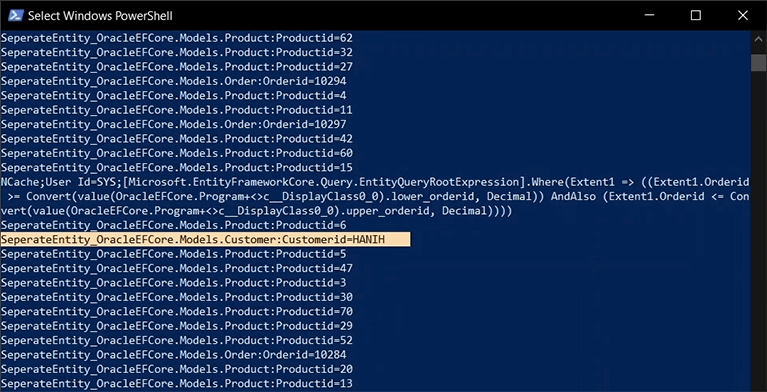
Now, let's export the cache keys and look at the data that we have. Perfect! So, we have 100 keys within our cache, and all of the products have been brought into the cache. Perfect! So now that our entire data set is in, I don't have to run this method again. I'm just going to go ahead and comment this.
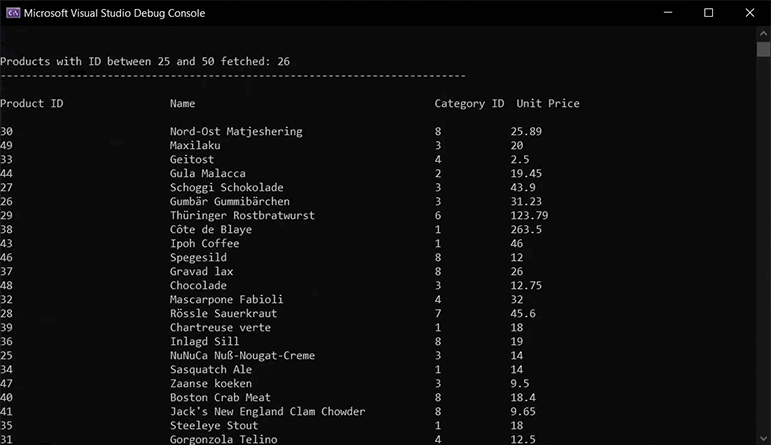
And now, we're going to run the FromCacheOnly() extension method on our products query that we've been running before. So, I just add '. FromCacheOnly(). Perfect! And now, let's go ahead and run the sample and let's take a look at the results of this fetches for us. Perfect! So, there we go, 26 results, the same we got when we ran this application without any caching, which means a complete result, and we can see the fetches that were performed and the requests that we got on the cache.
EF Core Specific NCache APIs
And that pretty much sums up how you can use the FromCacheOnly() with the LoadIntoCache() extension method. And that brings us on to the EF Core specific NCache APIs that you can use. So, say for example, you didn't want to use the extension methods, and you wanted to work with independent entities where you're creating an entity, persisting it into the context, and then pushing it into the cache. Well, NCache allows you to do that with the EF Core specific NCache APIs. So, the way that these work is that you would fetch the cache context from the EF Core context within your application. And then, once you have that cache context, you can use that cache context to insert entities into the cache or to remove entities from the cache.
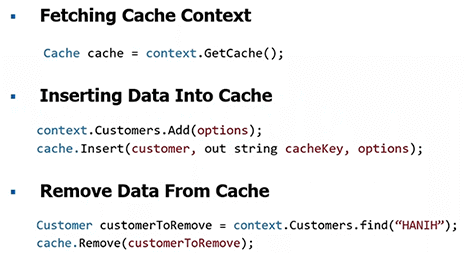
Now, this has not to be mistaken with the APIs that are provided in the NCache SDK. These are specific to Entity Framework Core and they behave the way they're supposed to with Entity Framework Core. So, in the insert data, you can see that we're going to insert a customer with an out string cache key. And this is a cache key that is provided by the Entity Framework Core API.
Now, let's go ahead and look at how this works, and then we can see how the items or entities are persistent into the cache. So, if we scroll down here, we can see that I can add a customer to the cache using the cache handle. So, I'm just going to uncomment this piece of code here. Perfect!
//-------------------Add Customer Using Cache Handle-------------------
...
	Cache cache = context.GetCache();


	var cust = new Customer
	{
	   Customerid = "HANIH",
	   Contactname = "Hanih Moos",
	   Contacttitle = "Sales Representative",
	   Companyname = "Blauer See Delikatessen",


	};

	var options = new CachingOptions
	{
	   StoreAs = StoreAs.SeparateEntities
	};

	options.SetAbsoluteExpiration(DateTime.Now.AddMinutes(10));

	context.Customers.Add(cust);
	context.SaveChanges(true);

	cache.Insert(cust, out string cacheKey, options);
	Console.WriteLine($"\n\nCustomer ID: {cust.Customerid} -> Added to Cache");
Now, if you can see that I'm simply getting the cache context, I'm creating this customer here. I say that I want to store it as a separate entity with an expiration of 10 minutes, over here. I'm just persisting this within my context, saving the changes, and then performing this cache insert here. And then, printing out that I have added this customer into the cache.
So now, let's go ahead and run the code and take a look at how this works. Perfect! So, we can see that the customer has been added into the cache. I'm just going to close this. We can see this addition for 1 that's been performed and this bump in our count. So, let's go to statistics. There we go! So, we can see 41, and the count's gone from 59 to 60.
Now, let's go ahead and export the cache keys. Perfect! So, there we go! We can see the customer that has been added into the cache, and you can see that the API has assigned the cache key to this item. We didn't have to specify a key to add it. So that's perfect!
Now, let's go ahead, let me clear this up, and let's actually remove this customer that we've put into the cache. So now, I'm just going to comment out this piece of code one more time. I'm just going to comment that out, and let's scroll down and let's remove the customer using the cache handle. So, I have that code over here. So, I'm just going to select all of it, and I'm just going to uncomment it right here.
//-------------------Remove Customer Using Cache Handle-------------------
...
	Cache cache = context.GetCache();

	Customer customerToRemove = context.Customers.Find("HANIH");

	if (customerToRemove != null)
	{
		context.Customers.Remove(customerToRemove);
		context.SaveChanges(true);
		cache.Remove(customerToRemove);
		Console.WriteLine($"\n\nCustomer ID: {customerToRemove.Customerid} -> Removed from Cache");
	}
	else
	{
		Console.WriteLine("\n\ncould not find the customer within the cache");
	}
And what this code is doing is it's getting the cache from the context again, and it is finding that customer within the context. And if that customer is actually found, then what it's going to do is it's going to remove it from the context, save the changes, then perform this cache.Remove() to remove the customer, and then it's going to print out that it's done so. Otherwise, if it can't find it, it's just going to tell us that it could not find the customer within the cache.
Now, let's go ahead and save this, and run this application, and take a look at what happens. Perfect! So, found the customer and removed it from the cache. Awesome!
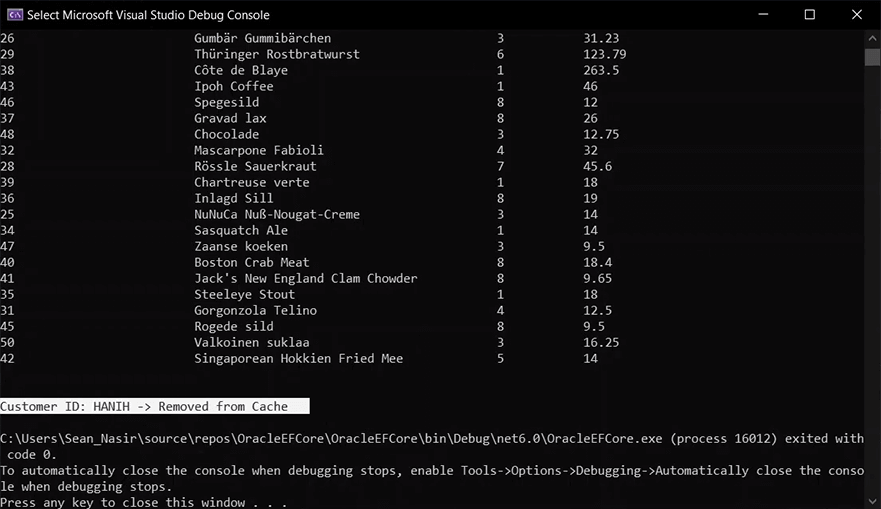
Now, let's close this and take a look at the count, and we do see it has gone down from 60 to 59. The statistics also show that the count has gone down from 60 to 59. Now, let's export the cache keys. We should see 100 keys now. Perfect! So, we cannot see that customer that we added previously in the count has gone back to 100. And that pretty much brings us to the end of this demonstration. Thank you so much for watching.
Next Steps
Download NCache
Now, as part of the next steps, what you can do is, if you want to download NCache, then you can get a free 30-Day trial, which will give you a fully working product. You can do that by heading over to alachisoft.com here, and then going to the download section from here, and here you have the offerings that you can download based on your requirements in your .NET version.
Try Playground
You can try the NCache playground for 30 minutes. This gives you a complete, sort of sandbox session where you can play around with code and look at how the samples would run and get a feel for the product in general.
Schedule a Personalized NCache Demo
Lastly, you can also schedule a personalized NCache demo where we will provide you with a one-hour dump of the NCache features and how well it works. We can also map the sort of use case to your pain points and see how well caching would work in your environment. So, you can just fill out this form here and submit the request. You can be sure that you we'll get it and we'll schedule that demo accordingly.
And that pretty much brings us to the end of this demo. Thanks so much for watching. Have a wonderful day. Goodbye.