Add Cache Server Node
Adding a cache server node to an existing NCache cluster enables you to horizontally scale your distributed cache, thus improving both the cache capacity as well as the rate of handling requests. You can add a cache server node to the cluster at any time. After adding a server node to the cluster, you need to start that node so that it can join the cluster.
Prerequisites
Make sure the NCache Service is running. If it is not, do the following:
To start the NCache Service on Windows, open Windows PowerShell as Administrator and run the following command:
Start-Service -Name NCacheSvc
Make sure that you run the NCache Service as an administrator. Here are the steps to do so:
- Open the Services window and look for NCache in the list.
- Right click on NCacheSvc from the list and choose Properties.
- Go to the Log On tab and click on the Browse button.
- In the object name field, type Administrator and click on the Check Names button.
- It will pick the appropriate Administrator, then click OK.
- Now, set a Password and click OK.
- Right click on the NCache Service and choose the Restart option. Now your service will start running as administrator.
Using NCache Management Center
Launch the NCache Management Center by browsing to http://localhost:8251 or
<server-ip>:8251.In the left navigation bar, click on Clustered Caches. This opens up a new page. It shows any existing local or clustered caches and additional details like Server and Server Platform.
Against the cache name, click on View Details.

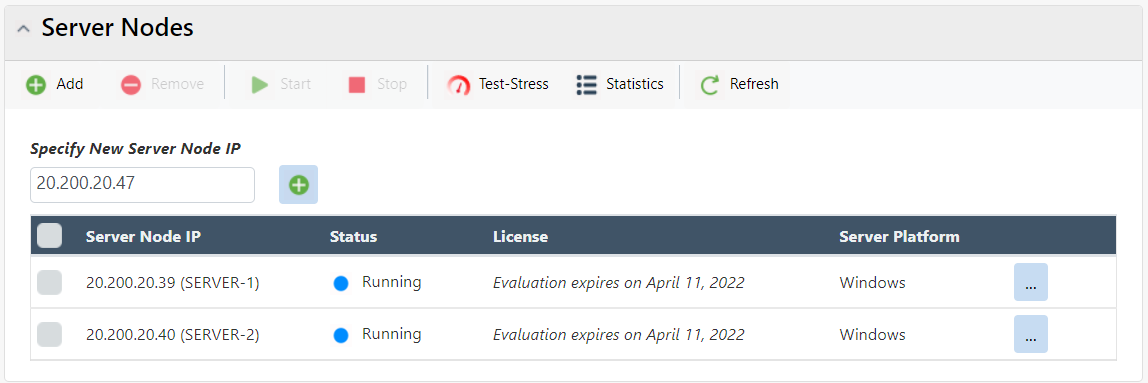
This opens up the detailed configuration page for the cache. The Server Nodes tab displays a list of IP statuses on the existing server nodes of the cache.
Click on the
 button and specify the server node's IP. Click on to add it to the cache. Upon which you will get a success notification.
Note
You might get prompted with a dialog box upon these changes, asking whether to reload or overwrite the cache config file.
- The newly added node is displayed in the Server Nodes list.
Note
You also have the option to download logs to monitor a specific server node.
Using PowerShell
- The Add Node cmdlet enables the users to add a new server node to the existing clustered cache on the specified server. It also enables users to have multiple server nodes in a clustered cache.
Add-Node -CacheName demoCache -ExistingServer 20.200.20.11 -NewServer 20.200.20.12
- The following command adds a new node 20.200.20.13 to the cache named demoCache existing on server node 20.200.20.12 using security credentials.
Add-Node -CacheName demoCache -ExistingServer 20.200.20.12 \
         -NewServer 20.200.20.13 -Credentials(Get-Credential john_smith)
Manually Edit NCache Configuration
You can also manually edit the NCache configuration to add a server node to the cluster.
Note
The following steps apply to both NCache Enterprise and NCache Open Source. However, NCache Open Source only supports Replicated Caches and allows a maximum of 3 nodes in a Replicated cache cluster.
Add a Node to a 1-Node Cluster
You can add a second server node to an existing 1-node cache cluster by updating the <cache-deployment> section in the config.ncconf file. To add a second node to an existing 1-node cache cluster, follow the steps stated below:
Open the config.ncconf file on node-1 with administrative privileges.
<cache-config cache-name="demoCache" alias="" config-id="44fb997a-f6a7-433b-9411-7ef9de9f47c7" config-version="0" store-type="distributed-cache">
  <cache-settings inproc="False" data-format="Serialized" serialization="Json">
    <logging enable-logs="True" trace-errors="True" trace-notices="False" trace-warnings="False" trace-debug="False" log-path=""/>
    <performance-counters enable-counters="True" snmp-port="0"/>
    <cleanup interval="15sec"/>
    <storage type="heap" cache-size="1024mb"/>
    <eviction-policy enabled-eviction="True" default-priority="normal" policy="lru" eviction-ratio="5%"/>
    <cache-topology topology="partitioned-replica">
      <cluster-settings operation-timeout="60sec" stats-repl-interval="60sec" use-heart-beat="False">
        <cluster-connection-settings cluster-port="7802" port-range="2" connection-retries="2" connection-retry-interval="2secs" join_retry_count="24" join_retry_timeout="5"/>
      </cluster-settings>
    </cache-topology>
    <client-death-detection enable="False" grace-interval="60sec"/>
  </cache-settings>
  <cache-deployment deployment-version="0">
    <servers>
      <server-node ip="20.200.20.12"/>
    </servers>
  </cache-deployment>
</cache-config>
In the
<cache-deployment>section of the cache named demoCache, add the new cache server as a separate<server-node>entry. In the example below, the existing server is node-1 with IP address20.200.20.12, and the new server being added is node-2 with IP address20.200.20.11:<cache-deployment deployment-version="0"> <servers> <server-node ip="20.200.20.12"/> <server-node ip="20.200.20.11"/> </servers> </cache-deployment>Save the updated config.ncconf file.
Copy the updated
<cache-deployment>block from node-1 to the config.ncconf file on node-2.Restart the NCache Service on node-2.
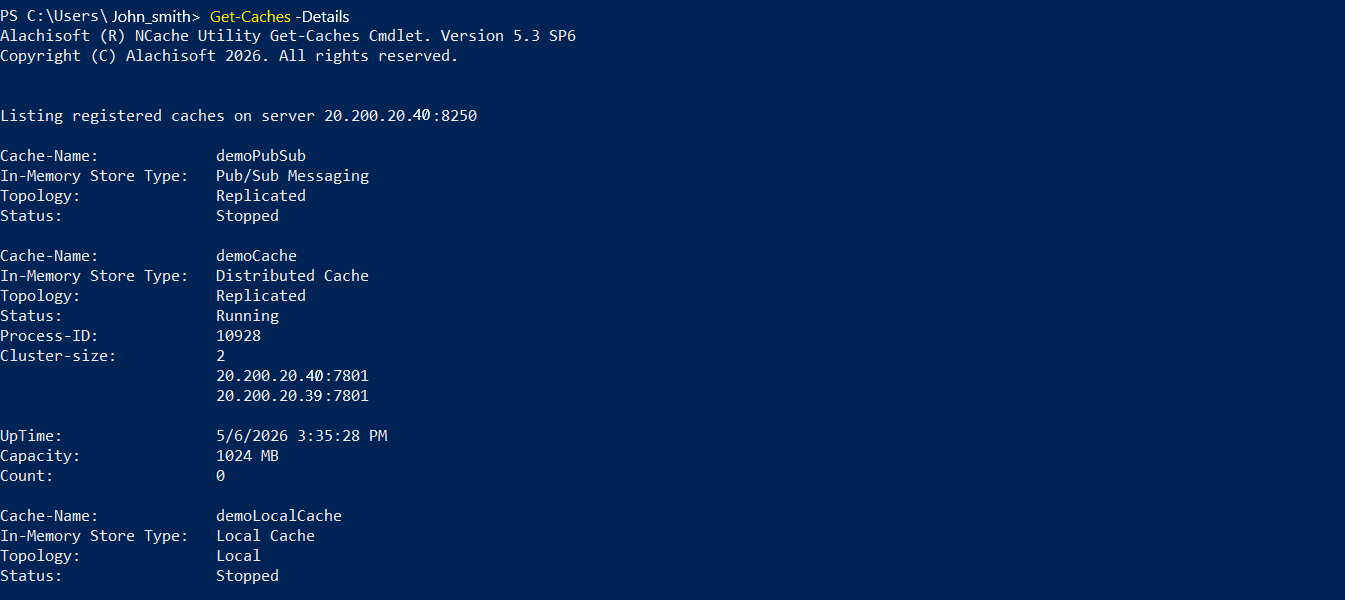
Restart-Service -Name NCacheSvcYou can verify that the node has been added successfully by executing the following PowerShell cmdlet.
Get-Caches -DetailOnce the command executes successfully, the newly added node appears in the cache cluster details.
Add a Node to a 2-Node Cluster
You can add a third server node to an existing 2-node cache cluster by updating the <cache-deployment> section in the config.ncconf file. To add a third node to an existing 2-node cache cluster, follow these steps:
Open the config.ncconf file on node-1 with administrative privileges.
<cache-deployment deployment-version="0"> <servers> <server-node ip="20.200.20.12"/> <server-node ip="20.200.20.11"/> </servers> </cache-deployment>In the
<cache-deployment>section of the cache named demoCache, add the IP address20.200.20.13of node-3 as a new<server-node>entry.<cache-deployment deployment-version="0"> <servers> <server-node ip="20.200.20.12"/> <server-node ip="20.200.20.11"/> <server-node ip="20.200.20.13"/> </servers> </cache-deployment>Save the updated config.ncconf file.
Copy the updated
<cache-deployment>block from node-1 to the config.ncconf file on node-2 and node-3.Restart the NCache Service on node-3 by executing the following PowerShell cmdlet.
Restart-Service -Name NCacheSvcRestart the NCache Service on node-2, and then restart it on node-1.
You can verify that the node has been added successfully by executing the following PowerShell cmdlet.
Get-Caches -Detail
Note
If the added node does not reflect in the Get-Caches -Detail output, make sure the updated <cache-deployment> section exists in the config.ncconf file on all required server nodes, the NCache Service has been restarted, and the cache has been restarted on every node in the cluster.
Update Client Configuration
- In client.ncconf of the server node from where the client is being executed, add the following information about the node under the
<configuration>tag:
<cache id="democache" client-cache-id="" client-cache-syncmode="optimistic" skip-client-cache-if-unavailable="True" reconnect-client-cache-interval="10" default-readthru-provider="" default-writethru-provider="" load-balance="True" enable-client-logs="False" log-level="error">
  <server name="20.200.20.12"/>
  <server name="20.200.20.11"/>
</cache>
- Once changes are made, start the cache, and restart the NCache Service for the changes to take effect.
Add Server Nodes in Azure (Scale Cluster)
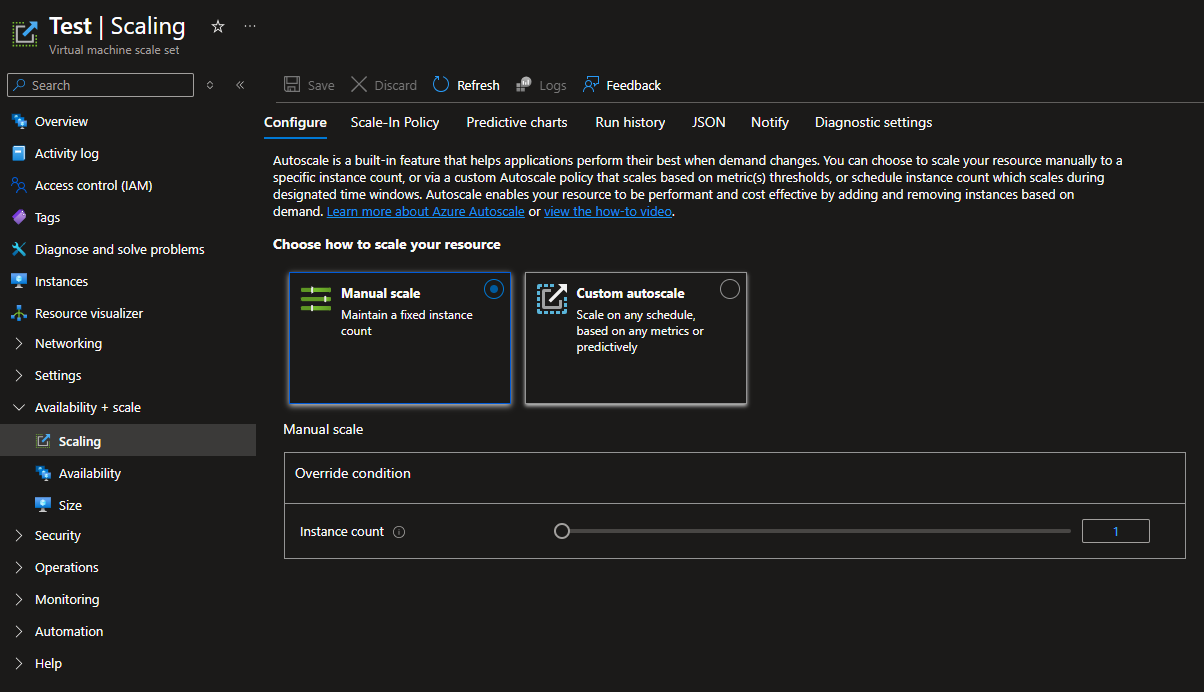
NCache provides you with the option to scale up your cluster. To manually scale your NCache cluster, follow these steps within the Azure portal:
Navigate to your Resource Group, select your VMSS, and locate the Scaling option under the Availability + scale section in the left menu.
Choose Manual scale from the available scaling options.
Either enter the specific number of instances you require or use the slider bar to reach your desired server count as shown below:
This will scale up the cluster and newly added instances will automatically add to all existing caches within the deployment.