Add Client Node
Client nodes are lightweight modules through which cache applications can connect to the hosted cache servers. Adding a client node is an important step for enabling load balancing and high availability for your application in the NCache distributed environment.
Prerequisites
Ensure that the NCache Service is running. If this is not the case, proceed with the following:
To start the NCache Service on Windows, open Windows PowerShell as Administrator and run the following command:
Start-Service -Name NCacheSvc
Make sure that you run the NCache Service as an administrator. Here are the steps to do so:
- Open the Services window and look for NCache in the list.
- Right click on NCacheSvc from the list and choose Properties.
- Go to the Log On tab and click on the Browse button.
- In the object name field, type Administrator and click on the Check Names button.
- It will pick the appropriate Administrator, then click OK.
- Now, set a Password and click OK.
- Right click on the NCache Service and choose the Restart option. Now your service will start running as administrator.
Using the NCache Management Center
Launch the NCache Management Center by browsing to http://localhost:8251 or
<server-ip>:8251.In the left navigation bar, click on Clustered Caches or Local Caches, based on the cache where the client will be added. Against the cache name, click on View Details.
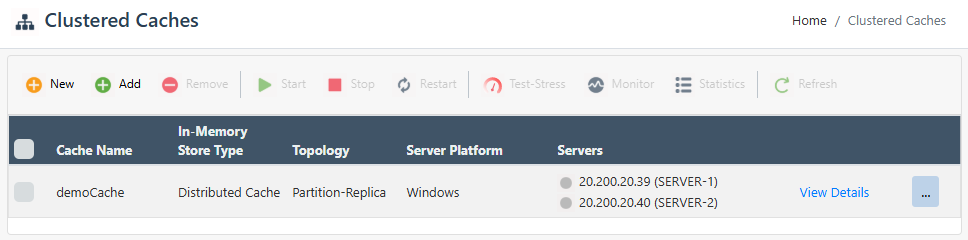
This opens up the detailed configuration page for the cache. The Client Nodes tab displays the list and status of any existing client nodes in the cache.
Click on the
 button and specify the client node IP to add it to the cache. A success notification will be displayed.
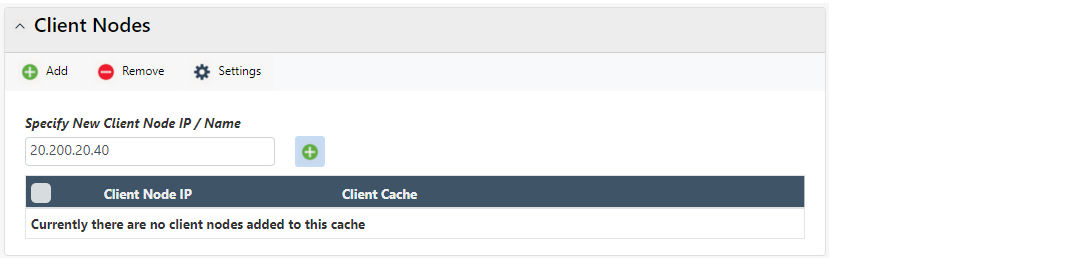
- The newly added node is visible in the Client Nodes list, with the Client Cache status.
Note
Upon committing these changes, you might get prompted with a dialog box, asking whether to reload or overwrite the cache config file.
Using PowerShell
The Add Client Node cmdlet enables the user to add one or more client nodes to the existing clustered cache(s), updates the server configuration, and acquires server mapping if specified.
- The following command adds a client node 20.200.20.11 to a cache named demoCache already existing on server node 20.200.20.12.
Add-ClientNode -CacheName demoCache -Server 20.200.20.12 -ClientNode 20.200.20.11
- The following command adds a client node 20.200.20.11 to a cache named demoCache already existing on server node 20.200.20.12 while specifying port number.
Add-ClientNode -CacheName demoCache -Server 20.200.20.12 -ClientNode 20.200.20.11 -Port 8250
- The following command adds a client node 20.200.20.11 to a cache named demoCache already existing on server node 20.200.20.12 and updating the server config.
Add-ClientNode -CacheName demoCache -Server 20.200.20.12 \
               -ClientNode 20.200.20.11 –UpdateServerConfig
- The following command adds a client node 20.200.20.11 to a cache named demoCache already existing on server node 20.200.20.12. It uses the
-AcquireServerMappingswitch to update the client configuration on the server node, which is essential when the cluster and client nodes are on different networks.
Add-ClientNode -CacheName demoCache -Server 20.200.20.12 \
               -ClientNode 20.200.20.11 –AcquireServerMapping
- The following command adds a client node 20.200.20.11 to a cache named demoCache already existing on server node 20.200.20.12 using security credentials.
Add-ClientNode -CacheName demoCache -Server 20.200.20.12 \
               -ClientNode 20.200.20.11 -Credentials(Get-Credential john_smith)
Manually Editing NCache Configuration
You can manually edit the NCache configuration as explained below.
Important
Make sure the cache is stopped before making any configuration changes.
Cache Server
- To add a client node to the cache server, add the following tag within the
<cache-deployment>tag in the config.ncconf file of each of your cache servers:
<cache-deployment>
...
<client-nodes>
  <client-node ip="20.200.20.11"/>
</client-nodes>
...
</cache-deployment>
- In the client.ncconf file of each server, add the following information about the client nodes under the
<configuration>tag:
<cache id="demoCache" load-balance="True" enable-client-logs="False" log-level="error">
  <server name="20.200.20.11"/>
</cache>
Note
Perform this configuration on all server nodes in the cluster to maintain consistency.
- Once the changes are made, start the cache, and restart the NCache Service.
Remote Client Node
In the client.ncconf file of the client node, add the following information under the configuration tag:
<cache id="demoCache" load-balance="True" enable-client-logs="False" log-level="error">
  <server name="20.200.20.11"/>
</cache>
See Also
Remove Client Node
Configure Client Cache
Configure Caches
Management Operations