Getting Started with NCache
This guide provides the basic steps you should follow to download and install NCache Enterprise on Windows on-premises along with how to get it up and running with a free trial. However, you can follow this guide while using the NCache Community Edition as well. This involves creating a distributed cache on Windows and using .NET for Data Caching.
Step 1: Download NCache
You can download NCache from the Software section on the NCache Downloads page.
This will take you to a User Registration page, where you must sign up as a New User.
Warning
Please ensure your Work Email is accurate as your evaluation license key will be sent here.
After clicking on Register & Download, you will be led to a Software Evaluation Agreement page, read through this and click on I Accept the License Agreement.
Click on the Download button on the resulting page.
Place the resulting .msi file in a folder in the
Cdrive, for instance,"C:\NCache".
Step 2: Installing NCache
Open a Command Prompt instance using the Run as Administrator option.
Type and run the following command, for the NCache Setup Wizard to appear. Click Next.
msiexec /i "<Setup Path>\ncache.ent.net.x64.msi"
On the next screen, accept the license agreement before proceeding with the preselected Installation Type. After that, you'll need to enter the Evaluation Key provided by Alachisoft, along with the user information you submitted during sign-up.
Next you need to proceed with the recommended Installation Folder, IP Binding, and Firewall Ports before choosing to use a Local System Account.
After which, you must click on Install and choose to Launch Management Center.
If you want to learn more about the installation process, please refer to the NCache Installation Guide.
Note
Refer to the NCache documentation for comprehensive guides on installing NCache on Windows and Linux, deploying it using Docker or Kubernetes, and configuring it for cloud environments on Azure and AWS.
Step 3: Create a Distributed Cache
This section will demonstrate how you can create a 2-Node Partition-Replica cache through the NCache Management Center and the Command Line Interface.
Note
Once you have installed NCache on your Dev/QA Server, Cache Server, and Remote Client machines, you can now create a distributed cache.
Launch the NCache Management Center at http://localhost:8251.
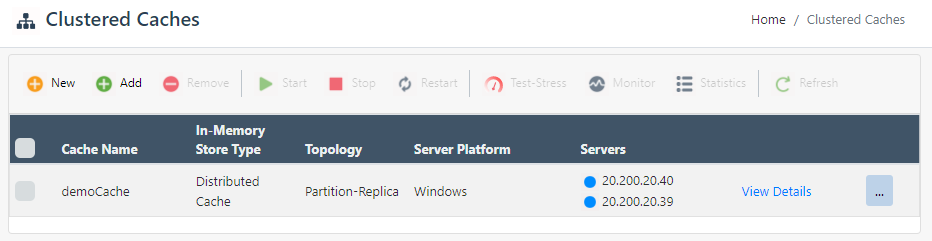
In the left navigation bar, go to Clustered Caches, and click on New.
In the resulting In-Memory Store page, select Distributed Cache as your store type and specify the name of your cache. Click Next.
Select the Partition-Replica caching topology and a Replication Strategy. However, if you are using the Community Edition you can choose the Replicated caching topology. Click Next.
Add two server nodes by specifing the Server Node IP/Name and click on the Add Node button for each. Click Next once all the required nodes are added.
Warning
If the cache is already registered with the same name on that node, you will not be able to create another cache.
Proceed with the preselected Cluster Port and Port Range, and accept any default settings, where required.
Enable auto-start cache as soon as it is created, or whenever the service starts. Click Finish to create 2-node cache cluster.
Note
To learn more about the options available to you as part of the cache creation process, please refer to the NCache Administrators Guide. Alternatively, you can also create such a distributed cache using PowerShell tools.
Step 4: Add Local/Remote Clients
A client is your web or application server. This can be either a local or remote client. You can add it using the NCache Management Center or the relevant PowerShell cmdlets. The process of adding local/remote clients to your cache cluster is exactly the same for all store types. This section uses the example of the Distributed Cache store type.
On the Clustered Caches page, click on View Details against the appropriate Cache Name.
This opens up the detailed configuration page for the cache. In the Client Nodes tab, click
 and enter the Client Node IP/Name.
Once you have added the client nodes you require, copy the following from the client.ncconf file located at
%NCHOME%\configof one of the cache servers and paste it to the same file on the client machines:
<configuration>
  <ncache-server connection-retries="3" retry-connection-delay="0" retry-interval="1" load-balancer-connection-retries = "15" command-retries="3" command-retry-interval="0.1" client-request-timeout="90" connection-timeout="5" port="9800" local-server-ip="20.200.20.40" enable-keep-alive="False" keep-alive-interval="30" />
  <cache id="demoCache" client-cache-id="" client-cache-syncmode="optimistic" default-readthru-provider="" default-writethru-provider="" load-balance="False" enable-client-logs="False" log-level="error">
    <server name="20.200.20.40" is-load-balancer="True"/>
    <server name="20.200.20.39" is-load-balancer="True"/>
  </cache>
</configuration>
Note
You might be prompted with a dialog box upon these changes, asking whether to reload or overwrite the cache config file at %NCHOME%\config.
This connects your application server to the cache cluster.
Step 5: Test the Cluster
You can test the cluster using the NCache Management Center or Test Stress PowerShell cmdlet.
Using the NCache Management Center
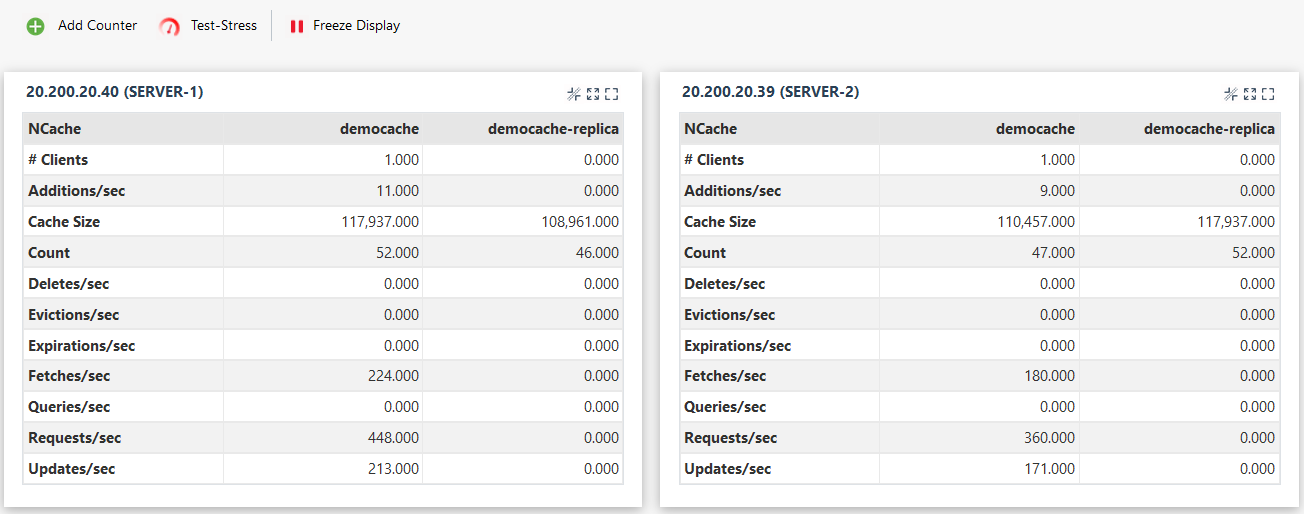
- In the NCache Management Center, click "..." next to your cache and select the Show Statistics option.
- Set the Test-Stress timer to 1 minute
- Click on the Start button next to the timer to see live cache activity on the Server Dashboard as shown below.
Using PowerShell
The following cmdlet lets you simulate the same load with PowerShell.
Important
Make sure to replace the -CacheName with the name of the cache you created.
Test-Stress -CacheName demoCache
Step 6: Data Caching in .NET Sample Application
After creating the cache and adding the client node successfully, you can run the .NET sample application provided by NCache on GitHub. Follow the steps mentioned below to cache your .NET application data.
Important
To learn about the supported .NET versions, please refer to the NCache Installation Guide.
1. Download Sample from GitHub
Download the BasicOperations sample from NCache’s GitHub repository, along with Alachisoft.NCache.Sample.Data. The Alachisoft.NCache.Sample.Data project contains the Customer, Product, and Order model classes used in the Basic Operations project.
2. Launch the Project
Launch the project in Visual Studio 2022 or above.
3. Install NuGet Package(s)
Install the following NuGet package(s) through the Package Manager Console, based on the NCache edition (Enterprise/Community/OpenSource) and version (for example, 5.3.6) you have installed:
Install-Package Alachisoft.NCache.SDK
Ensure that the following namespaces are present in the Basic Operations sample application:
- Alachisoft.NCache.Client
- Alachisoft.NCache.Runtime
- Alachisoft.NCache.Runtime.Caching
- Alachisoft.NCache.Sample.Data
Additionally, note that all the classes in the Alachisoft.NCache.Sample.Data project are marked [Serializable] as shown below:
[Serializable]
public class Product
{
    // Properties being defined below
    public int Id {...}
    public string Name {...}
    public string Category {...}
    ...
}
4. Configure App.config Settings
After launching the project, open the App.config file in your project and set your cache name, as shown below:
<add key="CacheID" value="demoCache"/>
5: Configure .NET 8 ThreadPool Settings
Define the UseWindowsThreadPool property in the runtimeconfig.json file in your project, as follows:
<Project Sdk="Microsoft.NET.Sdk">

  <PropertyGroup>
    <UseWindowsThreadPool>true</UseWindowsThreadPool>
  </PropertyGroup>

</Project>
6. Build and Run Your Application
After configuring the cache settings, build and run the sample application for further use.
7. View Activity in Statistics
To monitor the results of using the sample, select your cache from the Clustered Caches page in the NCache Management Center. Then click on the "..." button against the cache name and click on Show Statistics from the available options. At this point, a Statistics window will open showing the cache statistics. Thus, demonstrating the increased item count and the requests being made to the cache.
Note
For more details on using NCache, please refer to the Administrator's and Programmer's Guides.