Create a New Distributed Persistent Cache
A Persistent Cache can be created through the NCache Management Center or any Command Line Tools by creating a new store or using an existing store.
Note
A Distributed Cache with Persistence is supported for Partitioned Topologies and Local (out-proc) caches.
Prerequisites
Make sure the NCache Service is started. If it is not, do the following:
- For .NET, type the following command in any Command Line Tool of your choice (run as admin):
Start-Service -Name NCacheSvc
- For .NET Core, run NCacheSvc as Administrator.
Using the NCache Management Center
Launch the NCache Management Center by browsing to http://localhost:8251 or
<server-ip>:8251on Windows and Linux.In the left navigation bar, click on Clustered Caches. This opens up the Clustered Caches page. It shows any existing clustered caches on your machine and additional details like Topology, Servers, and Server Platform.
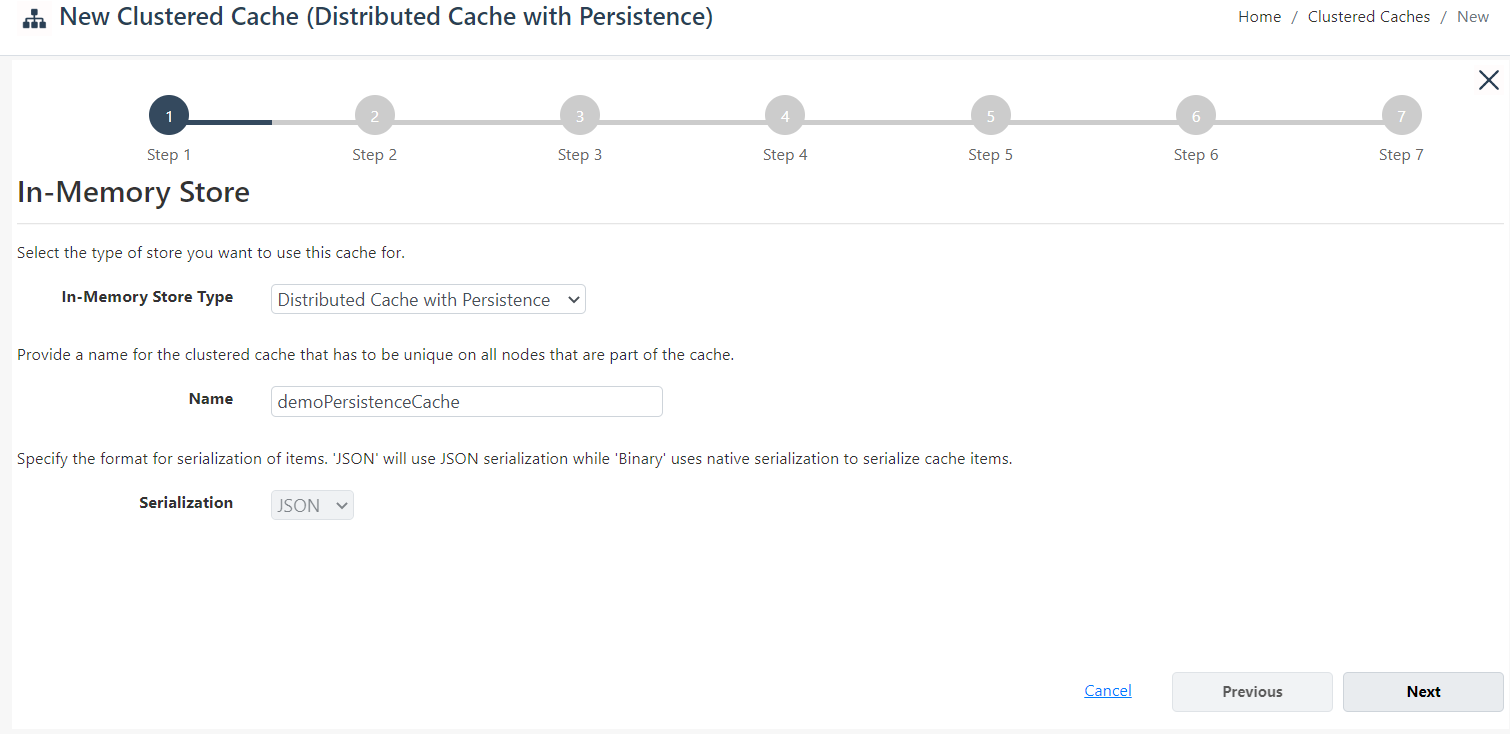
To create a new Distributed Cache with Persistence, click on New.

- From the In-Memory Store Type dropdown menu, select Distributed Cache with Persistence and specify the name of your cache. Click Next.
Note
A Distributed Cache with Persistence supports JSON serialization only.
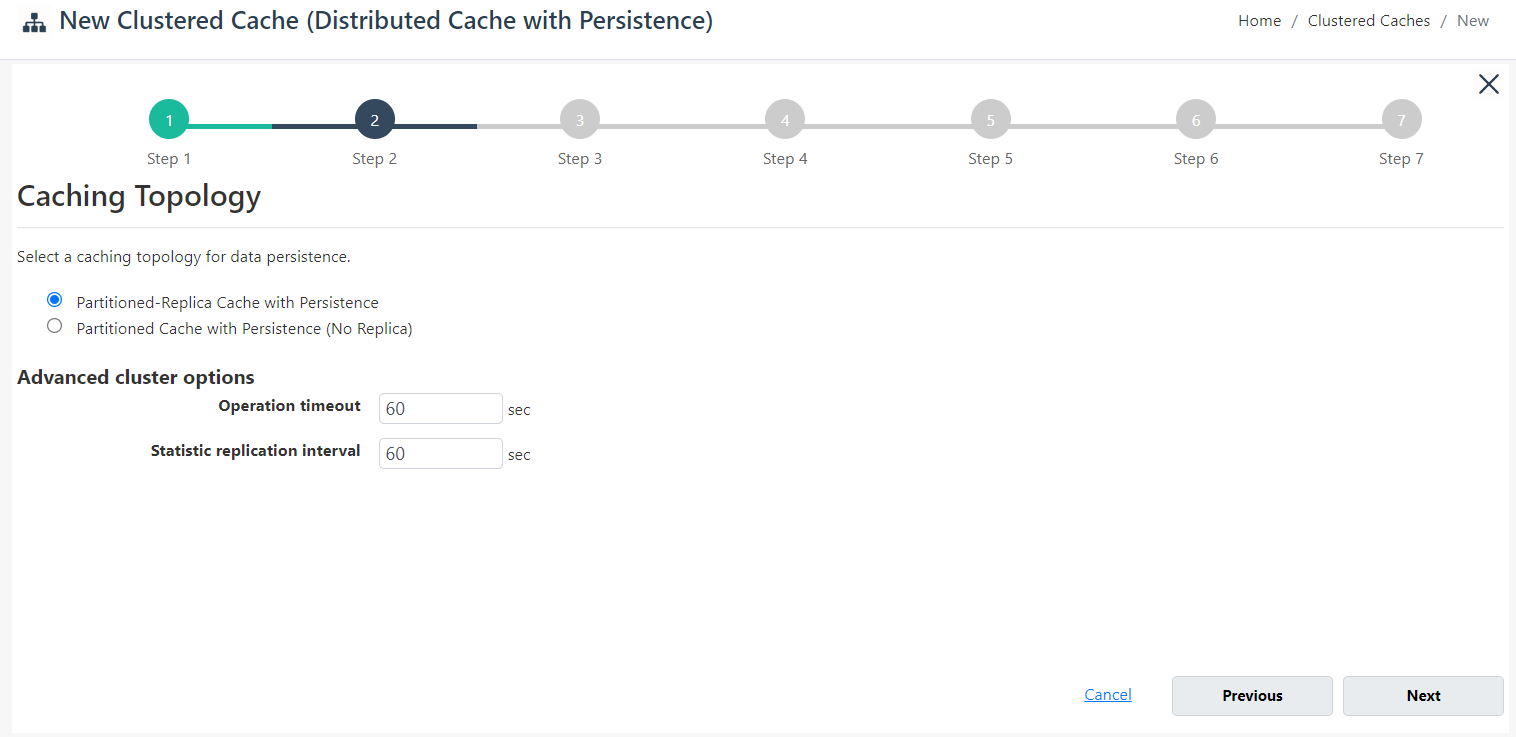
- Select the caching topology and advanced options like Operation timeout and Statistic replication interval. Click Next.
Note
A Distributed Cache with Persistence supports the Partitioned and Partition-Replica Topologies only.
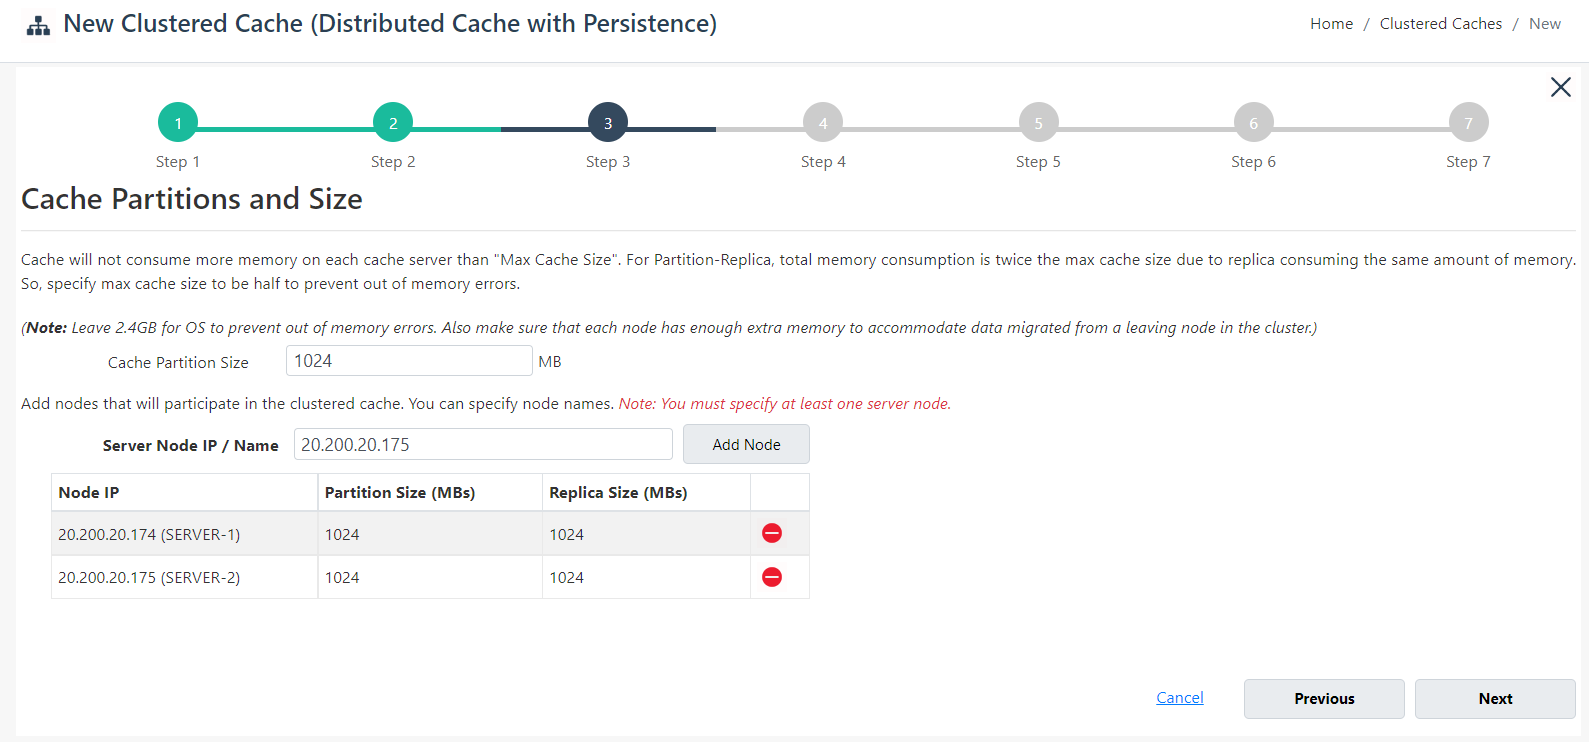
- Specify the Cache Partition Size and add your cluster nodes by providing the Server Node IP or Host Name and clicking on the Add Node button. To add more nodes, click Add Node. Once all the required nodes are added, click Next.
Warning
If a cache with the specified name already exists, you are prompted with an error message.
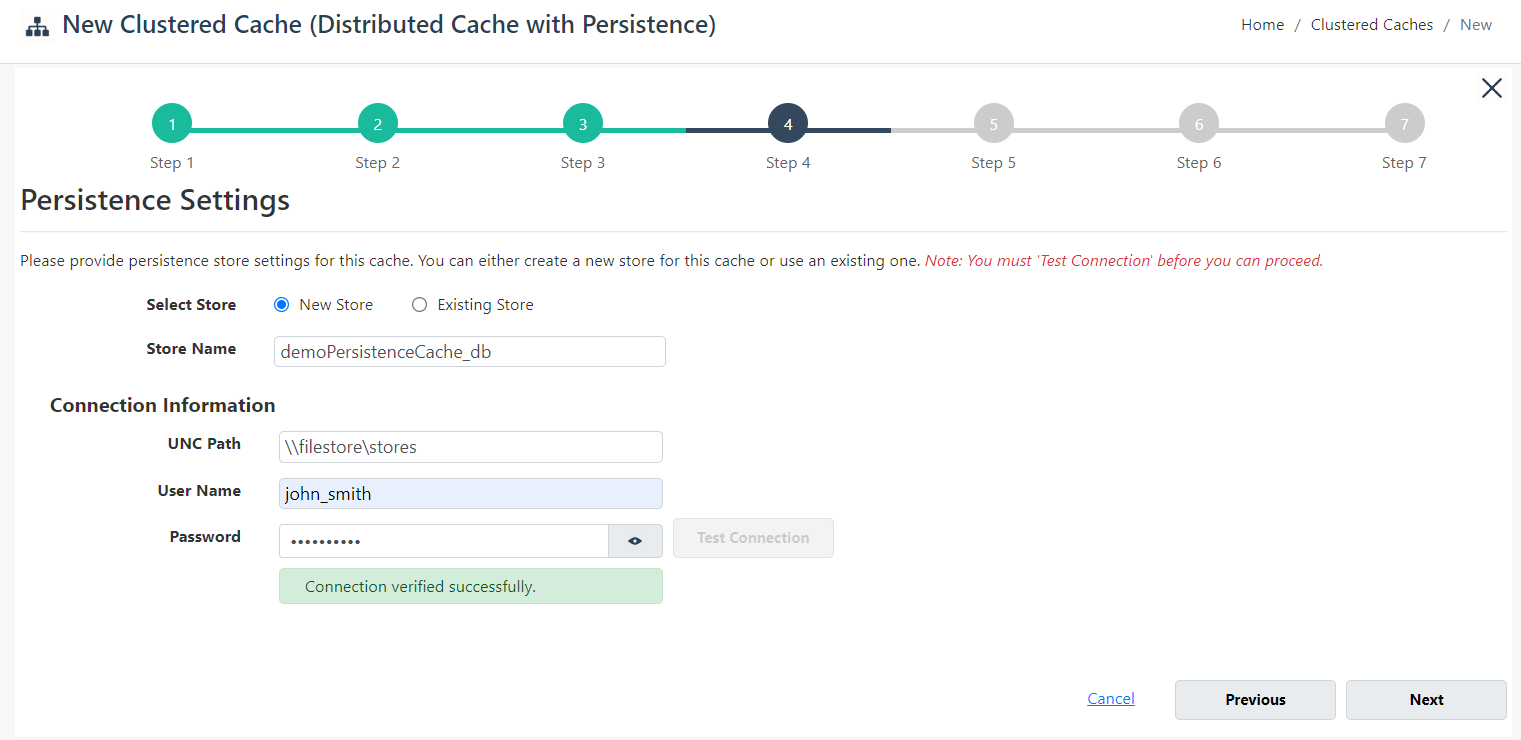
- Next, you need to provide the persistence store settings for this cache on the Persistence Settings page where you have two options for persistence store.
Warning
Unless the connection to the persistence store has been tested successfully, you cannot proceed further with the cache creation process.
Important
The NCache Persistence requires a shared path that is accessible from all nodes. Make sure that all nodes have read and write access to the shared path.
Create New Store
- In case you want to create a new store from scratch, choose New Store against the Select Store label. Specify the name of your store against the Store Name label. For connection information, provide the UNC Path, User Name, and Password. Once done, click on Test Connection. If the connection to your persistence store has been successfully tested, you will receive a success notification. Click Next.
Note
For Windows, User Name and Password are required if authentication is enabled on the file share. You can also provide the domain name along with the user name as domain_name\user_name.
Use Existing Store
In case you want to use an existing store previously created with the same cache type (Distributed Cache with Persistence), choose Existing Store against the Select Store label given that you have an existing NCache Persistence store. Specify the name of your store against the Store Name label. For connection information, provide the UNC Path, User Name, and Password. Once done, click on Test Connection, and then either of the following can happen.
If the connection to the specified store is successful and it is in use of another cache, then you will be prompted with the following message. If you continue by clicking OK, no other cache will be able to use this store and you will receive a success notification.

If the connection to the specified store is successful and it is not in use of another cache, then you will receive a success notification.
Warning
The existing store of a local Distributed Cache with Persistence is incompatible with a clustered Distributed Cache with Persistence and vice versa.
After receiving the success message, click Next to proceed further.
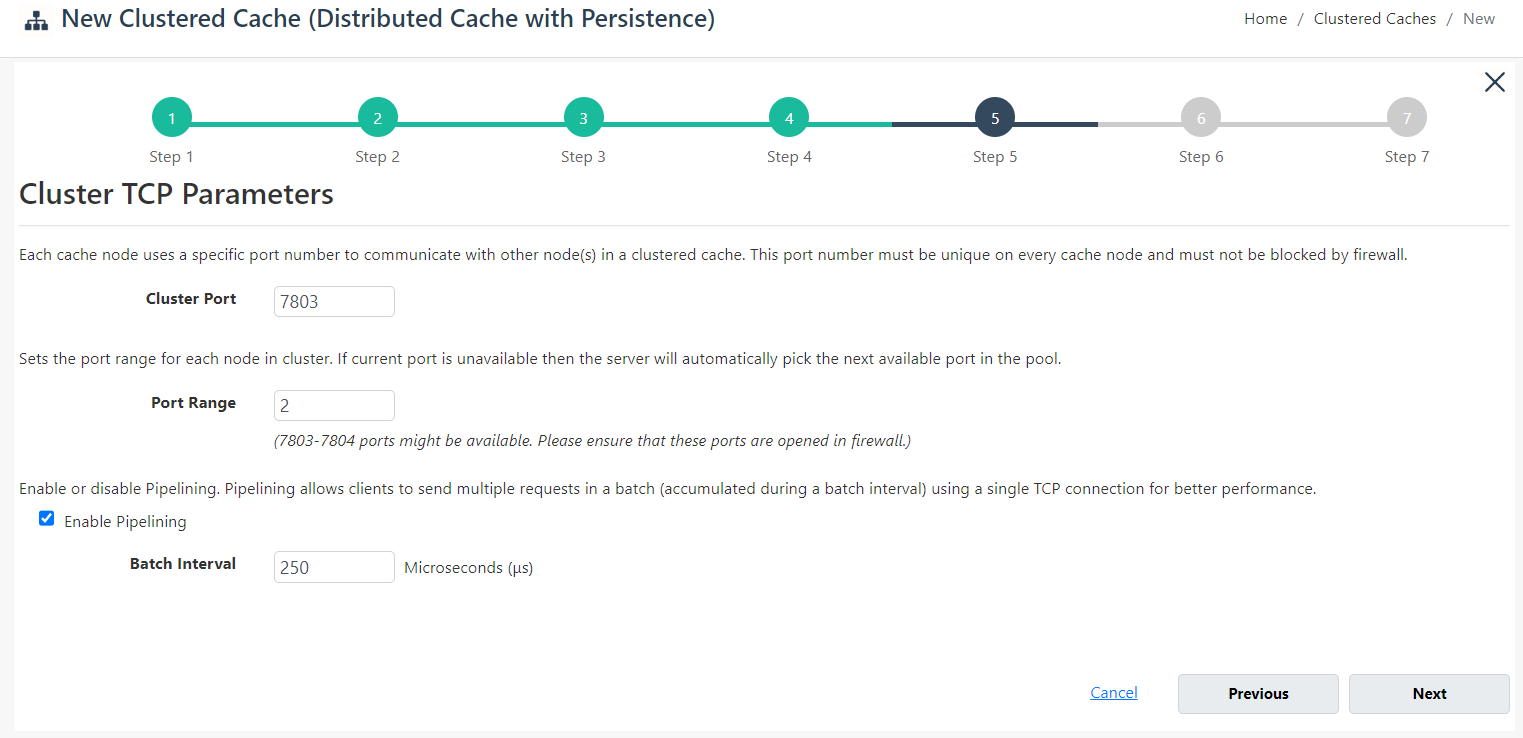
Change the Cluster Port and Port Range if required. Click Next.
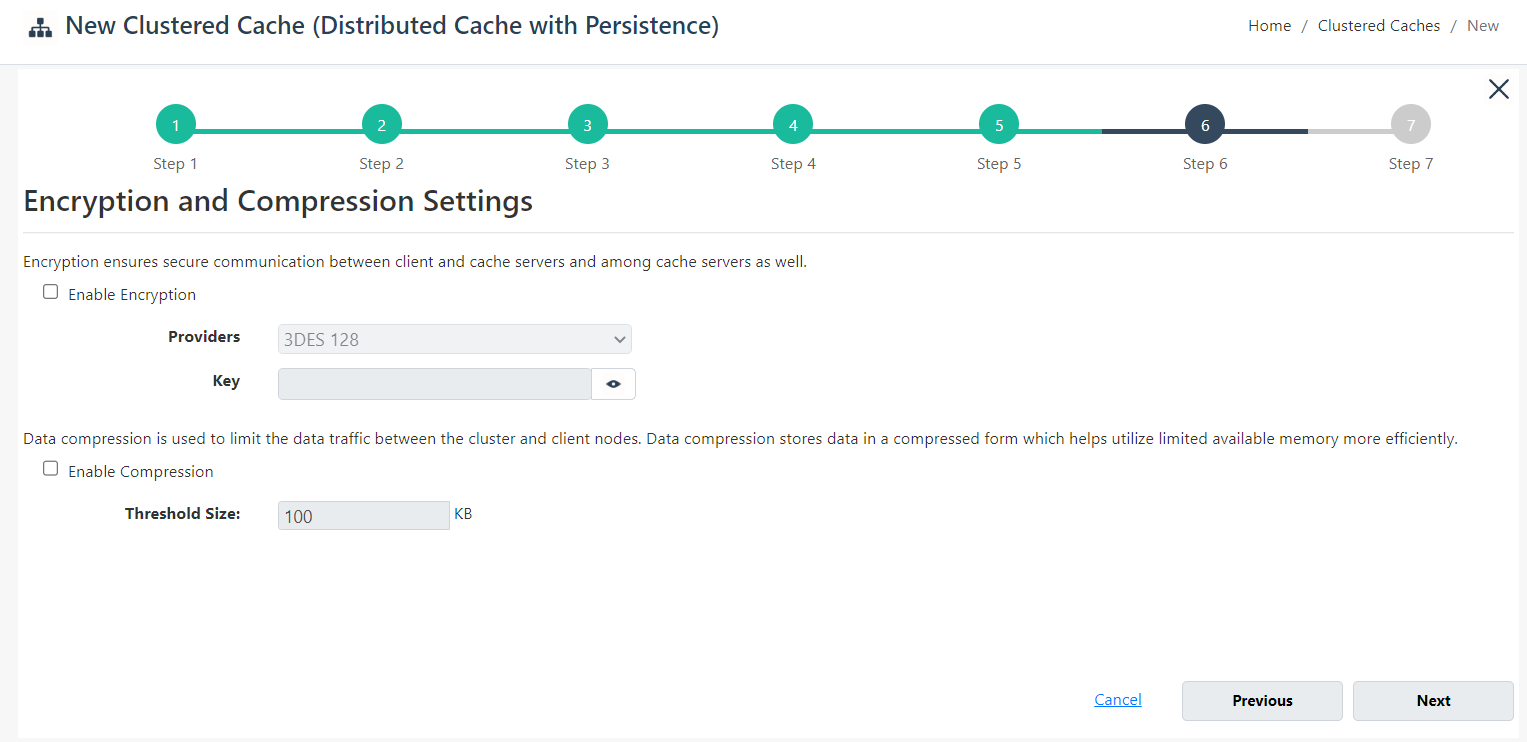
- If you want to enable encryption and compression, select the Enable Encryption and Enable Compression checkboxes. If enabled, set the Providers and Key for encryption and Threshold Size for compression. Click Next.
Note
If you want to use an existing store with encryption while creating a new cache, then encryption must be enabled on the new cache and vice versa. If the existing store was encrypted, the encryption credentials (provider and key) need to be the same as the ones used for the original store. If they are different, you will not be allowed to create the cache.
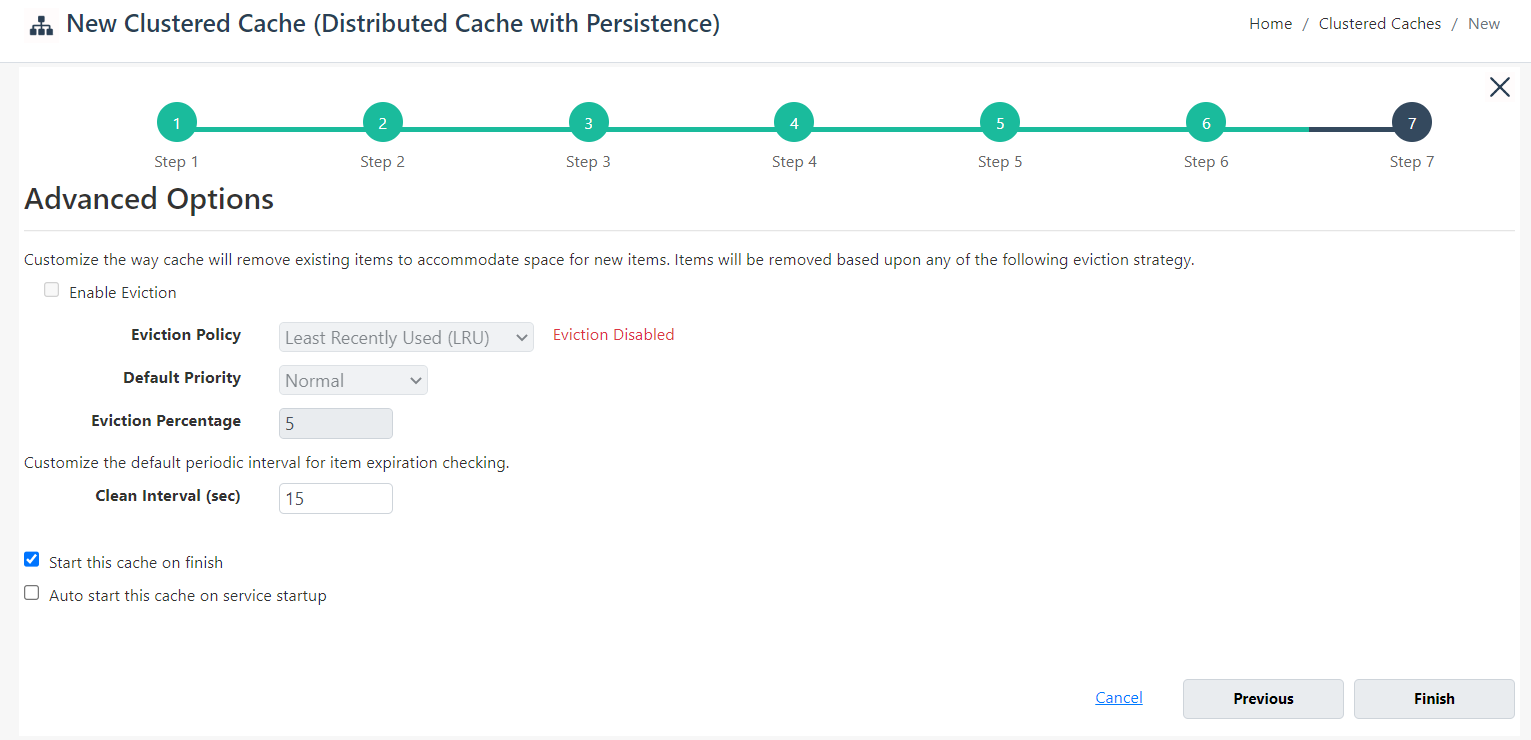
On Advanced Options page, you can configure the following settings:
Eviction can't be enabled for this cache.
You can change the Clean Interval value. The default is 15 seconds.
This cache can be started automatically upon the completion of this process if you have selected the Start this cache on finish checkbox on this dialog box.
You can make the cache start automatically after service restart by selecting the Auto start this cache on service startup checkbox.
Note
Eviction is not supported for a Distributed Cache with Persistence.
Warning
The cache will not start on a node on which the persistence store is inaccessible.
- Click Finish to complete the process. Your created cache will appear in Clustered Caches page with the server nodes and their status and a success notification will be displayed in the notification panel.
Using Command Line
You can also use Command Line Tools to manage persistence caches by using the NCache supported cmdlets.
Create Cache
The New Cache tool is responsible for creating new caches. You can create a new Distributed Cache with Persistence as follows.
Important
The NCache Persistence requires a shared path that is accessible from all nodes. Make sure that all nodes have read and write access to the shared path.
The following command creates a Distributed Cache with Persistence named demoClusteredCache on the server nodes 20.200.20.40 and 20.200.20.39. A new NCache Persistence store named demoClusteredCache_db is created on the path \fileserver\stores using the provided connection string. The topology is PartitionReplica and the cache size is 1024MB.
Note
For Windows, User Name and Password are required if authentication is enabled on the file share. You can also provide the domain name along with the user name as domain_name\user_name.
New-Cache -Name demoClusteredCache -Server "20.200.20.40,20.200.20.39" -Size 1024 -InMemoryStoreType DistributedCacheWithPersistence -PersistenceStoreName demoClusteredCache_db -NewPersistenceStore -PersistenceStoreConnectionString "\\fileserver\stores\store1;\user_name;password" -Topology PartitionReplica
Warning
The cache creation process will fail if the connection to the persistence store is unsuccessful.
Note
If you create a Distributed Cache with Persistence using an existing persistence store, you will be prompted with the message: The store might already be configured as a persistence store for another cache. No other cache will be able to use this store if you continue with this existing store. Are you sure you want to use the given store with this new cache('y' or 'n')?. Press y if you want to continue.
See Also
Start Cache
Add Server Node
Add Existing Cache
Remove Cache
Clear Cache