Getting Started with NCache Open Source
NCache Open Source provides in-memory caching capabilities for .NET applications. This guide covers the essential steps for setting up Local or Replicated caches, validating cluster configuration, and integrating NCache with a .NET application.
Step 1: Install NCache
You can install NCache either by downloading and installing it on your machine or by using Docker.
Download & Install
You can download NCache from the Software section on the NCache Downloads page.
This will take you to a User Registration page, where you must sign up as a New User.
After clicking on Register & Download, you will be led to a Software Evaluation Agreement page, read through this and click on "I Accept the License Agreement".
Click on the Download button on the resulting page.
Place the resulting .msi file in a folder in the
Cdrive, for instance,"C:\NCache".Open a Command Prompt instance using the Run as Administrator option.
Type and run the following command, for the NCache Setup Wizard to appear. Click Next.
msiexec /I "<Setup Path>\ncache.oss.x64.msi"
On the next screen, accept the license agreement before proceeding. After that, you'll need to enter the Installation Key provided by Alachisoft, along with the user information you submitted during sign-up.
Click Install to complete the setup.
If you want to learn more about the installation process, please refer to the NCache Windows Installation Guide.
Get Docker Image & Create Container
NCache also provides Docker images that allow you to run NCache in a containerized environment without manual installation.
- Ensure that Docker is installed on your machine.
- Verify Docker installation by running:
docker version
- Pull the NCache Docker image from Docker Hub:
docker pull alachisoft/ncache-oss:latest
Important
For production environments, use a specific version tag (for example, alachisoft/ncache-oss:x.x.x) instead of latest. Since latest always pulls the most recent image, which may affect your existing setup.
- Create a Docker container using the host network:
docker create --name ncache --network host alachisoft/ncache-oss:latest
Note
- The container name
ncachecan be replaced with any desired name. - Host networking is recommended for NCache to ensure proper cluster communication and avoid port mapping issues.
- Start the Docker container:
docker start ncache
Once the container is running, proceed to Step 2 to register NCache. If you want to learn more about the process, please refer to the Docker Installation Guide.
Step 2: Register NCache (Docker Only)
When using NCache through Docker, you must register the container before using it. For Windows and Linux installations, registration is handled during installation.
You can register NCache as either:
- Cache Server (default)
- Dev/QA Server (for free evaluation)
Note
- If
registerasis not specified, the container is registered as a Cache Server by default. - Registration can be performed either inside the container or directly from the host machine.
- To register NCache as a Cache Server, run the following command from the host terminal:
docker exec -it ncache /opt/ncache/bin/tools/register-ncacheevaluation -key xxxxxxxxxxxxxxxxxxxxxxxxxxxxxxxx -registeras CacheServer
Replace the parameters (key, name, email, and company) with your own details.
For more details, please refer to the NCache Docker Guide.
Step 3: Create Cache
Add the required cache configurations in the config.ncconf file on the cache server.
Warning
- NCache Open Source only supports Local and Replicated Caches.
- By default, the accumulative cache size is 4 GB in NCache Open Source. There is no individual size limit per cache, but the combined usage must not exceed 4 GB.
Open %NCHOME%\config\config.ncconf file on your local machine.
Copy and paste the entire
<cache-config>section from the examples below to the<configuration>section of config.ncconf (cache configuration) file.
Note
All NCache configuration files (.ncconf) can be opened in any text editor (Notepad, Notepad++, etc.).
- You can modify this configuration to change the cache name, as required.
Important
Each cache should have a unique name.
The following are configuration examples for both Local and Replicated cache:
For Local Cache
NCache Open Source supports a standalone (non-clustered) cache residing on a single node.
<cache-config cache-name="demoLocalCache" alias="" config-id="e097c2c0-88af-4aa2-8a8a-c6432eeaa3fe" config-version="0" store-type="distributed-cache">
  <cache-settings inproc="False" data-format="Serialized" serialization="Json">
    <logging enable-logs="True" trace-errors="True" trace-debug="False" log-path=""/>
    <performance-counters enable-counters="True" snmp-port="0"/>
    <cleanup interval="15sec"/>
    <storage type="heap" cache-size="1024mb"/>
    <eviction-policy enabled-eviction="True" default-priority="normal" policy="priority" eviction-ratio="5%"/>
    <cache-topology topology="local-cache"/>
    <client-death-detection enable="False" grace-interval="60sec"/>
  </cache-settings>
</cache-config>
For Replicated Cache
A cache cluster is a set of interconnected server nodes forming a cluster of servers that behaves as a single cache unit from the outside.
Warning
For NCache Open Source, Replicated caches are limited to a maximum of 3 nodes.
Follow the steps below to add the new server node to an existing 1-node Replicated cache cluster.
Open the config.ncconf file on node-1 with administrative privileges.
In the
<cache-deployment>section of the cache named demoCache, add each cache server as a separate<server-node>entry. In the example below, the existing server is node-1 with IP address20.200.20.40, and the new server being added is node-2 with IP address20.200.20.39:
<cache-config cache-name="demoCache" alias="" config-id="44fb997a-f6a7-433b-9439-7ef9de9f47c7" config-version="0" store-type="distributed-cache">
  <cache-settings inproc="False" data-format="Serialized" serialization="Json">
    <logging enable-logs="True" trace-errors="True" trace-debug="False" log-path=""/>
    <performance-counters enable-counters="True" snmp-port="0"/>
    <cleanup interval="15sec"/>
    <storage type="heap" cache-size="1024mb"/>
    <eviction-policy enabled-eviction="True" default-priority="normal" policy="priority" eviction-ratio="5%"/>
    <cache-topology topology="replicated">
      <cluster-settings operation-timeout="60sec" stats-repl-interval="300sec">
        <cluster-connection-settings port-range="1" connection-retries="1" connection-retry-interval="2secs" cluster-port="7801"/>
      </cluster-settings>
    </cache-topology>
    <client-death-detection enable="False" grace-interval="60sec"/>
  </cache-settings>
  <cache-deployment deployment-version="0">
    <servers>
      <server-node ip="20.200.20.40"/>
      <server-node ip="20.200.20.39"/>
    </servers>
  </cache-deployment>
</cache-config>
Replace the IP addresses given in the <cache-deployment> section with the IP addresses of your cache servers.
Save the updated config.ncconf file on node-1.
Copy the updated
<cache-deployment>block from node-1 to the config.ncconf file on node-2.Restart the NCache Service on node-2.
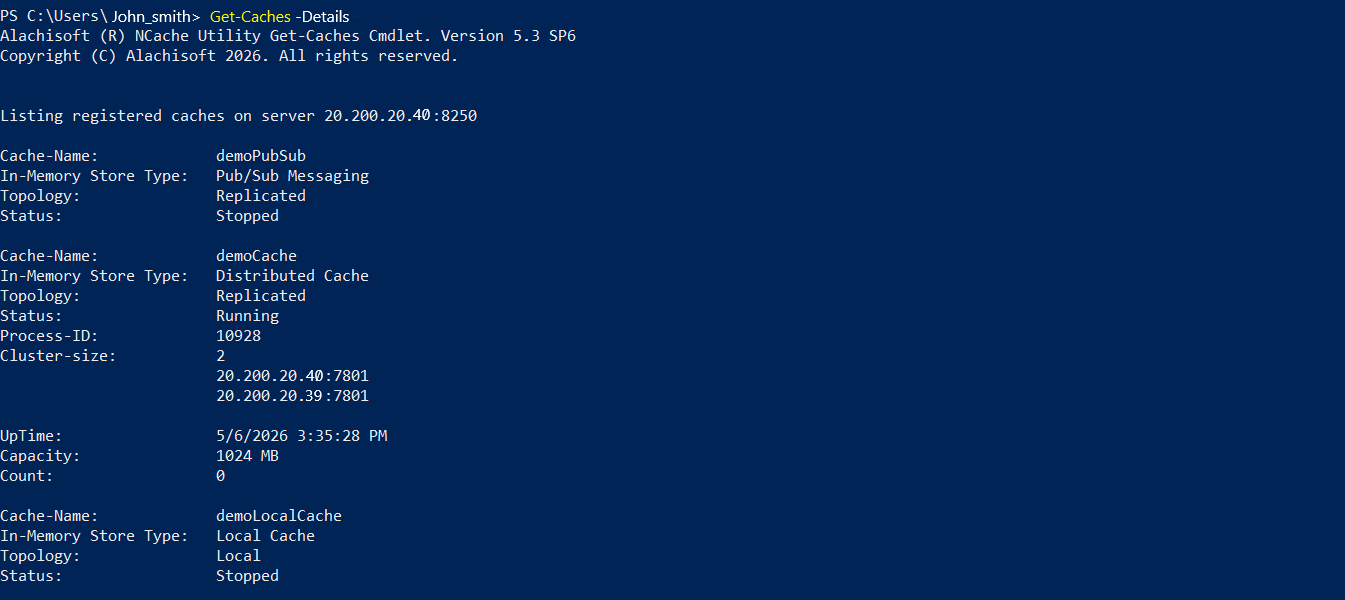
Restart-Service -Name NCacheSvcVerify that the node has been added successfully by executing the following PowerShell cmdlet.
Get-Caches -DetailOnce the command executes successfully, the newly added node appears in the cache cluster details.
Please note the following:
- For clustered caches, you can have a single server if you want to test on your machine.
- Every cache cluster should have a unique
cluster-port. Otherwise, the port conflict will cause the cache to fail to start. However, all nodes of the same cluster must have the same<cluster-port>, or cache nodes may fail to join and form a cluster. - You need to copy this configuration on all of your cache servers.
To learn how to add a node to an existing 2-node Replicated Cache cluster, refer to Add Cache Server Node. To remove a node from a Replicated Cache cluster, refer to Remove Cache Server Node.
Step 4: Add Local/Remote Client
A local/remote client is your web or application server that connects to the cache, either on the same machine (local) or on a different machine (remote). You can add one or more client nodes to your cache(s). To configure a web or application server as a cache client, please see the steps below:
Copy and paste the entire
<cache>section from the example below to the<configuration>section in the client.ncconf (client configuration) file.<cache id="demoCache" client-cache-id="" load-balance="false" enable-client-logs="False" log-level="error"> <server name="20.200.20.40"/> </cache>Make sure your
cache idis unique within the client.ncconf file.Replace the IP address specified in the name property of
<server>tag to your server's IP address. Mention all the cache server IP addresses here as separate<server>tags.Please perform the above steps for all cache clients.
Step 5: Restart the Cache and NCache Service
For the configuration changes made to take effect, you will need to restart both the cache instance and the NCache Service (NCacheSvc). Ensure you have enough privileges to restart the service. If the user is not an Administrator, run PowerShell as an administrator. Otherwise, you might get an error message, "Cannot open NCacheSvc service on computer."
Execute the following command in PowerShell to restart the NCache Service:
Restart-Service -Name NCacheSvc
Warning
The NCache Service fails to start if the configuration file has a missing tag or incorrect tag syntax.
After restarting, verify that:
- The NCache Service (NCacheSvc) is running.
- The cache instance status shows Running.
Proceed only after confirming that both the service and the cache have started successfully.
Step 6: Test the Cluster
In this step, you will verify that the cache has been created successfully, start the cache on all nodes, and test the cluster to ensure it is functioning correctly. This helps confirm that the cache is properly configured and ready to handle client operations.
Verify Cache Creation
To verify the successful creation of the cache, open PowerShell and use the Get-Caches cmdlet (shipped with NCache) with the -Detail parameter which displays all registered caches on the server and respective nodes of the cache cluster along with additional information.
Get-Caches -Detail -Server 20.200.20.40
For example, if a demoCache has been created, the list will contain demoCache with the nodes and the status "Stopped." If the list does not display the cache, there might have been some mistake while changing the configuration, or the NCache Service may not have been restarted.
Important
Please keep in mind that if the cache is stopped on any remote node, that node will not appear in the output of Get-Caches -Detail.
Note
You can see what PowerShell cmdlets are supported in NCache Open Source using the Edition Comparison page.
Start Cache
Once cache creation is verified, start the cache on each server through PowerShell using the Start-Cache cmdlet.
Start-Cache -Name demoCache -Server 20.200.20.40
Important
Repeat this step on all cache server nodes. If the -Server parameter is not specified, the cmdlet uses the local machine’s IP address by default. Specify the -Server parameter when starting the cache on a remote server.
To learn how to stop a cache using PowerShell, refer to the Stop-Cache cmdlet documentation.
Test Stress
You can test the cluster using the Test Stress PowerShell cmdlet to simulate the usage:
Important
Make sure to replace the -CacheName with the name of the cache you created.
Test-Stress -CacheName demoCache
Step 7: Monitor Cluster Health
Both local and clustered caches publish performance statistics using Windows Performance Counters. NCache also publishes performance statistics of the cache from the client's perspective. In this step, you will verify that the Stress Test Tool that you ran in the previous step is making cache calls successfully.
Monitor Using PerfMon
To view the statistics of a running cache, type PerfMon in the Windows search bar.
Performance Monitor appears in the search results. Open Performance Monitor.
Click on the Performance Monitor under the Monitoring Tools in the left pane. The Performance Monitor window opens up in the right pane.
Click on the Add (+) button. This opens the Add Counters pop-up window.
By default, it shows the Performance Counter categories on the local system. If the cache is running on a different computer, type the computer name or IP prepended by “\\”, e.g., \\20.200.20.40 or \\TEST.
Scroll in the Performance Categories window to find and select NCache.
Although NCache publishes a lot of statistics, you can select the following basic counters to monitor the cache:
Additions/sec: This shows the number of new cache items being added per second.
Count: This shows the number of items present in the cache.
Expirations/sec: This shows the number of items expired per second.
Fetches/sec: This shows the number of cache items read by your application from the cache.
Requests/sec: This shows the number of requests received (meaning cache commands like add, get, insert, remove, etc.) from all clients to this cache server.
Updates/sec: This shows the number of existing cache items updated per second.
Every cache publishes its statistics under its cache name. Select the cache you want to monitor and click the Add button at the bottom.
Click OK.
Change the graph type from Line to Report.

Monitor Using SNMP
NCache also allows monitoring through SNMP (Simple Network Management Protocol) using a centralized MIB file.
- NCache provides a single alachisoft.mib file that contains all counters for monitoring.
- This file is located at:
- Windows:
%NCHOME%\bin\resources - Linux:
/opt/ncache/ext/resources/snmp/
- Windows:
- The MIB file includes counters for:
- Cache
- Bridge
- Bridge Cache
- Persistence Cache
- Client counters
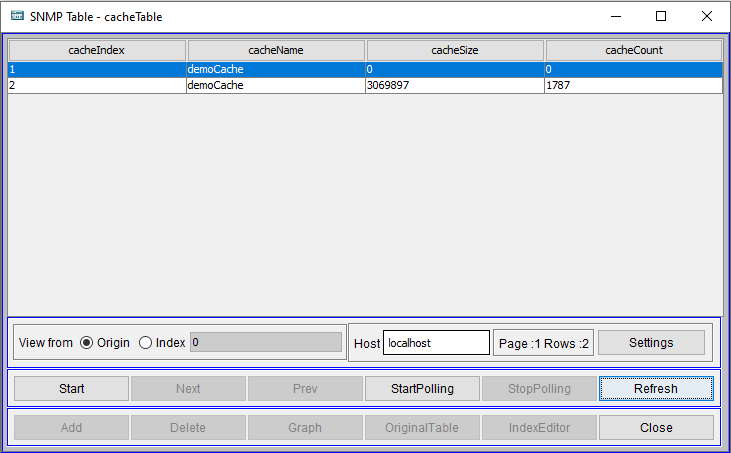
- Use an SNMP tool such as MIB Browser to load and browse the MIB file.
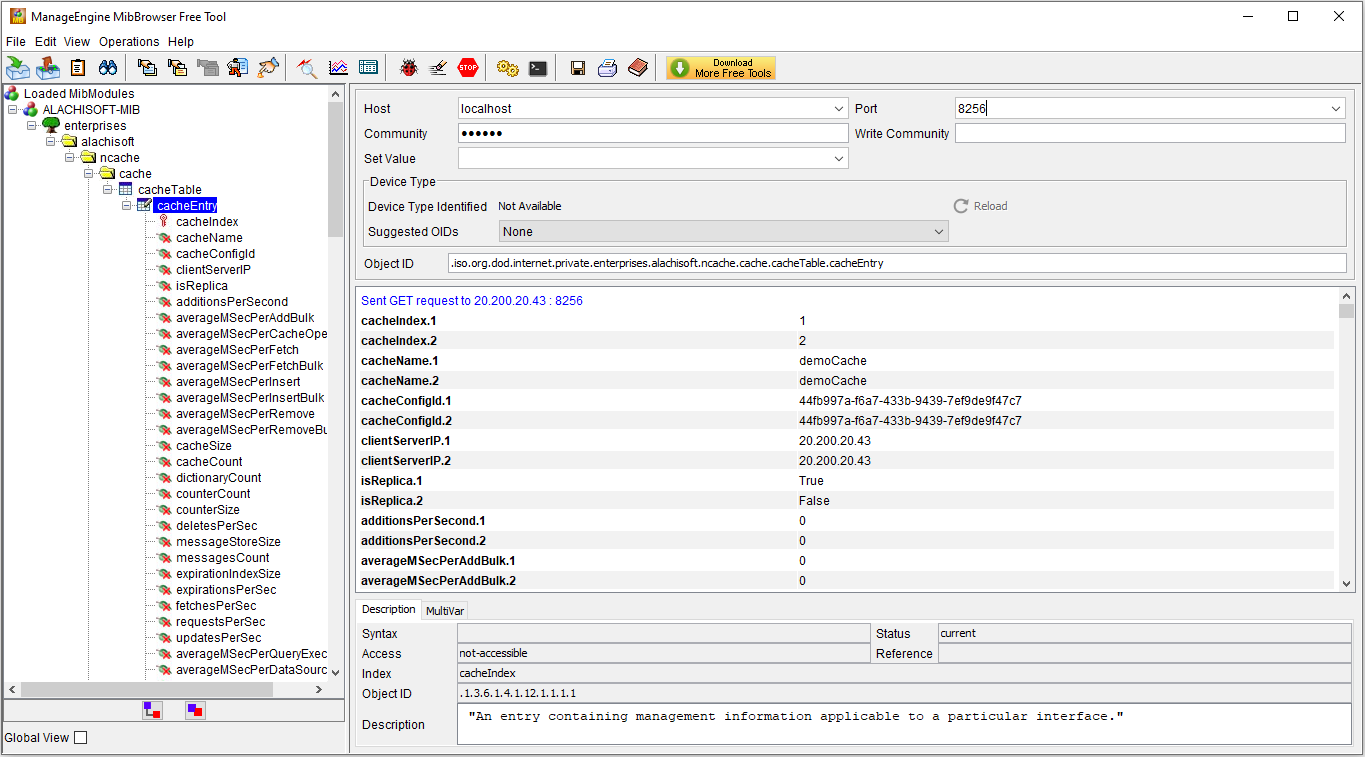
- Select the required attributes and view their values through the SNMP Table.
Step 8: Setup .NET Client
To create an application to connect with your cache, follow the steps below:
Create a new .NET Console Application.
To install NuGet packages, open Visual Studio and go to Tools -> NuGet Package Manager -> Package Manager Console.
Install the NCache NuGet package through the Package Manager Console as follows:
Install-Package Alachisoft.NCache.OpenSource.SDK
This will generate the configuration files client.ncconf and config.ncconf and add them to the current project.
Note
Please note that if these files are missing or deleted, they can be generated by running the command init.ps1 from the Package Manager Console.
Step 9: Coding Samples
In this step, you will create a simple .NET application and perform basic cache operations using NCache APIs. This helps you validate that your application can successfully connect to the cache and store data.
Data Caching
Once connected to the cache, you can start adding application data as key-value pairs. The following example demonstrates how to connect to the cache and add an object:
using Alachisoft.NCache.Client;

// Connect to cache
ICache cache = CacheManager.GetCache("demoCache");

// Create item
var product = new Product(1005, "Laptop", 1500, "Electronics");
var cacheItem = new CacheItem(product);

// Add to cache
cache.Add("1009", cacheItem);
Console.WriteLine("Item 1009 successfully added to demoCache.");

// Dispose cache
cache.Dispose();

[Serializable]
public class Product
{
    public int Id { get; set; }
    public string Name { get; set; }
    public double Price { get; set; }
    public string Category { get; set; }

    public Product(int id, string name, double price, string category)
    {
        Id = id;
        Name = name;
        Price = price;
        Category = category;
    }
}
For more details on Data Caching, please refer to the NCache guide.
Events
NCache allows your application to receive notifications when specific cache items are modified. Item-level events are useful when you want to monitor a particular key and respond when that item is updated or removed from the cache.
The following example demonstrates how to register Item-level notifications for a specific item and handle the ItemUpdated event:
...
using Alachisoft.NCache.Runtime.Events;

// Connect to cache
using ICache cache = CacheManager.GetCache("demoCache");

// Add an item first, because the key must already exist
var product = new Product(1005, "Laptop", 1500, "Electronics");
string key = "Product:1005";
cache.Add(key, new CacheItem(product));

// Create callback
var dataNotificationCallback = new CacheDataNotificationCallback(OnCacheDataModification);

// Register item-level notifications for update operation
cache.MessagingService.RegisterCacheNotification(key, dataNotificationCallback, EventType.ItemUpdated, EventDataFilter.DataWithMetadata);

// Update item to trigger ItemUpdated event
product.Price = 1750;
cache.Insert(key, new CacheItem(product));

Console.WriteLine("Item-level event notifications registered successfully.");

// Callback method that is invoked when a registered cache item is modified
static void OnCacheDataModification(string key, CacheEventArg args)
{
    switch (args.EventType)
    {
        case EventType.ItemUpdated:
            Console.WriteLine($"Item with key '{key}' has been updated in cache '{args.CacheName}'.");

            if (args.Item != null)
            {
                Product updatedProduct = args.Item.GetValue<Product>();
                Console.WriteLine($"Updated product: {updatedProduct.Name}, Price: {updatedProduct.Price}");
            }
            break;
    }
}
...
For more details on Events, please refer to the NCache guide.
You can see what features are available as part of NCache Open Source using the Edition Comparison.
Important
After running the application or performing cache operations, NCache generates log files that can be used for monitoring and troubleshooting. By default, the log files are generated at the following location: %NCHOME%\log-files. Log file locations may vary if a custom installation directory was selected during NCache setup.
Note
For more details on using NCache, please refer to the Developer's Guide.
See Also
NCache Installation
NCache Developer's Guide
NCache Command Line Interface