In-Memory IdentityServer4 Store
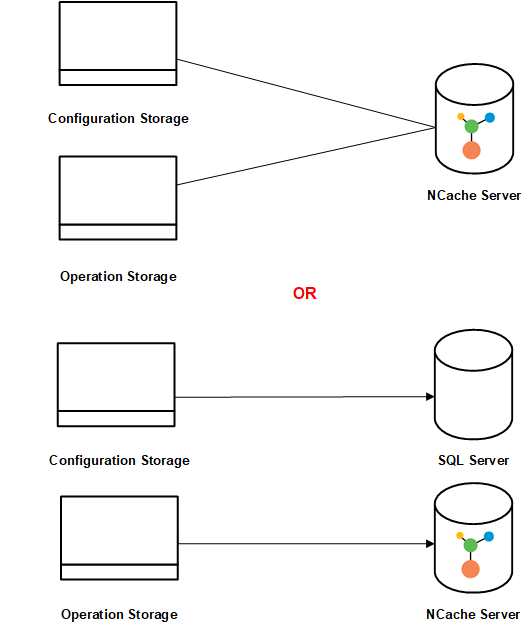
Using NCache as an IdentityServer4 store means storing information about the clients, API, identity resources, etc., let's see through the following diagram how NCache acts as an IdentitySever4 store:
Prerequisites to Configure NCache as an In-Memory IdentityServer4 Cache
- Use the .NET 4.8 SDK and runtime API for IdentityServer4.
- The cache name and IP address information should change according to your application.
- The cache must be running.
- To handle any unseen exceptions, refer to the Troubleshooting section.
To use NCache for the IdentityServer4 configuration and operational data, perform these configurations as explained below.
How to Configure NCache as IdentityServer4 Store
Step 1:
- Install the following NuGet package to your application:
- Include the following namespaces in the StartupNCache.cs file of your application.
IdentityServer4.NCache.EntitiesIdentityServer4.NCache.MappersIdentityServer4.NCache.OptionsIdentityServer4.NCache.Stores.Interfaces
Step 2:
In the .cs file of your project, add the .UseStartup<StartupNCache> method. Then for NCache as both a configuration and operational store, add the following code where CacheId is the name of your cache and Servers are the IP addresses of your nodes in the StartupNCache.cs file.
Warning
If the client.ncconf file in the project folder or your installation directory, i.e., %NCHOME%/config does not contain the information regarding the cache cluster, then the ConnectionOptions must contain the information of at least one server in the NCache cluster. That information is available within the ServerList property of the NCacheConnectionOptions class.
public void ConfigureServices(IServiceCollection services)
{
    services.AddControllersWithViews();

    var builder = services.AddIdentityServer()
            .AddTestUsers(TestUsers.Users)
            // Add NCache as a configuration store
            .AddNCacheConfigurationStore(options =>
            {
                options.CacheId = _configuration["CacheId"];

                var serverList = _configuration["Servers"].Split(',')
                            .Select(x => x.Trim())
                            .ToList()
                            .Select(y =>
                                new NCacheServerInfo(y,9800))
                            .ToList();
                options.ConnectionOptions = new NCacheConnectionOptions
                {
                    ServerList = serverList,
                    EnableClientLogs = true,
                    LogLevel = NCacheLogLevel.Debug
                };
            })
            // Add NCache as an operational store
               .AddNCachePersistedGrantStore(options =>
            {
                options.CacheId = _configuration["CacheId"];

                var serverList = _configuration["Servers"].Split(',')
                            .Select(x => x.Trim())
                            .ToList()
                            .Select(y =>
                                new NCacheServerInfo(y,9800))
                            .ToList();
                options.ConnectionOptions = new NCacheConnectionOptions
                {
                    ServerList = serverList,
                    EnableClientLogs = true,
                    LogLevel = NCacheLogLevel.Debug
                };
            })
             .AddNCacheDeviceCodeStore(options =>
            {
                options.CacheId = _configuration["CacheId"];

                var serverList = _configuration["Servers"].Split(',')
                            .Select(x => x.Trim())
                            .ToList()
                            .Select(y =>
                                new NCacheServerInfo(y,9800))
                            .ToList();
                options.ConnectionOptions = new NCacheConnectionOptions
                {
                    ServerList = serverList,
                    EnableClientLogs = true,
                    LogLevel = NCacheLogLevel.Debug
                };
            })
    // Rest of the code
}
Note
To ensure the operation is fail-safe, it is recommended to handle any potential exceptions within your application, as explained in Handling Failures.
Step 3:
After that, in the appsettings.json file, modify the value of the CacheId key to the name of the cache you are using. Furthermore, for the multiple server keys, use a comma-separated list of one or more IP addresses belonging to the NCache servers making up the NCache cluster.
{
    "CacheId" : "demoCache",
    "Servers" : "20.200.20.40,20.200.20.39",
}
Step 4:
Run your applications IdentityServer, MvcClient, Api, and JavaScriptClient to see how NCache operates as an IdentityServer4 configuration and operational store. Ensure that the cache is running and can be connected to the IdentityServer sample application.
Additional Resources
NCache provides a sample application for IdentityServer4 on GitHub.
See Also
.NET: IdentityServer4 namespace.