VNET Peering for Azure
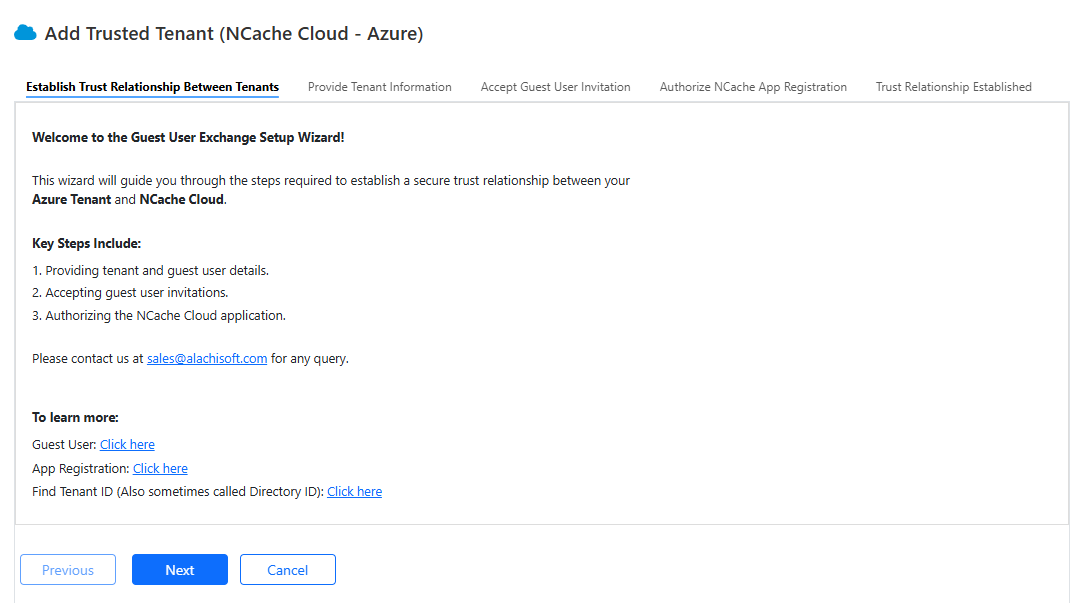
If you choose the VNET Peering connection option and have not set up trusted tenants, you will be led straight to the Add Trusted Tenants page. This section aims to guide you through establishing a secure trust relationship between your Azure Tenant and NCache Cloud.
Tenant Relationship
Note
If tenant trust is already established, you'll be taken directly to the Configure Environment page after clicking Create Environment on the subscription dashboard.
To establish a trust relationship between tenants, follow these steps:
- Read through the instructions in the Establish Trust Relationship Between Tenants tab, then click Next to proceed.
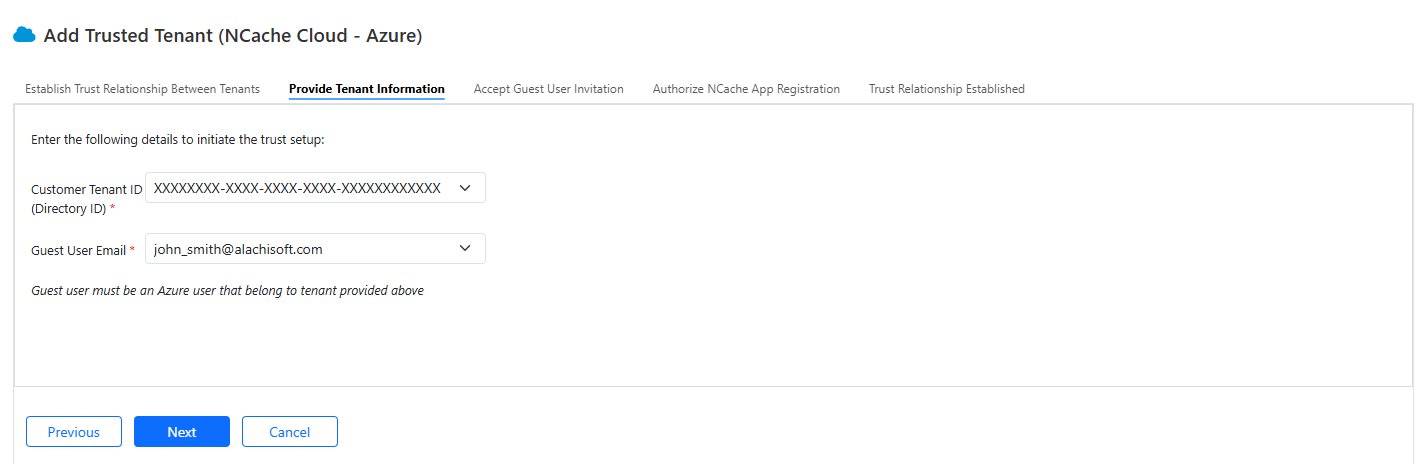
- In the Provide Tenant Information tab, select your Customer Tenant ID / Directory ID. Enter the Guest User Email (the email address of the user being added). Click Next.
Note
You can find your Tenant ID by navigating to Settings > Directories + subscriptions in your Azure Portal.
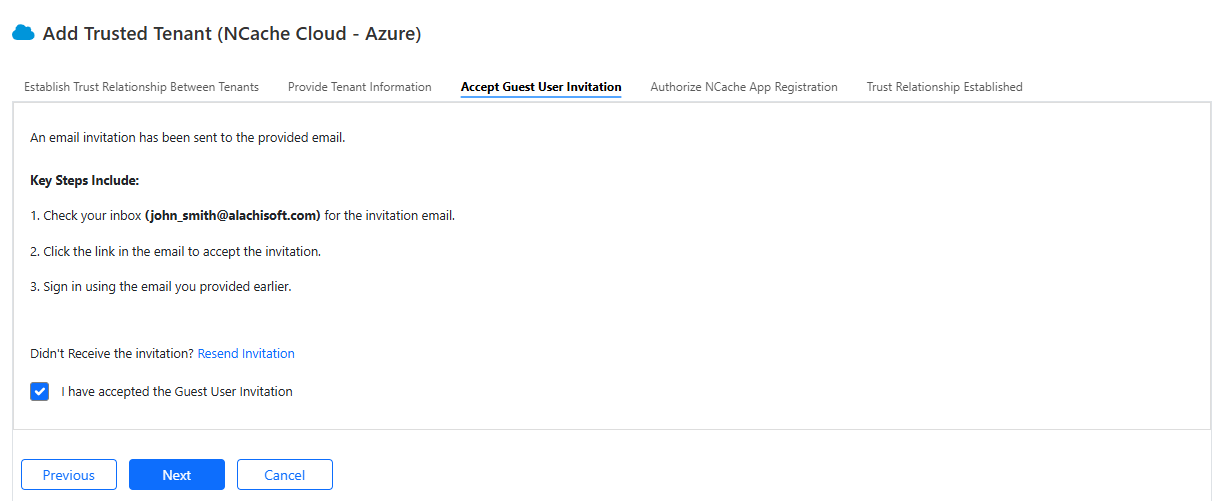
- The guest user will receive an accept invitation link email. Click the link in the email. This will open the Azure Portal where after accepting invite, the guest user will be redirected to the "Authorized Page" on the Cloud Portal. Select the checkbox: “I have accepted the Guest User Invitation”. Click Next to proceed.
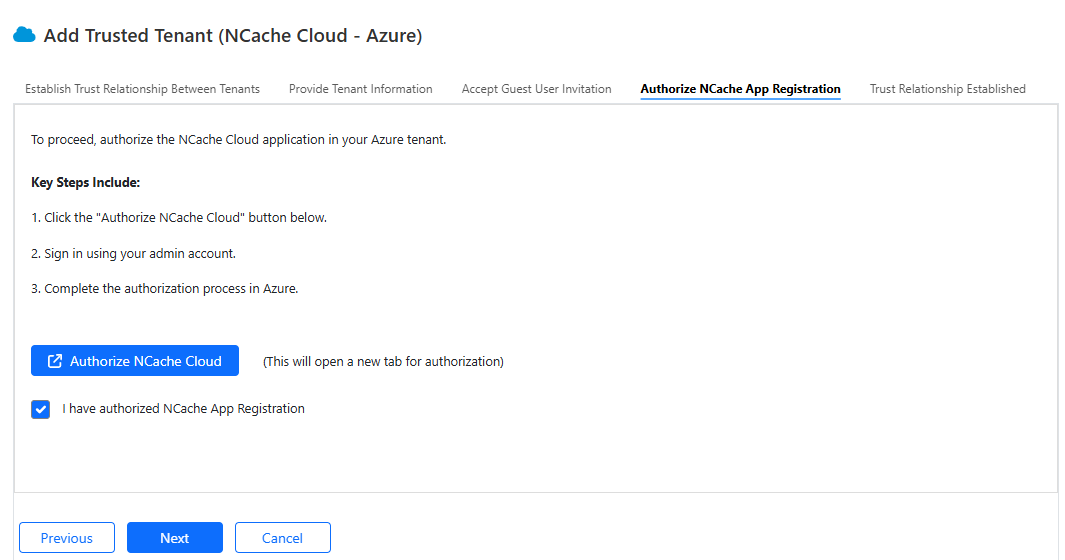
Now, you need to authorize the NCache cloud application in your Azure tenant by clicking on Authorize NCache Cloud. A new tab will open where you need to sign in with your Azure Admin account on Azure portal to approve NCache Application in your tenants. After authorization, a popup screen appears stating: "You have successfully been Authorized".
Select the checkbox: “I have authorized NCache App Registration” after successful login. Click Next.
- You will receive a success confirmation on the Trust Relationship Established tab. After that, return to the dashboard to configure your environment.
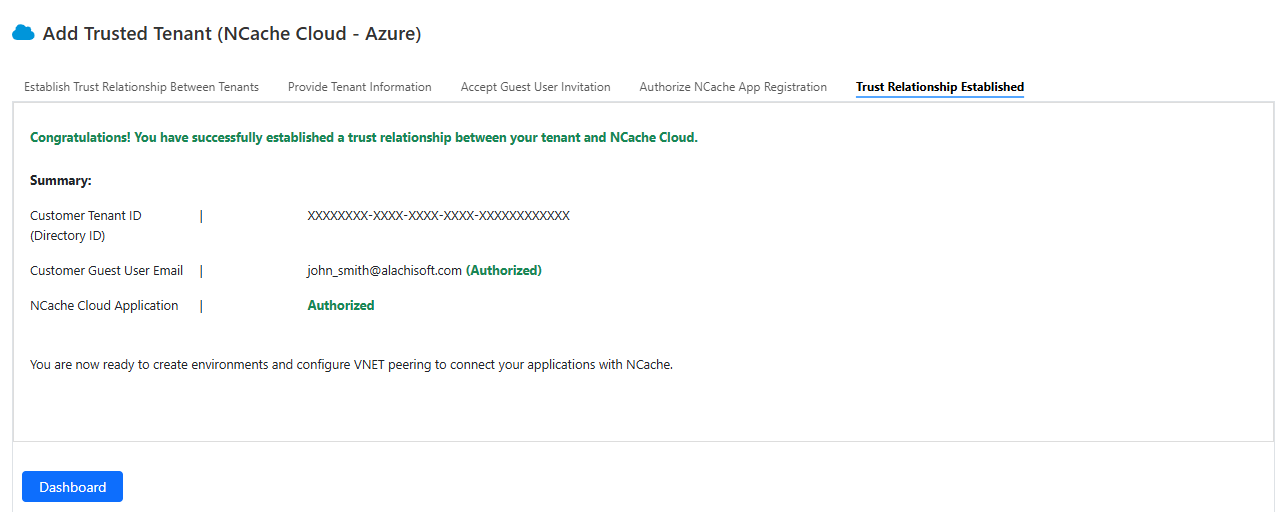
You will be able to see your added tenants in the trusted tenants tab. Moreover, any additional Azure user belonging to that tenant can be added as guest user.
Configure VNET Peering
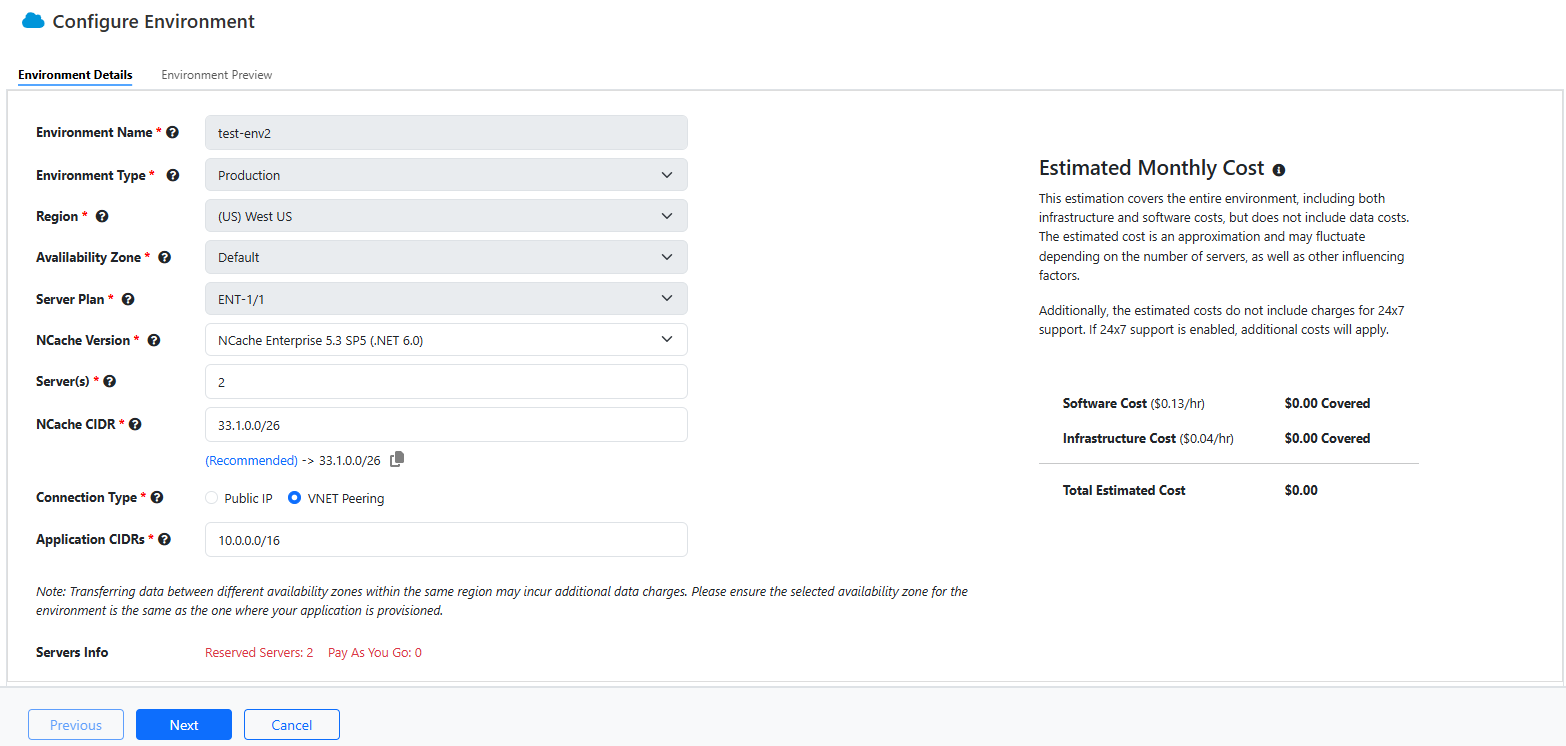
Once you’ve completed the prerequisites for VNET Peering, the next step is to configure your environment based on your chosen subscription type (i.e., PAYG or Annual). You’ll be able to view the monthly cost on the right-hand side of the screen, which includes both infrastructure and software costs.
The step-by-step details to configure and establish VNET Peering is as detailed below. Please note that we are proceeding with annual subscription in this process.
- Provide Environment Name, Environment Type, Region, Availability Zone, Server Plan, NCache Version, Server(s), NCache CIDR, and Application CIDRs in the respective fields. Please ensure that VNET must be in the same region as the NCache environment it is being peered with. Click Next.
Note
- The NCache CIDR represents your environment’s CIDR block – range of IP addresses that will be assigned to your specific environment’s VNET. There is a recommended CIDR block that you can choose to prevent any overlaps.
- The Application CIDRs are basically your chosen set of CIDRs to see if there are any overlaps with the environment’s VNET. These CIDRs must not overlap with each other or with the NCache CIDR.
Note
Please note that you can provide multiple CIDR in application CIDRs list. However, only one CIDR will be used during VNET peering as VNET has one CIDR.
Note
In case of PAYG subscription, the Servers Info field is not present. Additionally, you can edit the environment details.
- You can preview your environment details as shown below. Click Finish once reviewed.
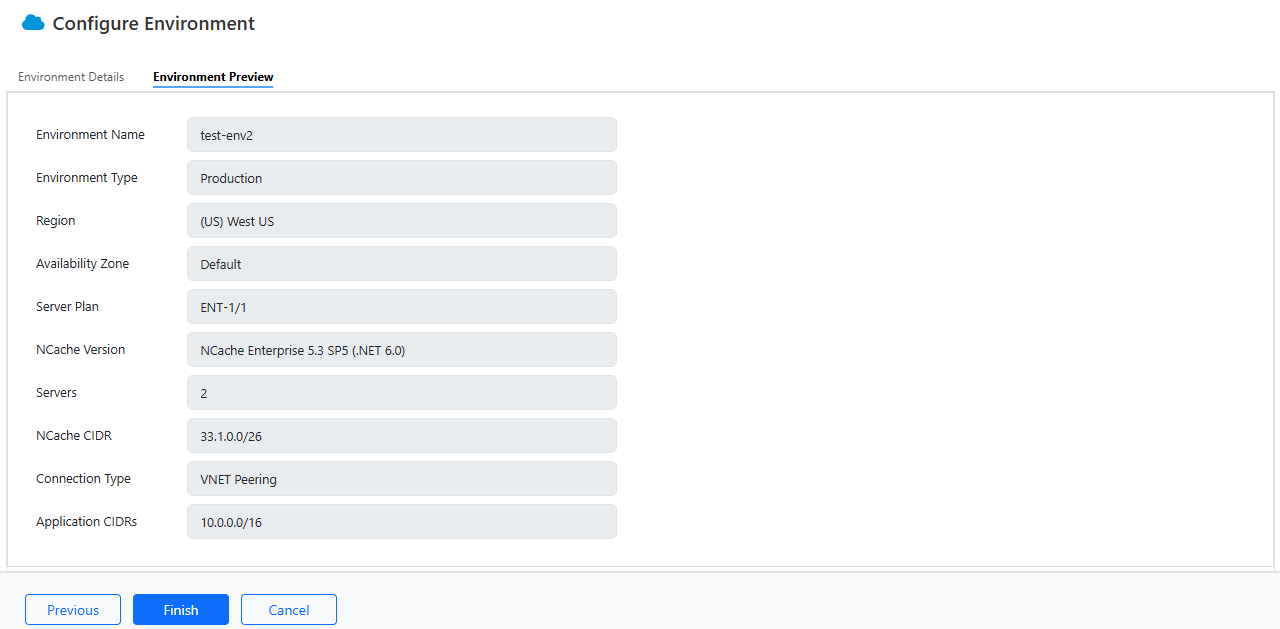
- An Environment Creation Prompt appears asking you to confirm or cancel your environment creation.

Upon confirming, you will see another prompt stating your environment deployment is in progress.
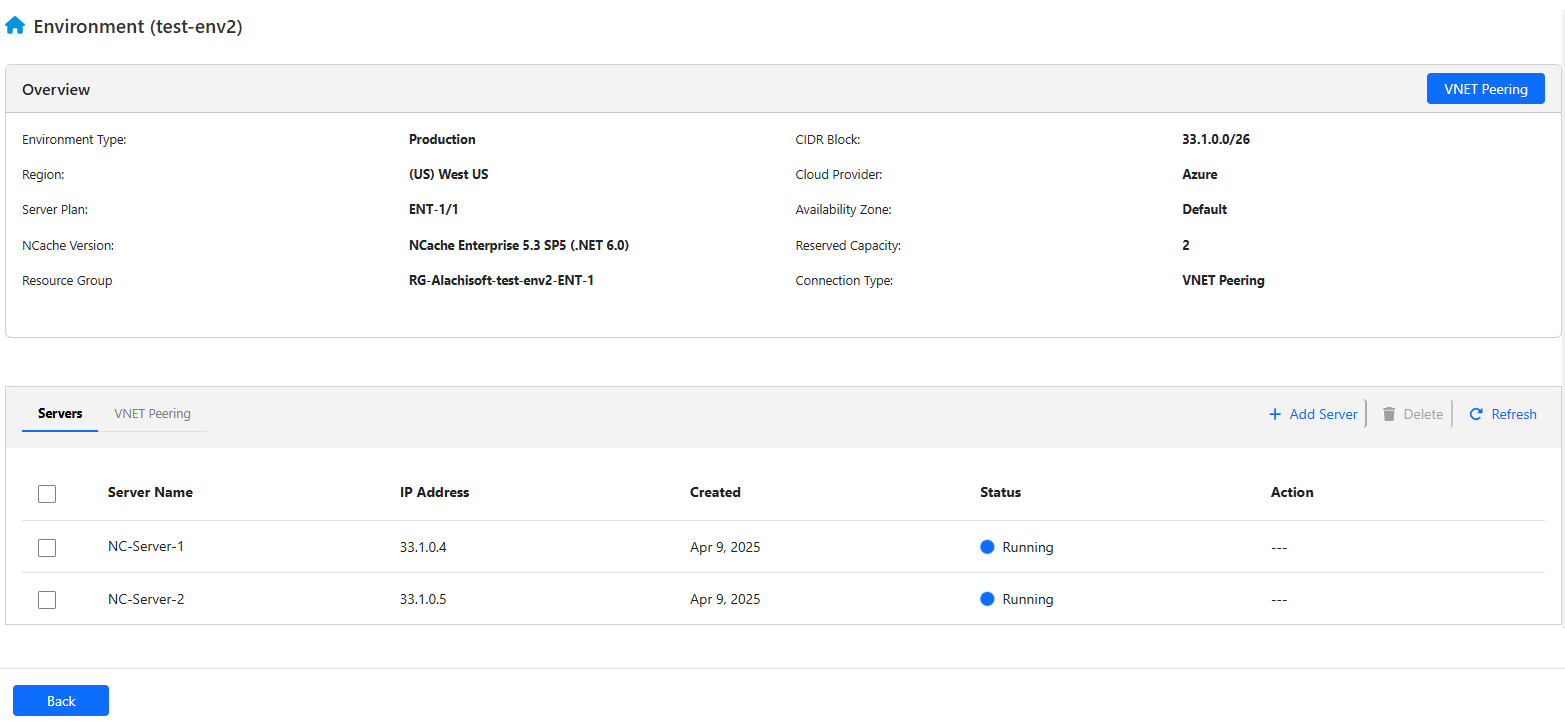
You'll be able to see your newly created environment on the Dashboard in the Environments tab.

Note
You can begin VNET Peering configuration in two ways:
- By clicking the VNET Peering button on your subscription dashboard, or
- By opening your created environment and selecting the VNET Peering option there.
- Click on Details. This will open your environment details. Now click VNET Peering.
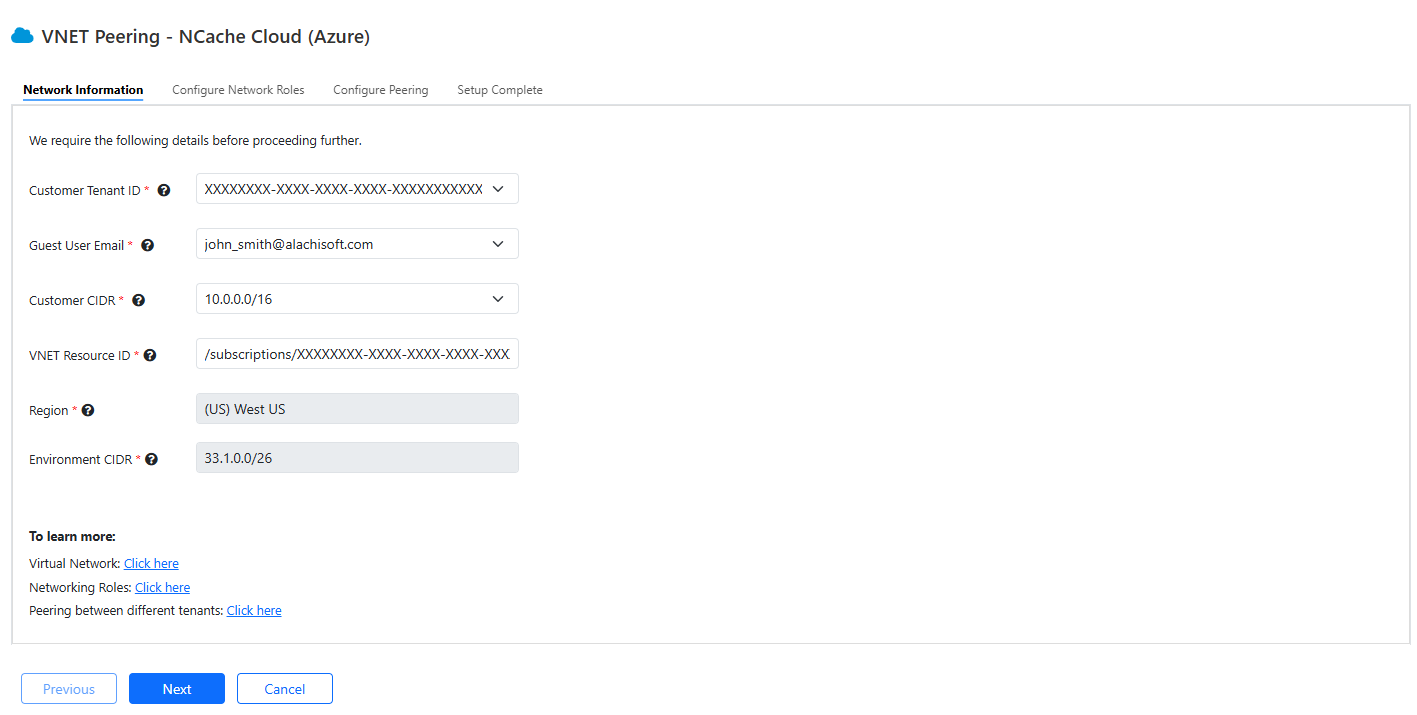
Now to establish VNET Peering, you need to provide the following details to proceed further.
- First, the Network Information tab requires you to add Customer Tenant ID, Guest User Email, Customer CIDR. Please note that Region and environment CIDR are already filled out and you cannot change or edit them. Since you have already added some of the required information while creating environments, it will be available in the dropdown of the required fields. Please ensure that your region should be same as of the VNET. Click Next.
- Next, network roles need to be assigned to the guest user as well as our Application Registration (NCache Cloud VNET Peering). Run the provided script that assigns Remote Peering NCache role to our Application Registration on your VNET. Please ensure to copy and run the script in your Azure Cloud Shell having owner permissions on the subscription.
Note
In case you do not wish to execute the script with owner permissions, ensure that you have the minimum required permissions, i.e., Network Contributor, Role Assignment (Read/Write), and Role Definition (Write) permissions.
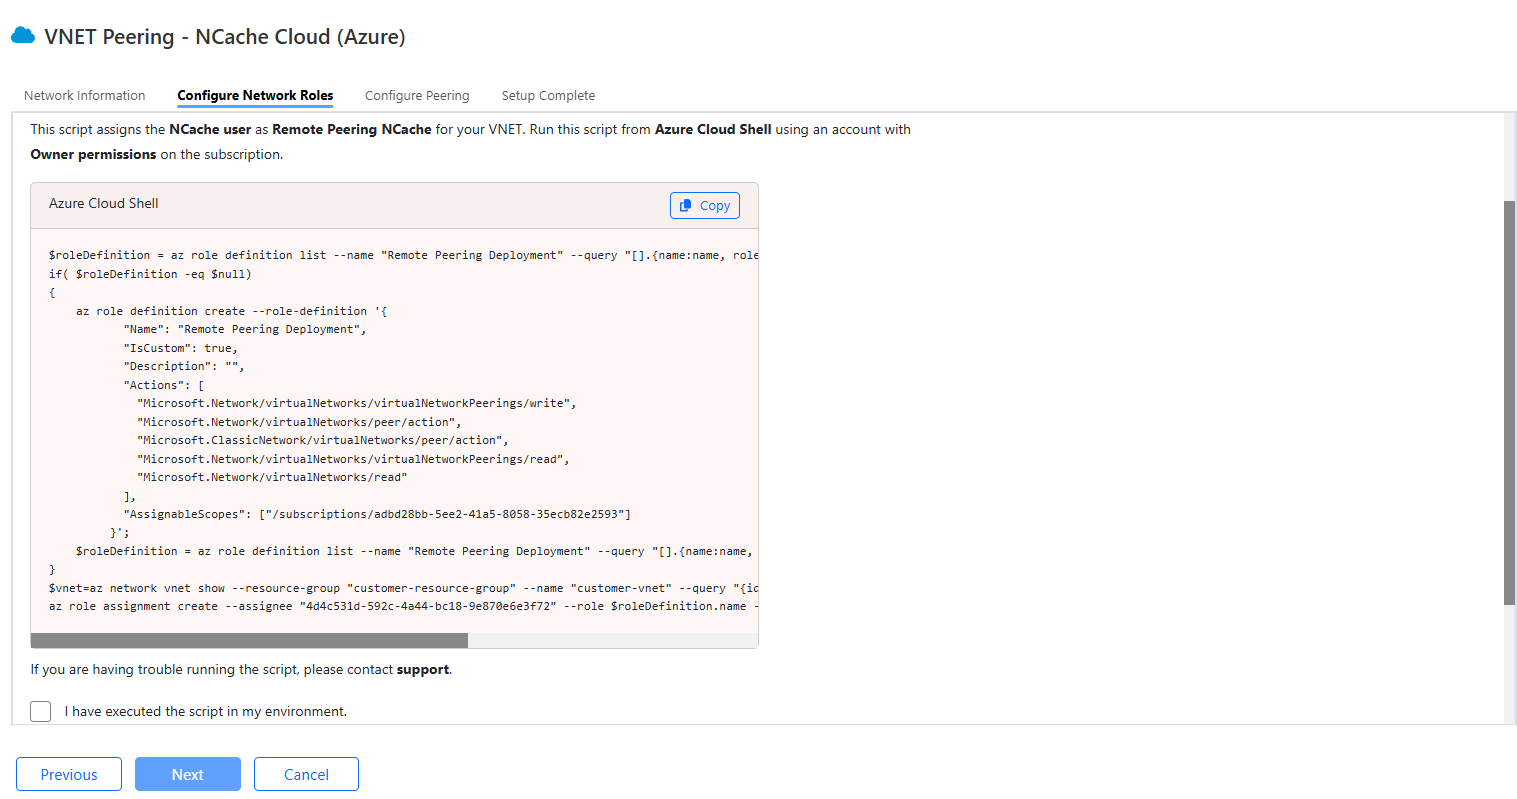
Select the checkbox: “I have executed the script in the environment”, and click Next.
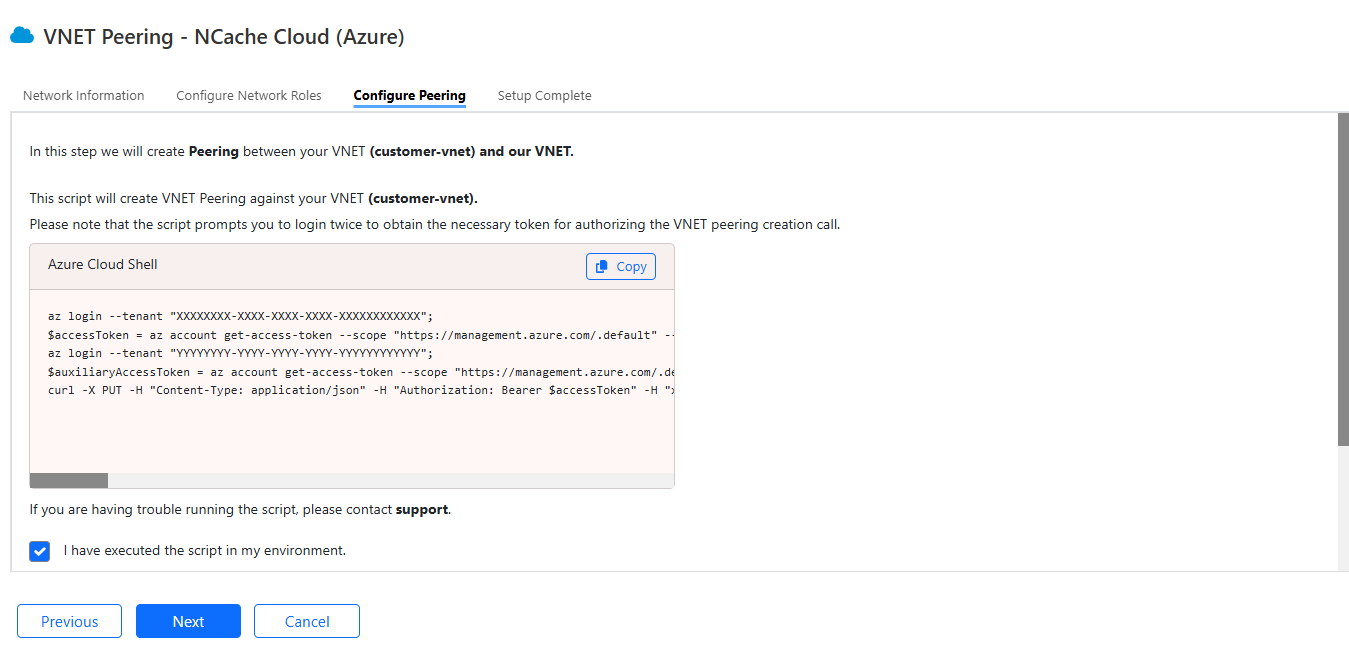
In the next step, you will need to create Peering between your and our VNET. Copy and run the provided script in your Azure Shell terminal.
Note
In case of any issue while running the script, please contact Alachisoft Support.
- Upon execution of the Configure Peering script, you'll be prompted to sign in twice to get necessary access tokens to have authorization to create peering.
Important
We require authorization for two subscriptions, one is our subscription (belonging to our tenant) and the other is your subscription (belonging to your tenant).
Select the checkbox: “I have executed the script in the environment” in the Configure Peering tab, and click Next.
The Setup Completion tab opens notifying about the successful VNET Peering.
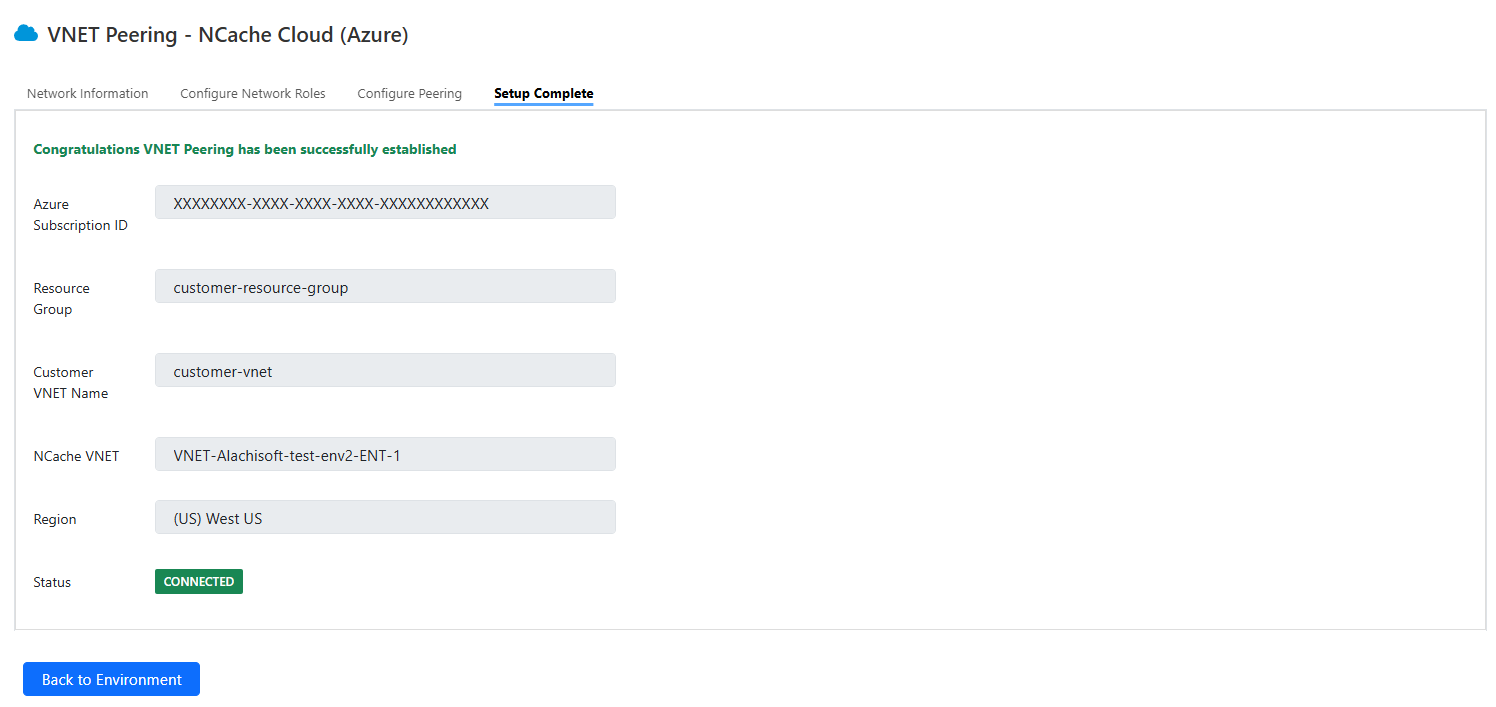
- You can view the details of your VNET Peering on the dashboard in the VNET Peering tab.

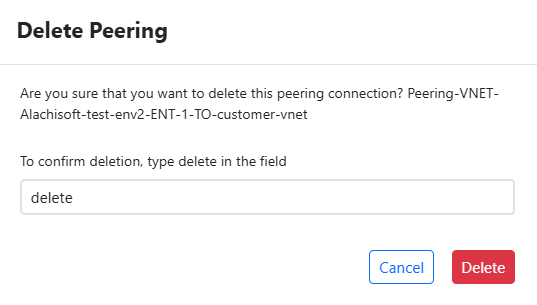
Delete Peering
- You can delete your peering connection when you no longer require it by selecting your Peering and clicking on the Delete icon.

- A prompt appears asking for confirmation.
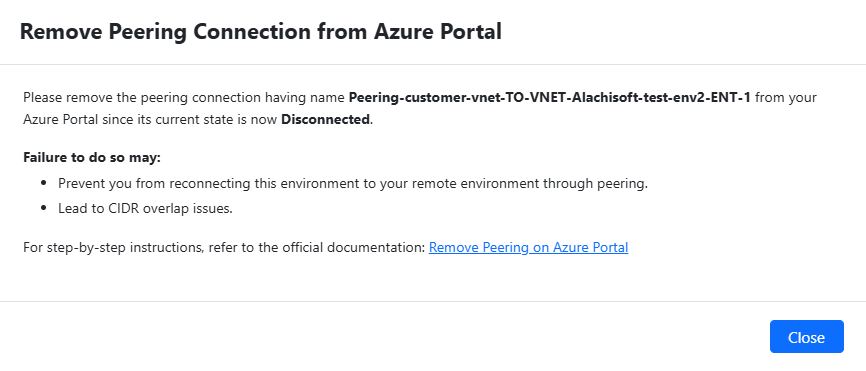
- Another prompt appears asking you to remove the peering connection from your Azure Portal since we do not have the delete access.
Add and Delete Tenants
Similarly you can add and delete tenants by choosing the required Tenant ID in the Trusted Tenants tab on the dashboard and performing the relevant operation.

To learn more about how to manage your environment, please see Environment Management page.