Getting Started with NCache Open Source
This guide provides the basic steps you should follow to get started with NCache Open Source.
Step 1: Create Cache
Add configurations for creating necessary cache in the config.ncconf file in the cache server.
Warning
NCache Open Source only supports Local and Replicated Caches.
Open %NCHOME%\config\config.ncconf file on your local machine.
Copy and paste the entire
<cache-config>section from the examples below to the<configuration>section of config.ncconf file.You can modify this configuration to change the cache name, as required.
Important
Each cache should have a unique name.
Warning
By default, the total cache size across all caches is limited to 2 GB in NCache Open Source. There is no individual size limit per cache, but the combined usage must not exceed 2 GB.
The following are configuration examples for both Local and Replicated cache:
For Local Cache
NCache Open Source supports a standalone (non-clustered) cache residing on a single node.
<cache-config cache-name="demoLocalCache" alias="" config-id="e097c2c0-88af-4aa2-8a8a-c6432eeaa3fe" config-version="0" store-type="distributed-cache">
  <cache-settings inproc="False" data-format="Serialized" serialization="Json">
    <logging enable-logs="True" trace-errors="True" trace-debug="False" log-path=""/>
    <performance-counters enable-counters="True" snmp-port="0"/>
    <cleanup interval="15sec"/>
    <storage type="heap" cache-size="1024mb"/>
    <eviction-policy enabled-eviction="True" default-priority="normal" policy="priority" eviction-ratio="5%"/>
    <cache-topology topology="local-cache"/>
    <client-death-detection enable="False" grace-interval="60sec"/>
  </cache-settings>
</cache-config>
For Replicated Cache
A cache cluster is a set of interconnected server nodes forming a cluster of servers that behave as a single cache unit from the outside. To create a Replicated Cache, you can use the following configuration. This sample config adds two servers, 20.200.20.40 and 20.200.20.39:
Warning
For NCache Open Source, Replicated caches are limited to a maximum of 2 nodes.
<cache-config cache-name="demoCache" alias="" config-id="44fb997a-f6a7-433b-9439-7ef9de9f47c7" config-version="0" store-type="distributed-cache">
  <cache-settings inproc="False" data-format="Serialized" serialization="Json">
    <logging enable-logs="True" trace-errors="True" trace-debug="False" log-path=""/>
    <performance-counters enable-counters="True" snmp-port="0"/>
    <cleanup interval="15sec"/>
    <storage type="heap" cache-size="1024mb"/>
    <eviction-policy enabled-eviction="True" default-priority="normal" policy="priority" eviction-ratio="5%"/>
    <cache-topology topology="replicated">
      <cluster-settings operation-timeout="60sec" stats-repl-interval="300sec">
        <cluster-connection-settings port-range="1" connection-retries="1" connection-retry-interval="2secs" cluster-port="7801"/>
      </cluster-settings>
    </cache-topology>
    <client-death-detection enable="False" grace-interval="60sec"/>
  </cache-settings>
  <cache-deployment deployment-version="0">
    <servers>
      <server-node ip="20.200.20.40"/>
      <server-node ip="20.200.20.39"/>
    </servers>
  </cache-deployment>
</cache-config>
Please note the following:
- Replace the IP Addresses given in the
<cache-deployment>section with the IP Addresses of your cache servers. - For clustered caches, you can have a single server if you want to test on your machine.
- Every cache cluster should have a unique
cluster-port. Otherwise, the port conflict will cause the cache to start to fail. However, all nodes of the same cluster must have the same<cluster-port>, or cache nodes may fail to join and form a cluster. - You need to copy this configuration on all of your cache servers.
Step 2: Add Local/Remote Client
Copy and paste the entire
<cache>section from the example below to the<configuration>section in the client.ncconf file.<cache id="demoCache" client-cache-id="" client-cache-syncmode="optimistic" default-readthru-provider="" default-writethru-provider="" skip-client-cache-if-unavailable="true" reconnect-client-cache-interval="10" load-balance="false" enable-client-logs="False" log-level="error"> <server name="20.200.20.40"/> </cache>Make sure your
cache idis unique within the client.ncconf file.Replace the ip address specified in the name property of
<server>tag to your server's ip address. Mention all the cache server ip addresses here as separate<server>tags.Please perform the above steps for all cache clients.
Step 3: Restart NCache Service
For the configuration changes made to take effect, you will need to restart the NCache Service. Therefore, you need to make sure you have enough privileges to restart the service. If the user is not an Administrator, run PowerShell as an administrator. Otherwise, you might get an error message, "Cannot open NCacheSvc service on computer."
Execute the following command in PowerShell to restart the NCache Service:
Restart-Service -Name NCacheSvc
Warning
The NCache Service fails to start if the configuration file has a missing tag or incorrect tag syntax.
Make sure that the NCache Service has successfully started.
Step 4: Verify Cache Creation
To verify successful creation of the cache, open PowerShell and use the Get-Caches cmdlet (shipped with NCache) with the -Detail parameter which displays all registered caches on the server and respective nodes of the cache cluster along with additional information.
Get-Caches -Detail -Server 20.200.20.40
For example, if a demoCache has been created, the list will contain demoCache with the nodes and the status "Stopped." If the list does not display the cache, there might have been some mistake while changing the configuration, or the NCache Service may not have been restarted.
Important
Please keep in mind, if the cache is stopped on any remote node, that node will not appear in the output of Get-Caches -Detail.
Note
You can see what PowerShell cmdlets are supported in NCache Open Source using the Edition Comparison page.
Step 5: Start Cache
Once cache creation is verified, start the cache on each server through PowerShell using the Start-Cache cmdlet.
Start-Cache -Name demoCache
Important
Repeat this step on all cache server nodes.
Step 6: Test the Cluster
You can test the cluster using the Test Stress PowerShell cmdlet to simulate the usage:
Important
Make sure to replace the -CacheName with the name of the cache you created.
Test-Stress -CacheName demoCache
Step 7: Monitor Cluster Health
Both local and clustered caches publish performance statistics using Windows Performance Counters. NCache also publishes performance statistics of the cache from the client's perspective. In this step, you will verify that the Stress Test Tool that you ran in the previous step is making cache calls successfully.
To view the statistics of a running cache, type PerfMon in the Windows search bar.
Performance Monitor appears in the search result. Open Performance Monitor.
Click on the Performance Monitor under the Monitoring Tools in the left pane. The Performance Monitor window opens up in the right pane.
Click on the Add (+) button. This opens the Add Counters pop-up window.
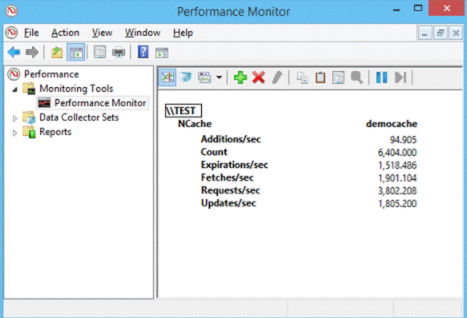
By default, it shows the Performance Counter categories on the local system. If the cache is running on a different computer, type the computer name or IP prepended by “\\” e.g., \\20.200.20.40 or \\TEST.
Scroll in the Performance Categories window to find and select NCache.
Although, NCache publishes a lot of statistics, you can select the following basic counters to monitor the cache:
Additions/sec: This shows the number of new cache items being added per second.
Count: This shows the number of items present in the cache
Expirations/sec: This shows the number of items expired per second.
Fetches/sec: This shows the number of cache items read by your application from the cache.
Request/sec: This shows the number of requests received (meaning cache commands like add, get, insert, remove, etc.) from all clients to this cache server.
Updates/sec: This shows the number of the existing cache items updated per second.
Every cache publishes its statistics under its cache name. Select the cache you want to monitor and click the Add button at the bottom.
Click OK.
Change graph type from Line to Report.
Step 8: Install NuGet Packages
To create an application to connect with your cache, follow the steps below:
Create a new .NET Console Application.
To install NuGet packages, open Visual Studio and go to Tools -> NuGet Package Manager -> Package Manager Console.
Install the NCache NuGet package through the Package Manager Console as follows:
Install-Package Alachisoft.NCache.OpenSource.SDK
Step 9: Import Namespaces
Add the following namespaces to your Program.cs file or similar:
using Alachisoft.NCache.Client;
using Alachisoft.NCache.Runtime.Exceptions;
Step 10: Serialize Objects
Go to Solutions and select Add->Class to create a new class Product as follows:
Important
This step is only mandatory when using Binary serialization.
[Serializable]
public class Product
{
    // Properties being defined below
    public int ProductID {...}
    public string ProductName {...}
    public string Category {...}
    public string UnitsInStock {...}
}
Step 11: Connect to Cache
Intialize and Connect using the GetCache API, as demonstrated below:
// Specify the cache name
string cacheName = "demoCache";

// Connect to cache
ICache cache = CacheManager.GetCache(cacheName);
Step 12: Begin Data Caching
Once the cache is connected, you can utilize the NCache features available to you as part of NCache Open Source. First, include the following namespaces:
Alachisoft.NCache.ClientAlachisoft.NCache.Runtime.Exceptions
The following example adds a basic CacheItem containing the Product object into the cache.
// Precondition: Cache is already connected

// Get product from database against given product ID
Product product = FetchProductFromDB(1001);

// Generate a unique cache key for this product
string key = $"Product:{product.ProductID}";

// Create a new CacheItem for this product
// You can OPTIONALLY specify multiple properties e.g. Priority, Expiration

var cacheItem = new CacheItem(product);
// cacheItem.AbsoluteExpiration = DateTime.Now.AddMinutes(5);

// Add CacheItem to cache
cache.Add(key, cacheItem);
You can see what features are available as part of NCache Open Source using the Edition Comparison.
Note
For more details on using NCache, please refer to the Programmer's Guide.
See Also
NCache Installation
NCache Programmer's Guide
NCache Command Line Interface