Create Stack
After launching NCache Cloud from AWS Marketplace, you are redirected to the Create stack page in AWS CloudFormation. A CloudFormation stack is a collection of AWS resources that are created and managed together as a single deployment unit. This page allows you to select the deployment template, provide environment-specific information, and create the stack that provisions your NCache deployment.
Prerequisite: Dedicated Subnet for NCache Cluster
NCache Cloud deployment requires a dedicated subnet within your VPC so that the deployed server instances can communicate externally for initialization, licensing, and registration. To prepare this subnet for the NCache cluster deployment, you can either use the provided PowerShell script to automatically create and configure the subnet, or manually create and configure it through the AWS Console. Depending on your deployment requirements, the subnet can be configured in one of the following modes:
Public Mode
Creates the subnet as a public subnet and assigns public IP addresses to deployed instances. This mode is recommended for evaluation and development environments where direct external access to the instances may be required.Private Mode
Creates the subnet as a private subnet without public IP addresses. In this mode, outbound internet connectivity is provided through a NAT Gateway, allowing the instances to access external services securely without being directly accessible from the internet. This mode is recommended for production deployments.Note
AWS NAT Gateway resources incur additional AWS infrastructure charges.
For more details about these AWS networking concepts, please refer to the Public and Private Subnets and NAT Gateway documentation.
To create this subnet, you must:
Ensure that a VPC is already created in your AWS account. For detailed steps, please refer to the Create a VPC guide.
Ensure that an Internet Gateway is attached to your VPC. For detailed steps, please refer to the Attach an Internet Gateway to a VPC guide.
The VPC ID of this VPC will be used in the script below to create and configure the dedicated subnet for the NCache cluster deployment. Therefore, ensure that the same VPC is later used during stack creation.
Create Subnet Using CloudShell Script
Follow the steps below to create and configure a dedicated subnet for the NCache cluster using AWS CloudShell.
From the AWS Console, click the CloudShell icon available in the top navigation bar.
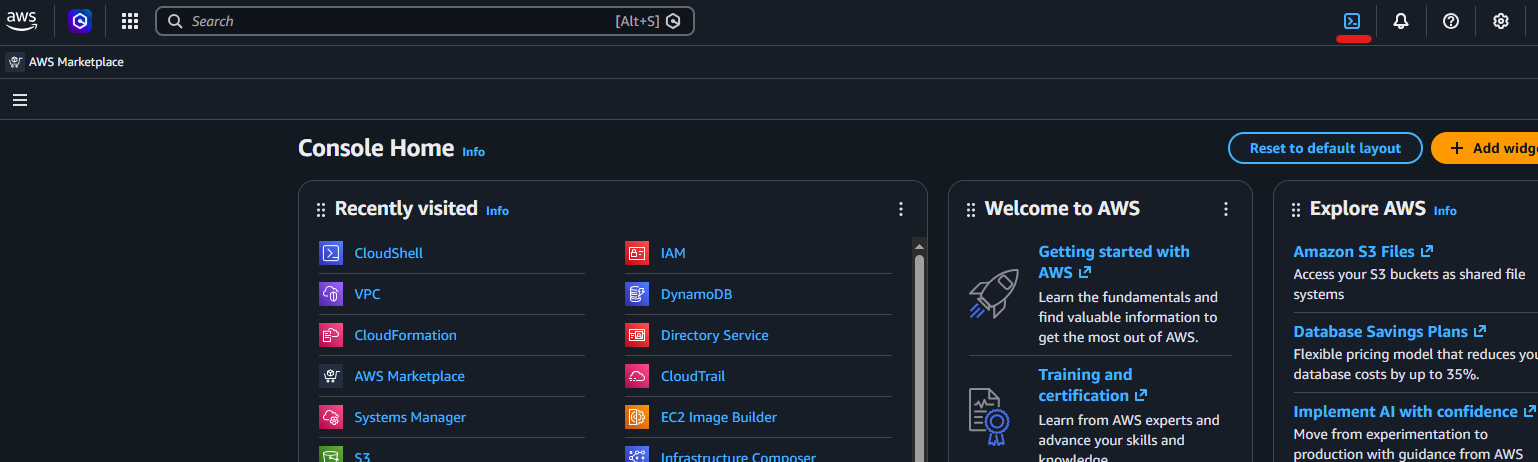
Once CloudShell opens, enter the
pwshcommand to switch to PowerShell. AWS CloudShell already includes the AWS CLI and required permissions for executing the script.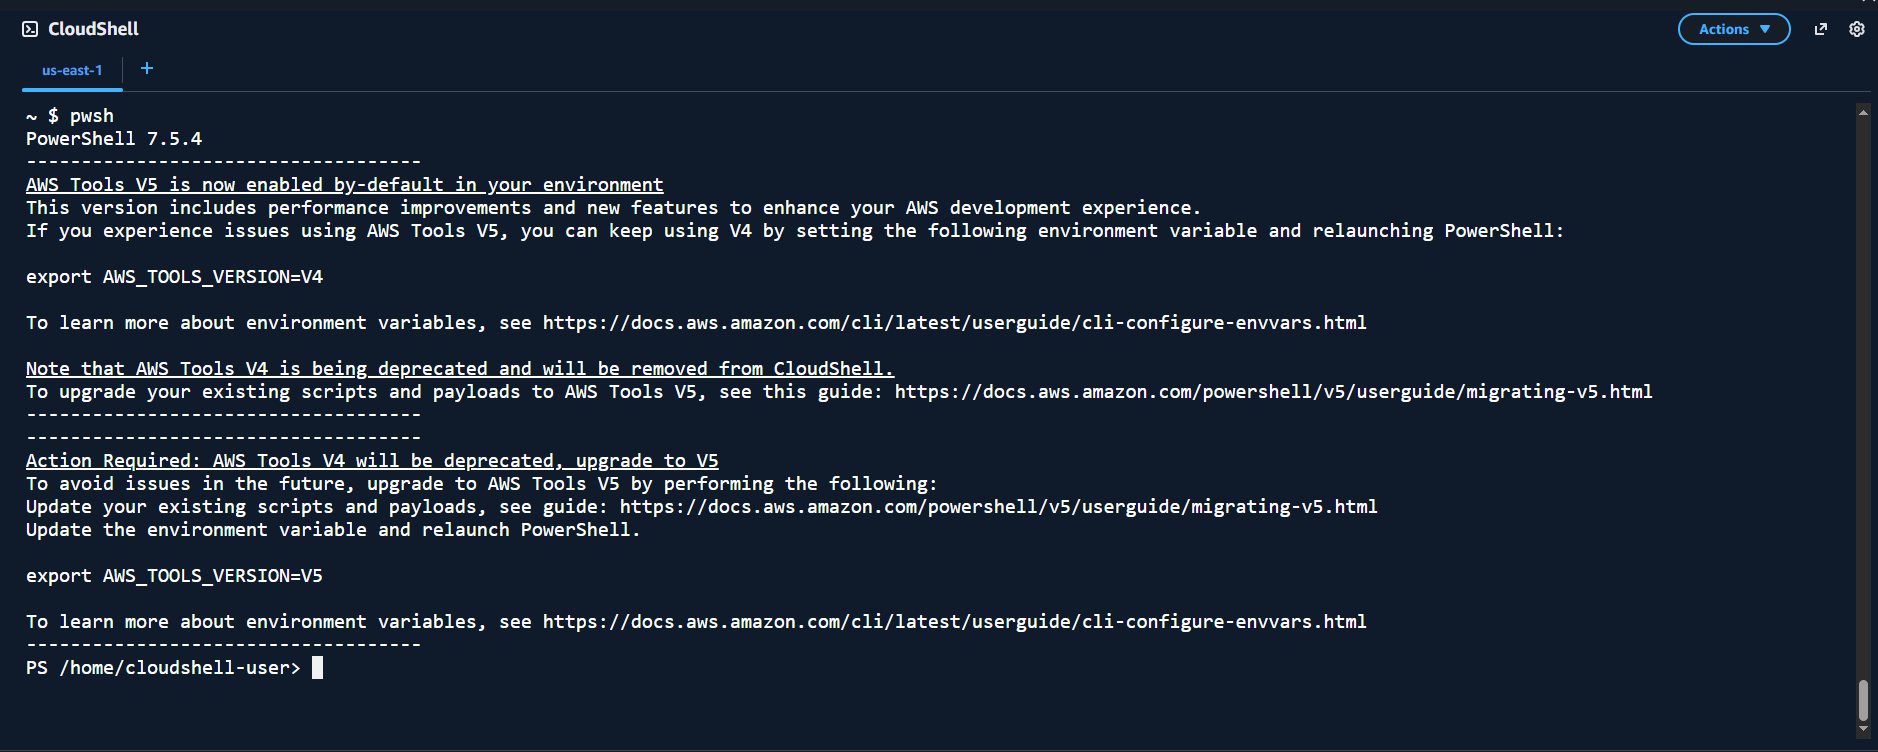
Before executing the script in CloudShell, update the following parameters according to your environment, and then copy and execute the full script:
$VPC_ID: Specify the ID of the VPC created earlier. The NCache subnet will be created within this VPC.
$AWS_REGION: Specify the AWS region in which the resources will be created. This must match the region where your VPC exists.
$AVAILABILITY_ZONE: Specify the Availability Zone within the selected region where the subnet will be created.
$NCACHE_SUBNET_CIDR: Define the CIDR block for the dedicated NCache subnet. This range should not overlap with any existing subnet in the selected VPC.
$PUBLIC_IP: Set this to
"yes"if you want the NCache subnet to be public and automatically assign public IP addresses to launched instances. Set it to"no"if you want a private NCache subnet with outbound internet access through a NAT Gateway.$NAT_PUBLIC_SUBNET_CIDR: Specify the CIDR block for the NAT Gateway public subnet. This value is only used when $PUBLIC_IP is set to
"no".
The script below automatically prepares the networking environment required for the NCache cluster deployment within your selected VPC. Based on the value configured for
$PUBLIC_IP, the script can create either a public subnet with direct internet access or a private subnet with outbound internet connectivity through a NAT Gateway.During execution, the script performs tasks such as:
- Validates that an Internet Gateway is attached to the selected VPC
- Creates the dedicated
ncache-subnetrequired for deployment - Configures route tables and internet routing
- Optionally creates NAT Gateway resources and Elastic IPs for private deployments
- Automatically configures the subnet so that the NCache CloudFormation template can discover and use it during deployment
The script also validates existing resources and reuses them where applicable to avoid duplicate subnet or routing creation. Following is the script:
# WHAT THIS SCRIPT DOES:
#   This script prepares your AWS VPC for an NCache cluster deployment. It creates a dedicated subnet named "ncache-subnet" which the NCache CloudFormation template will automatically discover and use.
#   Depending on your choice, it will either:
#
#   [Public Mode]
#     - Create the "ncache-subnet" as a public subnet
#     - Route it to your VPC's Internet Gateway
#     - NCache instances will be assigned public IPs
#     - Recommended for evaluation and dev environments only
#
#   [Private Mode]
#     - Create the "ncache-subnet" as a private subnet
#     - Create a dedicated public subnet for a NAT Gateway
#     - Create the NAT Gateway with an Elastic IP
#     - Route the NCache subnet outbound through the NAT Gateway
#     - NCache instances will have NO public IPs
#     - Recommended for production environments

# =============================================================================
# CONFIGURATION - fill these in before running
# =============================================================================

# Your VPC ID where NCache will be deployed
# Find it at: https://console.aws.amazon.com/vpc/home#/vpcs
$VPC_ID = "vpc-0e7979887f8536279"

# AWS region where your VPC lives
$AWS_REGION = "us-east-1"

# Availability Zone for the NCache subnet
$AVAILABILITY_ZONE = "us-east-1a"

# CIDR block for the NCache subnet
# Must be within your VPC CIDR and not overlap any existing subnets
# Example: if your VPC is 10.0.0.0/24, you could use 10.0.10.0/24
$NCACHE_SUBNET_CIDR = "10.0.0.0/26"

# Do you want NCache instances to have public IPs?
# "yes" = public subnet, instances get public IPs (dev/eval environments)
# "no"  = private subnet, instances go through NAT Gateway (production)
$PUBLIC_IP = "yes"

# [Only used if PUBLIC_IP = "no"]
# CIDR block for the NAT Gateway's dedicated public subnet
$NAT_PUBLIC_SUBNET_CIDR = "10.0.0.64/26"

# =============================================================================

$env:AWS_DEFAULT_REGION = $AWS_REGION

# =============================================================================
# STEP 1 - Find the Internet Gateway attached to the VPC
# =============================================================================
#
# Both public and private modes need an Internet Gateway:
#   - Public mode: the NCache subnet routes directly to the IGW
#   - Private mode: the NAT Gateway's public subnet routes to the IGW
#
# If your VPC does not have one, create and attach one first:
# https://console.aws.amazon.com/vpc/home#/internet-gateways
#
Write-Host "Step 1: Looking up Internet Gateway for VPC $VPC_ID..." -ForegroundColor Yellow

$igwJson = aws ec2 describe-internet-gateways `
    --filters "Name=attachment.vpc-id,Values=$VPC_ID" `
    --query "InternetGateways[0].InternetGatewayId" `
    --output text

if ($igwJson -eq "None" -or [string]::IsNullOrWhiteSpace($igwJson)) {
    Write-Host ""
    Write-Host "ERROR: No Internet Gateway found attached to VPC $VPC_ID." -ForegroundColor Red
    Write-Host "Your VPC needs an Internet Gateway before running this script."
    Write-Host "Create one here: https://console.aws.amazon.com/vpc/home#/internet-gateways"
    exit 1
}

$IGW_ID = $igwJson
Write-Host "Found Internet Gateway: $IGW_ID" -ForegroundColor Green

# =============================================================================
# STEP 2 - Create the dedicated NCache subnet
# =============================================================================
#
# This subnet is named "ncache-subnet" and the NCache CloudFormation template will look it up automatically by this name within your VPC. Do not rename it.
#
Write-Host "Step 2: Checking for existing NCache subnet in VPC $VPC_ID..." -ForegroundColor Yellow

$existingNcacheSubnet = aws ec2 describe-subnets `
    --filters "Name=vpc-id,Values=$VPC_ID" "Name=tag:Name,Values=ncache-subnet" `
    --query "Subnets[0].SubnetId" `
    --output text

if ($existingNcacheSubnet -ne "None" -and -not [string]::IsNullOrWhiteSpace($existingNcacheSubnet)) {
    Write-Host "WARNING: A subnet named 'ncache-subnet' already exists: $existingNcacheSubnet" -ForegroundColor Yellow
    Write-Host "Skipping subnet creation and reusing existing subnet." -ForegroundColor Yellow
    $NCACHE_SUBNET_ID = $existingNcacheSubnet
} else {
    Write-Host "Creating dedicated NCache subnet ($NCACHE_SUBNET_CIDR)..." -ForegroundColor Yellow
    $NCACHE_SUBNET_ID = aws ec2 create-subnet `
        --vpc-id $VPC_ID `
        --cidr-block $NCACHE_SUBNET_CIDR `
        --availability-zone $AVAILABILITY_ZONE `
        --query "Subnet.SubnetId" `
        --output text

    if ([string]::IsNullOrWhiteSpace($NCACHE_SUBNET_ID) -or $NCACHE_SUBNET_ID -eq "None") {
        Write-Host "ERROR: Failed to create NCache subnet. Check CIDR conflicts in your VPC." -ForegroundColor Red
        exit 1
    }

    aws ec2 create-tags `
        --resources $NCACHE_SUBNET_ID `
        --tags Key=Name,Value="ncache-subnet" | Out-Null

    Write-Host "Created NCache subnet: $NCACHE_SUBNET_ID" -ForegroundColor Green
}

if ($PUBLIC_IP -eq "yes") {

    # =========================================================================
    # PUBLIC MODE
    # =========================================================================
    #
    # We create a route table for the NCache subnet and route all outbound traffic (0.0.0.0/0) directly to the Internet Gateway. This makes the subnet public. Instances launched here will be assigned public IPs by the CF template.
    #
    Write-Host "Step 3: Configuring NCache subnet as PUBLIC..." -ForegroundColor Yellow

    $existingNcacheRt = aws ec2 describe-route-tables `
        --filters "Name=vpc-id,Values=$VPC_ID" "Name=tag:Name,Values=ncache-subnet-public-rt" `
        --query "RouteTables[0].RouteTableId" `
        --output text

    if ($existingNcacheRt -ne "None" -and -not [string]::IsNullOrWhiteSpace($existingNcacheRt)) {
        Write-Host "WARNING: Route table 'ncache-subnet-public-rt' already exists: $existingNcacheRt" -ForegroundColor Yellow
        Write-Host "Skipping route table creation." -ForegroundColor Yellow
        $NCACHE_RT_ID = $existingNcacheRt
    } else {
        $NCACHE_RT_ID = aws ec2 create-route-table `
            --vpc-id $VPC_ID `
            --query "RouteTable.RouteTableId" `
            --output text

        aws ec2 create-tags `
            --resources $NCACHE_RT_ID `
            --tags Key=Name,Value="ncache-subnet-public-rt" | Out-Null

        aws ec2 create-route `
            --route-table-id $NCACHE_RT_ID `
            --destination-cidr-block "0.0.0.0/0" `
            --gateway-id $IGW_ID | Out-Null

        aws ec2 associate-route-table `
            --subnet-id $NCACHE_SUBNET_ID `
            --route-table-id $NCACHE_RT_ID | Out-Null

        Write-Host "NCache subnet is now public (routed to IGW)" -ForegroundColor Green
    }
} else {

    # =========================================================================
    # PRIVATE MODE - Full NAT Stack
    # =========================================================================
    #
    # We create:
    #   1. A dedicated public subnet for the NAT Gateway
    #   2. A route table for that public subnet pointing to the IGW
    #   3. An Elastic IP for the NAT Gateway
    #   4. The NAT Gateway itself in the public subnet
    #   5. A private route table for the NCache subnet pointing to the NAT GW
    #
    # The NCache instances get outbound internet access for licensing through the NAT Gateway but are not reachable from the internet inbound.
    #

    # -------------------------------------------------------------------------
    # Step 3 - Create the NAT Gateway's dedicated public subnet
    # -------------------------------------------------------------------------
    #
    # The NAT Gateway must live in a PUBLIC subnet (one with an IGW route). It is separate from the NCache subnet and only exists to host the NAT GW.
    #
    Write-Host "Step 3: Checking for existing NAT public subnet..." -ForegroundColor Yellow

    $existingNatSubnet = aws ec2 describe-subnets `
        --filters "Name=vpc-id,Values=$VPC_ID" "Name=tag:Name,Values=ncache-nat-public-subnet" `
        --query "Subnets[0].SubnetId" `
        --output text

    if ($existingNatSubnet -ne "None" -and -not [string]::IsNullOrWhiteSpace($existingNatSubnet)) {
        Write-Host "WARNING: NAT public subnet already exists: $existingNatSubnet. Reusing." -ForegroundColor Yellow
        $NAT_PUBLIC_SUBNET_ID = $existingNatSubnet
    } else {
        Write-Host "Creating dedicated public subnet for NAT Gateway ($NAT_PUBLIC_SUBNET_CIDR)..." -ForegroundColor Yellow
        $NAT_PUBLIC_SUBNET_ID = aws ec2 create-subnet `
            --vpc-id $VPC_ID `
            --cidr-block $NAT_PUBLIC_SUBNET_CIDR `
            --availability-zone $AVAILABILITY_ZONE `
            --query "Subnet.SubnetId" `
            --output text

        if ([string]::IsNullOrWhiteSpace($NAT_PUBLIC_SUBNET_ID) -or $NAT_PUBLIC_SUBNET_ID -eq "None") {
            Write-Host "ERROR: Failed to create NAT public subnet. Check CIDR conflicts in your VPC." -ForegroundColor Red
            exit 1
        }

        aws ec2 create-tags `
            --resources $NAT_PUBLIC_SUBNET_ID `
            --tags Key=Name,Value="ncache-nat-public-subnet" | Out-Null

        Write-Host "Created NAT public subnet: $NAT_PUBLIC_SUBNET_ID" -ForegroundColor Green
    }

    # -------------------------------------------------------------------------
    # Step 4 - Create route table for NAT public subnet and route to IGW
    # -------------------------------------------------------------------------
    #
    # This makes the NAT Gateway's subnet public so the NAT GW itself can reach the internet and forward outbound traffic from the NCache subnet.
    #
    Write-Host "Step 4: Checking for existing NAT public route table..." -ForegroundColor Yellow

    $existingNatRt = aws ec2 describe-route-tables `
        --filters "Name=vpc-id,Values=$VPC_ID" "Name=tag:Name,Values=ncache-nat-public-rt" `
        --query "RouteTables[0].RouteTableId" `
        --output text

    if ($existingNatRt -ne "None" -and -not [string]::IsNullOrWhiteSpace($existingNatRt)) {
        Write-Host "WARNING: NAT public route table already exists: $existingNatRt. Reusing." -ForegroundColor Yellow
        $NAT_PUBLIC_RT_ID = $existingNatRt
    } else {
        $NAT_PUBLIC_RT_ID = aws ec2 create-route-table `
            --vpc-id $VPC_ID `
            --query "RouteTable.RouteTableId" `
            --output text

        aws ec2 create-tags `
            --resources $NAT_PUBLIC_RT_ID `
            --tags Key=Name,Value="ncache-nat-public-rt" | Out-Null

        aws ec2 create-route `
            --route-table-id $NAT_PUBLIC_RT_ID `
            --destination-cidr-block "0.0.0.0/0" `
            --gateway-id $IGW_ID | Out-Null

        aws ec2 associate-route-table `
            --subnet-id $NAT_PUBLIC_SUBNET_ID `
            --route-table-id $NAT_PUBLIC_RT_ID | Out-Null

        Write-Host "NAT public subnet is now routed to IGW" -ForegroundColor Green
    }

    # -------------------------------------------------------------------------
    # Step 5 - Allocate an Elastic IP and create the NAT Gateway
    # -------------------------------------------------------------------------
    #
    # The NAT Gateway needs a static public IP (Elastic IP) to communicate with the internet. This EIP will appear in your AWS bill as a separate resource. NAT Gateway itself also has an hourly charge (~$32/month).
    #
    # The NAT Gateway is placed in the public subnet created above, NOT in the NCache subnet. This is intentional - the NAT GW acts as the bridge between the private NCache subnet and the internet.
    #
    Write-Host "Step 5: Checking for existing NAT Gateway..." -ForegroundColor Yellow

    $existingNatGw = aws ec2 describe-nat-gateways `
        --filter "Name=vpc-id,Values=$VPC_ID" "Name=tag:Name,Values=ncache-nat-gateway" "Name=state,Values=available,pending" `
        --query "NatGateways[0].NatGatewayId" `
        --output text

    if ($existingNatGw -ne "None" -and -not [string]::IsNullOrWhiteSpace($existingNatGw)) {
        Write-Host "WARNING: NAT Gateway already exists: $existingNatGw. Reusing." -ForegroundColor Yellow
        $NAT_GW_ID = $existingNatGw
        $EIP_ALLOCATION_ID = aws ec2 describe-nat-gateways `
            --nat-gateway-ids $NAT_GW_ID `
            --query "NatGateways[0].NatGatewayAddresses[0].AllocationId" `
            --output text
    } else {
        Write-Host "Allocating Elastic IP and creating NAT Gateway..." -ForegroundColor Yellow
        Write-Host "(This may take 1-2 minutes)" -ForegroundColor Gray

        $EIP_ALLOCATION_ID = aws ec2 allocate-address `
            --domain vpc `
            --query "AllocationId" `
            --output text

        aws ec2 create-tags `
            --resources $EIP_ALLOCATION_ID `
            --tags Key=Name,Value="ncache-nat-eip" | Out-Null

        $NAT_GW_ID = aws ec2 create-nat-gateway `
            --subnet-id $NAT_PUBLIC_SUBNET_ID `
            --allocation-id $EIP_ALLOCATION_ID `
            --query "NatGateway.NatGatewayId" `
            --output text

        if ([string]::IsNullOrWhiteSpace($NAT_GW_ID) -or $NAT_GW_ID -eq "None") {
            Write-Host "ERROR: Failed to create NAT Gateway." -ForegroundColor Red
            exit 1
        }

        aws ec2 create-tags `
            --resources $NAT_GW_ID `
            --tags Key=Name,Value="ncache-nat-gateway" | Out-Null

        Write-Host "Waiting for NAT Gateway to become available..." -ForegroundColor Gray
        aws ec2 wait nat-gateway-available --nat-gateway-ids $NAT_GW_ID
        Write-Host "NAT Gateway is ready: $NAT_GW_ID" -ForegroundColor Green
    }

    # -------------------------------------------------------------------------
    # Step 6 - Create private route table for NCache subnet and route to NAT GW
    # -------------------------------------------------------------------------
    #
    # This route table makes the NCache subnet private - outbound traffic goes through the NAT Gateway (so instances can reach the internet for licensing) but no inbound traffic from the internet can reach the instances directly.
    #
    # We create a dedicated route table rather than modifying any existing ones to avoid accidentally affecting other subnets in your VPC.
    #
    Write-Host "Step 6: Checking for existing private route table for NCache subnet..." -ForegroundColor Yellow

    $existingPrivateRt = aws ec2 describe-route-tables `
        --filters "Name=vpc-id,Values=$VPC_ID" "Name=tag:Name,Values=ncache-subnet-private-rt" `
        --query "RouteTables[0].RouteTableId" `
        --output text

    if ($existingPrivateRt -ne "None" -and -not [string]::IsNullOrWhiteSpace($existingPrivateRt)) {
        Write-Host "WARNING: Private route table already exists: $existingPrivateRt. Reusing." -ForegroundColor Yellow
        $NCACHE_PRIVATE_RT_ID = $existingPrivateRt
    } else {
        $NCACHE_PRIVATE_RT_ID = aws ec2 create-route-table `
            --vpc-id $VPC_ID `
            --query "RouteTable.RouteTableId" `
            --output text

        aws ec2 create-tags `
            --resources $NCACHE_PRIVATE_RT_ID `
            --tags Key=Name,Value="ncache-subnet-private-rt" | Out-Null

        aws ec2 create-route `
            --route-table-id $NCACHE_PRIVATE_RT_ID `
            --destination-cidr-block "0.0.0.0/0" `
            --nat-gateway-id $NAT_GW_ID | Out-Null

        aws ec2 associate-route-table `
            --subnet-id $NCACHE_SUBNET_ID `
            --route-table-id $NCACHE_PRIVATE_RT_ID | Out-Null

        Write-Host "NCache subnet is now private (routed through NAT Gateway)" -ForegroundColor Green
    }
}

Write-Host "Your NCache subnet 'ncache-subnet' is ready in VPC $VPC_ID. The CF template will automatically discover 'ncache-subnet' within your VPC and deploy the NCache cluster into it."

if ($PUBLIC_IP -eq "no") {
    Write-Host "Resources created:" -ForegroundColor Gray
    Write-Host "  NCache subnet (private):  $NCACHE_SUBNET_ID" -ForegroundColor Gray
    Write-Host "  NAT public subnet:         $NAT_PUBLIC_SUBNET_ID" -ForegroundColor Gray
    Write-Host "  NAT Gateway:               $NAT_GW_ID" -ForegroundColor Gray
    Write-Host "  Elastic IP:                $EIP_ALLOCATION_ID" -ForegroundColor Gray
    Write-Host ""
    Write-Host "NOTE: The NAT Gateway incurs an hourly charge (~`$32/month) plus data transfer costs. It will remain running until you delete it or delete the NCache CF stack." -ForegroundColor Yellow
} else {
    Write-Host "Resources created:" -ForegroundColor Gray
    Write-Host "  NCache subnet (public):  $NCACHE_SUBNET_ID" -ForegroundColor Gray
}

Write-Host ""
After successful execution, the script creates a dedicated subnet named ncache-subnet within the specified VPC. You can verify the created subnet by navigating to AWS Console → VPC → Subnets and locating the subnet under the selected VPC.

Manual Subnet Configuration
The CloudShell script is the recommended method because it automatically creates and configures the subnet required for NCache deployment. However, you can also configure the subnet manually from the AWS Console.
To create the subnet manually:
Navigate to AWS Console → VPC → Subnets and click Create subnet.
Select the VPC where the NCache cluster will be deployed.
Create a subnet named ncache-subnet.
Important
The subnet name must be ncache-subnet because the NCache CloudFormation template automatically discovers the subnet by this name within the selected VPC.
Specify an Availability Zone and a valid IPv4 CIDR block that does not overlap with any existing subnet in the VPC. Ensure that the subnet is created in the same AWS region that will later be used during stack creation.
Configure internet access based on your deployment requirement:
For a public subnet, associate the subnet with a route table that has a route to the Internet Gateway (
0.0.0.0/0 → Internet Gateway). Enable public IP assignment if instances need public IPs.For a private subnet, create or use a NAT Gateway in a public subnet, and associate the NCache subnet with a route table that routes outbound traffic through the NAT Gateway (
0.0.0.0/0 → NAT Gateway).
After creating and configuring the subnet, verify it from AWS Console → VPC → Subnets.
For detailed AWS steps, refer to the Create a subnet, Configure route tables, and NAT Gateway guides.
Create CloudFormation Stack
After completing the prerequisite configuration, follow the steps below to create the CloudFormation stack for the NCache cluster deployment.
Step 1: Prepare Template
At this step, AWS CloudFormation prepares the deployment template that will be used to provision the NCache Cloud environment. A CloudFormation template defines the AWS resources, networking configuration, storage settings, and deployment logic required for the NCache cluster.
Under the Prerequisite - Prepare template section, AWS allows you to either use the template already associated with the Marketplace offer or provide your own template file. It is recommended to proceed with Choose an existing template so that the template already provided with the NCache Cloud offer is used, as shown below.
Note
A template file is a JSON or YAML file used by AWS CloudFormation to define the resources and configuration required for deployment. It describes what AWS resources will be created and how they will be configured.
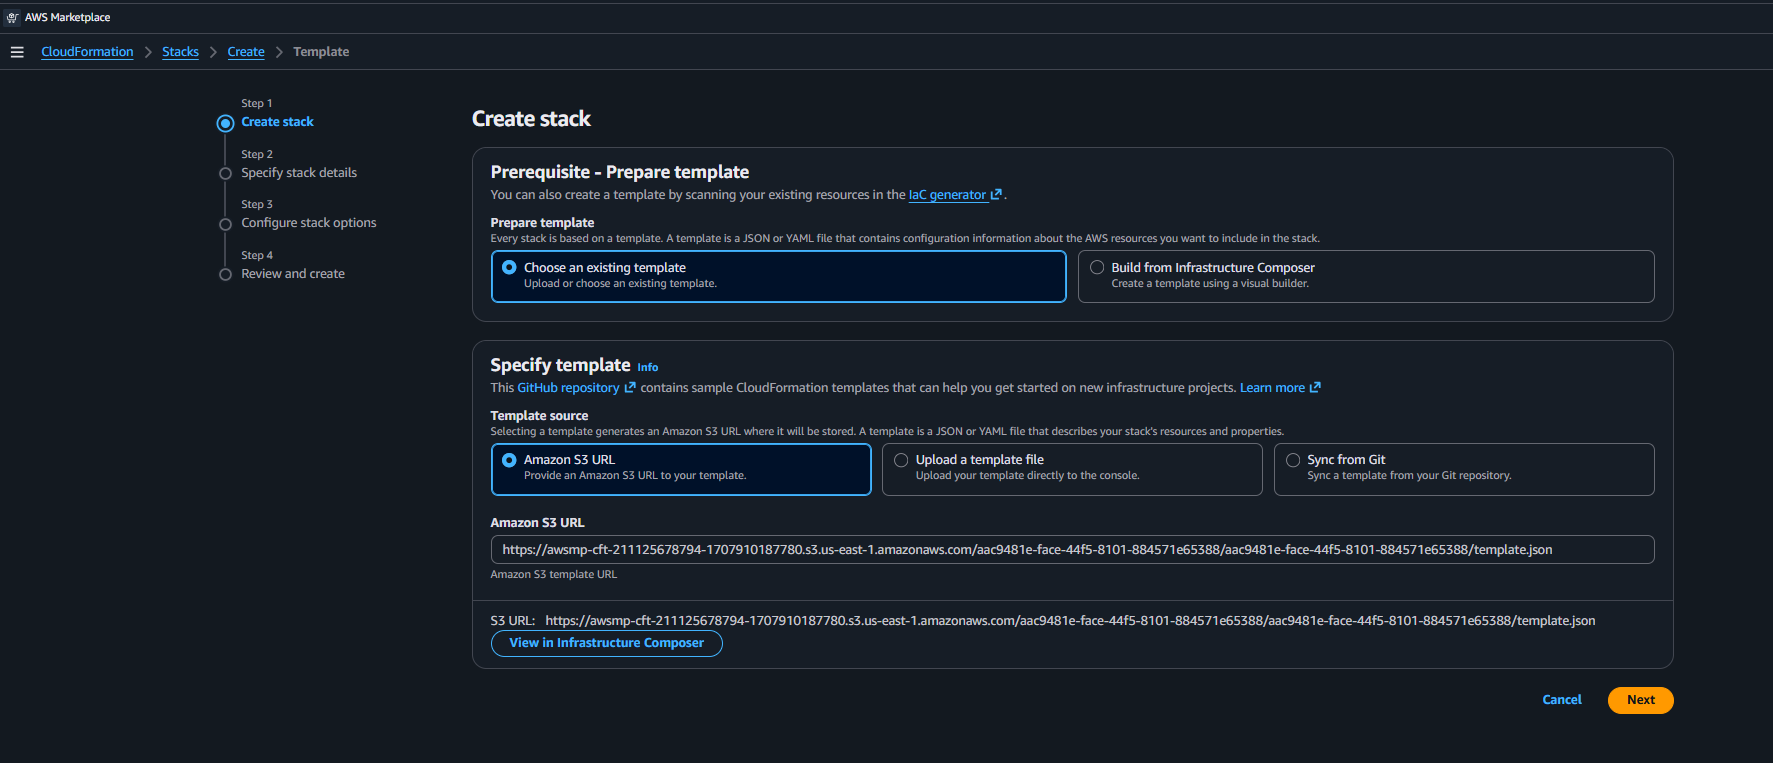
Under the Specify template section, you can choose one of the following options:
- Amazon S3 URL to use the template already uploaded by AWS Marketplace
- Upload a template file to use your own template
- Sync from Git to use a template stored in a Git repository
Although all three options are available, it is recommended to use the Amazon S3 URL already provided with the Marketplace offer. After reviewing the template source, click Next to proceed to the Specify stack details page.
Step 2: Specify Stack Details
At this step, you provide the deployment and environment-specific configuration that AWS CloudFormation will use while provisioning the NCache cluster. This includes user information, networking configuration, server sizing, storage settings, patching preferences, and Marketplace image details required for the deployment.
Follow the sections below to configure the required stack parameters.
On the Specify stack details page, first provide a Stack name. AWS uses this name to create and group all resources associated with the deployment.

After entering the stack name, fill in the values under the Parameters section. These values are used by the CloudFormation template during deployment.
Deployment Details
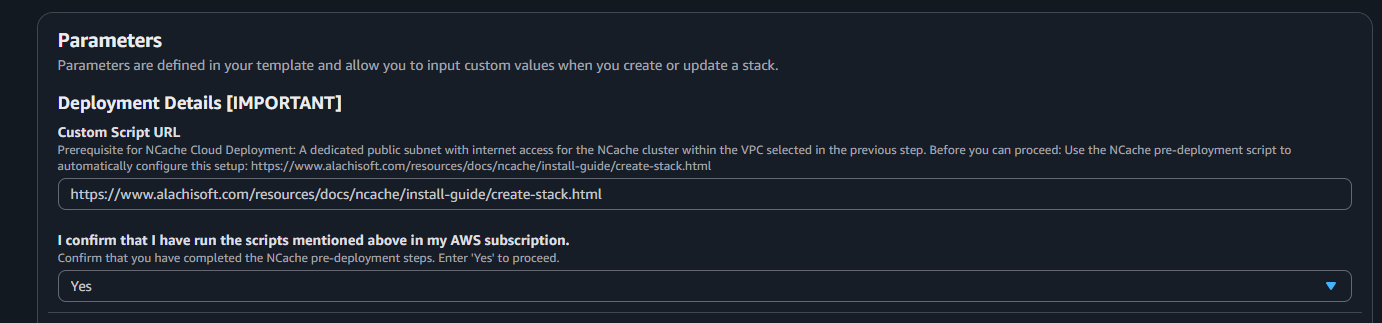
Under Deployment Details [IMPORTANT] section, review the prerequisite deployment information before proceeding.
The Custom Script URL field provides the link to the prerequisite subnet configuration script discussed earlier in the prerequisite section.
Before continuing with the deployment, ensure that the dedicated subnet has already been created and configured either through the provided PowerShell script or manually through the AWS Console, depending on your preferred deployment approach.
Selecting Yes confirms that the prerequisite subnet configuration has already been completed successfully. This dedicated subnet creation step is mandatory for deployment; otherwise, the stack creation process may fail during resource provisioning.
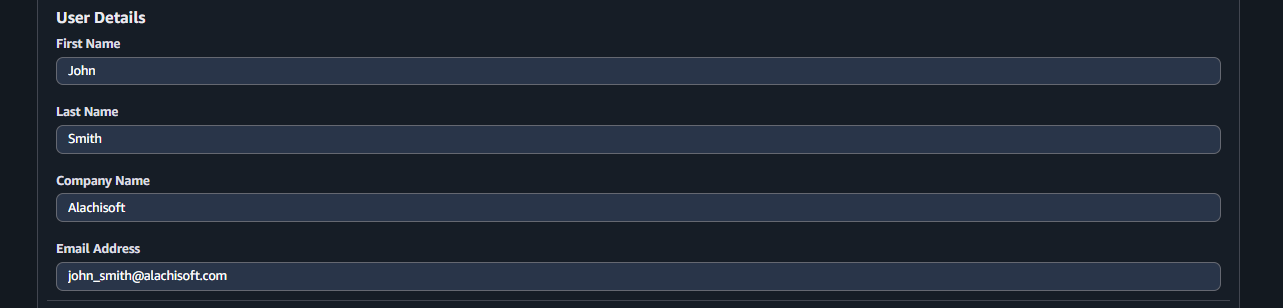
User Details
Under User Details, provide the following information:
- First Name
- Last Name
- Company Name
- Email Address
Environment Details
Under Environment Details, provide the information required for the deployment environment:
Environment Name
Specify the name of the environment. This name is also used as the Auto Scaling Group name.Environment Type
Select the environment type, for example, DEV, Prod, DR, or Staging.EC2 Key Pair
Select an existing EC2 Key Pair. This key pair is used for secure access to the deployed EC2 instances and is required when retrieving the Windows administrator password during RDP connection.NCache Servers
Specify the initial number of NCache server nodes to deploy. This value can later be modified from the Auto Scaling Group settings.Note
During stack creation, you can specify up to 10 servers. If you require more than 10 servers or want to increase the number of nodes after deployment, you can scale the cluster by updating the Auto Scaling Group capacity, as described in the Administrator's Guide.
Important
If TLS or NCache Security is to be enabled, it's recommended to set the initial maximum number of servers to 0. First, create the environment, then enable TLS and NCache security by adding scripts to the user data in the ASG launch template. This will automatically configure TLS and NCache security on all new ASG instances
VPC
Select the VPC in which the deployment will be created. The VPC must already exist and should be the same VPC in which thencache-subnetwas created in the prerequisite section.
Assign Public IP to NCache Instances
Specify whether public IP addresses should be assigned to the deployed NCache instances. Select Yes for evaluation or environments where direct RDP and management access to the instances is required. In this case, the dedicated subnet should be configured as a public subnet. Select No for private deployments where instances should not be directly accessible from the internet. In this case, the dedicated subnet should be configured as a private subnet with outbound internet access through a NAT Gateway. Please refer to the prerequisite section for subnet configuration details.Public IP Allowed CIDR
Specify the CIDR range that is allowed to access the public IP addresses of the deployed instances for RDP and management operations. You can provide a specific IP range or use0.0.0.0/0to allow access from anywhere over the internet.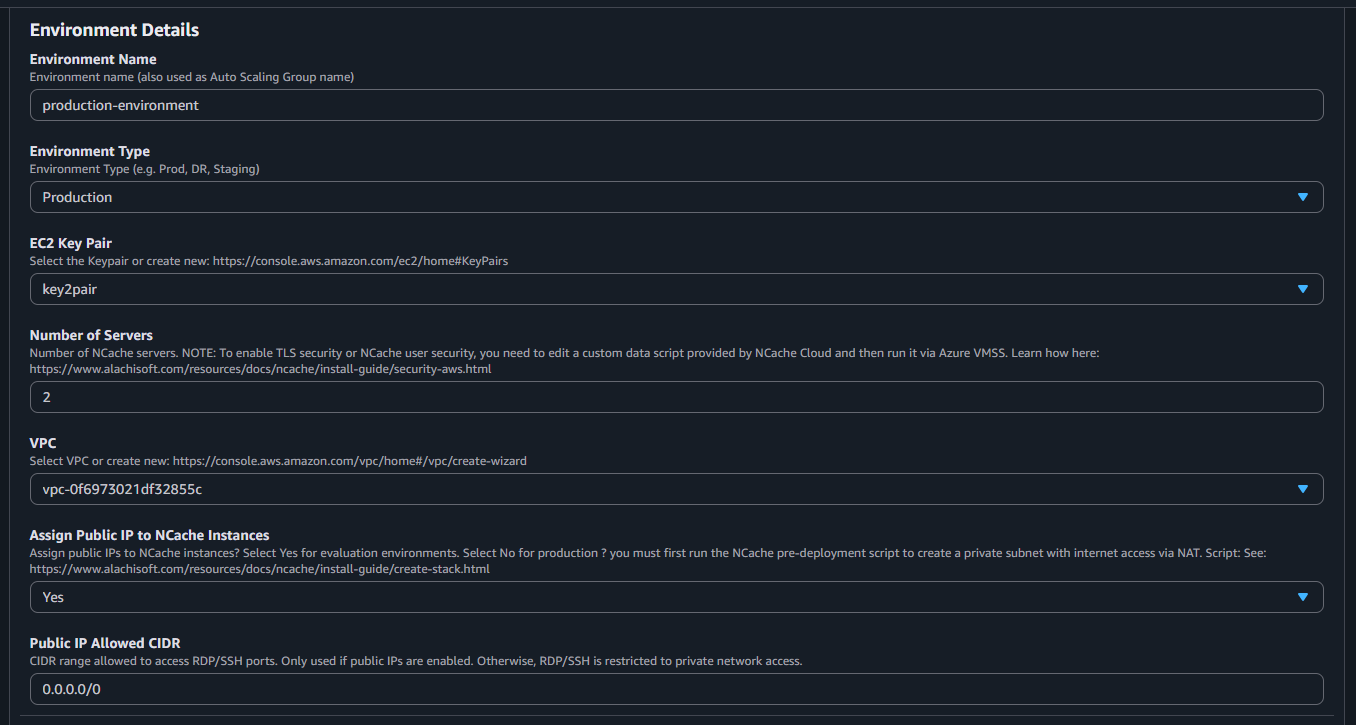
NCache Details
Under NCache Details, select the required NCache Server Plan for the deployment.

Storage Configuration
Under Storage Configuration, specify the following:
Root Disk Size (GiB)
Specify the size of the root volume in GiB.Root Disk Type
Select the volume type for the root disk. Available options include AWS SSD-based volume types such as gp2 and gp3.- gp2: General Purpose SSD volume where performance scales automatically based on the allocated storage size.
- gp3: Newer generation General Purpose SSD volume that provides better price-to-performance and allows independent configuration of storage, and throughput.

Patching Configuration
Under Patching Configuration (SSM Patch Manager), configure the operating system update settings for the deployed instances. AWS uses its built-in AWS Systems Manager Patch Manager service for this purpose.
The available options include:
Enable Patching
Select whether automated operating system patching should be enabled for the deployed instances. If set toYes, AWS creates and uses an SSM maintenance window to apply OS updates based on the selected schedule. If set toNo, automated patching is not configured during deployment.Week of the Month
Specify the week of the month when patching should run. The value represents the monthly occurrence of the selected day. For example,1means the first selected day of the month,2means the second selected day,3means the third selected day, and4means the fourth selected day.Day of the Week
Select the day of the week on which patching should run, such asSUN,MON,TUE, and so on. This value works together with the Week of the Month value to determine the monthly patching day. For example, if Week of the Month is set to3and Day of the Week is set toSUN, patching runs on the third Sunday of the month.Time Zone
Specify the time zone that AWS should use for the patching schedule. For example,Etc/UTCmeans the schedule runs according to Coordinated Universal Time (UTC), which is the standard time reference used by cloud services. If you select another time zone, such asAmerica/New_York,Europe/London, orAsia/Tokyo, AWS runs the patching schedule according to that selected time zone.Hour of the Day (24-hour)
Specify the hour when patching should start, using the 24-hour format. For example,2means patching starts at 02:00 according to the selected time zone.Patching Window Duration
Specify the duration of the maintenance window in hours. This defines how long AWS can continue performing patching operations once the maintenance window starts.Patching Cutoff
Specify how many hours before the end of the maintenance window AWS should stop starting new patching tasks.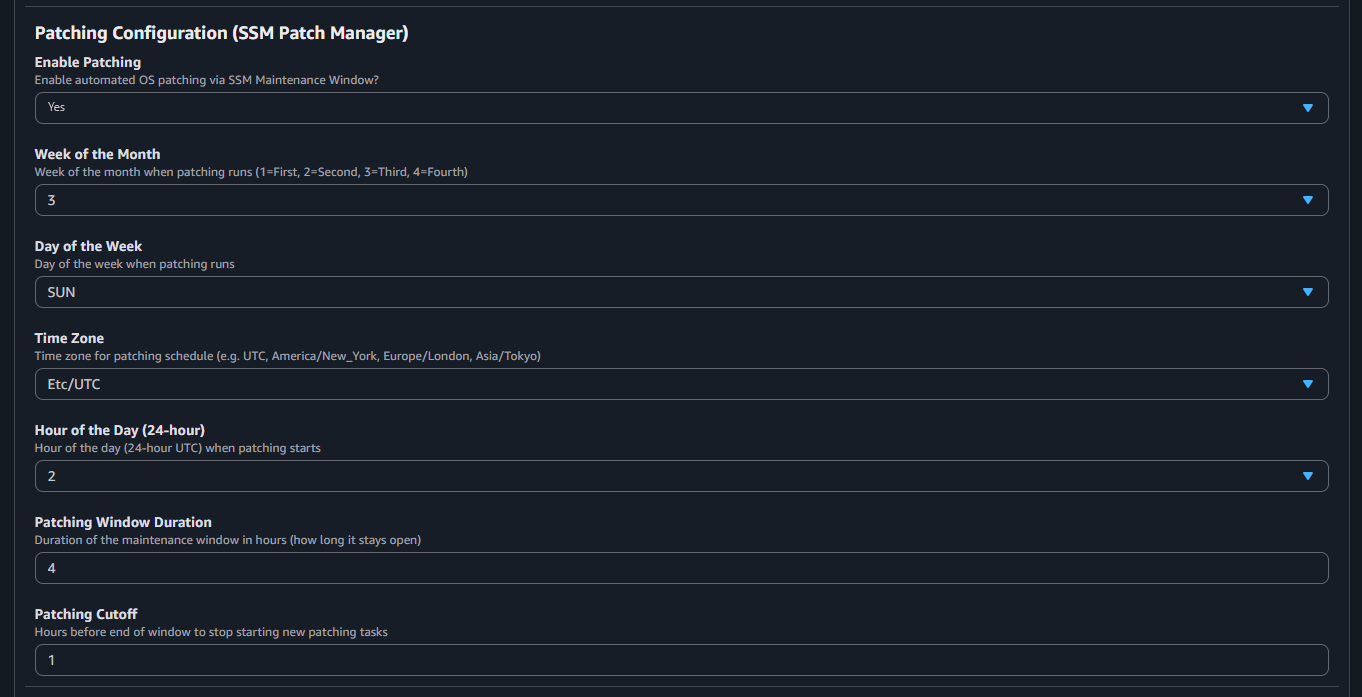
After patching is enabled, AWS automatically performs operating system updates on the deployed instances according to the configured maintenance schedule. To verify whether patching operations are executing successfully and to review update activity, you can view the maintenance window logs generated by AWS Systems Manager. For more details, please refer to the AWS Maintenance Window Logs section.
Marketplace AMI
Under Marketplace AMI, the Amazon Machine Image (AMI) alias required for deployment is already preconfigured.
This AMI contains the operating system, NCache installation, deployment scripts, and configuration required for the selected NCache Cloud Marketplace version.
It is recommended to keep the default value unchanged, since it points to the Marketplace AMI associated with the selected NCache Cloud version.

After carefully entering all required information, click Next to proceed to the Configure stack options page.
Step 3: Configure Stack Options
At this step, AWS CloudFormation allows you to configure additional stack-level settings related to resource organization, permissions, failure handling, and deployment behavior. Most of these settings are optional and can typically be left with their default values unless your environment requires custom configuration.
The available options include:
Tags
Tags are key-value pairs used to organize, categorize, and identify AWS resources associated with the deployment. These tags can help with resource management, automation, monitoring, and cost tracking within your AWS account.Permissions
Allows you to specify an IAM (Identity and Access Management) role that AWS CloudFormation can assume while creating and managing the stack resources. In most cases, this can be left empty and AWS CloudFormation will use the permissions of the currently logged-in AWS account.Stack Failure Options
Defines how AWS CloudFormation should behave if stack provisioning fails during deployment.The available options include:
Roll back all stack resources
AWS automatically deletes or rolls back all resources created during deployment and returns the stack to its previous stable state.Preserve successfully provisioned resources
Keeps successfully created resources even if some resources fail during deployment. This option can help with troubleshooting failed deployments.Delete newly created resources during rollback
Controls whether newly created resources should be deleted during rollback operations.
Additional Settings
AWS CloudFormation also provides advanced optional settings such as notifications, stack policies, rollback triggers, monitoring time periods, and termination protection. These settings are generally used for advanced deployment scenarios and can usually remain unchanged for standard NCache Cloud deployments.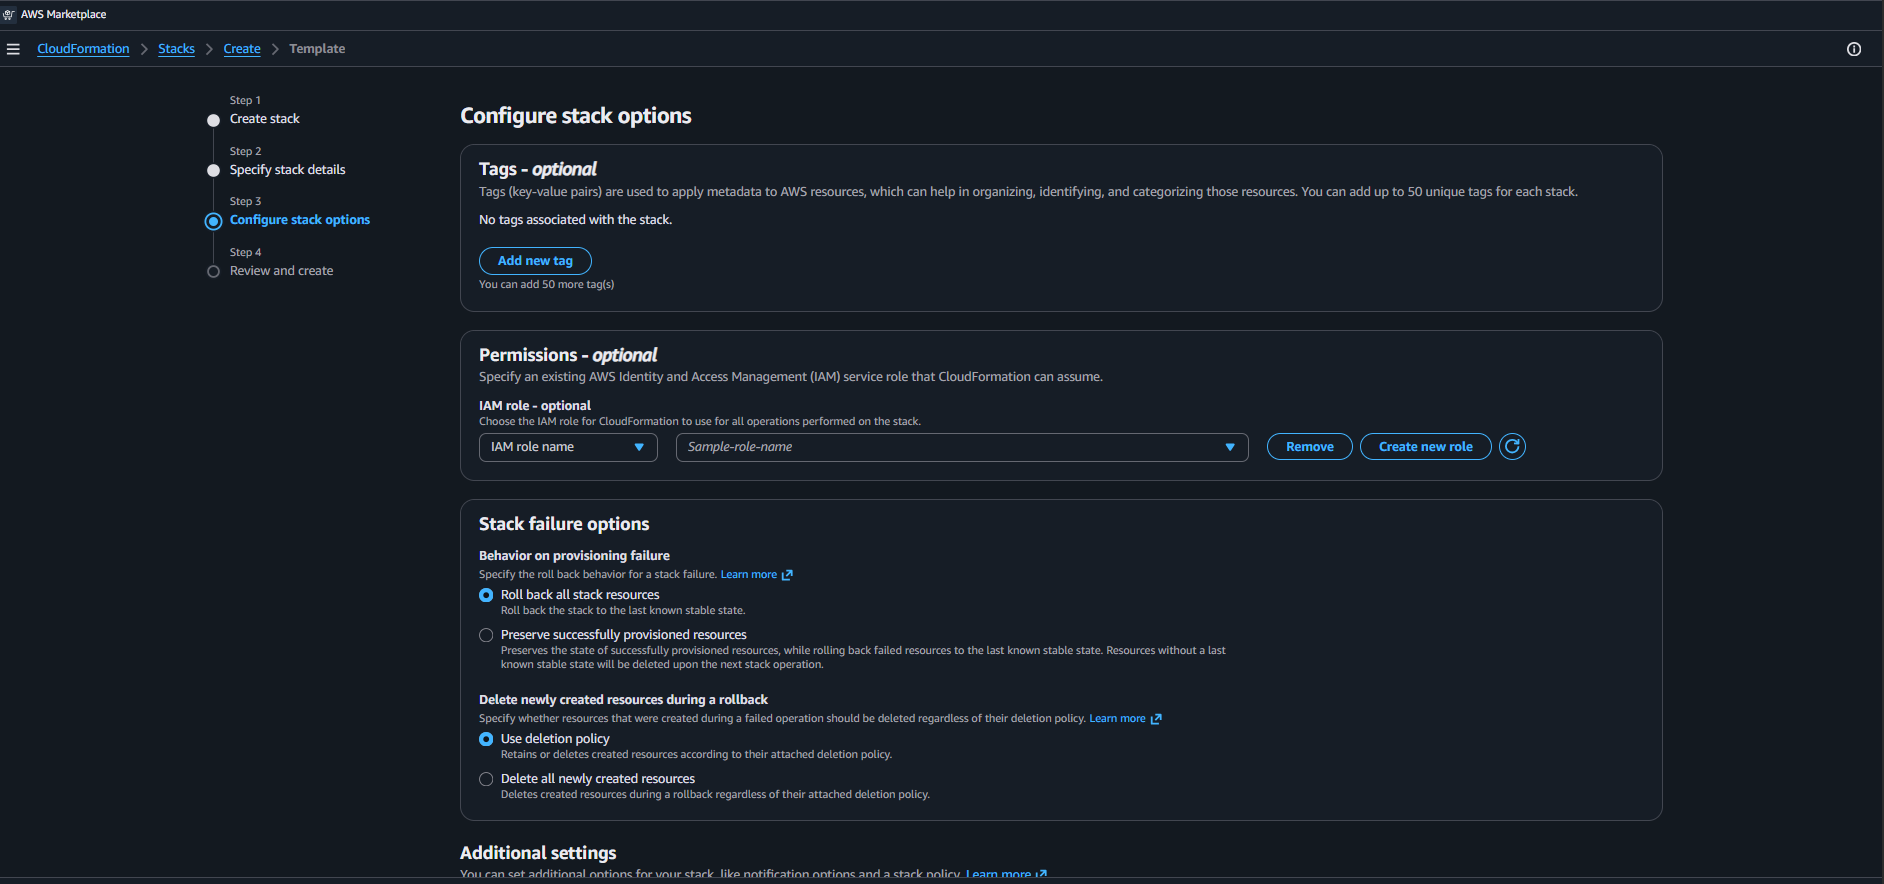
After specifying the required optional settings, review the acknowledgement section and select the checkbox that allows AWS to create the necessary roles, if applicable. These roles enable AWS to provision and manage resources such as CloudWatch dashboards, maintenance windows for OS patching, and their associated logging (logs stored in S3).
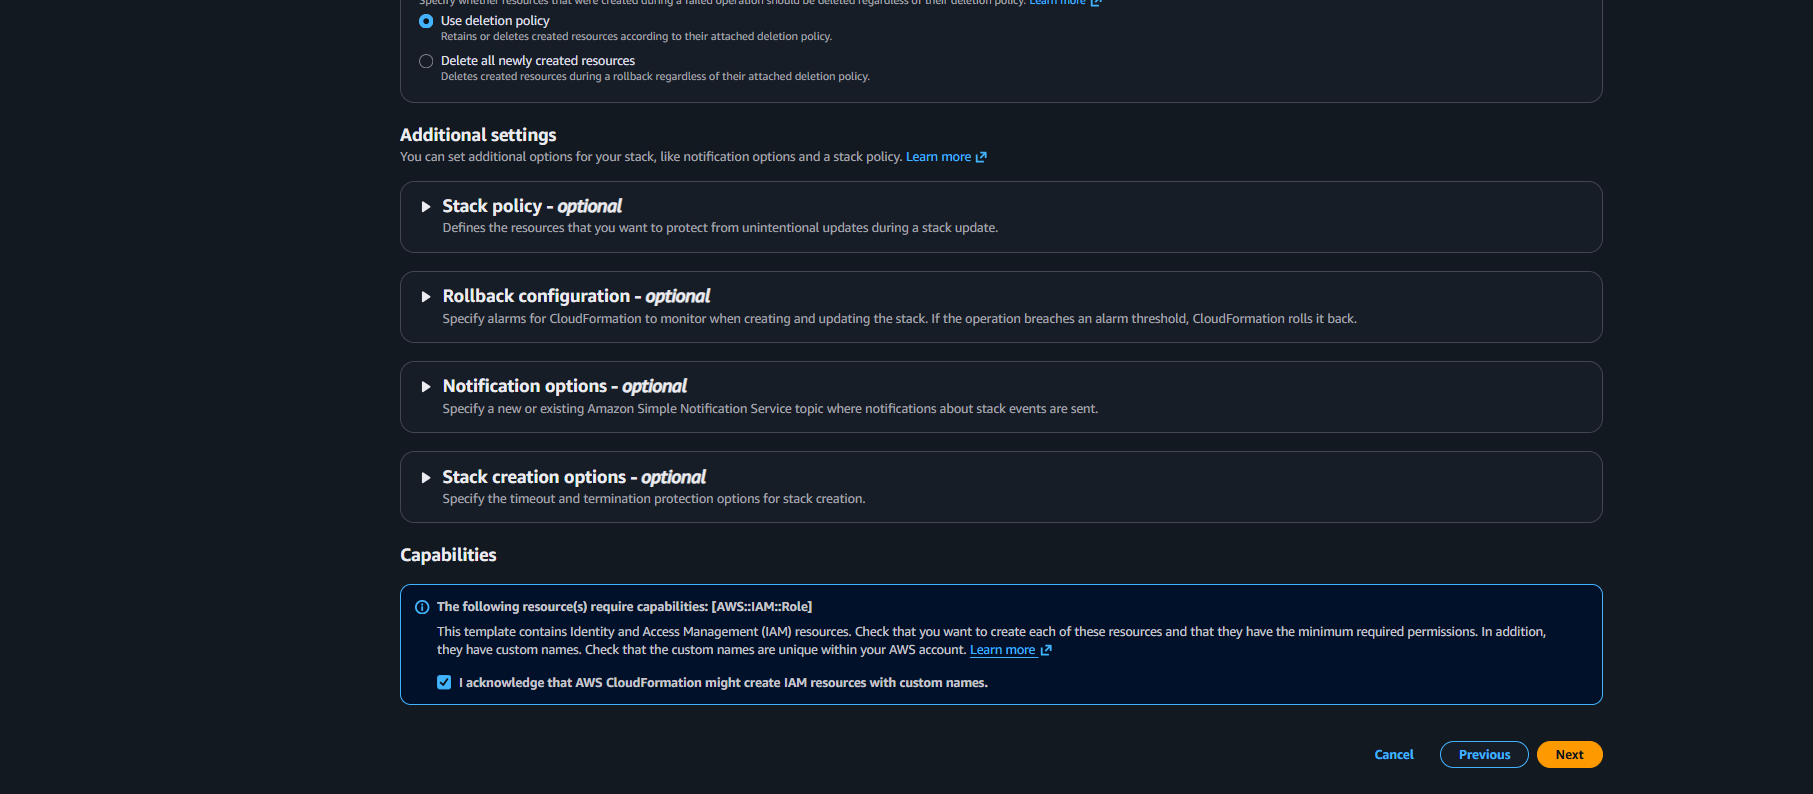
Then click Next to proceed to the Review and create page.
Step 4: Review and Create
On the Review and create page, carefully review all configuration details you have entered for the stack. After verification, click Submit to create the stack. AWS CloudFormation will then begin provisioning the required resources and redirect you to the created stack page.
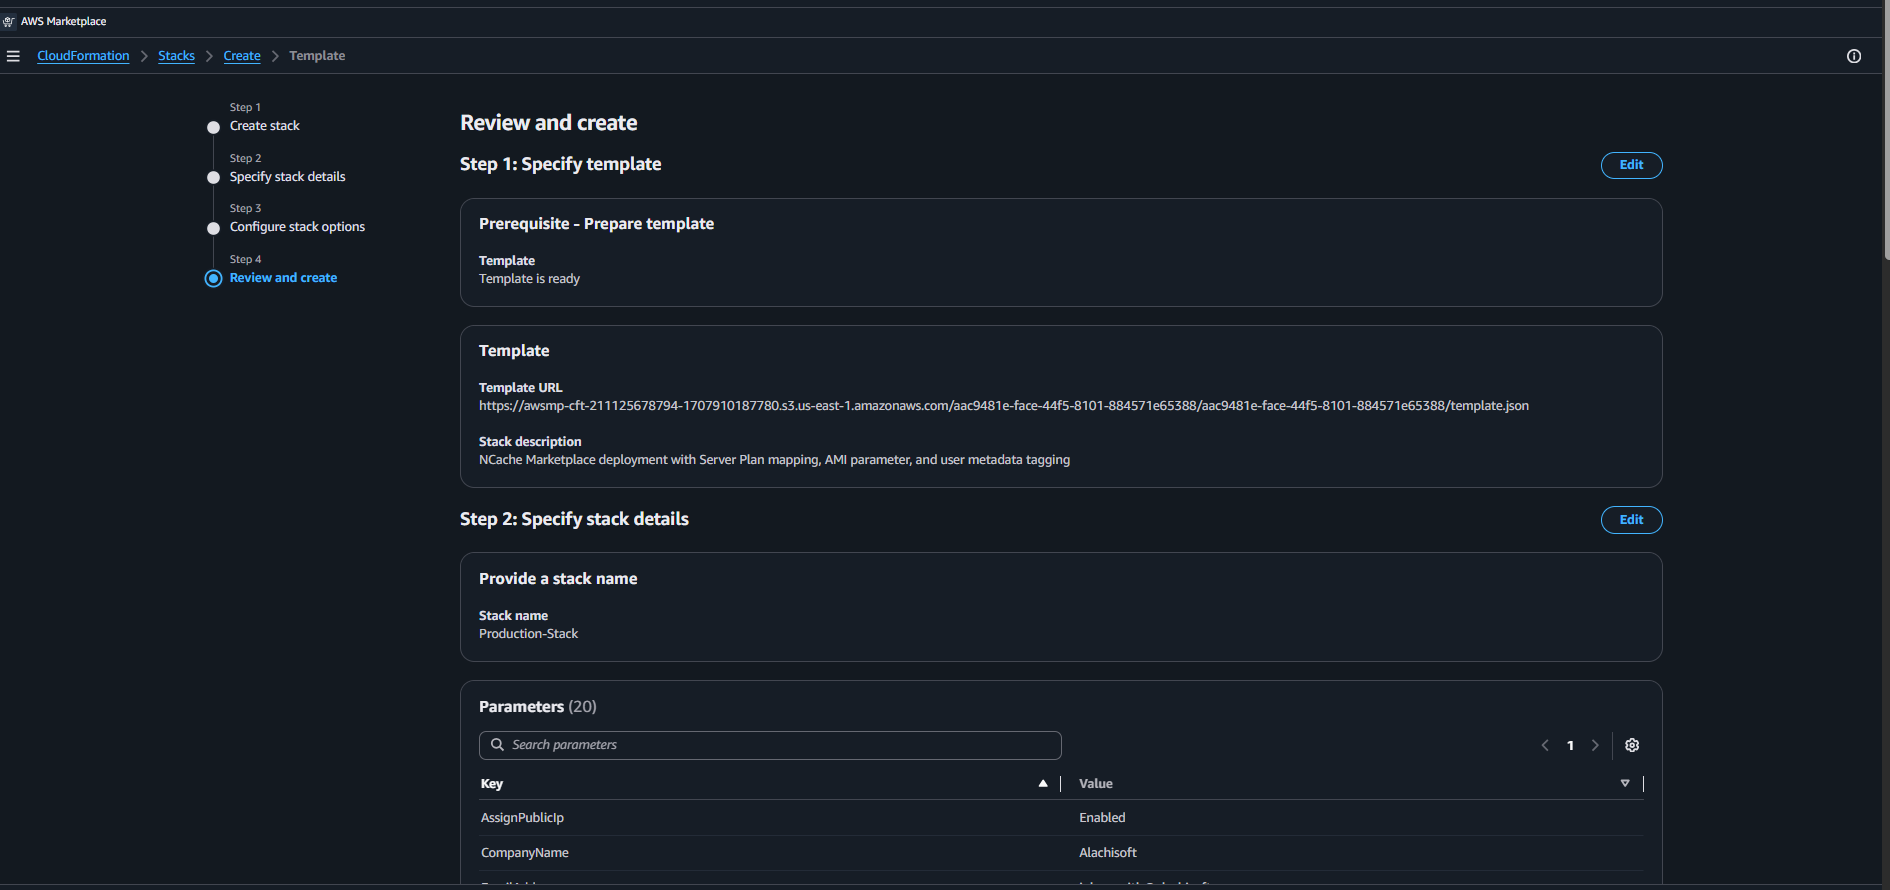
After successfully creating the stack, you are redirected to the Stacks page in AWS CloudFormation. Initially, the stack status appears as CREATE_IN_PROGRESS, and it may take approximately 10 minutes for the deployment and NCache to reach a fully ready state.
Once the deployment is complete, the stack status changes to CREATE_COMPLETE. At this point, the stack details page provides a complete view of all resources created as part of the deployment. You can navigate through various tabs such as:
Stack info
Displays general information about the stack such as stack status, creation time, rollback settings, and deployment summary.Events
Displays real-time deployment events and resource creation progress. This tab is useful for monitoring provisioning activities and troubleshooting deployment issues.Resources
Lists all AWS resources created as part of the deployment, including Auto Scaling Groups, security groups, EC2 resources, IAM roles, and related infrastructure components.Outputs
Displays deployment outputs generated by the CloudFormation template, such as resource identifiers, endpoints, or deployment-related values.Parameters
Displays the parameter values provided during stack creation, including networking, server configuration, and deployment settings.Template
Displays the CloudFormation template used for the deployment.Change sets
Used to preview and manage proposed stack changes before applying updates to the deployment.Git sync
Used for CloudFormation template synchronization with Git repositories, if configured.
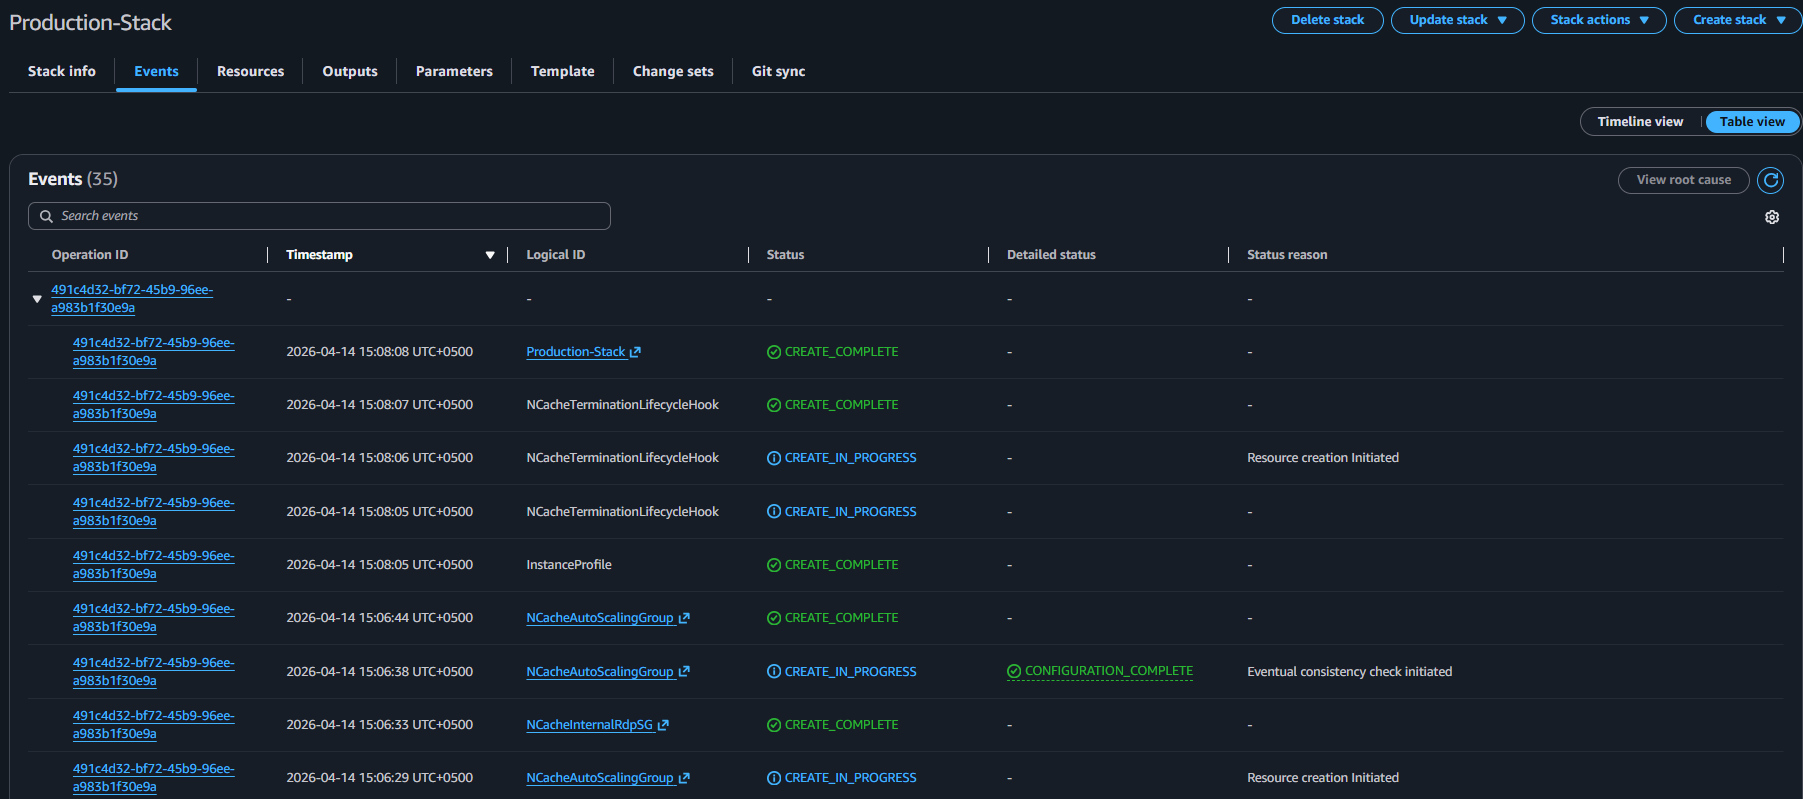
After the deployment is complete and all resources are successfully provisioned, the next step is to connect to one of the deployed instances to access and manage your NCache environment.
Stack Deletion Steps
If you no longer need the deployed environment, you can delete the stack to remove all associated resources. Following are the steps:
Warning
Deleting a stack is irreversible. This action will remove all resources created as part of the deployment.
- Navigate to the AWS Console → CloudFormation → Stacks page.
From the list of stacks, select the stack you want to delete.
From the top-right corner, click Delete stack.

Upon clicking, a confirmation dialog will appear. Enter the stack name to confirm deletion.
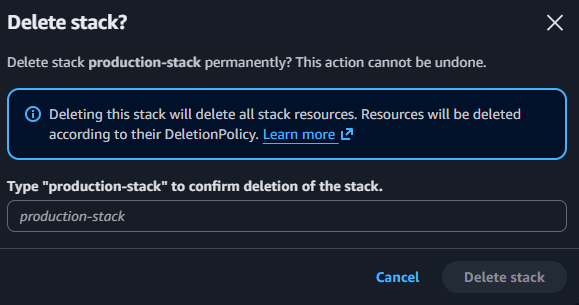
After confirming, the stack status will change to DELETE_IN_PROGRESS.
All resources created by the stack (such as EC2 instances, Auto Scaling Groups, and associated configurations) will be deleted automatically based on their defined policies. Some resources, such as dashboards or externally managed components, may not be deleted automatically and might require manual cleanup.
