Get NCache Cloud from AWS Marketplace
NCache Cloud can be subscribed to and deployed directly from AWS Marketplace using an AWS Auto Scaling Group (ASG) based deployment model. The deployment process uses AWS CloudFormation to automatically provision and configure the AWS infrastructure and NCache server instances required for the environment. Through this deployment process, AWS creates and configures resources such as Amazon EC2 instances, networking components, Auto Scaling Groups, and supporting deployment resources required for the NCache cluster.
This page walks through the process of subscribing to NCache Cloud from AWS Marketplace and launching the CloudFormation deployment workflow for the NCache environment. Follow the steps below to subscribe to and launch NCache Cloud.
Step 1: Navigate to AWS Marketplace
Open the AWS Marketplace and navigate to the Discover products page.
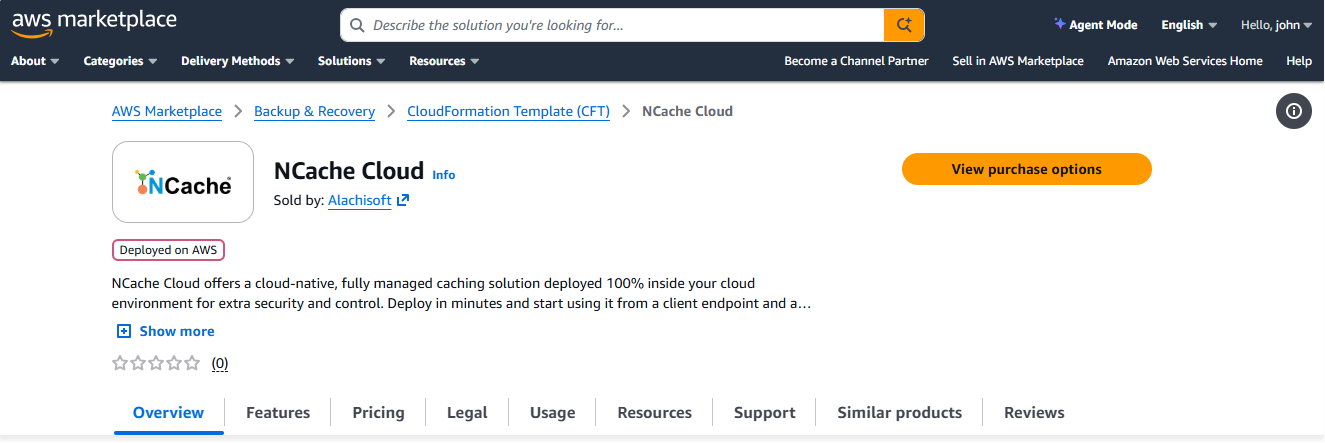
Search for NCache Cloud and select it from the search results. This will take you to the NCache Cloud product overview page in AWS Marketplace.
After reviewing the product offering and details, click View purchase options to proceed. Upon clicking, the Purchase options for NCache Cloud page will appear, where you can review the available offers and pricing details.
Step 2: Subscribe to NCache Cloud
On the Subscribe to NCache Cloud page, review the offer and pricing details carefully before proceeding with the subscription. This page provides information related to:
- Product pricing and recurring subscription cost
- Hourly usage-based billing details
- Estimated taxes and invoice information
- Offer type and offer availability
- AWS Marketplace terms and conditions
- Purchase order configuration options
- Additional AWS infrastructure cost information
The pricing section also explains that AWS Marketplace charges a recurring subscription fee for the product, while AWS infrastructure resources such as Amazon EC2, storage, and networking are billed separately through your AWS subscription.
After reviewing the offer details, click Subscribe from the bottom-right corner of the page to subscribe to the NCache Cloud Marketplace offering
Clicking Subscribe accepts the Marketplace offering and enables the product for deployment within your AWS account.
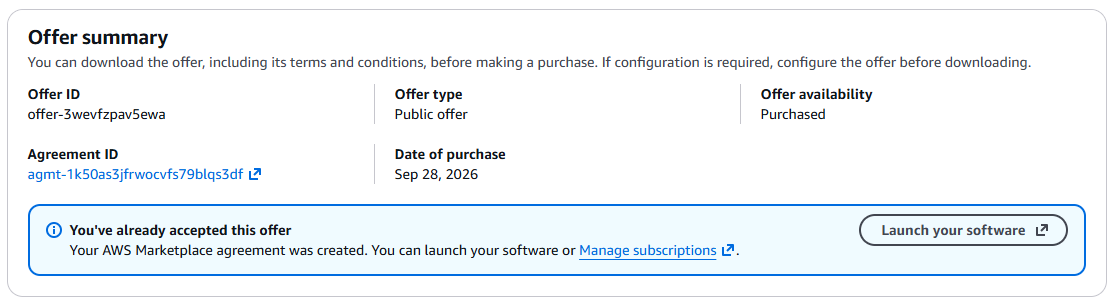
Upon successful subscription, locate the Offer summary on the available page. This section displays deployment-related information such as:
Offer ID Unique identifier assigned by AWS Marketplace to the selected NCache Cloud offering.
Offer Type Specifies the type of Marketplace offer being used, such as a public offer or private offer.
Offer Availability Indicates whether the selected offer is currently available for subscription and deployment.
Agreement ID The unique tracking ID associated with your AWS Marketplace agreement.
Date of purchase The exact date when the subscription or agreement was completed.
From the Offer summary section, click Launch your software to begin the NCache Cloud deployment process.
Step 3: Launch NCache Cloud
Upon clicking Launch your software, the Launch NCache Cloud page will open.
This page displays deployment configuration details required for launching the NCache Cloud environment through AWS Marketplace.
The displayed information includes:
Service
Specifies the AWS deployment service that will be used for provisioning the environment. For NCache Cloud, the deployment uses AWS CloudFormation, which automatically creates and configures the required AWS infrastructure resources.Launch Method
Specifies the deployment mechanism used by the Marketplace offering. This determines how AWS Marketplace initiates the deployment workflow for the selected product.- Available Version
Displays the AWS Marketplace product and template packaging version (e.g., 2.0.2), which manages the deployment automation and CloudFormation configuration release cycle.
- Available Version
CloudFormation template: Allows you to select your preferred licensing model for the stack deployment:
Free Trial: A 30-day evaluation covering all server plans with no software cost, while you pay only for the underlying AWS infrastructure. Ideal for evaluating NCache before purchasing.
Hourly: An on-demand, pay-as-you-go billing model with no license keys or manual registration required. It scales instantly and aligns costs directly with your hourly usage. Ideal for production environments or temporary deployments.
BYOL (Bring Your Own License): Allows you to reuse existing NCache licenses while paying only for the underlying AWS infrastructure. Ideal for existing NCache customers who already own licenses.
Region: Specifies the active AWS geographical region selected in the AWS Management Console where the CloudFormation stack and infrastructure resources will be provisioned. (Ensure your target region is selected in the top-right corner of the AWS Console before launching the template)
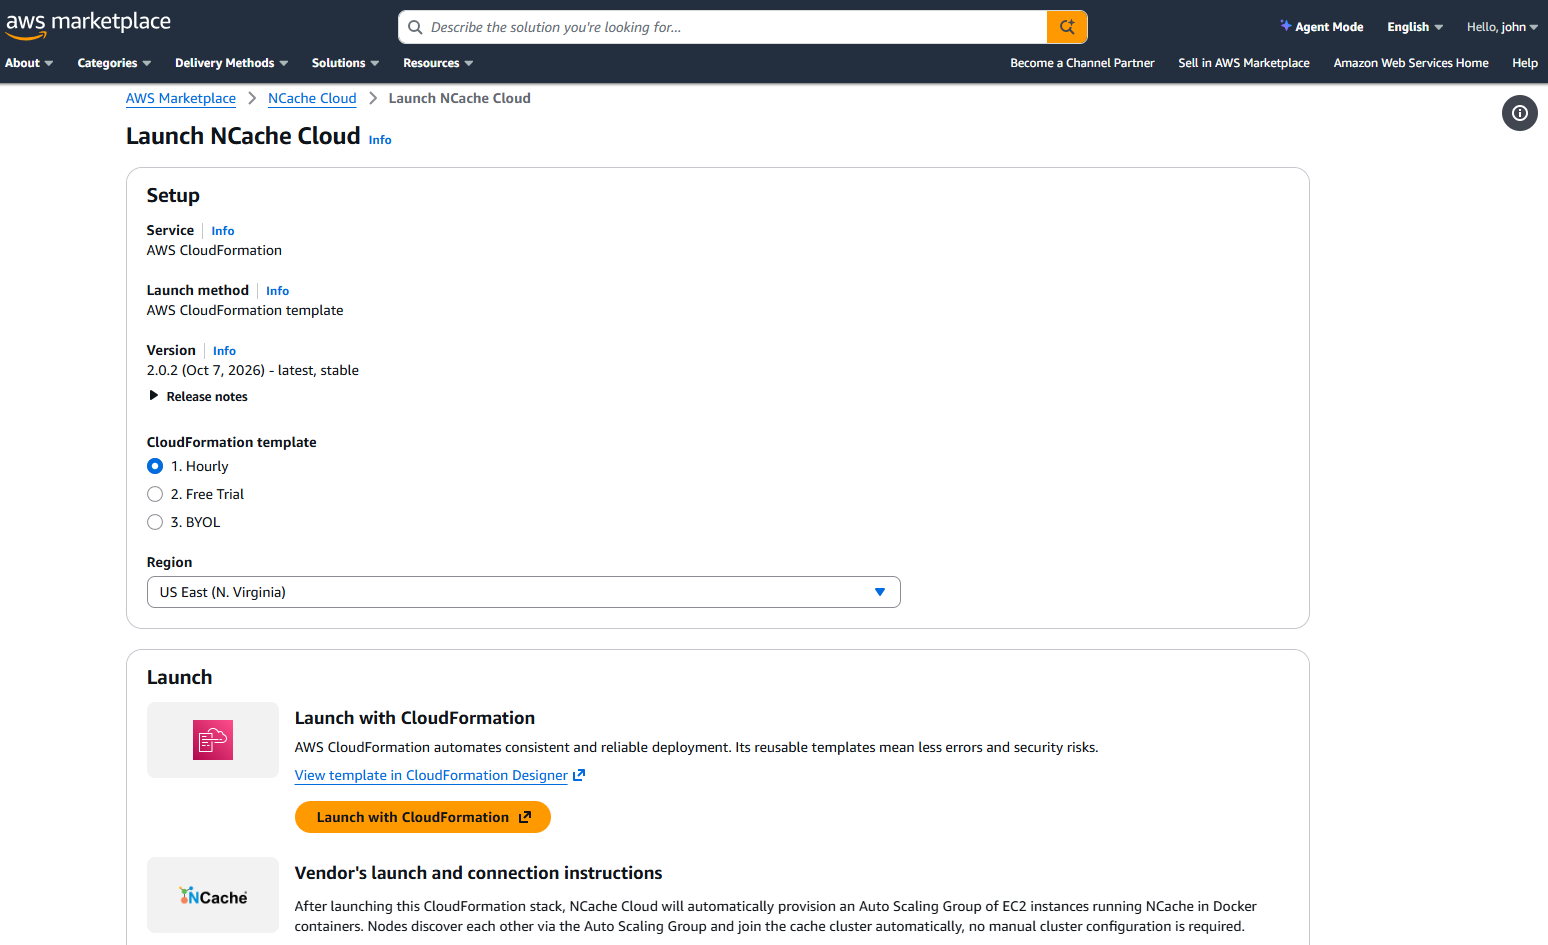
The selected AWS Region determines where the deployment resources such as Amazon EC2 instances, networking components, storage resources, and Auto Scaling Group infrastructure will be created. It is recommended to select the region closest to your application environment or users for lower latency and improved performance.
After selecting the desired region and reviewing the deployment configuration, click Launch with CloudFormation under the Launch section.
Clicking Launch with CloudFormation initiates the AWS CloudFormation deployment workflow using the NCache Cloud Marketplace template.
After completing these steps, you will be redirected to the Create Stack page in AWS CloudFormation, where you can configure and deploy your NCache cluster.
Step 4: Create CloudFormation Stack
A CloudFormation stack is a collection of AWS resources that are created and managed together as a single deployment unit. The steps below allow you to select the deployment template, provide environment-specific information, and create the stack that provisions your NCache deployment.
Create Stack
At this step, AWS CloudFormation prepares the deployment template that will be used to provision the NCache Cloud environment. A CloudFormation template defines the AWS resources, networking configuration, storage settings, and deployment logic required for the NCache cluster.
- Under the Prerequisite - Prepare template section, AWS allows you to either use the template already associated with the Marketplace offer or provide your own template file. It is recommended to proceed with Choose an existing template so that the template already provided with the NCache Cloud offer is used, as shown below.
Note
A template file is a JSON or YAML file used by AWS CloudFormation to define the resources and configuration required for deployment. It describes what AWS resources will be created and how they will be configured.
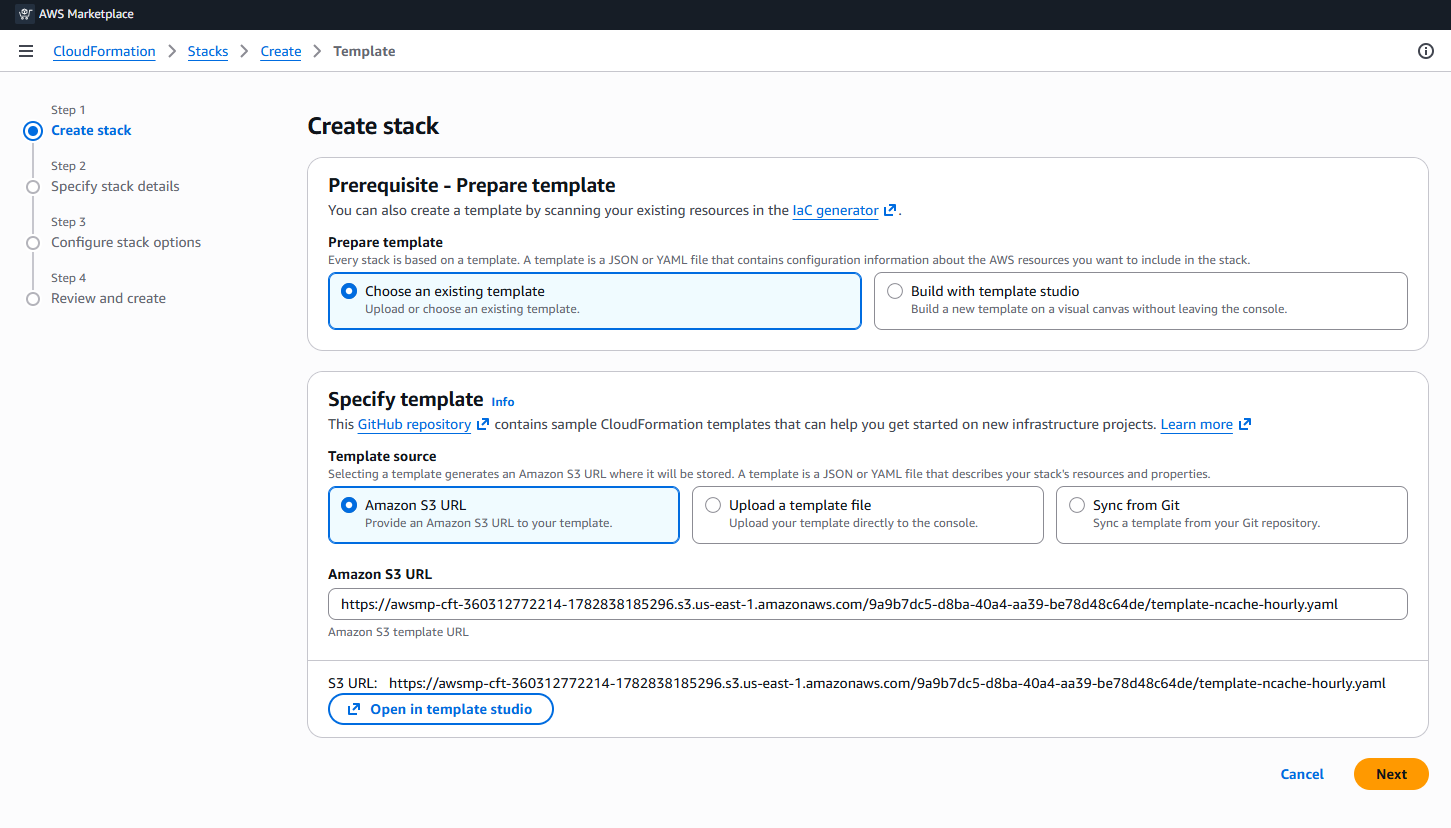
Under the Specify template section, you can choose one of the following options:
Amazon S3 URL to use the template already uploaded by AWS Marketplace
Upload a template file to use your own template
Sync from Git to use a template stored in a Git repository
Although all three options are available, it is recommended to use the Amazon S3 URL already provided with the Marketplace offer. After reviewing the template source, click Next to proceed to the Specify stack details page.
Note
When launching the deployment directly from the AWS Marketplace, the Amazon S3 template URL is populated automatically. If you initiate the deployment manually from the AWS CloudFormation console instead, you will need to provide this S3 URL yourself.
Specify Stack Details
At this step, you provide the deployment and environment-specific configuration that AWS CloudFormation will use while provisioning the NCache cluster. This includes user information, networking configuration, server sizing, storage settings, patching preferences, and Marketplace image details required for the deployment.
- On the Specify stack details page, first provide a Stack name. AWS uses this name to create and group all resources associated with the deployment.
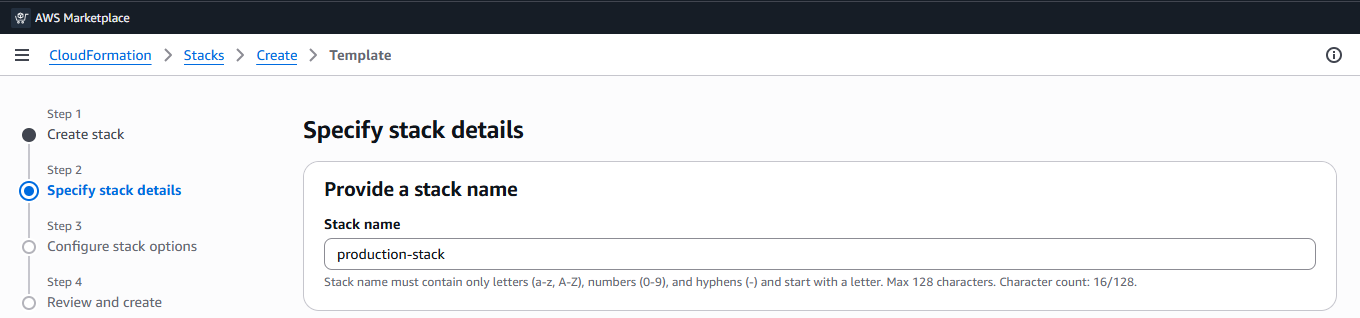
After entering the stack name, fill in the values under the Parameters section. These values are used by the CloudFormation template during deployment.
Copy the prerequisite script below and run it in the CloudShell. You must have
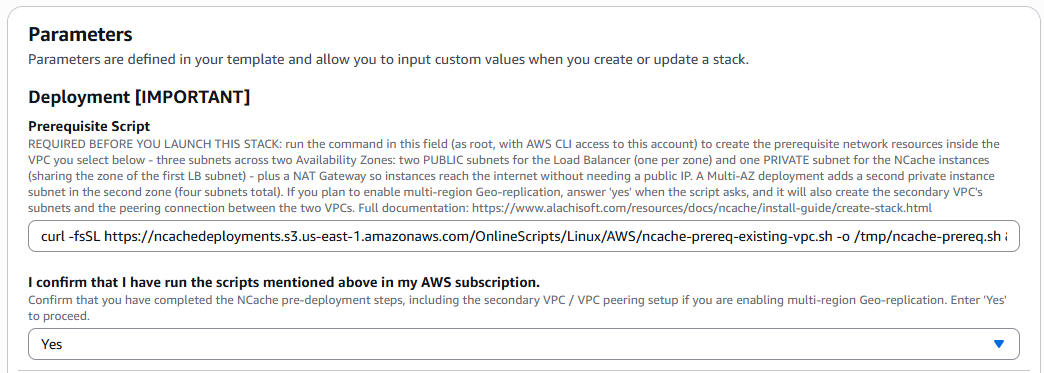
Prerequisite Script Interactive Configuration Inputs
When executing the script in CloudShell, provide the required configuration details when prompted interactively:
Deployment Type: Choose the desired deployment topology option:
1(ornone): Single site, no geo-replication.2(ormultiaz): Multi-AZ deployment (second site in the same region).3(ormultiregion): Multi-region deployment (second site in a different region). We are proceeding with multi-region.
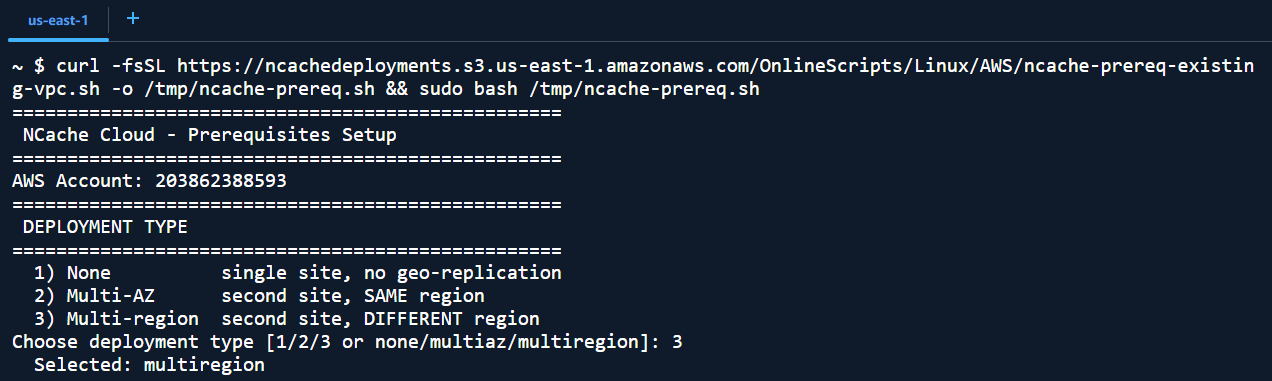
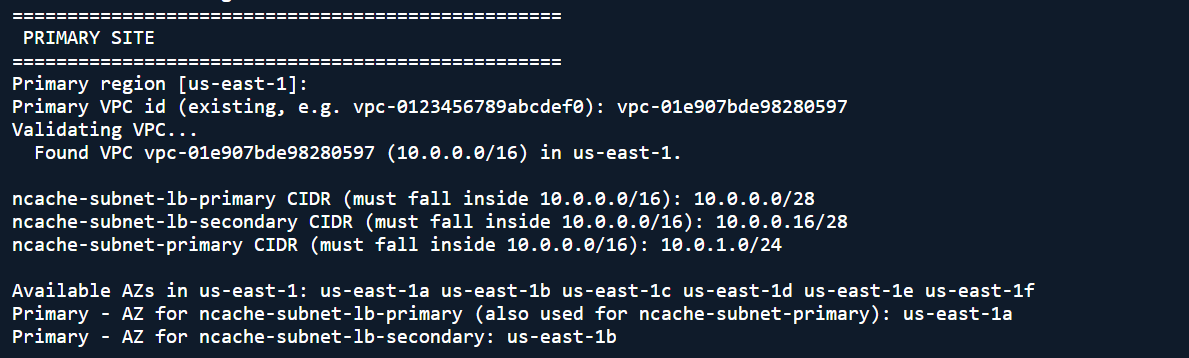
Primary Site Configuration: Provide the networking details for your primary region when prompted:
Primary region: Enter your active target region (e.g.,
us-east-1).Primary VPC id: Enter your existing VPC identifier.
ncache-subnet-lb-primary CIDR: Define the CIDR block for the primary public load balancer subnet (e.g.,
10.0.0.0/28).ncache-subnet-lb-secondary CIDR: Define the CIDR block for the secondary public load balancer subnet (e.g.,
10.0.16.0/28).ncache-subnet-primary CIDR: Define the CIDR block for the primary cache instance subnet (e.g.,
10.0.1.0/24).Primary - AZ for ncache-subnet-lb-primary (also used for
ncache-subnet-primary): Select the Availability Zone for the primary subnets (e.g.,us-east-1a).Primary - AZ for ncache-subnet-lb-secondary: Select the Availability Zone for the secondary load balancer subnet (e.g.,
us-east-1b).
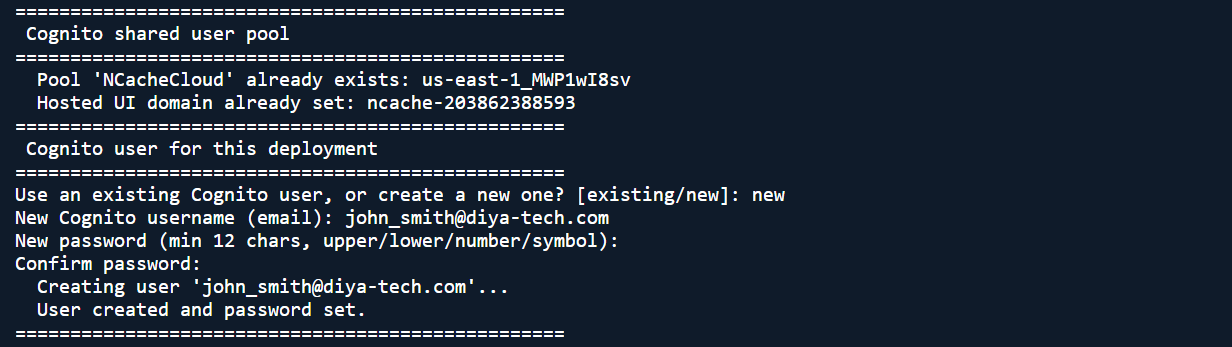
Just like Azure uses Microsoft Entra ID, AWS uses Amazon Cognito to authenticate the NCache Cloud Portal and Management Center. There can only be one Cognito User Pool per AWS account and region.
Cognito User Provisioning: After verifying the user pool, the script prompts you to manage authentication access for the deployment:
Choose Existing or New: Select whether to use an existing Cognito user or create a new one (
existingornew).User Credentials: If creating a new user, provide the user's email address and set a secure password (requiring a minimum of 12 characters with uppercase, lowercase, numbers, and symbols).
Important
The automated prerequisite script checks if an NCache Cognito user pool already exists in your account. If found, it safely reuses it; otherwise, it automatically provisions a new one to avoid duplicates.
Secondary Site Configuration: When configuring a multi-region deployment, provide the networking details for your secondary region when prompted:
Secondary region: Enter your target disaster recovery region (e.g.,
us-east-2).Secondary VPC id: Enter your existing secondary VPC identifier.
ncache-subnet-lb-primary CIDR: Define the CIDR block for the secondary region's primary public load balancer subnet (e.g.,
20.0.0.0/28).ncache-subnet-lb-secondary CIDR: Define the CIDR block for the secondary public load balancer subnet (e.g.,
20.0.16.0/28).ncache-subnet-primary CIDR: Define the CIDR block for the secondary cache instance subnet (e.g.,
20.0.1.0/24).Secondary - AZ for ncache-subnet-lb-primary (also used for
ncache-subnet-primary): Select the Availability Zone for the secondary site's primary subnets (e.g.,us-east-2a).Secondary - AZ for ncache-subnet-lb-secondary: Select the Availability Zone for the secondary load balancer subnet (e.g.,
us-east-2b).
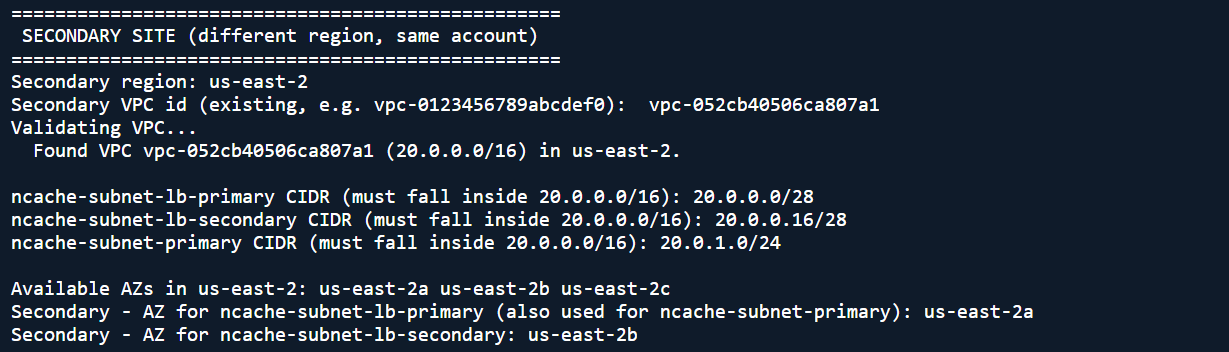
After this, the prerequisite script synchronizes a multi-region deployment by reusing the shared Cognito user pool and mirroring your user account across regions, validating and reusing existing primary region networking components, preparing and configuring the secondary region's VPC infrastructure, and automatically establishing a secure cross-region VPC peering connection to enable direct communication between the cache clusters.
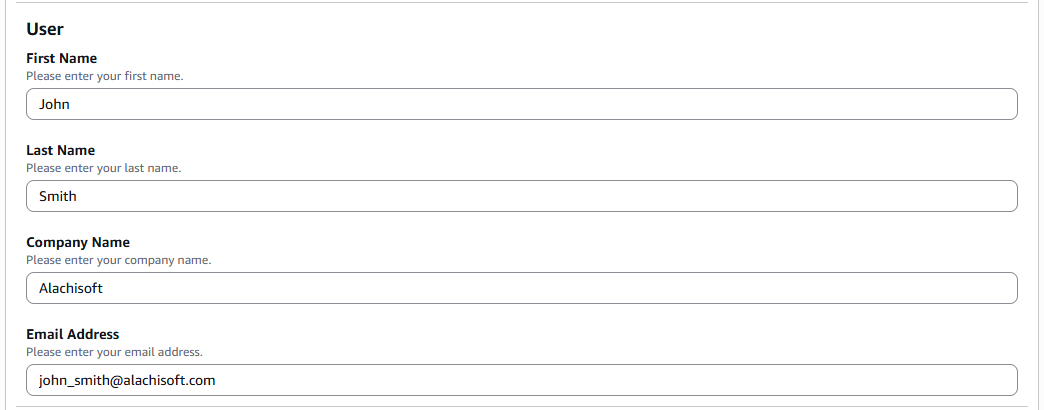
- In the User section, provide user details such as First Name, Last Name, Company Name, and Email Address.
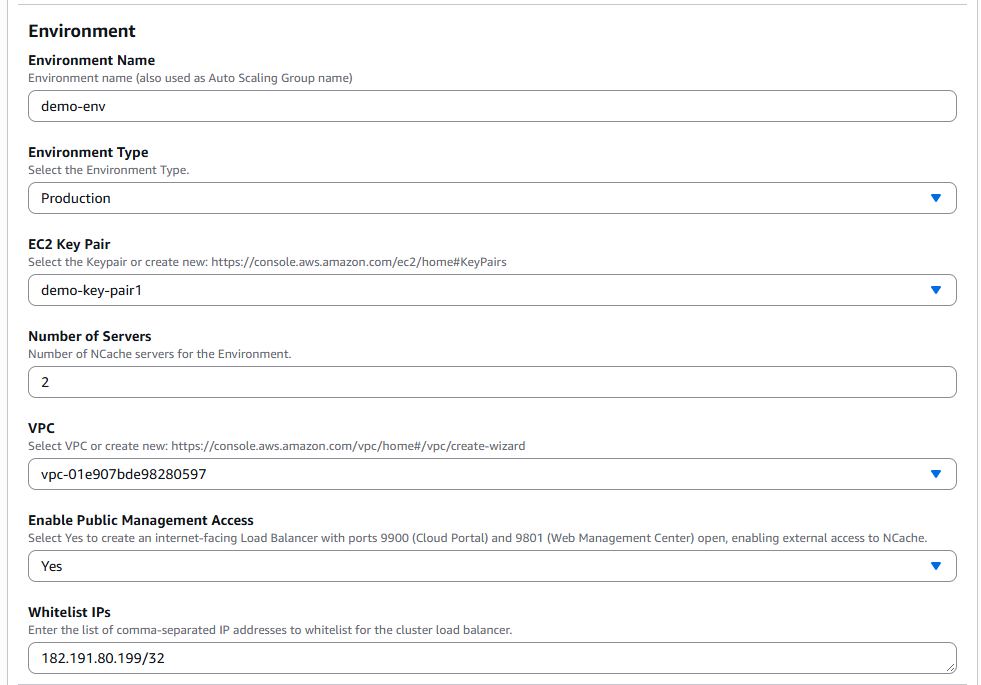
Under Environment Details, provide the information required for the deployment environment
Environment Name
Specify the name of the environment. This name is also used as the Auto Scaling Group name.Environment Type
Select the environment type, for example, DEV, Prod, DR, or Staging.EC2 Key Pair
Select an existing EC2 Key Pair. This key pair is used for secure access to the deployed EC2 instances and is required when retrieving the Windows administrator password during RDP connection.NCache Servers
Specify the initial number of NCache server nodes to deploy. This value can later be modified from the Auto Scaling Group settings.Important
During stack creation, you can specify up to 10 servers. If you require more than 10 servers or want to increase the number of nodes after deployment, you can scale the cluster by updating the Auto Scaling Group capacity, as described in the Administrator's Guide.
VPC
Selects the target VPC where the dedicated NCache subnets reside.Enable Public Management Access
Configures an internet-facing load balancer with ports9900(Cloud Portal) and9801(Management Center) enabled for external administrative access.Whitelist IPs
Restricts load balancer access to specified comma-separated IP addresses or CIDR blocks for enhanced cluster security.
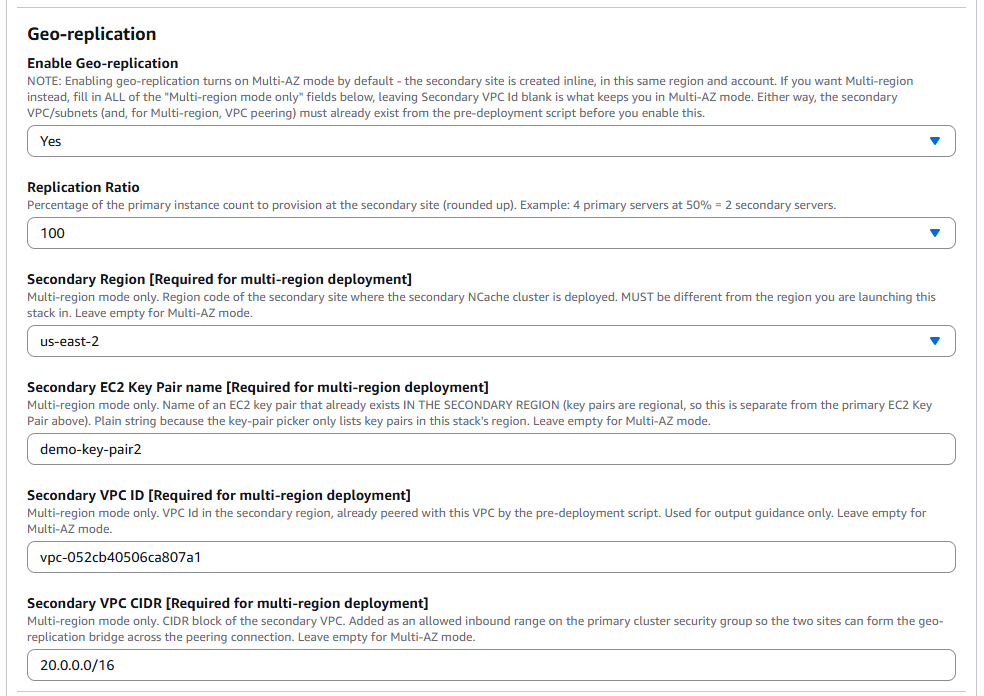
Next, configure the geo-replication settings for Multi-AZ or Multi-region deployments:
Enable Geo-replication: Set to Yes to enable replication. Enabling geo-replication defaults to Multi-AZ mode (creating the secondary site inline within the same region and account). To configure a Multi-region deployment instead, fill out all of the multi-region fields below while leaving the secondary VPC ID blank for Multi-AZ mode. Note that the secondary VPC, subnets, and (for multi-region) VPC peering must already exist and be prepared via the pre-deployment script before enabling this option.
Replication Ratio: Specifies the percentage of primary server instances to provision at the secondary site, rounded up (e.g., 4 primary servers at 50% provisions 2 secondary servers).
Secondary Region [Required for multi-region deployment]: Enter the region for the secondary site where the secondary NCache cluster will be deployed (e.g.,
us-east-2). This must be different from the region where you are launching this stack. Leave empty if configuring Multi-AZ mode.Secondary EC2 Key Pair name [Required for multi-region deployment]: Enter the name of an existing EC2 key pair located in the secondary region (since AWS key pairs are regional, this is separate from the primary key pair). Entered as a plain text string because the AWS console key-pair picker only lists keys for the stack's primary launch region. Leave empty if configuring Multi-AZ mode.
Secondary VPC ID [Required for multi-region deployment]: Enter the VPC ID in the secondary region that was already peered with your primary VPC by the pre-deployment script (e.g.,
vpc-052cb40506ca807a1), used for output guidance. Leave empty if configuring Multi-AZ mode.Secondary VPC CIDR [Required for multi-region deployment]: Enter the CIDR block of the secondary VPC (e.g.,
20.0.0.0/16). This is added as an allowed inbound range on the primary cluster security group so both sites can successfully form the geo-replication bridge across the VPC peering connection. Leave empty if configuring Multi-AZ mode.
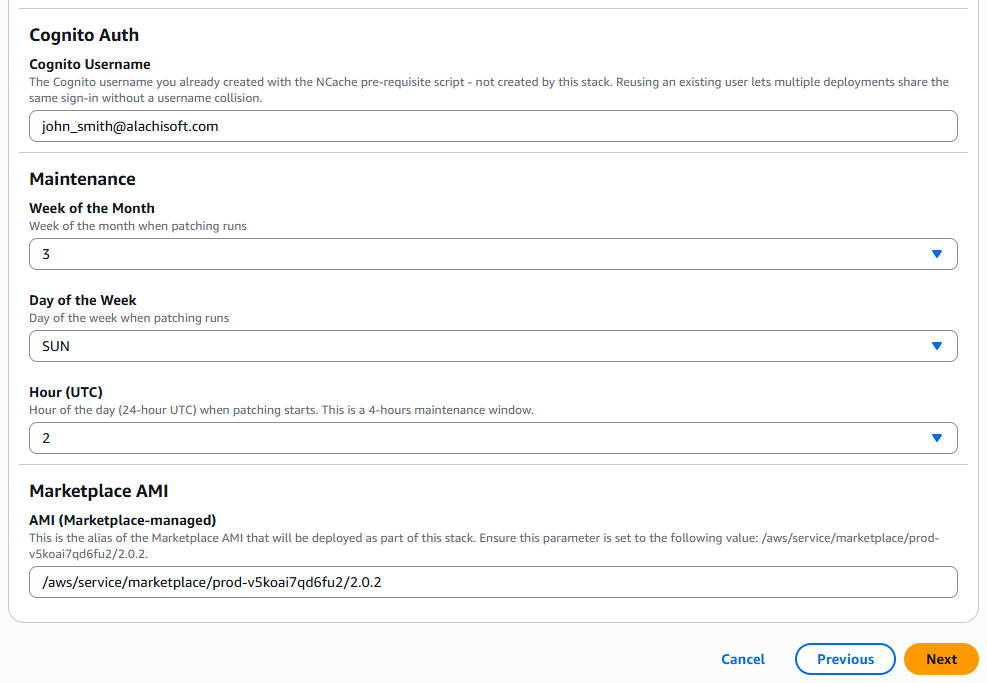
Cognito Username: Enter the Cognito username you previously created using the NCache pre-requisite script (e.g.,
john_smith@alachisoft.com). This user is reused across deployments rather than created by this stack, allowing multiple deployments to share the same sign-in profile without username collisions.Configure the recurring schedule for automated patching and system maintenance:
Week of the Month: Select the week of the month when automated patching should run (e.g.,
3).Day of the Week: Select the specific day of the week for the maintenance window (e.g.,
SUNfor Sunday).Hour (UTC): Choose the start hour in 24-hour UTC format when the patching window begins (e.g.,
2). This initiates a designated 4-hour maintenance window.
AMI (Marketplace-managed): Specifies the alias of the Marketplace Amazon Machine Image (AMI) deployed as part of the stack. This AMI contains the operating system, NCache installation, deployment scripts, and configuration required for the selected NCache Cloud Marketplace version. It is recommended to keep the default value unchanged, since it points to the Marketplace AMI associated with the selected NCache Cloud version.
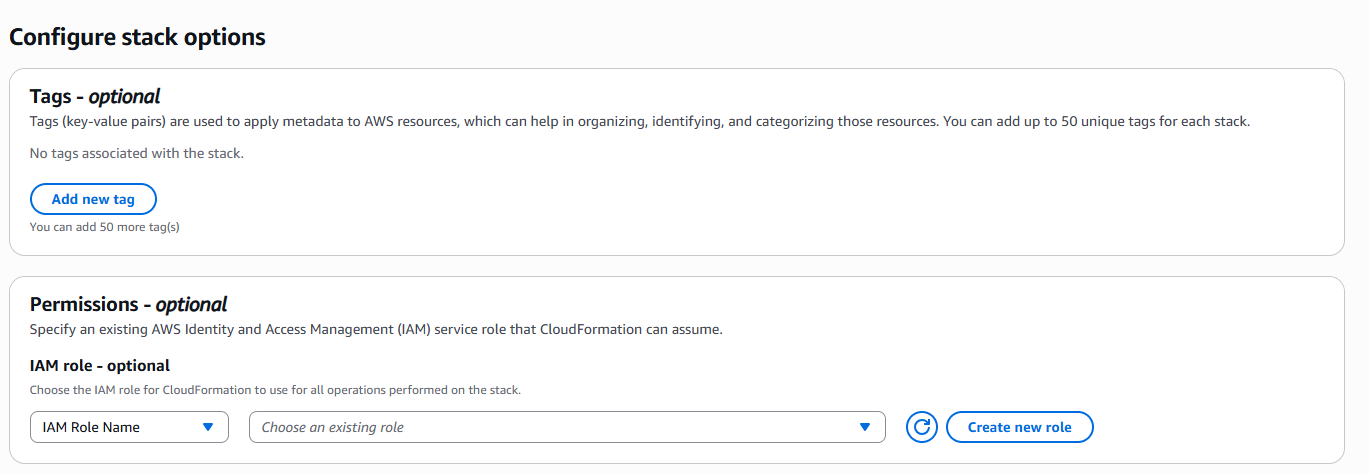
Configure Stack Options
At this step, AWS CloudFormation allows you to configure additional stack-level settings related to resource organization, permissions, failure handling, and deployment behavior. Most of these settings are optional and can typically be left with their default values unless your environment requires custom configuration.
The available options include:
Tags
Tags are key-value pairs used to organize, categorize, and identify AWS resources associated with the deployment. These tags can help with resource management, automation, monitoring, and cost tracking within your AWS account.Permissions
Allows you to specify an IAM (Identity and Access Management) role that AWS CloudFormation can assume while creating and managing the stack resources. In most cases, this can be left empty and AWS CloudFormation will use the permissions of the currently logged-in AWS account.
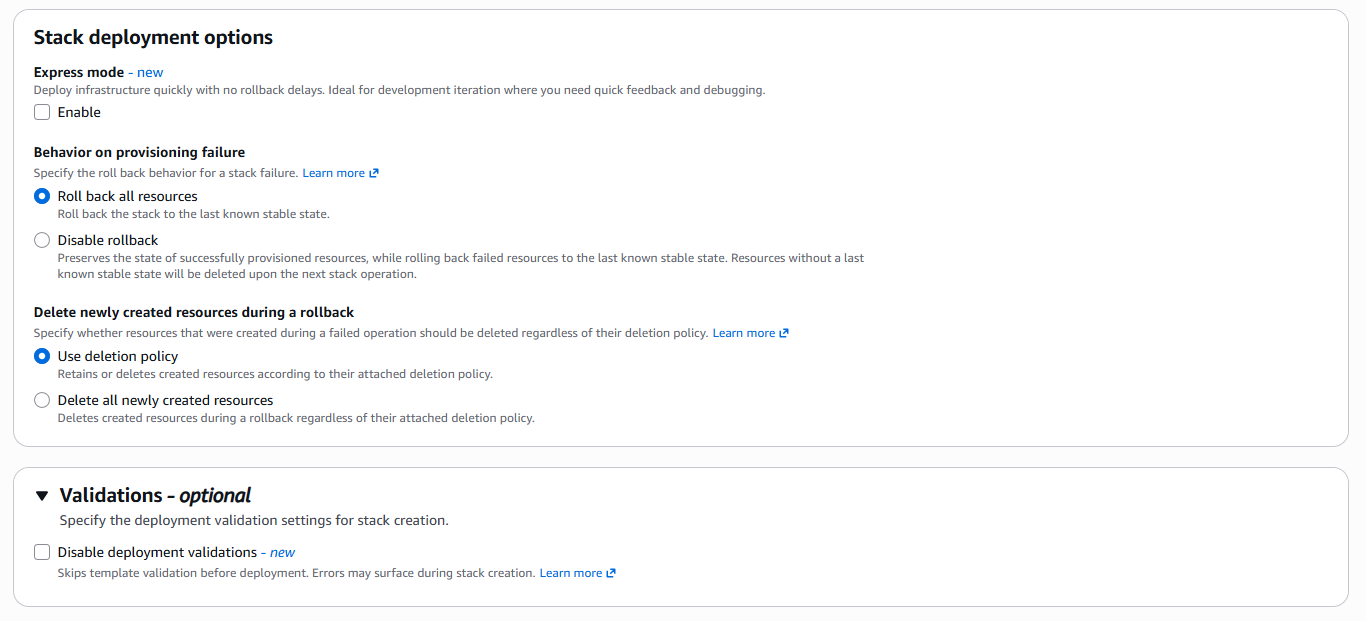
Stack Deployment Options
Defines how AWS CloudFormation should behave if stack provisioning fails during deployment.Express mode
Enable this option to deploy infrastructure quickly without rollback delays. This is ideal for development iterations where rapid feedback and debugging are required.Behavior on provisioning failure
Define how CloudFormation handles stack errors during deployment:Roll back all resources: Automatically rolls back the entire stack to its last known stable state upon failure (default behavior).
Disable rollback: Preserves successfully provisioned resources while rolling back failed resources to their last known stable state. Resources without a stable state will be deleted during the next stack operation.
Delete newly created resources during a rollback: Determine resource retention during rollback scenarios:
Use deletion policy: Retains or deletes newly created resources based on their assigned deletion policies (default behavior).
Delete all newly created resources: Forces the deletion of all resources created during a failed operation regardless of their individual deletion policies.
Validations Configuration
Optional setting that skips template validation before deployment. When enabled, deployment validation checks are bypassed, though errors may surface later during actual stack creation.
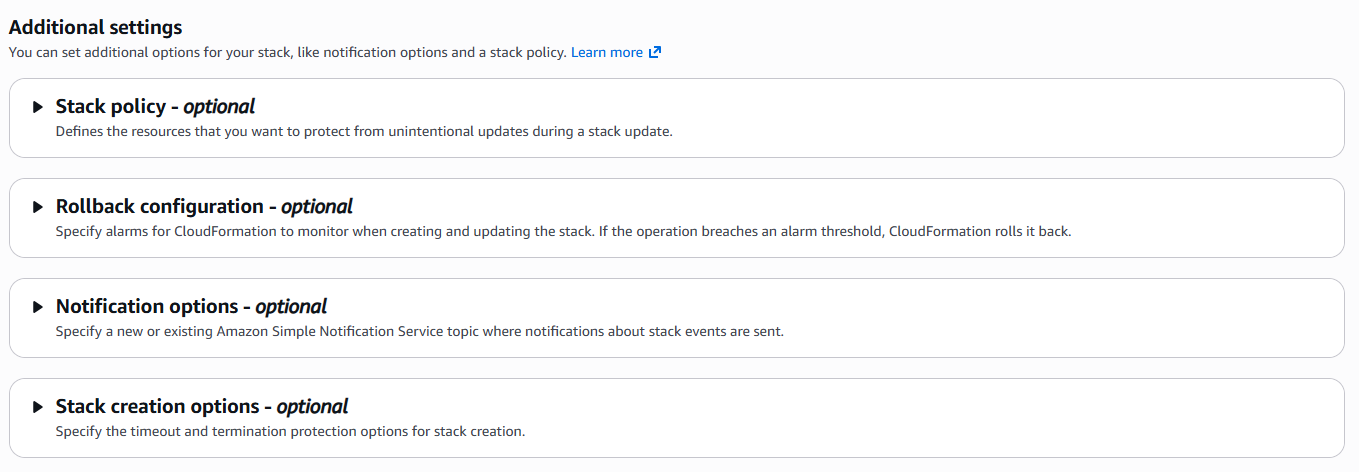
- Additional Settings AWS CloudFormation also provides advanced optional settings such as notifications, stack policies, rollback triggers, monitoring time periods, and termination protection. These settings are generally used for advanced deployment scenarios and can usually remain unchanged for standard NCache Cloud deployments.
- After specifying the required optional settings, review the acknowledgement section and select the checkbox that allows AWS to create the necessary roles, if applicable. These roles enable AWS to provision and manage resources such as CloudWatch dashboards, maintenance windows for OS patching, and their associated logging (logs stored in S3).
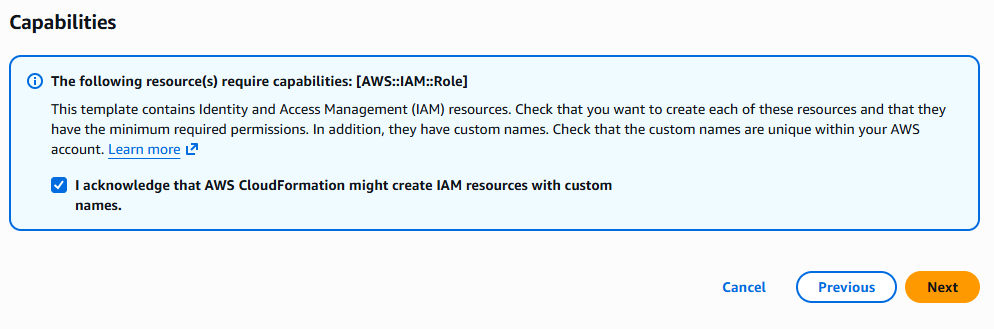
- Then click Next to proceed to the Review and create page.
Review and Create
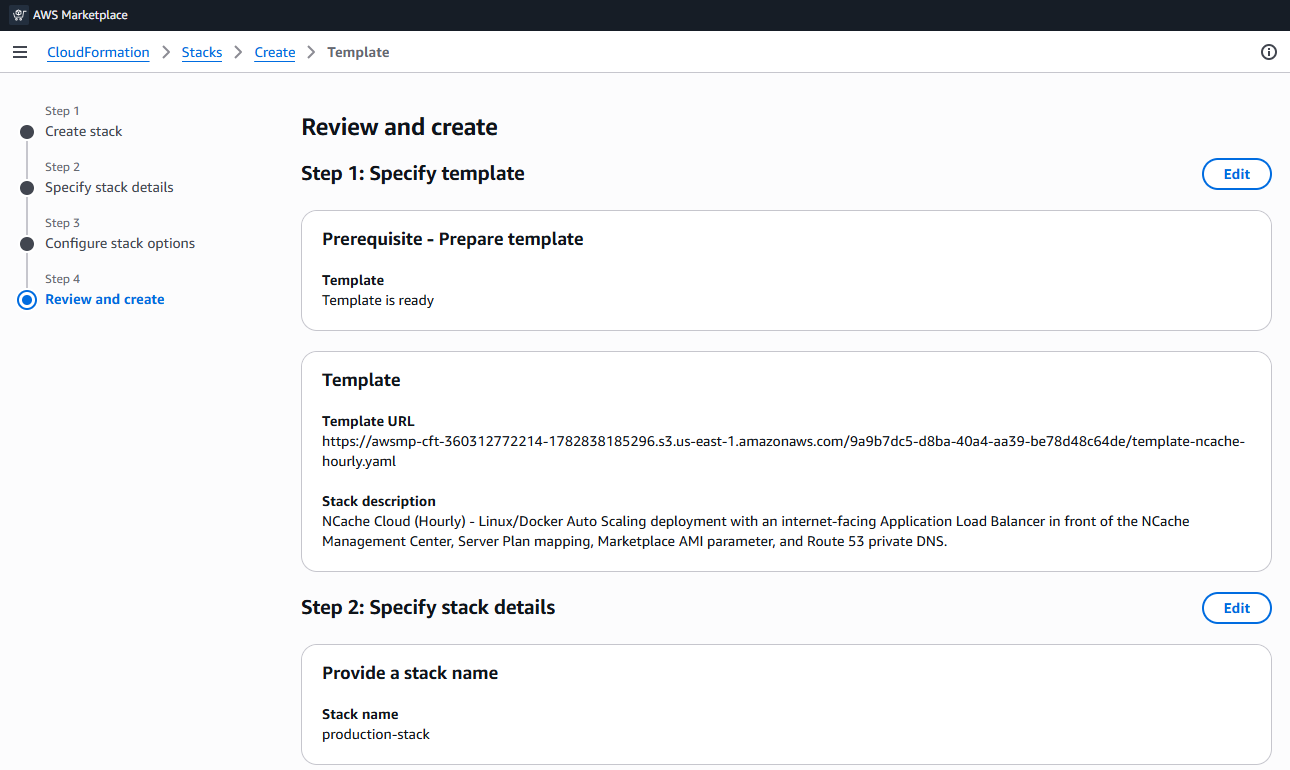
On the Review and create page, carefully review all configuration details you have entered for the stack. After verification, click Submit to create the stack. AWS CloudFormation will then begin provisioning the required resources and redirect you to the created stack page.
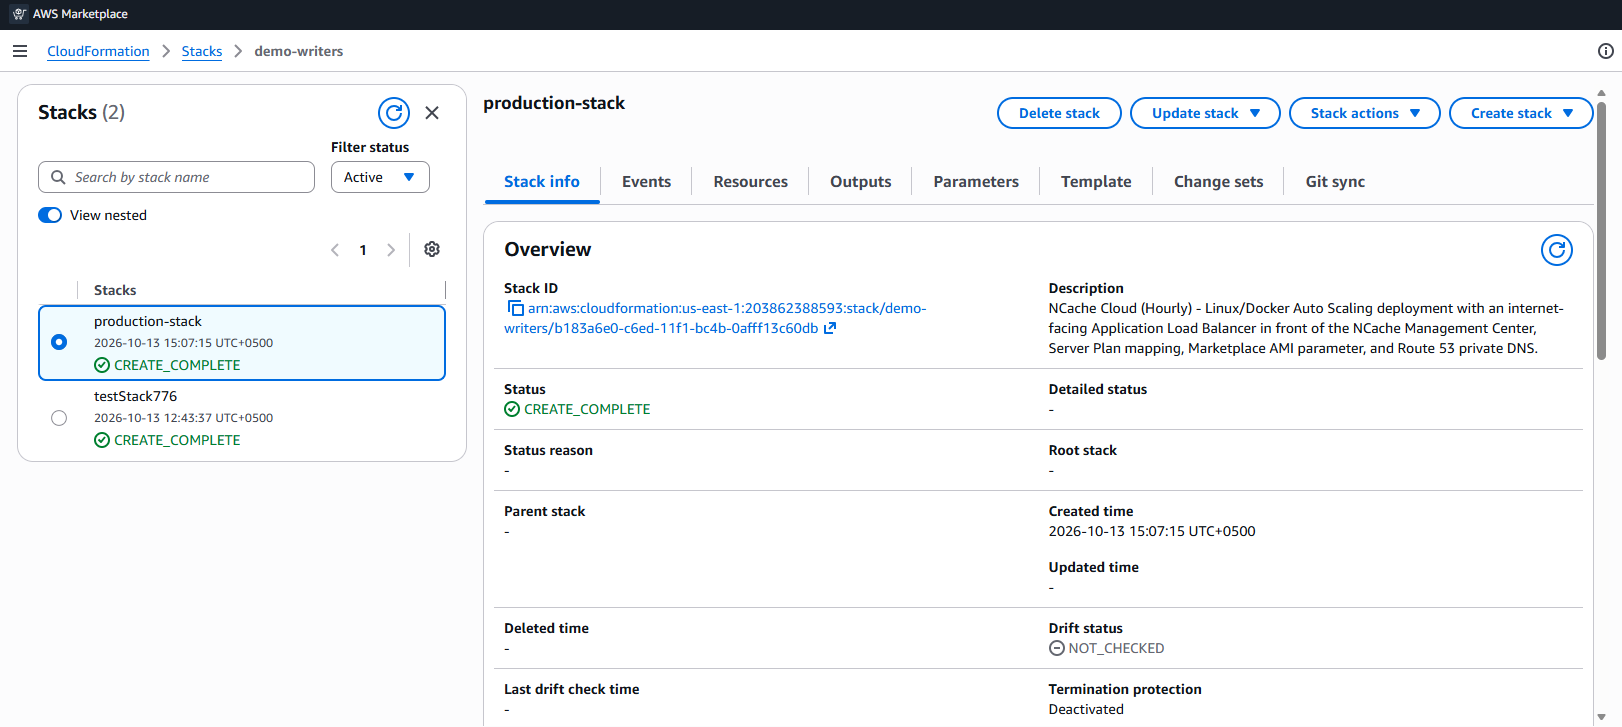
After successfully creating the stack, you are redirected to the Stacks page in AWS CloudFormation. Initially, the stack status appears as CREATE_IN_PROGRESS, and it may take approximately 10 minutes for the deployment and NCache to reach a fully ready state.
Once the deployment is complete, the stack status changes to CREATE_COMPLETE. At this point, the stack details page provides a complete view of all resources created as part of the deployment. To learn more about the resources, please see this page.
Accessing the NCache Cloud Portal
To access the NCache Cloud Portal, navigate to the AWS CloudFormation Console, select Stacks from the left navigation menu, and click on your deployed stack name (e.g., production-stack).
In the stack details pane on the right, click on the Outputs tab to view all system endpoints and resource identifiers.
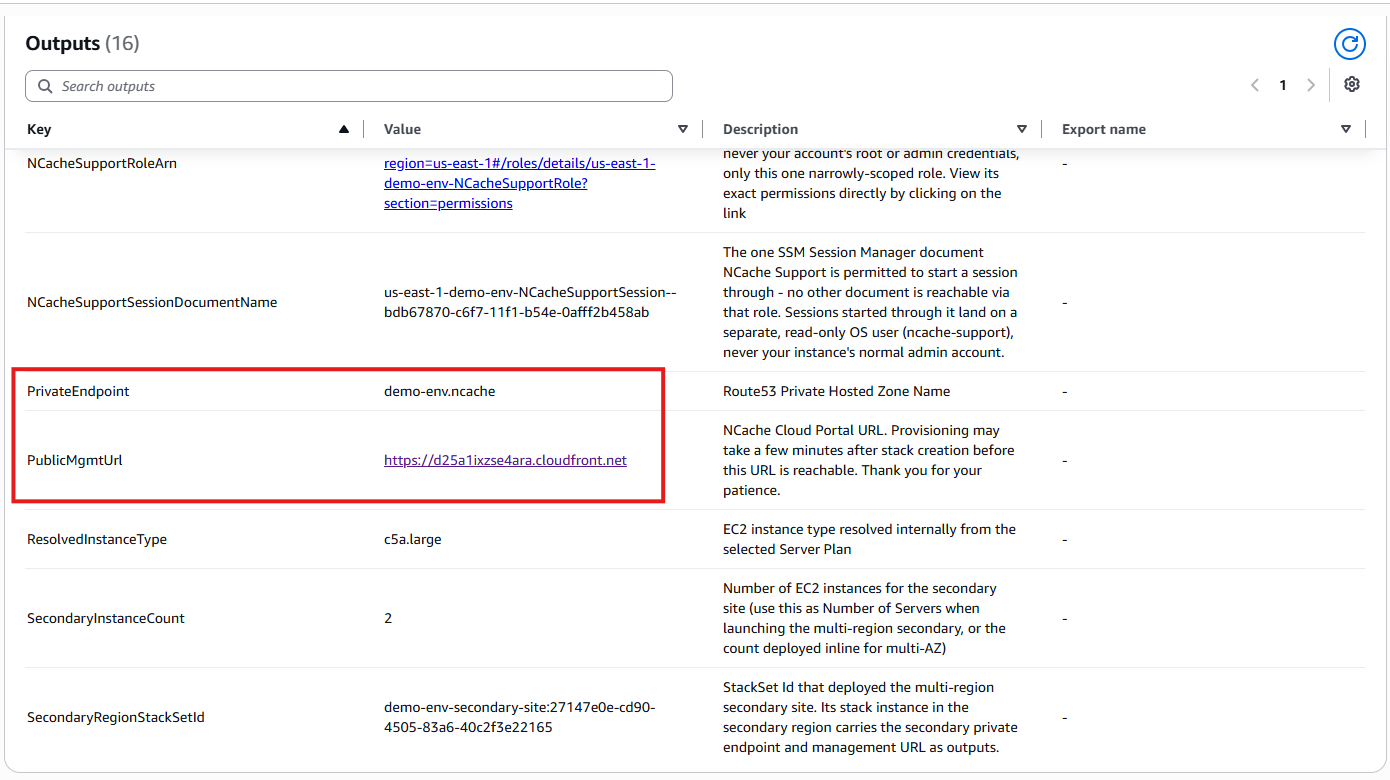
Locate the PublicMgmtUrl key in the list, and click on the hyperlink next to it (e.g., your CloudFront distribution link) to open the NCache Cloud Portal in your browser.
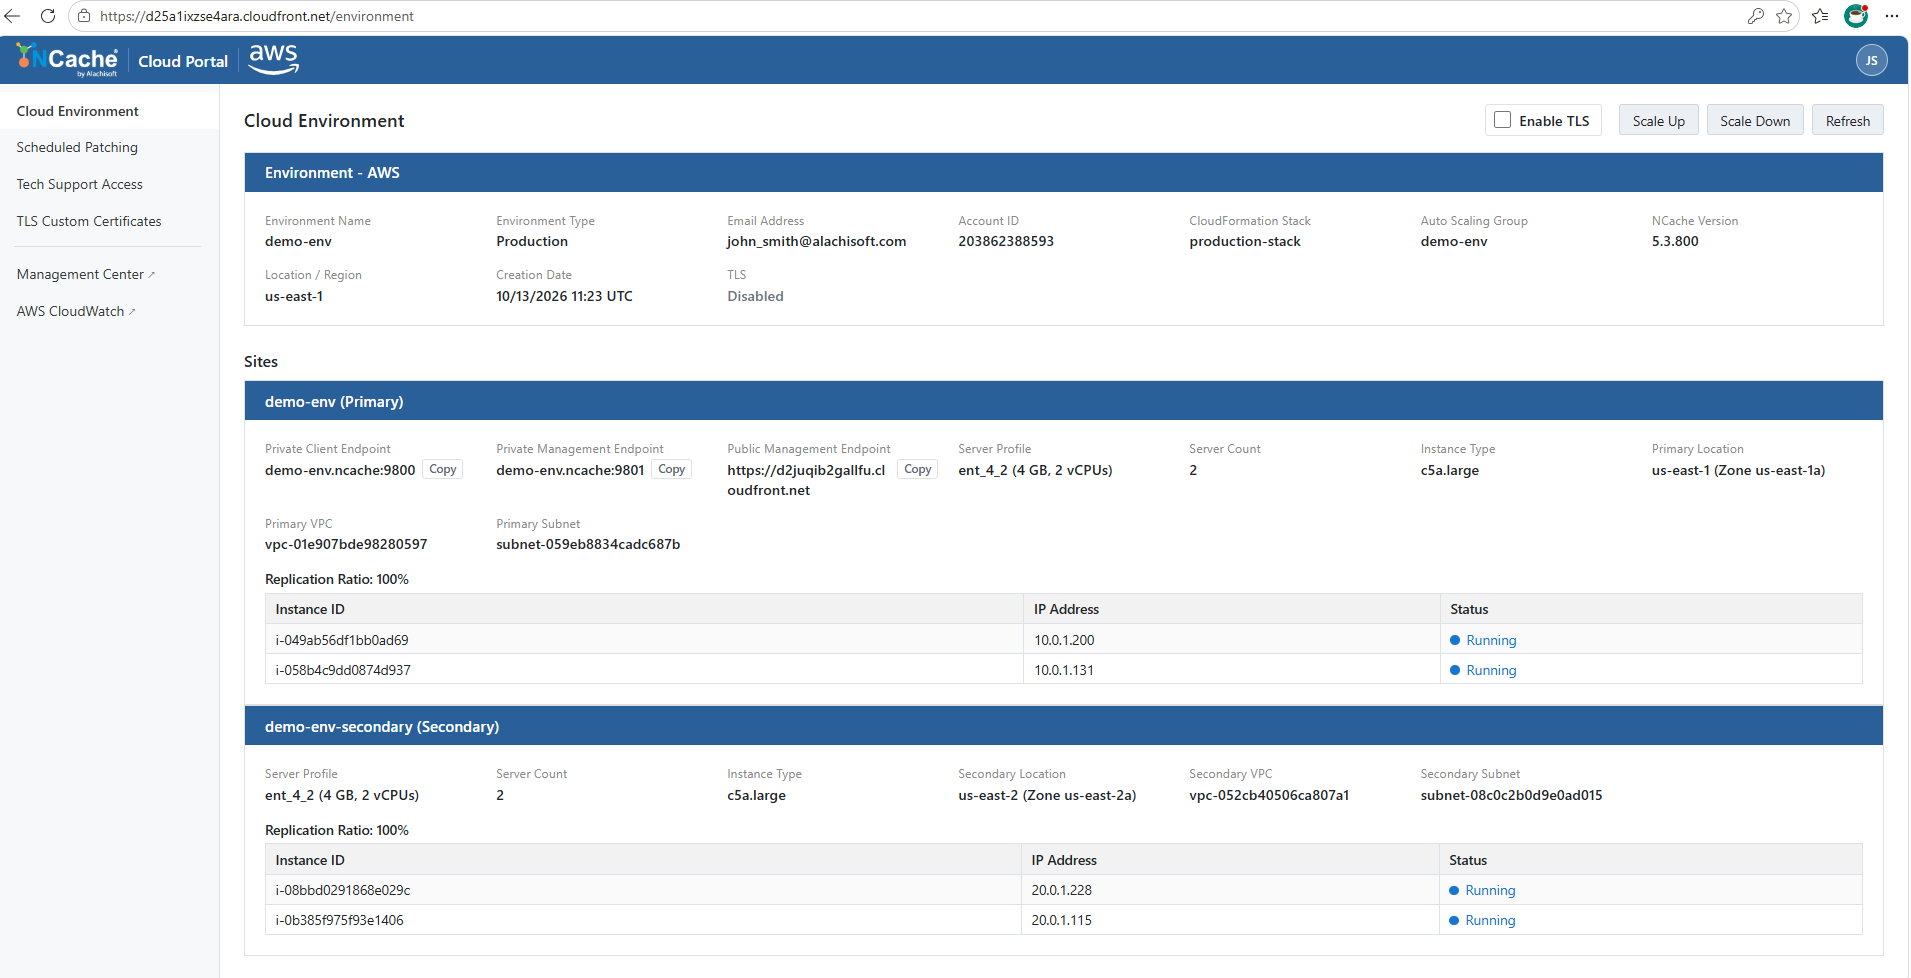
Upon clicking the link, you will be redirected to the following Cloud Portal.
PrivateEndpoint: The private web address (demo-env.ncache) used by your internal applications and cache servers to communicate with each other securely inside your private cloud network.
PublicMgmtUrl: The public web link (https://d25a1ixse4ara.cloudfront.net) you click to open the NCache Cloud Portal from your web browser. (Note: It can take a few minutes after the deployment finishes before this link becomes active.)
Stack Deletion Steps
If you no longer need the deployed environment, you can delete the stack to remove all associated resources. Following are the steps:
Warning
Deleting a stack is irreversible. This action will remove all resources created as part of the deployment.
Navigate to the AWS Console > CloudFormation > Stacks page. From the list of stacks, select the stack you want to delete.
From the list of stacks, select the stack you want to delete.
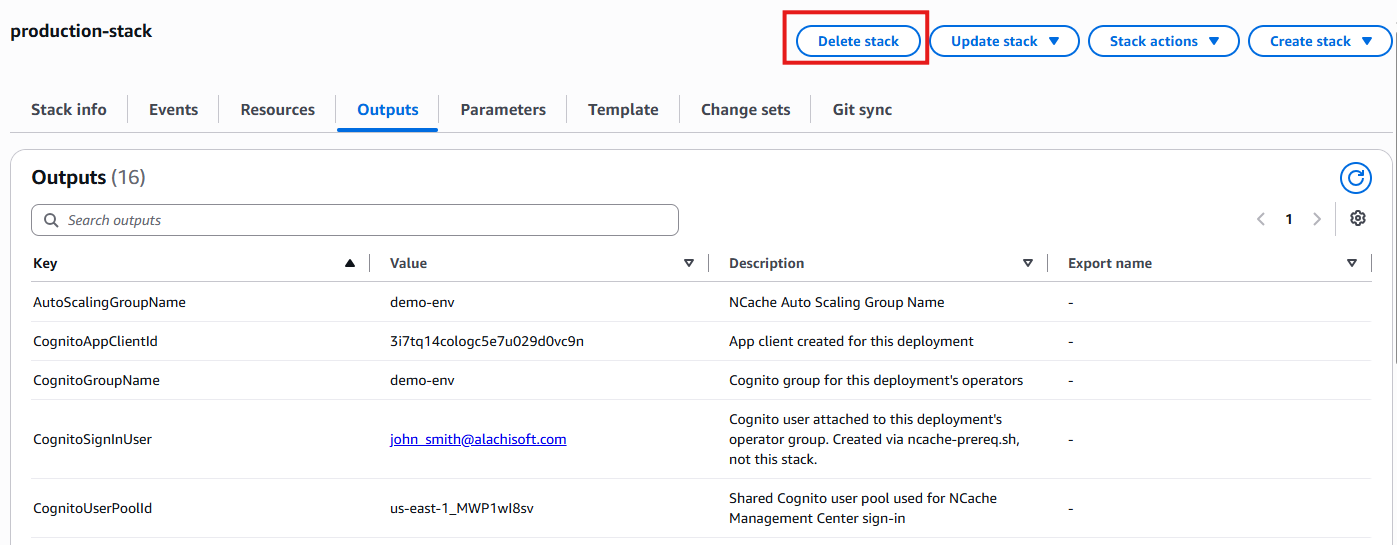
From the top-right corner, click Delete stack.
- Upon clicking, a confirmation dialog will appear. Enter the stack name to confirm deletion.
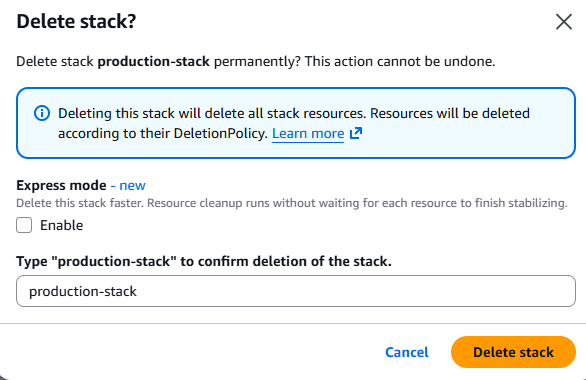
- After confirming, the stack status will change to DELETE_IN_PROGRESS.
All resources created by the stack (such as EC2 instances, Auto Scaling Groups, and associated configurations) will be deleted automatically based on their defined policies. Some resources, such as dashboards or externally managed components, may not be deleted automatically and might require manual cleanup.
For more information on NCache Cloud Portal, please see NCache Cloud Portal docs
