Add Clustered Caches to the Bridge
You can add multiple existing clustered caches to an NCache Bridge to enable WAN Replication. These caches must already be configured on local or remote servers before being added. Integrating multiple clusters into a Bridge helps ensure high availability and disaster recovery. Each cache can be configured in Active or Passive mode. Please follow these steps to add a cache to your Bridge.
Using the NCache Management Center
Important
Please ensure your bridge is stopped.
Launch the NCache Management Center by browsing to http://localhost:8251 or
<server-ip>:8251.In the left navigation bar, click on the Bridges. It will open up a list of pre-existing bridges.
Method 1: Select the Bridge and click on
 button.
Method 2: From the list, select the Bridge Name and go to View Details.
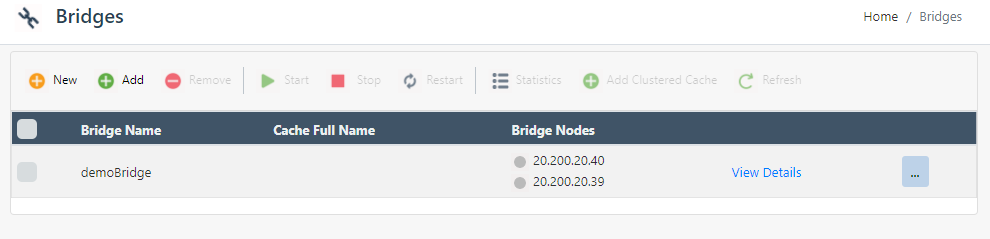
A new page will open up containing the Bridge configuration and details.
Go to the Bridge Caches section on this page and click on
 .
.

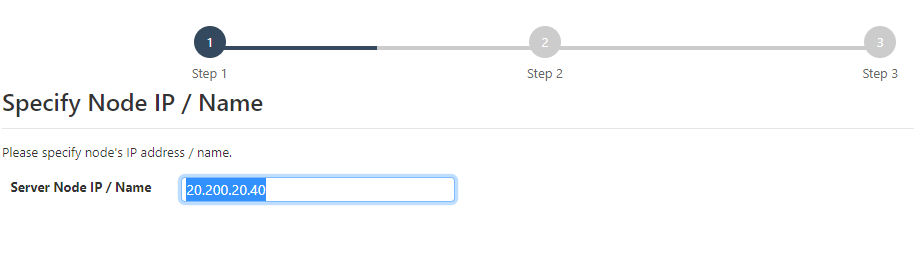
- Enter the Server Node IP containing the clustered cache and click Next.
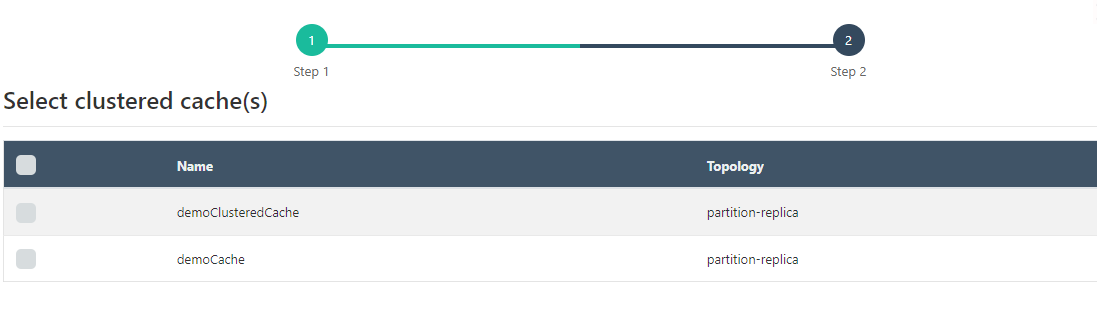
- A list containing all the registered caches appears on the screen. Select the clustered cache to be added to the bridge and click Next.
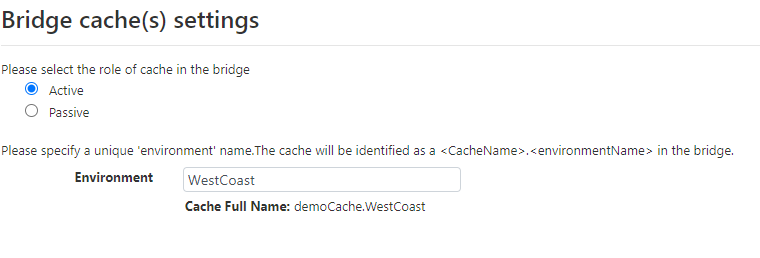
- After the selection of the cache, a new page opens up showing Bridge cache(s) settings. Choose the Cache Mode (i.e., Active or Passive) for this bridge configuration, as well as specify the Environment which will distinguish the caches if they have the same names. Click Finish.
- The selected cache will be successfully added to the Bridge and will be displayed under the Bridge Caches section.

- Add the second cache for this Bridge using the same steps mentioned above.
Using PowerShell
The Add Bridge Cache cmdlet enables users to add an existing clustered cache to a specified NCache Bridge.
- This command adds an existing clustered cache named demoCache to the Bridge demoBridge running on 20.200.20.39. The cache name will now be demoCache.WestCoast using Port 8260.
Add-BridgeCache -Name demoBridge -Server 20.200.20.39 \
                -CacheName demoCache -CacheServer 20.200.20.40 \
                -Environment WestCoast -Port 8260
- This command adds an existing clustered cache named demoCache to the Bridge demoBridge running on 20.200.20.39. The cache name will now be demoCache.WestCoast. The mode of the Bridge is set as Active.
Add-BridgeCache -Name demoBridge -Server 20.200.20.39 \
                -CacheName demoCache -CacheServer 20.200.20.40 \
                -Environment WestCoast -Mode Active
- This command adds an existing clustered cache named demoCache to the Bridge demoBridge running on 20.200.20.39. The cache name will now be demoCache.WestCoast using security credentials.
Add-BridgeCache -Name demoBridge -Server 20.200.20.39 \
                -CacheName demoCache -CacheServer 20.200.20.40 \
                -Environment WestCoast -Credentials(Get-Credential john_smith)
See Also
Create Bridge
Configure Conflict Resolver
Change Cache Synchronization Modes
Remove Cache from Bridge