Configure SSL/TLS Encryption in Windows and Linux
You should configure SSL/TLS encryption when you want to protect communication between NCache servers and clients, especially in production or distributed setups where data security matters. The process starts by creating or obtaining a TLS certificate and placing it in the correct certificate store. After that, you simply note the certificate name and thumbprint, enable TLS using the provided command or configuration file, make sure all servers and clients use the same settings, and then restart the NCache services to apply the changes securely.
Note
Make sure the cache and client processes are stopped before proceeding with the following.
Considerations for Certificate Placement
The following are the considerations for certificate placement for both Windows and Linux:
If you have a test certificate (that contains the root and intermediate certificates), then you need to add the certificate to both, the Personal and Trusted Root of the local machine. If you have a separate Trusted Root and Personal certificate, then you need to add them individually i.e., the Personal certificate to the Personal store and the CA root certificate to the Trusted Root store. For non-mutual TLS, configure the server certificate. The client must trust the certificate authority that issued the server certificate. For mutual TLS, configure both the server and client certificates. The server must trust the issuer of the client certificate, and the client must trust the issuer of the server certificate.
Note
NCache will utilize the certificates stored in the certificate stores automatically. When started under the correct user account, the NCache Service will automatically identify and use the relevant certificates from the appropriate certificate stores.
Note
You don’t need to install client certificate on Bridge and Server nodes if you don’t want to run client from them.
Note
From 5.3 SP5 onwards, clients and servers can have different certificates.
TLS Certificate Selection and Authentication
Server's Selection of Certificate
On Windows, when the server starts, it reads the configured certificate thumbprint from the registry. It checks the Trusted Root stores of the Local Machine and Current User, followed by the Personal stores of the Local Machine and Current User. The server selects the first matching certificate it finds. Subsequently, the server reads this chosen certificate through its thumbprint and shares it with the client, facilitating secure communication.
On Linux, if the configured certificate is not found in the My store, NCache also searches the Root store.
Client's Selection of Certificate
When mutual TLS is enabled for client-server communication, the client presents the configured client certificate to the server for authentication.
Mutual TLS Authentication
For mutual client-server TLS, the client presents its configured certificate to the server. The server must trust the certificate authority that issued the client certificate.
For mutual server-server TLS, connecting servers must present valid certificates, and each server must trust the certificate authorities that issued the certificates used by the other servers.
How to Configure TLS Encryption
To configure TLS Encryption, please see below.
The steps below should be followed in order to install the TLS certificate on a Windows machine.
Step 1 - Machine Login: Login to your machine.
Step 2 - Create a Self-signed Certificate: Create (you can create a self-signed certificate as detailed in Microsoft WCF certificate documentation) or obtain a TLS certificate that includes an exportable private key.
Important
- Your certificate must be authorized by a Certificate Authority (CA). To reflect this as part of your configurations, please ensure that the Basic Constraints section specifies Subject Type=CA in the Certificate Details. Similarly, you can achieve this through the
-TextExtensionattribute with the value@("2.5.29.19={text}CA=true")when generating a certificate using the following command:New-SelfSignedCertificate. - We do not recommend using self-generated certificates in your production environments. However, you can use them in your testing environments.
Step 3 - Import Certificate: Import your certificate to the appropriate machine as detailed in Microsoft certificate installation guide.
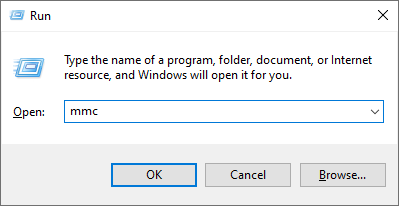
Step 4 - Open Microsoft Management Console: Press Win + R, type mmc, and press Enter.
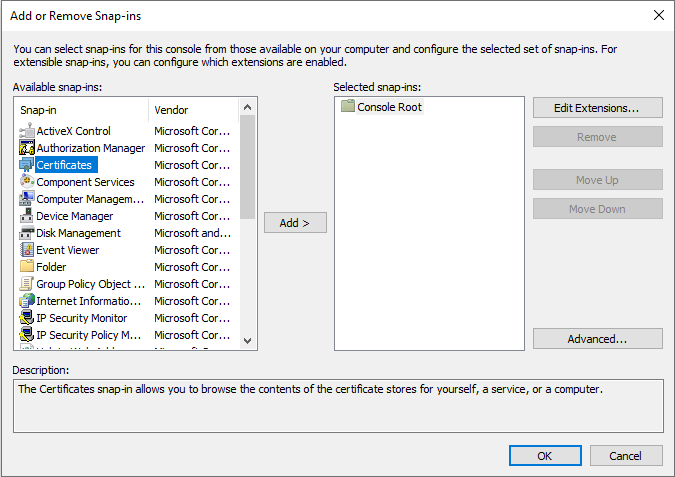
Step 5 - Select Certificate: In Microsoft Management Console (MMC), in the File menu, click Add or Remove Snap-ins. Select Certificates from the list of available snap-ins and click the Add button.
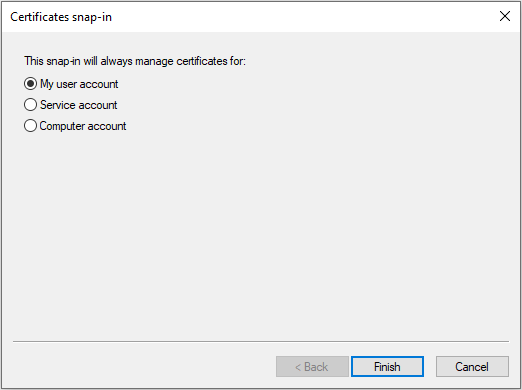
Step 6 - Choose Account: Choose the account type from the My user account, Service account, and Computer account. You can choose a My user account or local machine based on where you place your certificate.
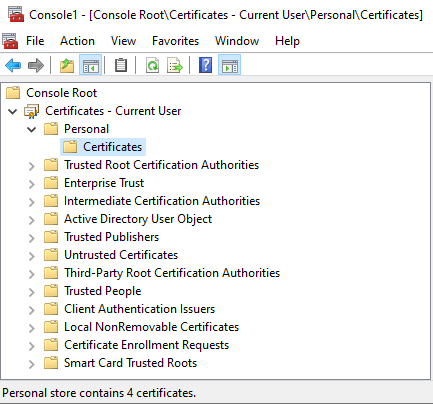
Step 7 - Locate the Certificate: In the left pane of MMC, expand Certificates and navigate Current User > Personal > Certificates to locate the TLS certificate that lists Client Authentication as an Intended Purpose and double-click. To learn about the certificate placement, refer to Considerations for Certificate Placement.
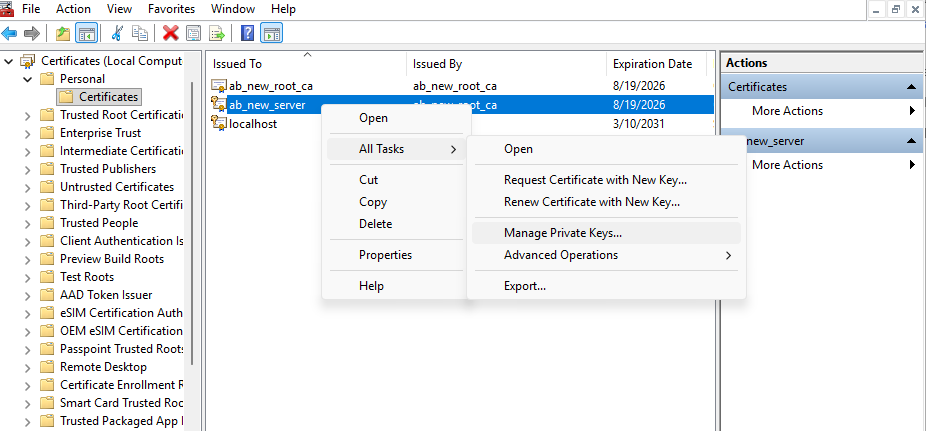
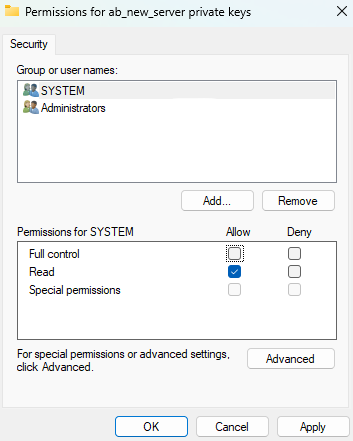
Please note that you need to grant permissions to your configured user accounts (other than an administrator of the machine) to access the certificate’s private key.
- Right-click the certificate and select: All Tasks -> Manage Private Keys
- In the permissions window, add the required user account by clicking on Add and then grant Read permission. Click Apply.
Note
If your configured user account does not have permission to access the certificate’s private key, NCache Client fails to retrieve the certificate during secure communication initialization, leading to TLS handshake failure and runtime exceptions.
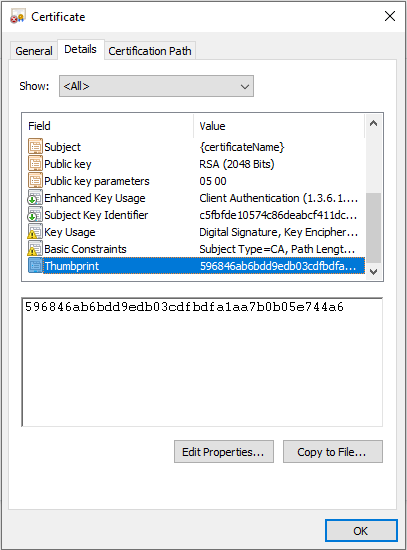
Step 8 - Get the Thumbprint: In the Certificate Dialog Box, click the Details tab and locate Thumbprint. Click on it and copy the hexadecimal characters from the box. Remove any colons (':') or extra spaces in the certificate thumbprint, if there are any. Save the thumbprint as it will be required in the following steps.
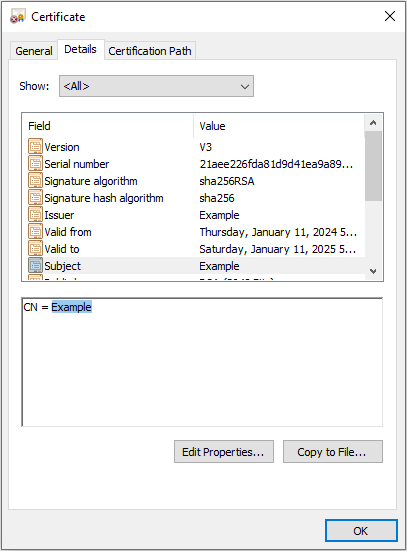
Step 9 - Copy the Certificate Name: Similarly, copy Certificate Name (CN) by clicking on the Subject property and copying only what comes after CN = in this case "Example". Save the certificate name as it will be required in the following steps.
Step 10 - Verify that the Service is Running: Make sure that the NCache Service is running under the same user that was used to import the certificate.
Step 11 - Enable TLS Security: Use the following PowerShell Cmdlet to enable TLS security. When executing the Enable-NCacheTLS command, make sure to specify the certificate name and thumbprint for the server that were saved in Steps 8 and 9. Similarly, you can add the client certificate by following the above-mentioned steps.
The Enable-NCacheTLS cmdlet is available when NCache is installed on the machine. On a client machine where NCache is not installed, configure TLS manually through the tls.ncconf file included with the NCache NuGet Package.
The following examples enable TLS for both client-server and server-server communication.
Configure Non-Mutual TLS
Non-mutual TLS encrypts client-server and server-server communication without requiring the connecting client or server to present a client certificate.
Enable-NCacheTLS -Node "20.200.20.39,20.200.20.40" -ServerCertificateCN "Example" `
                 -ServerCertificateThumbprint "596846ab6bdd9edb03cdfbdfa1aa7b0b05e744a6" `
                 -ServerToServerCommunication -ClientServerCommunication
For normal TLS (without mutual TLS), the tls.ncconf contains the following tags:
<tls-info>
 <server-certificate-cn>certificate-name</server-certificate-cn>
 <server-certificate-thumbprint>your-thumbprint</server-certificate-thumbprint>
 <client-certificate-cn></client-certificate-cn>
 <client-certificate-thumbprint></client-certificate-thumbprint>
 <enable>true</enable>
 <enable-client-server-tls>true</enable-client-server-tls>
 <enable-server-to-server-tls>true</enable-server-to-server-tls>
 <use-mutual-tls-for-client-to-server>false</use-mutual-tls-for-client-to-server>
 <use-mutual-tls-for-server-to-server>false</use-mutual-tls-for-server-to-server>
 <protocol-version>tls12</protocol-version>
</tls-info>
Configure Mutual TLS
Mutual TLS requires both server and client certificates. Each side authenticates the certificate presented by the other side.
Enable-NCacheTLS -Node "20.200.20.39,20.200.20.40" -ServerCertificateCN "Example" `
                 -ServerCertificateThumbprint "596846ab6bdd9edb03cdfbdfa1aa7b0b05e744a6" `
                 -ClientCertificateCN "MyClientCert" `
                 -ClientCertificateThumbprint "1234567890EFGHIJKL" `
                 -ServerToServerCommunication -ClientServerCommunication `
                 -UseMutualTLSForClientToServer True -UseMutualTLSForServerToServer True
For mutual TLS, the tls.ncconf contains the following tags:
<tls-info>
 <server-certificate-cn>certificate-name</server-certificate-cn>
 <server-certificate-thumbprint>your-thumbprint</server-certificate-thumbprint>
 <client-certificate-cn>certificate-name</client-certificate-cn>
 <client-certificate-thumbprint>your-thumbprint</client-certificate-thumbprint>
 <enable>true</enable>
 <enable-client-server-tls>true</enable-client-server-tls>
 <enable-server-to-server-tls>true</enable-server-to-server-tls>
 <use-mutual-tls-for-client-to-server>true</use-mutual-tls-for-client-to-server>
 <use-mutual-tls-for-server-to-server>true</use-mutual-tls-for-server-to-server>
 <protocol-version>tls12</protocol-version>
</tls-info>
For more examples on enabling TLS for different scenarios check Enable-NCacheTLS page.
Note
If the ProtocolVersion parameter is not provided in the above command, the default protocol used is TLS 1.2.
Important
Make sure that the configuration values are consistent on all server and client nodes to ensure connectivity and homogeneity of the cluster.
Step 12 - Restart the Services & Processes: Once the desired properties are set, restart the cache, client processes, and NCache Service. Make sure that the NCache Service is running under the same user that was used to import the certificate.
Note
Once the certificates have been enabled, make sure that:
- The NCache Service is running under the same user that was used to import the certificate.
- All client applications run on 64-bit machines.
Verify Successful Client Connectivity Through TLS
In order to verify successful client connectivity through TLS, you can run the Test Stress cmdlet using the PowerShell. The following example runs Test-Stress on the cache named demoCache.
Test-Stress -CacheName demoCache
You can also verify this using the Microsoft Network Monitor. In case TLS is enabled, the Protocol Name of the process PowerShell on running this command will be TLS.
Note
UseMutualTLSForClientToServer, EnableBridgeTLS, EnableClientServerTLS, EnableServerToServerTLS, and UseMutualTLSForServerToServer will not work if Enable hasn't been set as true in your tls.ncconf, regardless of whether they have individually been enabled.
Troubleshooting
Client connectivity through TLS can fail due to the following reasons:
- If the registry entries are missing, the connectivity might fail. Make sure that all the entries are made in the registry.
- If the NCache Service runs under a different user account than the account used to install the certificate, the service might not be able to access the certificate.
- Connectivity fails if the configured certificate thumbprint is incorrect or does not match an installed certificate.
- If the Trusted Root of the client does not have the CA of the server.
- If
UseMutualTLSForClientToServerorUseMutualTLSForServerToServerare true and the Trusted Root of the server does not have the CA of the client or the other server. - If the values of the properties are not the same in the client and server machine, you receive an error saying "Decryption Operation Failed".
