User Security
Configure NCache Security to protect cache server nodes using a robust framework for authorization and authentication. This page provides comprehensive guidance on setting up authorization and authentication within the NCache Security framework for cache server nodes. It will guide you through establishing LDAP-based authentication for user verification. Moreover, it also explains how to assign users to particular roles and permissions.
Important
All the participant nodes in a cluster should have uniform security settings.
Add Server to Active Directory
Adding Active LDAP Server in Linux
To configure and use LDAP on Linux systems, ensure you have the required LDAP utilities installed on your system. For installation instructions, please refer to the LDAP documentation.
Adding Active LDAP Server in Windows
As NCache supports LDAP-integrated security, to secure the cache nodes you should have established LDAP domain controller settings. You can configure these settings in NCache through the following steps:
- Launch the NCache Management Center by browsing to http://localhost:9801 or
<server-ip>:9801on Windows and Linux. - Click on
 present in the left hand menu to open the Environment Settings page. When this opens click on User Security.
 - This will open up a Domain Info page where you will configure the Domain Controller, Port, Search Base, and optionally Secondary Domain Controller (backup domain controller if your primary domain controller fails). If you are using a secure port, please select the Use SSL Port checkbox.
- Search Base specifies the base DN (Distinguished Name) for searching LDAP entries. It helps narrow down the search scope within the LDAP directory. If you are unsure about the Search Base, it is recommended to consult your LDAP administrator or IT department for an accurate domain name for your LDAP directory's structure.

- Click on Verify to verify the provided domain controller settings.
- On clicking verify you will get the following login prompt asking for valid user credentials.

- After authentication of user credentials, you will get a prompt asking you to save your changes to apply the domain controller settings.
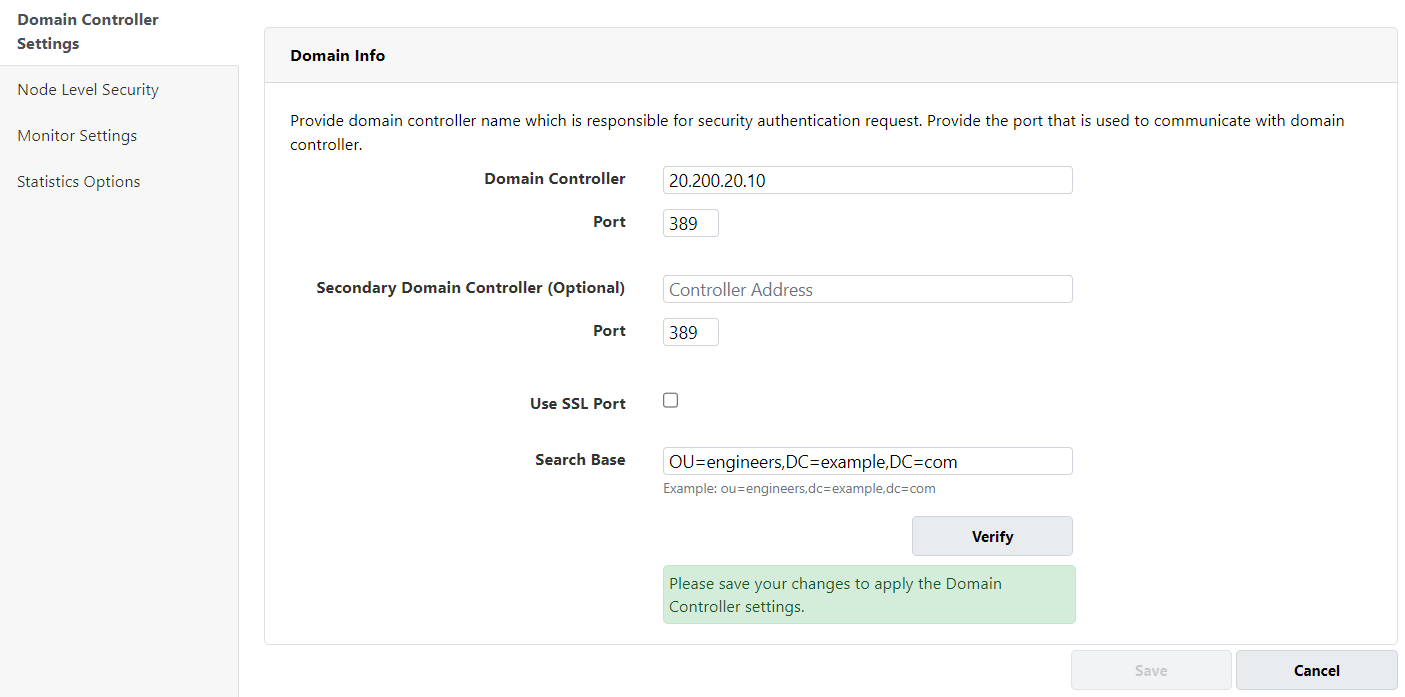
- Click on Save to save your domain controller settings.
Enable NCache Node Security
Once you have established the domain controller settings and saved them, now is time to secure your cache nodes by following the steps given below:
- Scroll down to Configure Security for Node.
- Specify the cache server node IP that you want to configure.
- Click Fetch Details to get the information of the node.
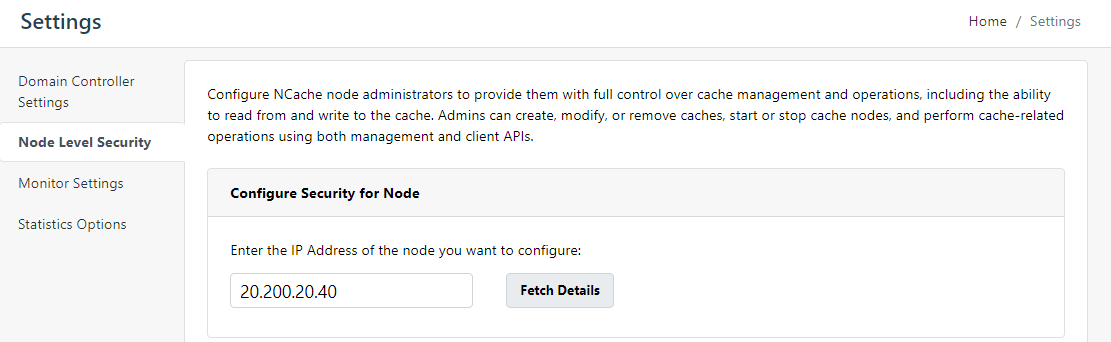
- Select the checkbox Enable Security. Next, specify the Users or Groups that should have permission to perform operations on the nodes.

- Click on Save.
Configuring Homogeneous Security Settings
After setting up security settings for one node, a prompt will appear asking you to add similar security settings to other nodes in that cluster by providing their IP addresses. It is required to configure similar security settings on all nodes in a cluster to avoid any problems while using the cache.
- After adding the IP addresses of all the nodes, click on Save.
- Upon clicking Save, the same security settings will be applied to all the other nodes in the cluster.

The next time you launch and access the NCache Management Center, you will encounter a login prompt requesting your authorized login credentials. Moreover, these security settings for the server node are also saved in security.ncconf under the <administrators> tag.
Add/Remove Users
After enabling security on an NCache node, you can add or remove users and groups based on the level of access they require. NCache supports Node Administrators, who can perform node-level management operations, and Cache Users, who are authorized to access specific caches only. The Node Administrator has already been configured in the above steps where you have specified Users or Groups to enable security upon. However, to add Cache Users you need to follow the steps mentioned below:
Adding Cache Users
The Node Administrator configured on this node has all the rights of the node and the configured caches. But, if you want to create users who have access over cache and not over a node, then you can configure Cache Users on that node. You can configure the Cache User by following the steps given below:
- In the NCache Management Center, click on Clustered Caches or Local Caches, based on your requirement.
- Against the cache name, click on View Details.
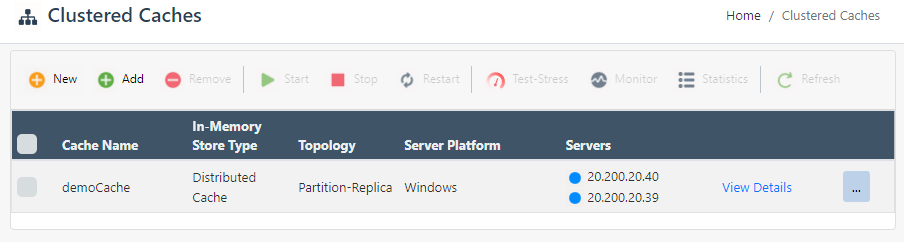
- This opens the detailed configuration page for the cache.
- Scroll down on the same page to find the Advanced Settings (Clustered Cache) section. Select Security and Encryption, it will open up a page where you can add one or more Users or Groups to configure as Cache Users.

- Similarly you can also Add gMSA Cache User. For more details on gMSA, please see Configure gMSA section.
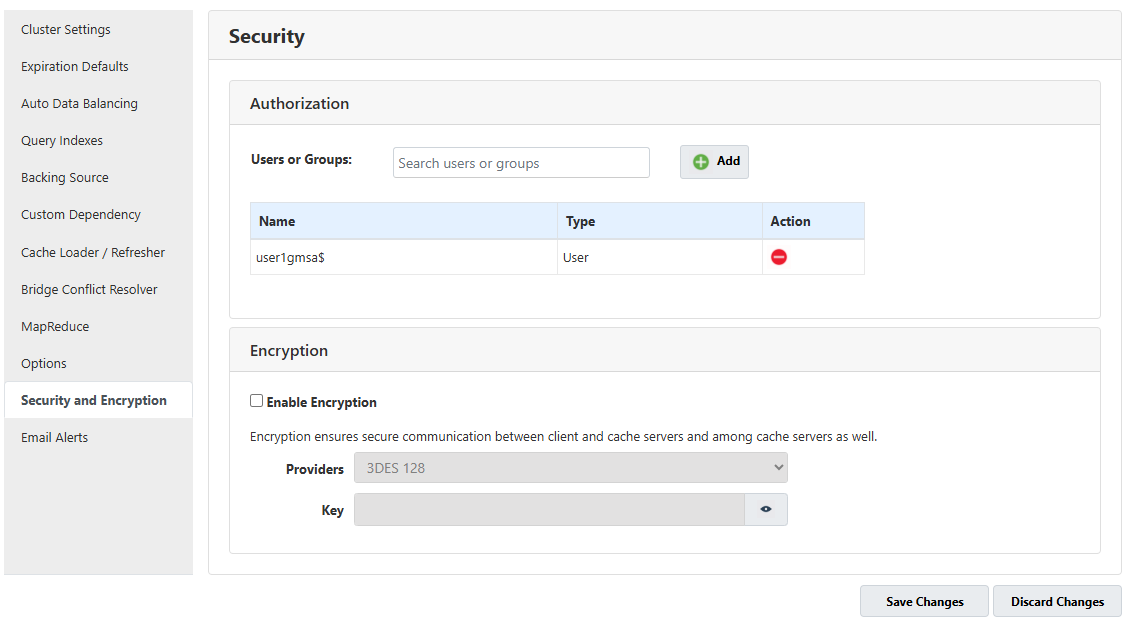
- Click on Save Changes to successfully add your Cache User or gMSA user.
Removing Cache Users
You can remove the Cache User by following the steps mentioned below:
- In the NCache Management Center, click on Clustered Caches or Local Caches, based on your requirement.
- Against the cache name, click on View Details.
- This opens the detailed configuration page for the cache.
- Scroll down on the same page to find the Advanced Settings (Clustered Cache) section. Select Security and Encryption, it will open up a page where you can remove one or more Users or Groups by clicking the
 under Action .
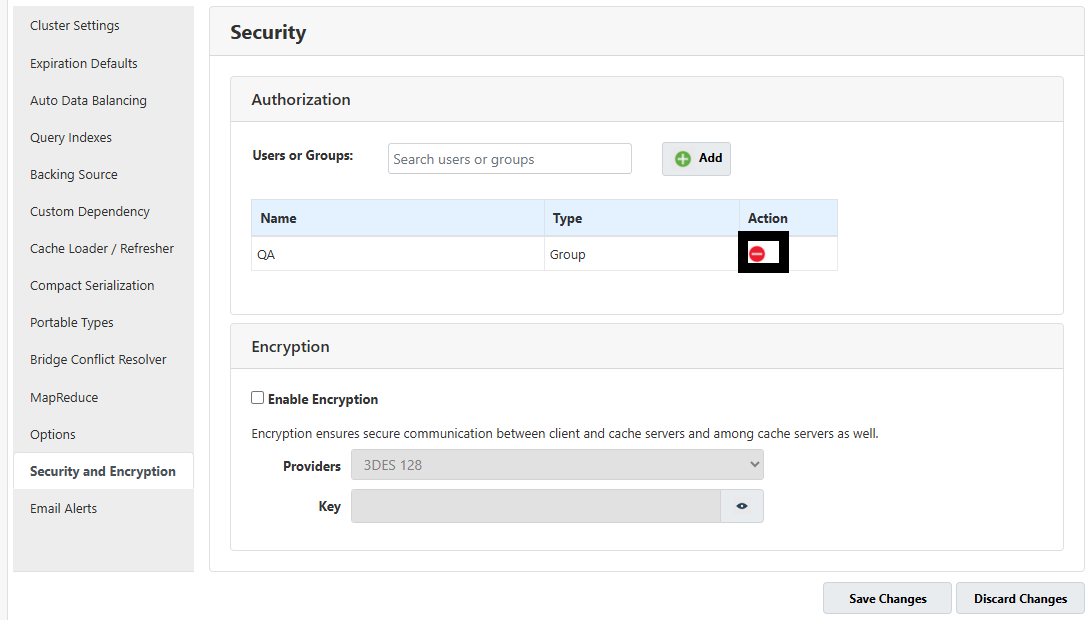
- Click on Save Changes to successfully remove your Cache User.
Credential Caching
To get the complete benefits of these access levels, NCache supports two types of LDAP users: Node Administrators (Users/Groups) and Cache Users (Users/Groups). Since NCache does not have its own authentication mechanisms, all the added users are first authenticated against their LDAP credentials. When a registered LDAP User gets added to the NCache, there is always a validation check through the domain controller to verify whether this user is registered with the domain or not. In this scenario, if the connection with the domain controller breaks, validation fails, and the user cannot perform any operation.
To avoid this, NCache offers Credential Caching where the user's credentials are stored in NCache so that an already authenticated user does not have to be authenticated repeatedly during the life of the process. It is disabled by default and the user can enable it by setting the NCacheServer.EnableCredentialCaching tag as True in the Service config file.
User Credential Authentication
By utilizing RSA-based cryptographic techniques, NCache secures user credential transmission during authentication. When a management tool or client needs to authenticate these credentials, it requests the server’s RSA-256 public key. The server generates a fresh public/private key pair for each process's lifecycle. Tools and clients encrypt user credentials (like username and password) with the server’s public key before transmitting them. The server decrypts these credentials using its private key to validate the user. This process ensures that credentials remain secure during transmission and are not vulnerable to interception or misuse.
Enable Credential Caching
NCache offers Credential Caching where the authenticated user's credentials are stored in the cache to avoid repeated authentications during the life of the process. This feature is disabled by default. To enable it, update the NCacheServer.EnableCredentialCaching tag to true.
<add key="NCacheServer.EnableCredentialCaching" value="true"/>
Enable Security Using PowerShell
NCache also provides a set of PowerShell cmdlets to seamlessly configure and manage security on the cache. You can add users, enable security, disable security, and remove users by using the following:
Enabling Security
To Enable Security you need to execute the following command. This command requires OS level Admin rights to successfully enable security on your NCache server.
- This command enables NCache security on the server 20.200.20.11. The machine administrator credentials are used to verify that David Watson has local administrator privileges on the specified server. The user Michael Parker is registered as the Node Admin, which authorizes the user to perform NCache management operations.
 $machineAdmin = Get-Credential david_watson `
  Enable-NCacheSecurity -Server 20.200.20.11 `
  -MachineAdminCredential $machineAdmin -NodeAdminName michael_parker `
  -NodeAdminDN "CN=Michael Parker,OU=engineers,DC=example,DC=com" `
  -DomainController domain_controller -DomainControllerPort 389
- This command enables NCache security on the server 20.200.20.11. As David Watson is a local account and cannot query the directory directly, John Smith is supplied via -DirectoryBrowsingCredential to browse the directory and validate Michael Parker's Distinguished Name against the domain controller.
$machineAdmin = Get-Credential david_watson `
 $directoryUser = Get-Credential john_smith `
 Enable-NCacheSecurity -Server 20.200.20.11 `
 -MachineAdminCredential $machineAdmin -NodeAdminName michael_parker `
 -NodeAdminDN "CN=Michael Parker,OU=engineers,DC=example,DC=com" `
 -DomainController domain_controller -DomainControllerPort 389 `
 -DirectoryBrowsingCredential $directoryUser
This command enables NCache security on the server with the IP address 20.200.20.11. Before enabling security, the command validates whether Michal Parker has the necessary privileges on the server.
Adding Node Administrators
Once you have enabled security on a node, you need to have Node Administrators member of active LDAP directory with full control over node, including cache management and cache API access.
- This command adds the user David Watson as an NCache admin on the server with the IP address 20.200.20.11.
$nodeAdmin = Get-Credential `
Add-NCacheUserOrGroup -Server 20.200.20.11 `
-AccessLevel Admin  -NodeAdminCredentials $nodeAdmin `
-UserOrGroupName david_watson `
-UserOrGroupDN "CN=David Watson,OU=engineers,DC=example,DC=com" `
-DomainController domain_controller
While executing the command please keep in mind that only the local administrator (domain user) of the machine can add the first Node Administrator. Subsequent Node Administrators can be added or removed by the existing Node Administrator.
- This command adds the user David Watson as a cache user for the 'defaultCache' cache hosted on the server with the IP address 20.200.20.11.
$nodeAdmin = Get-Credential `
Add-NCacheUserOrGroup -Server 20.200.20.11 `
-AccessLevel Cache -CacheName defaultCache `
-NodeAdminCredentials $nodeAdmin -UserOrGroupName david_watson `
-UserOrGroupDN "CN=David Watson,OU=engineers,DC=example,DC=com" `
-DomainController domain_controller
- You can also add a group of users as admin as NCache admin group. The following command adds a group named 'Dev' as an NCache admin group on the server with IP address 20.200.20.11.
$nodeAdmin = Get-Credential `
Add-NCacheUserOrGroup -Server 20.200.20.11 `
-AccessLevel Admin  -NodeAdminCredentials $nodeAdmin `
-UserOrGroupName dev `
-UserOrGroupDN "CN=Dev,OU=engineers,DC=example,DC=com" `
-DomainController domain_controller
- This command adds the gMSA 'user1gmsa$' as a cache user for the 'defaultCache' cache hosted on the server with the IP address 20.200.20.11.
$nodeAdmin = Get-Credential `
Add-NCacheUserOrGroup -Server 20.200.20.11 `
-AccessLevel Cache -CacheName defaultCache `
-NodeAdminCredentials $nodeAdmin -UserOrGroupName user1gmsa$ `
-UserOrGroupDN "CN=user1gmsa,CN=Managed Service Accounts,DC=example,DC=com" `
-DomainController domain_controller
Note
Please note that in Linux you can add Administrative Groups (sudo, root, wheel, etc) through the NCacheServer.LinuxAdminGroups tag to configure Node Administrators.
Granular Access Control: Adding Cache Users
Now you have successfully secured your node along with all the caches configured on it. But, if you want to limit some users' access to cache operations without management privileges, you can Add Cache Users. You can add multiple users or groups by using the similar cmdlet as for Node Administrator, by just specifying the AccessLevel cache parameter. You have to specify the cache to which that user should have access using the CacheName parameter. You can add the Cache User by running the following:
$nodeAdmin = Get-Credential `
Add-NCacheUserOrGroup -Server 20.200.20.11 `
-AccessLevel Cache -CacheName defaultCache `
-NodeAdminCredentials $nodeAdmin -UserOrGroupName david_watson `
-UserOrGroupDN "CN=David Watson,OU=engineers,DC=example,DC=com" `
-DomainController domain_controller
Removing Users
Along with adding users, Node Administrators also have the right to Remove Users.
- The following cmdlet removes the administrator user David Watson from the NCache server with the IP address 20.200.20.11:
$nodeAdmin = Get-Credential `
Remove-NCacheUserOrGroup -Server 20.200.20.11 `
-AccessLevel Admin -NodeAdminCredentials $nodeAdmin `
-UserOrGroupName david_watson
- The following command removes the administrator user David Watson from the NCache server with the IP address 20.200.20.11.
$nodeAdmin = Get-Credential `
 Remove-NCacheUserOrGroup -Server 20.200.20.11 `
-AccessLevel Cache -CacheName defaultCache `
-NodeAdminCredentials $nodeAdmin -UserOrGroupName david_watson
- This command removes the gMSA cache user user1gmsa$ from the cache named defaultCache on server 20.200.20.11. The credentials supplied through -NodeAdminCredentials are used to authorize the remove operation.
$nodeAdmin = Get-Credential
Remove-NCacheUserOrGroup -Server 20.200.20.11 `
-AccessLevel Cache -CacheName defaultCache `
-NodeAdminCredentials $nodeAdmin -UserOrGroupName user1gmsa$
- This command removes the group dev from the defaultCache cache hosted on the server with the IP address 20.200.20.11.
$nodeAdmin = Get-Credential
Remove-NCacheUserOrGroup -Server 20.200.20.11 `
-AccessLevel Cache -CacheName defaultCache `
-NodeAdminCredentials $nodeAdmin -UserOrGroupName dev
While attempting to remove a user with security enabled, if the targeted user is the last one, the system will prompt you to decide if you also want to disable security.
Disabling Security
NCache also provides the option to disable security without removing configured Node Administrators and Cache Users through the following cmdlet:
Disable-NCacheSecurity -Server 20.200.20.11 -AdminCredentials(Get-Credential john_smith)
This cmdlet also requires OS level admin rights to be executed successfully.
After you have configured security settings, they will be reflected in the security.ncconf config file shipped at %NCHOME%\config.
