Create New Distributed Cache
Create a new Distributed Cache and Pub/Sub Messaging Cache through either the NCache Management Center or PowerShell. Distributed caches support Partitioned, Replicated, and Partition-Replica topologies, which provide different combinations of scalability, high availability, and fault tolerance. During cache creation, you can configure cache size, add server nodes, select eviction policies, enable encryption or compression, and configure auto-start options.
Prerequisites
Ensure the NCache Service is started. If it is not, do the following:
- For .NET, type the following command in PowerShell (run as admin):
Start-Service -Name NCacheSvc
- For .NET Core, make sure that you run the NCache Service as an administrator. Here are the steps to do so:
- Open the Services window and look for NCache in the list.
- Right click on NCacheSvc from the list and choose Properties.
- Go to the Log On tab and click on the Browse button.
- In the object name field, type Administrator and click on the Check Names button.
- It will pick the appropriate Administrator, then click OK.
- Now, set a Password and click OK.
- Right click on the NCache Service and choose the Restart option. Now your service will start running as administrator.
Important
If all ports in the configured management port range are occupied, cache creation fails and NCache displays an error indicating that a custom management port is required. The NCache Service remains responsive.In this case, manually add the cache configuration to config.ncconf and assign the required management port to the same cache in ports.xml. For details about management ports, see Cache Server Ports.
Using the NCache Management Center
Launch the NCache Management Center by browsing to http://localhost:9801 or
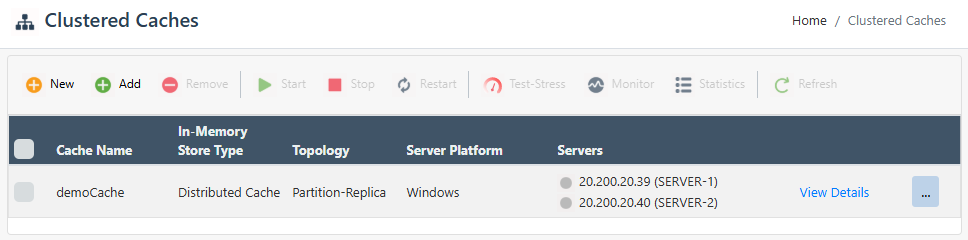
<server-ip>:9801.In the left navigation bar, click on Clustered Caches. This opens up the Clustered Caches page. It shows any existing clustered caches on your machine and additional details like Topology, Servers, and Server Platform.
To create a new distributed cache, click on New.
If you want to create a distributed cache:
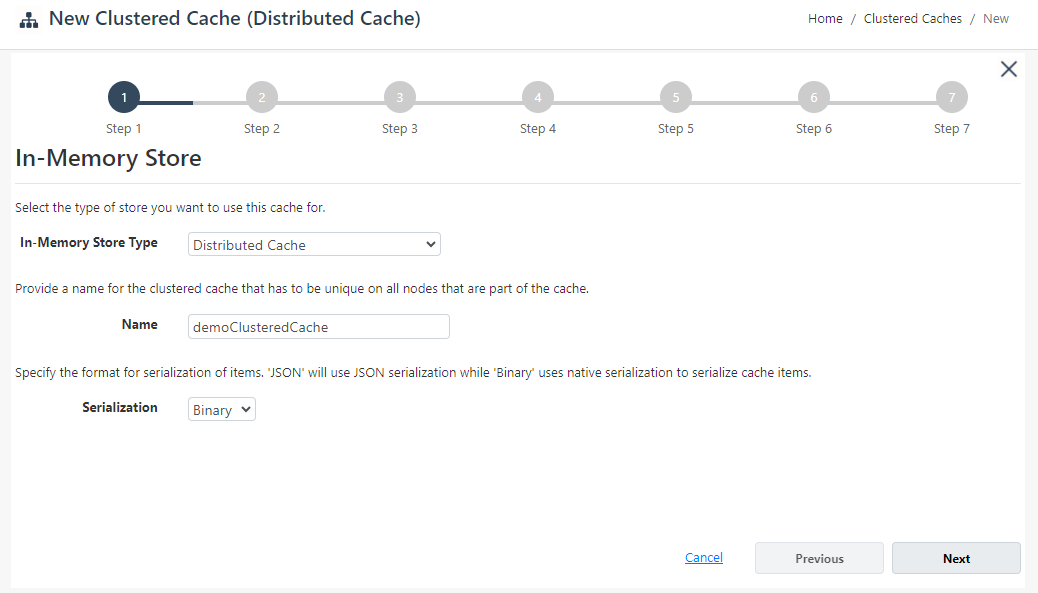
- From the In-Memory Store Type dropdown menu, select Distributed Cache and specify the name of your cache. Click Next.
Warning
If a cache with the specified name already exists, you are prompted with an error message.
Note
If you select Pub/Sub Messaging, follow the same configuration steps as Distributed Cache.
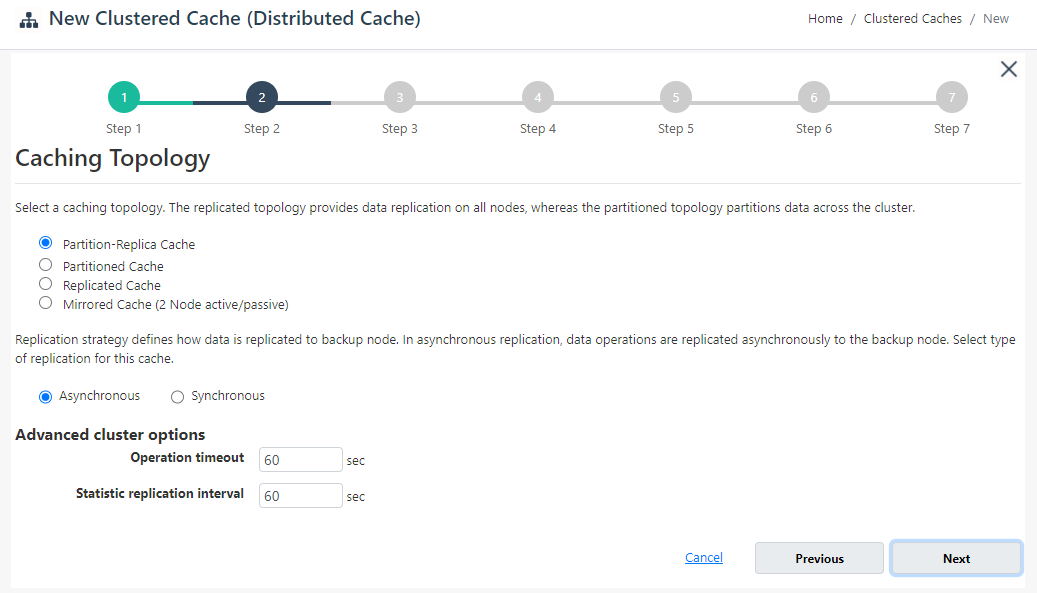
- Select the caching topology and any advanced options like Operation timeout and Statistic replication interval. If you have selected the Partition-Replica Cache topology, you have to select a Replication Strategy, either Asynchronous or Synchronous. Click Next.
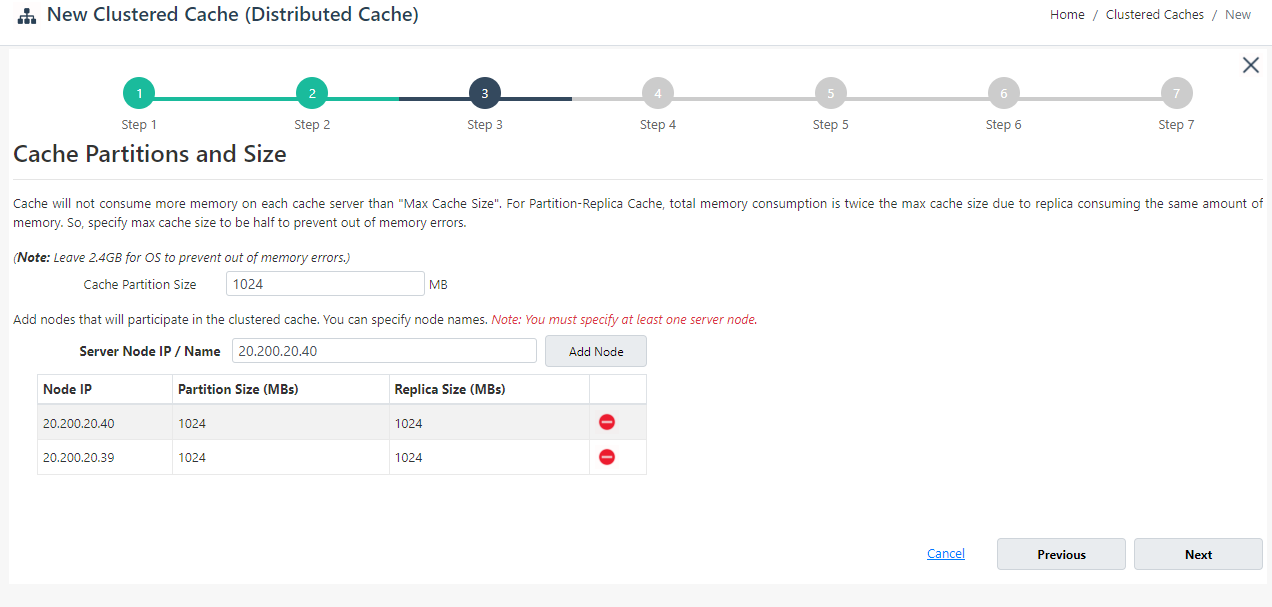
- Specify the Maximum Size of the cache, if required. You can also add cache nodes to the cluster by specifying the node IP address and clicking on the Add Node button. To add more nodes, click Add Node. Click Next once all the required nodes are added.
Warning
If a node is already registered on that cache, a notification is prompted.
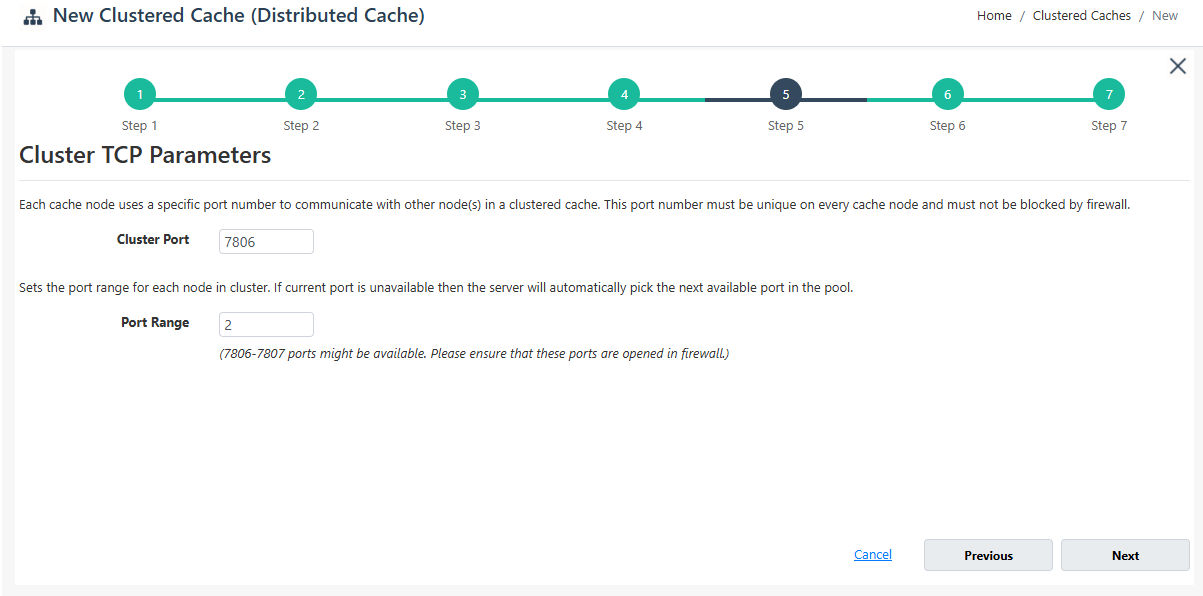
- Change the Cluster Port and Port Range, if required. Click Next.
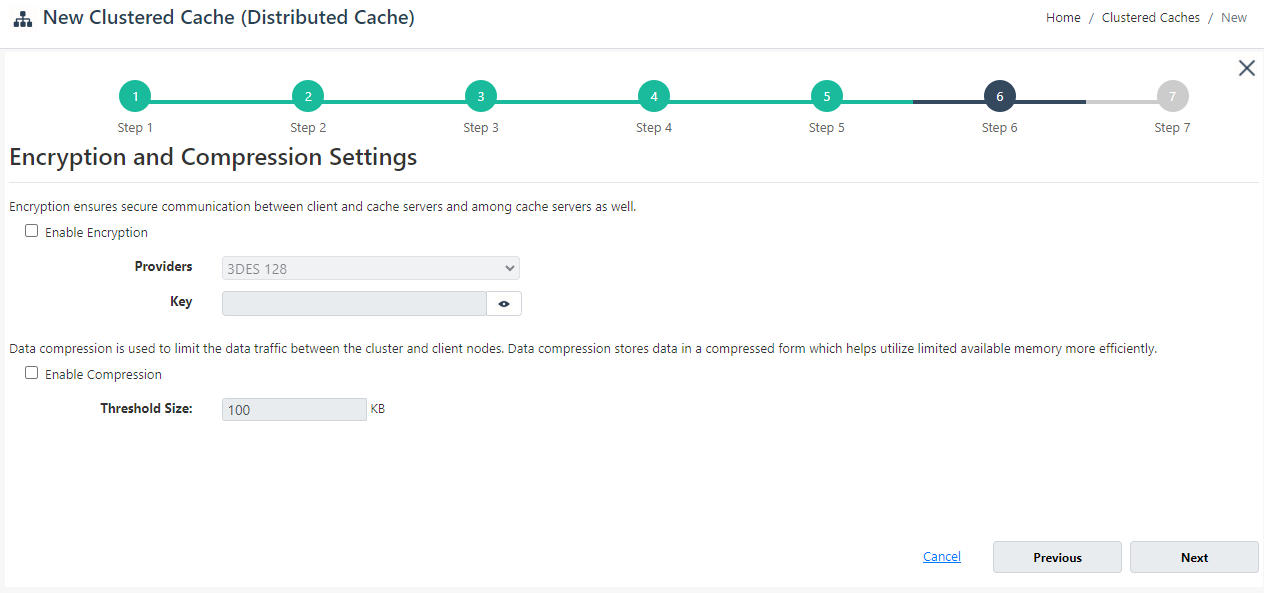
- If you want to enable encryption and compression, select the Enable Encryption and Enable Compression checkboxes. If enabled, set the Provider and Key for encryption and Threshold Size for compression. Click Next.
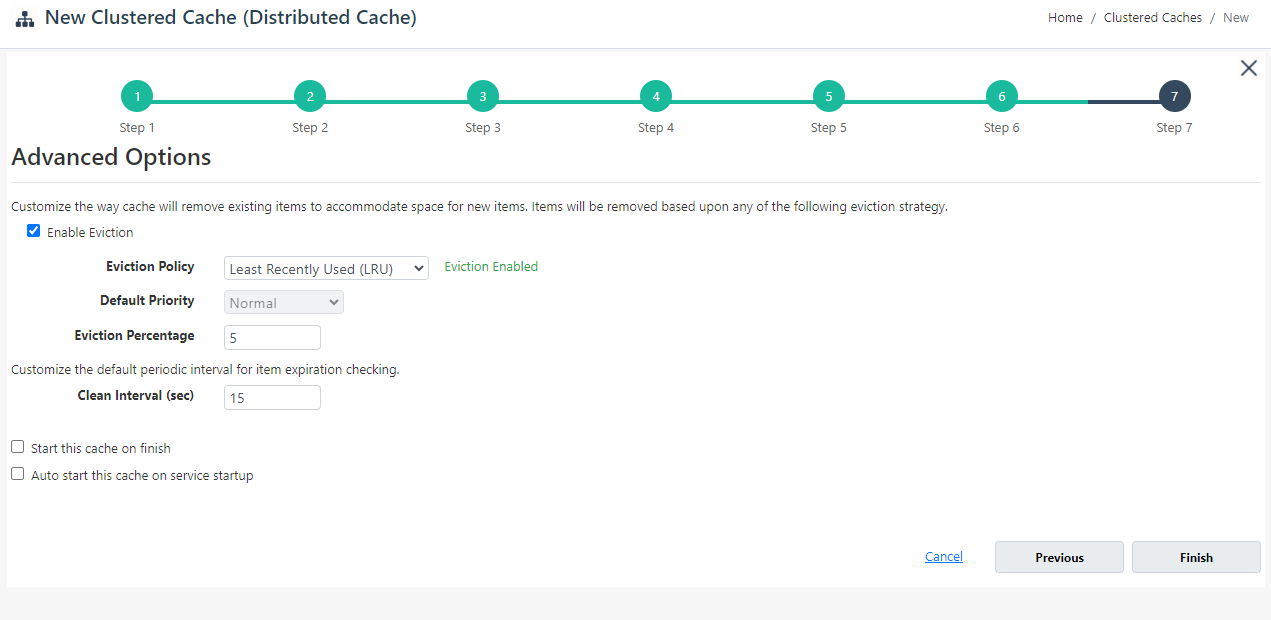
On Advanced Options page, you can configure the following settings:
Eviction is enabled by default. You can configure the Eviction Policy accordingly. If you want to disable eviction, uncheck the checkbox Enable Eviction.
You can also change the Eviction percentage; items will be evicted from the cache using this percentage value if eviction is enabled.
You can change the Clean interval value. The default is 15 seconds.
This cache can be started automatically upon the completion of this process if you have selected the Start this cache on finish checkbox on this dialog box.
You can make the cache start automatically after service restart by selecting the Auto start this cache on service startup checkbox.
- Click Finish. The created cache will appear on the Clustered Caches page with the server nodes and their status. A success notification will be received in the notification panel.
Important
If all ports in the configured management port range are occupied, cache creation fails and NCache displays an error indicating that a custom management port is required. The NCache Service remains responsive. In this case, manually add the cache configuration to config.ncconf and assign a management port to the same cache in ports.xml. The cache must be present in both files.
Using PowerShell
You can use PowerShell to manage distributed caches by using the NCache supported cmdlets. The New Cache cmdlet enables the user to create a new cache on one or more server nodes.
Distributed Cache
- This command creates a distributed cache named defaultClusteredCache of PartitionReplica topology of size 1024MB on server nodes 20.200.20.11 and 20.200.20.12. You can explicitly specify InMemoryStoreType as DistributedCache. If
InMemoryStoreTypeis not specified, the command will create a distributed cache, since it is the default option.
New-Cache -Name defaultClusteredCache -Server "20.200.20.11,20.200.20.12" `
          -Size 1024 -Topology PartitionReplica
- This command creates a new distributed cache named defaultCache on server 20.200.20.11 having the size of 1024 MB, topology as Partitioned, eviction policy set as priority based, default priority set as high, as well as eviction ratio set as 10%. The cleanup interval of the cache will be 20 seconds and port 9851.
New-Cache -Name defaultCache -Server 20.200.20.11 `
          -Size 1024 -Topology Partitioned `
          -EvictionPolicy priority -DefaultPriority high `
          -EvictionRatio 10 -CleanupInterval 20 `
          -ClusterPort 9851
- This command creates a new distributed cache named defaultCache on servers 20.200.20.11 and 20.200.20.12 having size 1024 MB, topology replicated, and occupying the port 9851.
New-Cache -Name defaultCache -Server "20.200.20.11,20.200.20.12" `
          -Size 1024 -Topology Replicated `
          -ClusterPort 9851
- This command creates a new distributed cache named defaultCache on server 20.200.20.11 with size 1024 MB using security credentials.
New-Cache -Name defaultCache -Server 20.200.20.11 `
          -Size 1024 -Credentials(Get-Credential john_smith)
Distributed Pub/Sub Messaging Cache
- In a similar way, you can create a Pub/Sub Messaging cache using the New Cache cmdlet. This command creates a cache named defaultCache of PartitionReplica topology of size 1024MB with clean up interval of 20 sec, eviction policy set as priority based, default priority set as high, as well as eviction ratio set as 10%, occupying the port 9851 on server nodes 20.200.20.11 and 20.200.20.12.
New-Cache -Name defaultCache -InMemoryStoreType PubSubMessaging `
          -Server "20.200.20.11,20.200.20.12" -Size 1024 `
          -Topology PartitionReplica -CleanupInterval 20 `
          -EvictionPolicy priority -DefaultPriority high `
          -EvictionRatio 10 -ClusterPort 9851
