NCache Deployment
The NCache deployment process leverages Azure Managed Applications and Virtual Machine Scale Sets (VMSS) to automate the provisioning and configuration of NCache server nodes. This deployment model ensures that your cache cluster is managed efficiently within your own environment, providing built-in scalability, high availability, and fault tolerance.
NCache Cloud on Azure is offered through multiple flexible plans, including an Hourly pricing model where software usage is billed per hour based on the selected server plan, as well as Free Evaluation/ BYOL and Free Dev/QA options for various testing and licensing needs.
Prerequisites
Before deploying NCache Cloud on Azure, ensure that the following requirements are met to facilitate a seamless installation process.
Setup Azure Infrastructure
NCache Cloud deploys as a managed application that attaches to your existing infrastructure. So, you must pre-configure the following resources in your target deployment region before initiating the NCache Cloud setup:
Resource Group: The Azure container where your NCache deployment is organized.
Managed Identity Resource: Ensure a User-Assigned Managed Identity with Contributor permissions on the target resource group has already been created. This identity enables NCache automation to provision and handle the lifecycle of VMSS nodes and related resources.
Virtual Network (VNet): An existing VNet where NCache servers run.
NCache Subnet: A specific subnet named ncache-subnet must be created within your VNet with public access. NCache VMSS instances are deployed on this subnet.
Accepting NCache Cloud Image Terms
Before proceeding with any of the deployment plans, ensure that your Azure subscription has accepted the legal terms for NCache Cloud images. Failure to do so may result in a deployment error referencing "PurchaseIdentity.PrincipalName".
Use az vm image terms accept Azure CLI command to programmatically accept the legal license and purchase terms for a marketplace Virtual Machine (VM) image. This is mandatory when deploying specialized images that have extra costs or legal agreements, allowing the deployment to proceed without manual interaction. To resolve or prevent this error, run the following commands:
Launch Azure Cloud Shell: You can launch the Cloud Shell by clicking the >_ icon in the top navigation bar of the Azure Portal. Alternatively, visit shell.azure.com.
Connect to Azure: Execute the following command to connect with Azure.
Connect-AzAccount
- Accept Terms: Execute the following script to accept the terms for NCache Cloud Marketplace images:
az vm image terms accept --publisher ncache --offer ncache_vm_offer_win --plan byol
az vm image terms accept --publisher ncache --offer ncache_vm_offer_win --plan ent-4-2
az vm image terms accept --publisher ncache --offer ncache_vm_offer_win --plan ent-8-2
az vm image terms accept --publisher ncache --offer ncache_vm_offer_win --plan ent-8-4
az vm image terms accept --publisher ncache --offer ncache_vm_offer_win --plan ent-16-2
az vm image terms accept --publisher ncache --offer ncache_vm_offer_win --plan ent-16-4
az vm image terms accept --publisher ncache --offer ncache_vm_offer_win --plan ent-16-8
az vm image terms accept --publisher ncache --offer ncache_vm_offer_win --plan ent-32-4
az vm image terms accept --publisher ncache --offer ncache_vm_offer_win --plan ent-32-8
az vm image terms accept --publisher ncache --offer ncache_vm_offer_win --plan ent-32-16
az vm image terms accept --publisher ncache --offer ncache_vm_offer_win --plan ent-64-8
az vm image terms accept --publisher ncache --offer ncache_vm_offer_win --plan ent-64-16
az vm image terms accept --publisher ncache --offer ncache_vm_offer_win --plan ent-64-32
az vm image terms accept --publisher ncache --offer ncache_vm_offer_win --plan ent-128-16
az vm image terms accept --publisher ncache --offer ncache_vm_offer_win --plan ent-128-32
az vm image terms accept --publisher ncache --offer ncache_vm_offer_win --plan ent-128-64
az vm image terms accept --publisher ncache --offer ncache_vm_offer_win --plan ent-256-32
az vm image terms accept --publisher ncache --offer ncache_vm_offer_win --plan ent-256-64
Deployment Steps
Following are the initial steps for all deployment models on Azure:
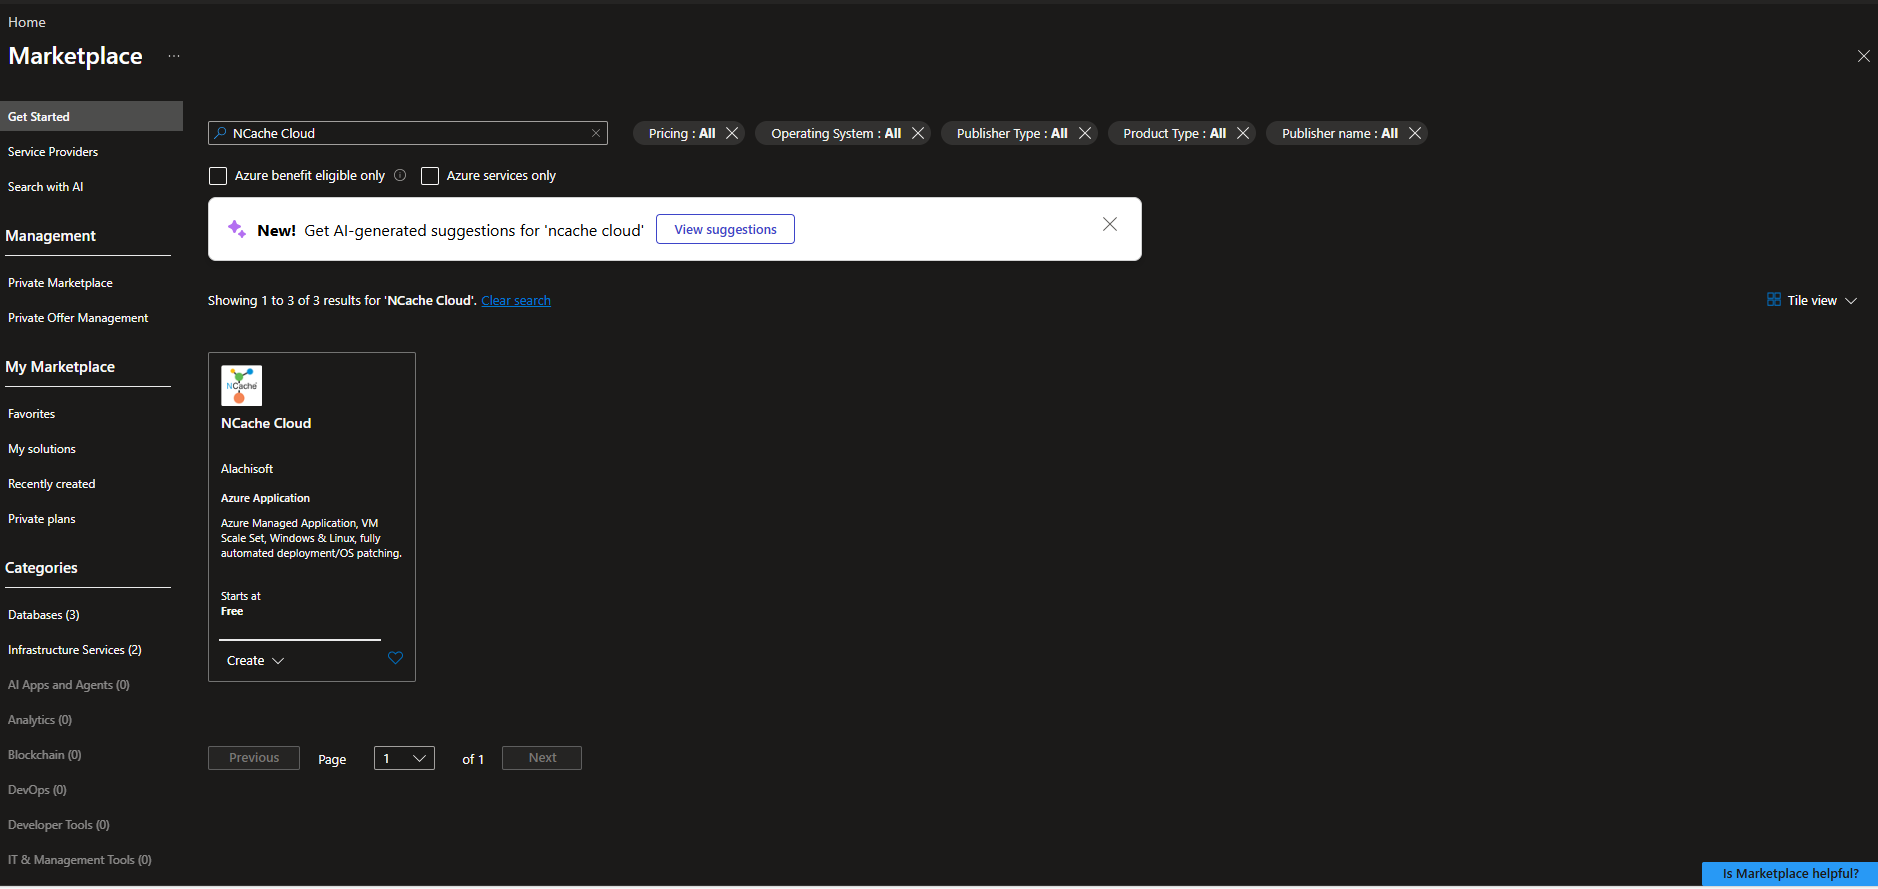
Go to Azure Portal and log in.
From the Azure Services, select Marketplace.
In the search box, type NCache in the Discover Products section and choose NCache Cloud Azure Application.
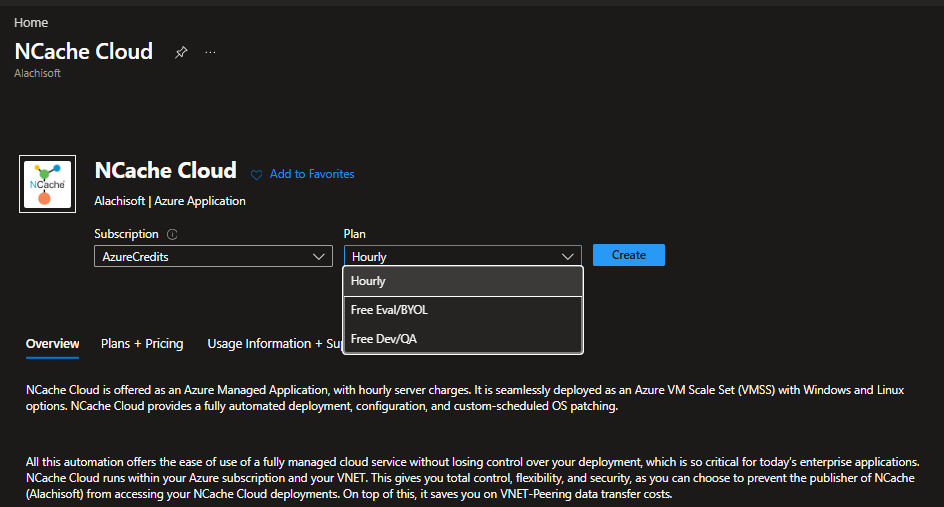
Step 1: Select a Plan
On selecting NCache Cloud Azure application, a new page with Subscription and Plan options will appear. NCache provides following plans:
Hourly: It provides an on-demand, pay-as-you-go approach to distributed caching on Azure offering 4GB, 8GB, 16 GB, 32GB, 64GB and 256GB server plans. Designed for flexibility and rapid deployment, this plan eliminates the need for pre-obtained license keys or manual registration. Each server node automatically registers upon activation, allowing you to scale your cluster up to 10 nodes instantly while ensuring your costs align directly with your hourly usage.The plan is best for production environment or temporary deployments where you want pay-as-you-go billing.
Free Eval (60-days): This plan offers a 60-day free trial on all server plans. In this plan the software is completely free to use, however you have to pay for the underlying Azure infrastructure. The plan is best for Trial users evaluating NCache before purchase.
BYOL: This plan offers you to reuse the existing licenses or purchase them separately to deploy NCache. You only pay for the underlying infrastructure, with the option to handle license purchases or renewals directly through the Azure Marketplace.The plan works best for exixting NCache customers who already have licenses.
Free Dev/QA: This plan offers a free 4GB single-server deployment specifically for development and testing. The NCache software is provided at no cost, meaning you pay only for the underlying Azure infrastructure. This plan includes a 2GB cache size with certain performance limitations best for development and testing with a small single-server deployment.
On this page we will proceed with Hourly server deployment.
Note
For an hourly subscription, you are not required to have an installation or evaluation key beforehand. These machines automatically register themselves upon activation and are charged on an hourly basis.
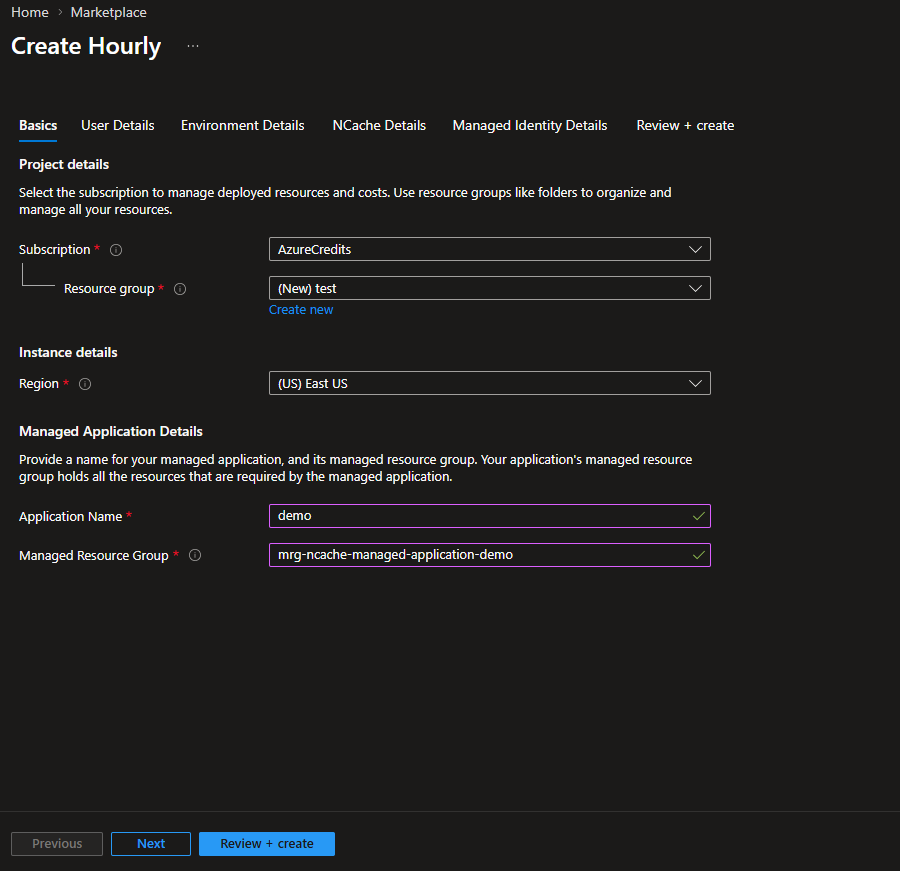
Step 2: Basics
After clicking Create on your chosen plan, configure the core Azure project parameters:
Subscription: Select the active Azure subscription for billing and resource allocation.
Resource Group: Identify the group where the NCache resources will be logically organized.
Region: Select the geographical location for your deployment.
Managed Application Details:
Application Name: Assign a unique identifier for the NCache Managed Application.
Managed Resource Group: Specify the name for the resource group that Azure will manage internally to hold the application's infrastructure.
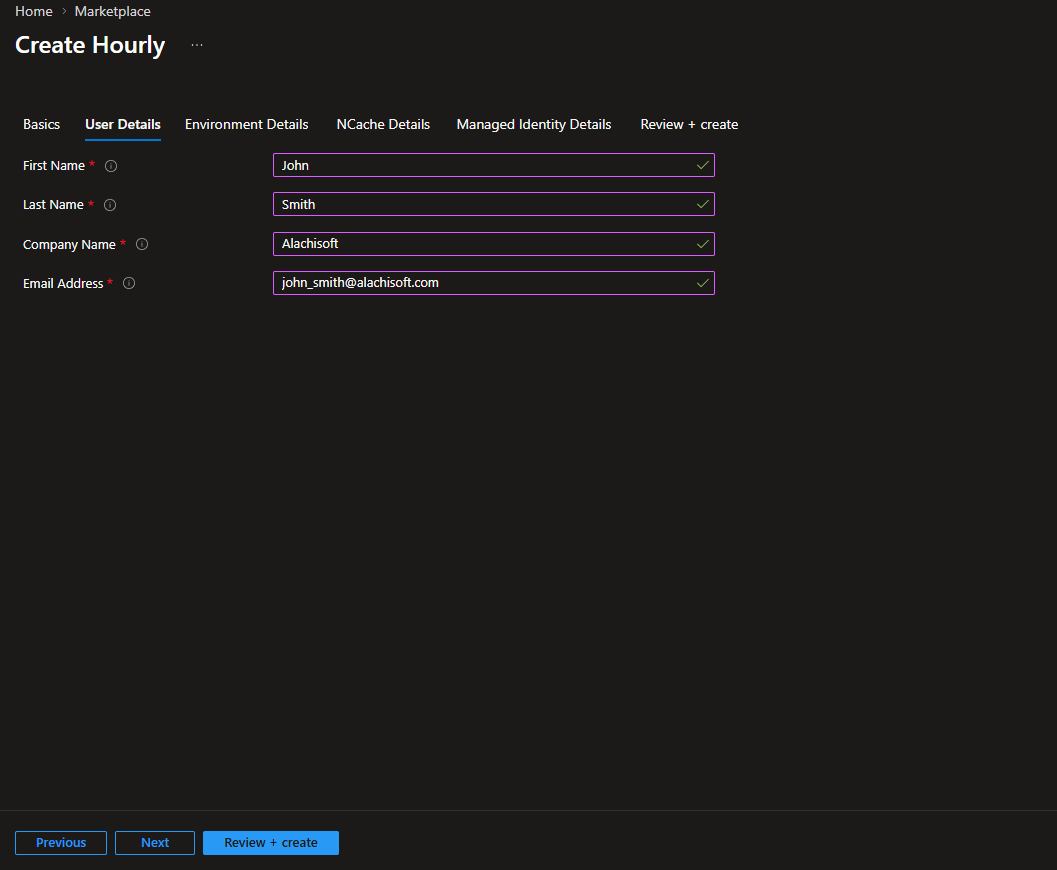
Step 3: User Details
Upon clicking Next, you will land on the User Details page where you need to provide the user information including First Name, Last Name, Company Name, and, Email Address. Click Next.
Step 4: Environment Details
Upon clicking Next, you will land on the Environment Details page. Provide environment-related details as follows:
Name & Type: Assign an environment name and designate the type (e.g., Production or Staging).
Install/License Key: Required for BYOL or Free Eval; however, for the Hourly plan, this is automatically handled.
Admin Credentials: Set the Admin Username, Password, and Confirm Password for VM-level access.
Number of Servers: Set the initial node count. You can scale beyond 10 nodes post-deployment via the Administrator's Guide.
Connectivity & Storage: Configure the network infrastructure and storage performance levels to ensure optimal cluster accessibility and data reliability.
Enable Public IP Address: Select this option if you want to access the VMSS instances externally for administrative purposes, such as RDP access or browser-based access to the NCache Management Center through port 8251. Public IP access is for management only and should not be used for NCache client communication.
Virtual Network: Select the VNet for deployment.
OS Disk Type & Availability Zone: Choose the storage performance level and physical location within the region for high availability.
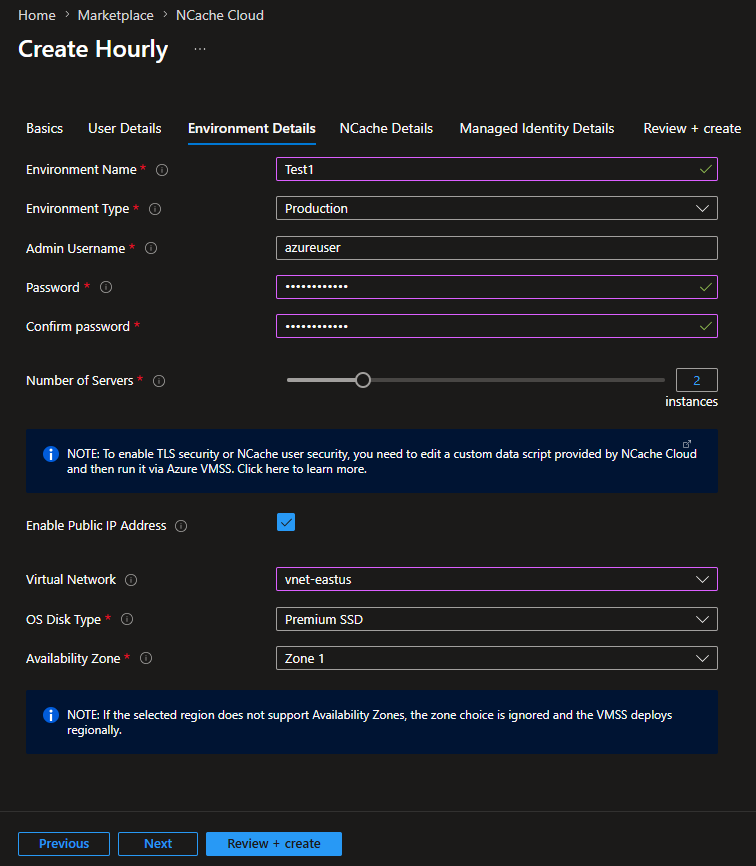
Note
To enable TLS security or NCache user security, you need to edit a customdata script provided by NCache Cloud and then run it via Azure VMSS. See Security Configuration in Azure to learn more.
Step 5: NCache Details
Configure software specifications and maintenance windows:
Version, Operating System, & Server Plan: Select the NCache version, OS, and hardware resource profile.

OS Patch Schedule: The OS Patch Schedule automates critical security updates for your cluster nodes during designated low-traffic windows. To ensure maintenance aligns with your specific operational hours, NCache schedules these updates based on your selected time zone. You can configure this as follows:
Week of the Month: Select the specific week (First, Second, Third, Fourth, or Last) during which the maintenance window should occur. This allows you to align patching with your organization's internal maintenance cycles.
Day of the Week: Choose the preferred day (e.g., Sunday or Saturday) to execute the updates. Typically, a day with the lowest recorded application traffic is selected to minimize the impact of brief node reboots on end users.
Time Zone: Specifies the local time settings for your specific region. This setting ensures that the maintenance schedule is correctly reconciled with local operational hours and accounts for regional variations. The default value for time zone is UTC.
Verification of Updates: You can verify the status and details of the patching process at two levels:
Orchestrator Level: Check the Runbook resource within your managed resource group. An Azure Automation Runbook is a compilation of routines that perform automated tasks. To verify:
Navigate to the Azure Managed Resource Group (the infrastructure group automatically created during deployment, often prefixed with mrg-).
Select the Automation Account.
Under Process Automation, click Runbooks.
Select the relevant runbook and check the Jobs section for execution status (Completed, Failed, etc.).
VM Level: For granular details, access each individual VM and review the patch-logs.txt file placed at C:\Program Files\NCache\log-files. This log identifies the specific patches applied, the current status of the VM, and whether a restart was triggered by the updates.
Following is the snapshot of a sample patch-logs.txt file which shows the script fetching all the caches from NCache, then it begins the cycles where it checks for updates and then logs the status of each available update (Accepted, Downloaded, Installed).
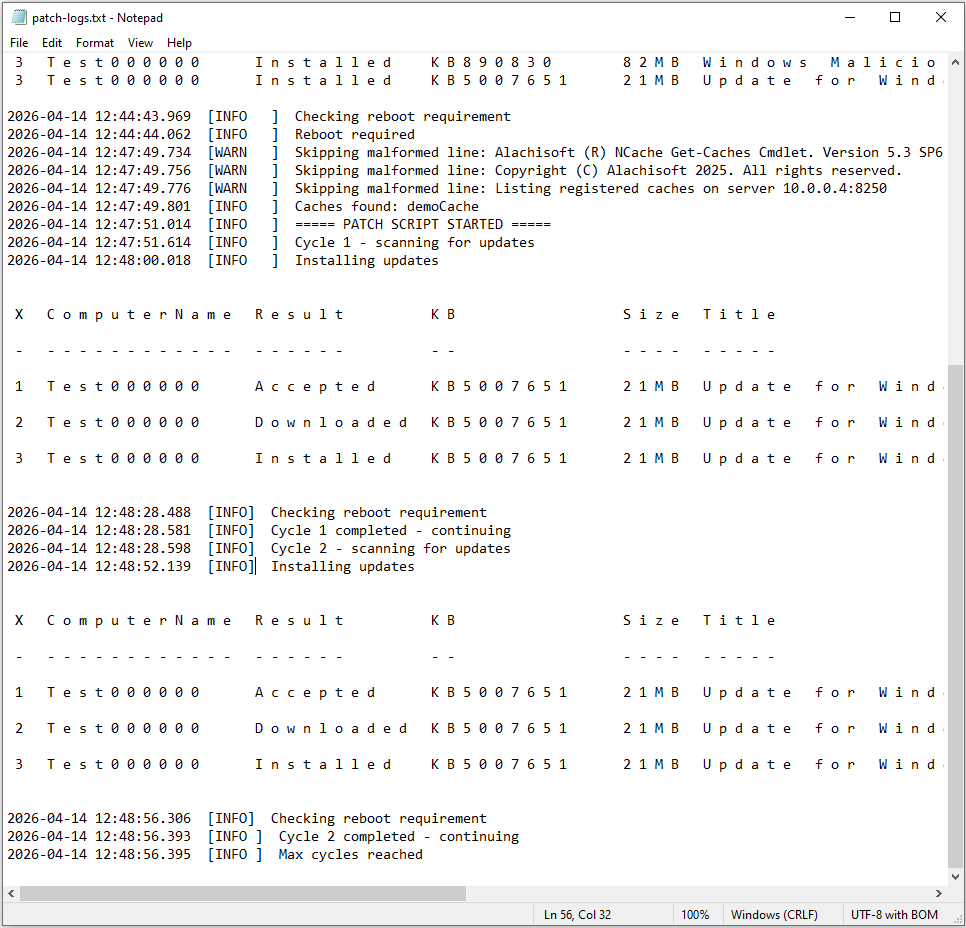
Failure Scenarios and Troubleshooting: The NCache Cloud orchestrator is designed to be fail-forward. This means that if an update fails on a specific VM, the orchestrator logs the error and moves to the next node in the cluster to ensure the maintenance window completes.
Windows Update Module Exceptions: The patch-logs.txt shows specific error codes (e.g., 0x80244017) during the "Downloaded" or "Installed" phase of a cycle.
Cause: These are standard Windows Update errors typically caused by corrupted local update caches, connectivity issues to Microsoft Update servers, or specific KB conflicts.
Solution: No immediate action is required. The orchestrator will retry these updates during the next monthly patch schedule. However, if the update is critical for security compliance, log into the specific VM and attempt to install the KB manually via the Windows Update UI to diagnose the OS-level failure.
Persistent Update Dependencies (Cycle Exhaustion): A specific update still shows as "Available" or "Failed" even after the 3rd patching cycle is complete.
Cause: Some complex update chains require more than three reboots/cycles to fully register and install. The orchestrator limits cycles to three to prevent infinite reboot loops and ensure the cluster returns to an operational state within the maintenance window.
Solution: These "hidden" updates will be picked up in the next scheduled patching window. If the system is significantly behind on updates (e.g., a new VM deployment), you may manually run the PSWindowsUpdate module on that specific node.
Unexpected Script or Environment Exceptions: The log shows exceptions such as "Service NCacheSvc could not be stopped" or "Access to the path... is denied."
Cause:
- The Managed Identity has lost the required permissions (Contributor) on the Azure Managed Resource Group.
- Manual file locks or anti-virus software are interfering with the NCache log directory or the marker file path.
Solution:
- Verify that the User-Assigned Managed Identity still has the Contributor role assigned at the Resource Group level.
- Ensure that no third-party security software is blocking the execution of PowerShell scripts or the writing of .txt marker files in the NCache installation folder.
Post-Patching Service Failure: The patching cycles complete successfully, but the log indicates a failure during the "Start all caches" phase.
Cause: The VM OS may have completed its reboot, but dependent network resources or internal OS services haven't fully initialized when the NCache service attempt was made.
Solution: Check the NCache Cache Logs to see if the service failed to bind to a specific IP or port. Usually, a manual service start via NCache Web Manager or PowerShell will resolve this if the OS patching itself was successful.
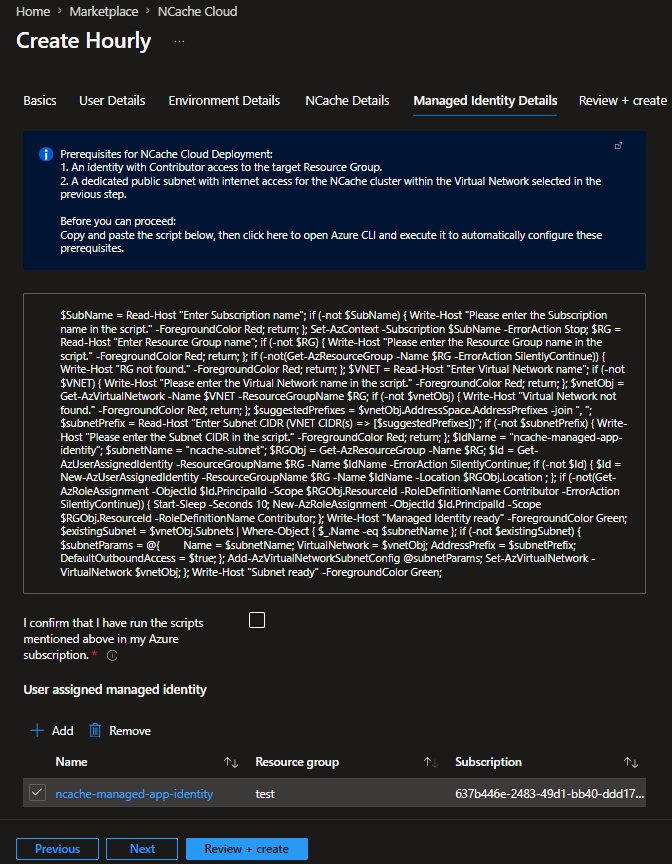
Step 6: Managed Identity Details
NCache Cloud is a fully managed solution that resides within your own subscription, utilizing a Managed Identity Resource to give you full control and security over the deployment.
Contributor Access: The deployment identity must have Contributor permissions on your target Resource Group.This allows NCache to create and delete the VMSS nodes. To do this manually, use Azure RBAC in the Access Control (IAM) tab of your Resource Group.
Deployment Script: You must execute the provided script in your Azure subscription. This script automates the infrastructure requirements by performing the following actions:
Environment Validation: Prompts for your Subscription, Resource Group, and Virtual Network to set the correct deployment context.
Identity Provisioning: Creates a User-Assigned Managed Identity named ncache-managed-app-identity if it does not already exist
Subnet Creation: Creates
ncache-subnetif missing. To do this manually:Navigate to your Virtual Network > Subnets.
Click + Subnet and set the Name exactly to ncache-subnet.
Assign a valid IPv4 address range (CIDR) that does not overlap with existing subnets.
Select Save.
A standard subnet requires an address prefix (e.g., 10.0.1.0/24). Ensure it is associated with a Network Security Group (NSG) that allows ports 8250-8251 for management. For more details see Microsoft Azure Subnet Creation docs.
Role Assignment: Assigns the Contributor role to the identity at the Resource Group scope, allowing NCache to manage resources on your behalf. To do this manually:
Go to your Resource Group > Access Control (IAM).
Click Add > Add role assignment.
Select Contributor, then select your Managed Identity. For further details see Microsoft Azure Role Assignment docs.
# This script creates a user assigned managed identity and assigns it the contributor role on the resource group. This is required for NCache to be able to create resources on behalf of the user.
# It also creates a subnet in the specified virtual network with the necessary configuration for NCache to use it for its cluster nodes.
# Note: You need to have the Azure PowerShell module installed and be logged in to your Azure account to run this script. You also need to have the necessary permissions to create managed identities and assign roles in the target resource group.

# This script will prompt you for the subscription name and the resource group name
$SubName = Read-Host "Enter Subscription name"
if (-not $SubName) {
    Write-Host "Please enter the Subscription name in the script." -ForegroundColor Red
    return
}
Set-AzContext -Subscription $SubName -ErrorAction Stop

$RG = Read-Host "Enter Resource Group name"
if (-not $RG) {
    Write-Host "Please enter the Resource Group name in the script." -ForegroundColor Red
    return
}
if (-not(Get-AzResourceGroup -Name $RG -ErrorAction SilentlyContinue)) {
    Write-Host "RG not found." -ForegroundColor Red
    return
}

$VNET = Read-Host "Enter Virtual Network name"
if (-not $VNET) {
    Write-Host "Please enter the Virtual Network name in the script." -ForegroundColor Red
    return
}
$vnetObj = Get-AzVirtualNetwork -Name $VNET -ResourceGroupName $RG
if (-not $vnetObj) {
    Write-Host "Virtual Network not found." -ForegroundColor Red
    return
}

$suggestedPrefixes = $vnetObj.AddressSpace.AddressPrefixes -join ", "
$subnetPrefix = Read-Host "Enter Subnet CIDR (VNET CIDR(s) => [$suggestedPrefixes])"
if (-not $subnetPrefix) {
    Write-Host "Please enter the Subnet CIDR in the script." -ForegroundColor Red
    return
}

# Define the name of the user assigned managed identity
$IdName = "ncache-managed-app-identity"
# This name must stay fixed as NCache will look for a subnet with this name to deploy its cluster nodes in it.
$subnetName = "ncache-subnet"

# Create the user assigned managed identity if it doesn't exist and assign it the contributor role on the resource group
$RGObj = Get-AzResourceGroup -Name $RG
$Id = Get-AzUserAssignedIdentity -ResourceGroupName $RG -Name $IdName -ErrorAction SilentlyContinue
if (-not $Id) {
    $Id = New-AzUserAssignedIdentity -ResourceGroupName $RG -Name $IdName -Location $RGObj.Location
}

if (-not(Get-AzRoleAssignment -ObjectId $Id.PrincipalId -Scope $RGObj.ResourceId -RoleDefinitionName Contributor -ErrorAction SilentlyContinue)) {
    # Wait for the managed identity to be fully provisioned before assigning the role
    Start-Sleep -Seconds 10
    New-AzRoleAssignment -ObjectId $Id.PrincipalId -Scope $RGObj.ResourceId -RoleDefinitionName Contributor
}
Write-Host "Managed Identity ready" -ForegroundColor Green

# Create the subnet in the specified virtual network with the necessary configuration for NCache to use it for its cluster nodes
$existingSubnet = $vnetObj.Subnets | Where-Object { $_.Name -eq $subnetName }

if (-not $existingSubnet) {
    $subnetParams = @{
        Name                  = $subnetName
        VirtualNetwork        = $vnetObj
        AddressPrefix         = $subnetPrefix
        DefaultOutboundAccess = $true
    }
    Add-AzVirtualNetworkSubnetConfig @subnetParams

    Set-AzVirtualNetwork -VirtualNetwork $vnetObj
}

Write-Host "Subnet ready" -ForegroundColor Green
Select the confirmation checkbox once the script has been executed to finalize your deployment.
Step 7: Review and Create
Upon clicking Next, you will land on the Review + create page, which validates all the required information provided in the previous steps.
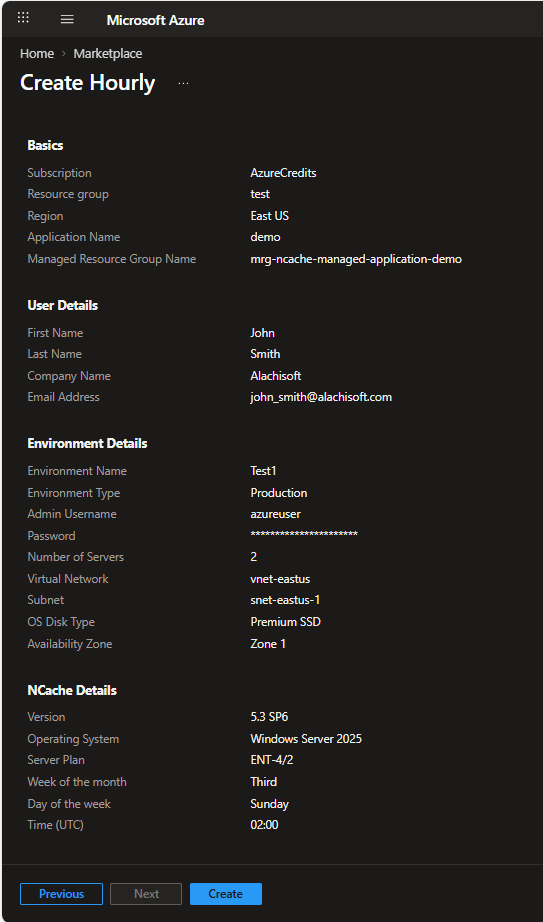
After validation is successful, click Create. NCache will be deployed on Azure, and the required resources will be provisioned.
After the deployment is complete and all resources are successfully provisioned, the next step is to connect to one of the deployed instances to access and manage your NCache environment.
Warning
Modifying resources within the Managed Resource Group is not recommended. While you may manage instances (add, remove, start, stop) or provide CustomData scripts via the customScriptExtension, altering core configurations like VM resizing, termination policies, NSG port rules, or the patching script may cause the application to fail or behave unexpectedly.
See Also
NCache Deployment
Connect to Instance
Security Configuration