Get NCache Cloud from Azure Marketplace
Following are the initial steps for all deployment models on Azure:
Go to Azure Portal and log in.
From the Azure Services, select Marketplace.
In the search box, type NCache in the Discover Products section and choose NCache Cloud.
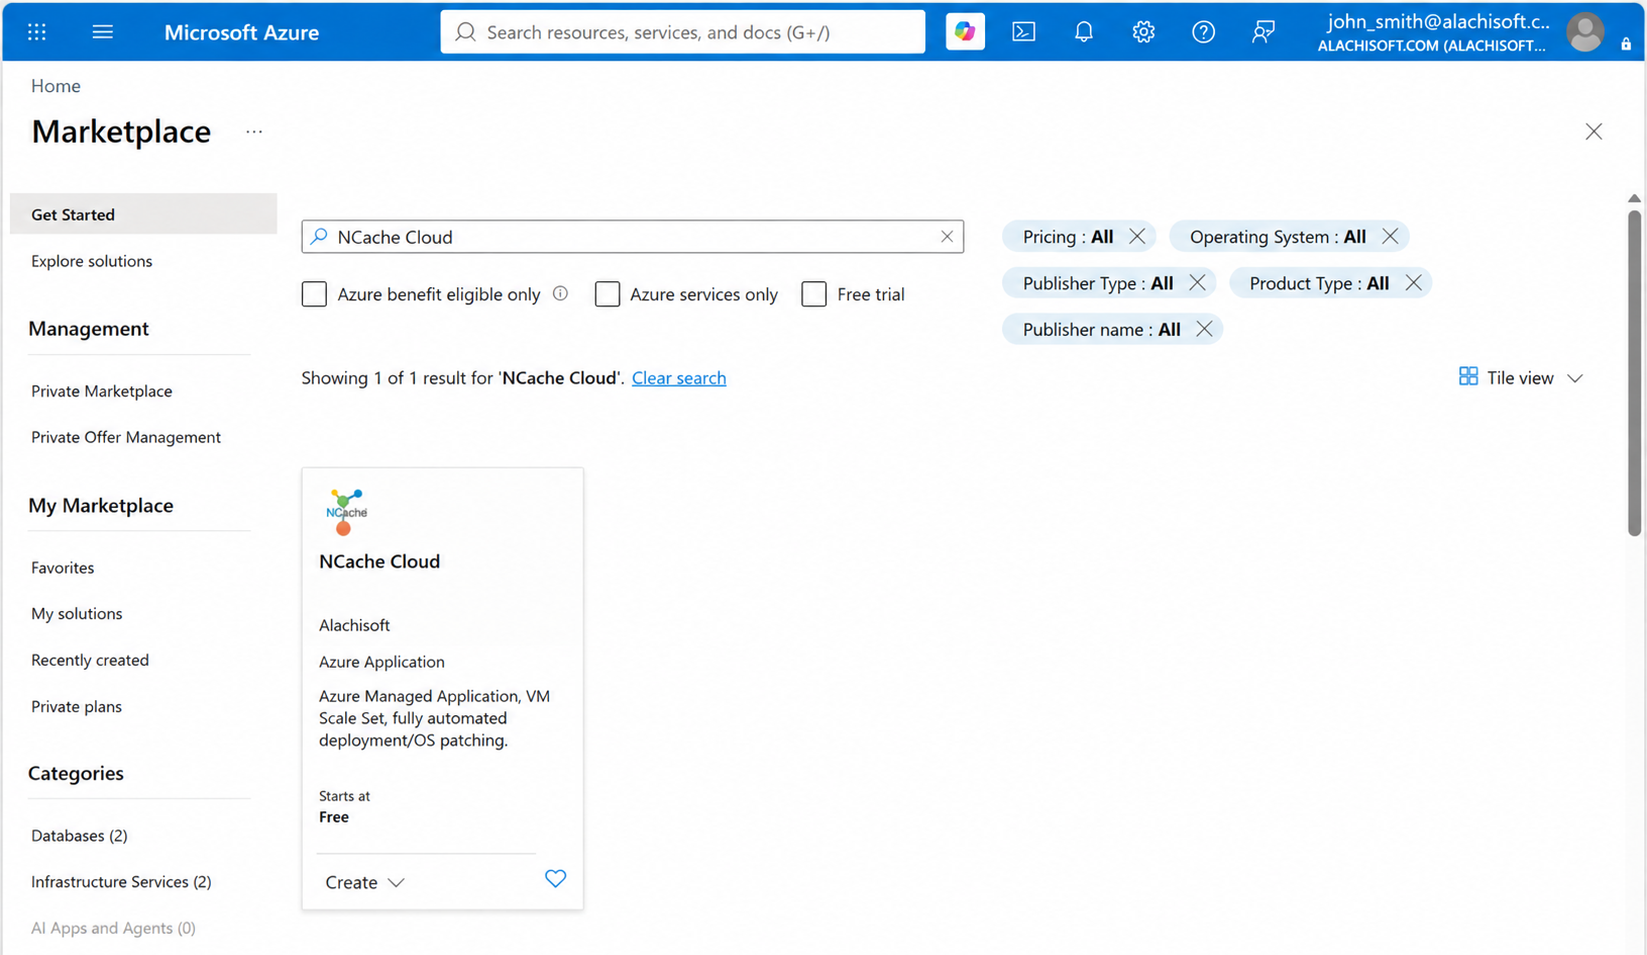
Step 1: Select a Plan
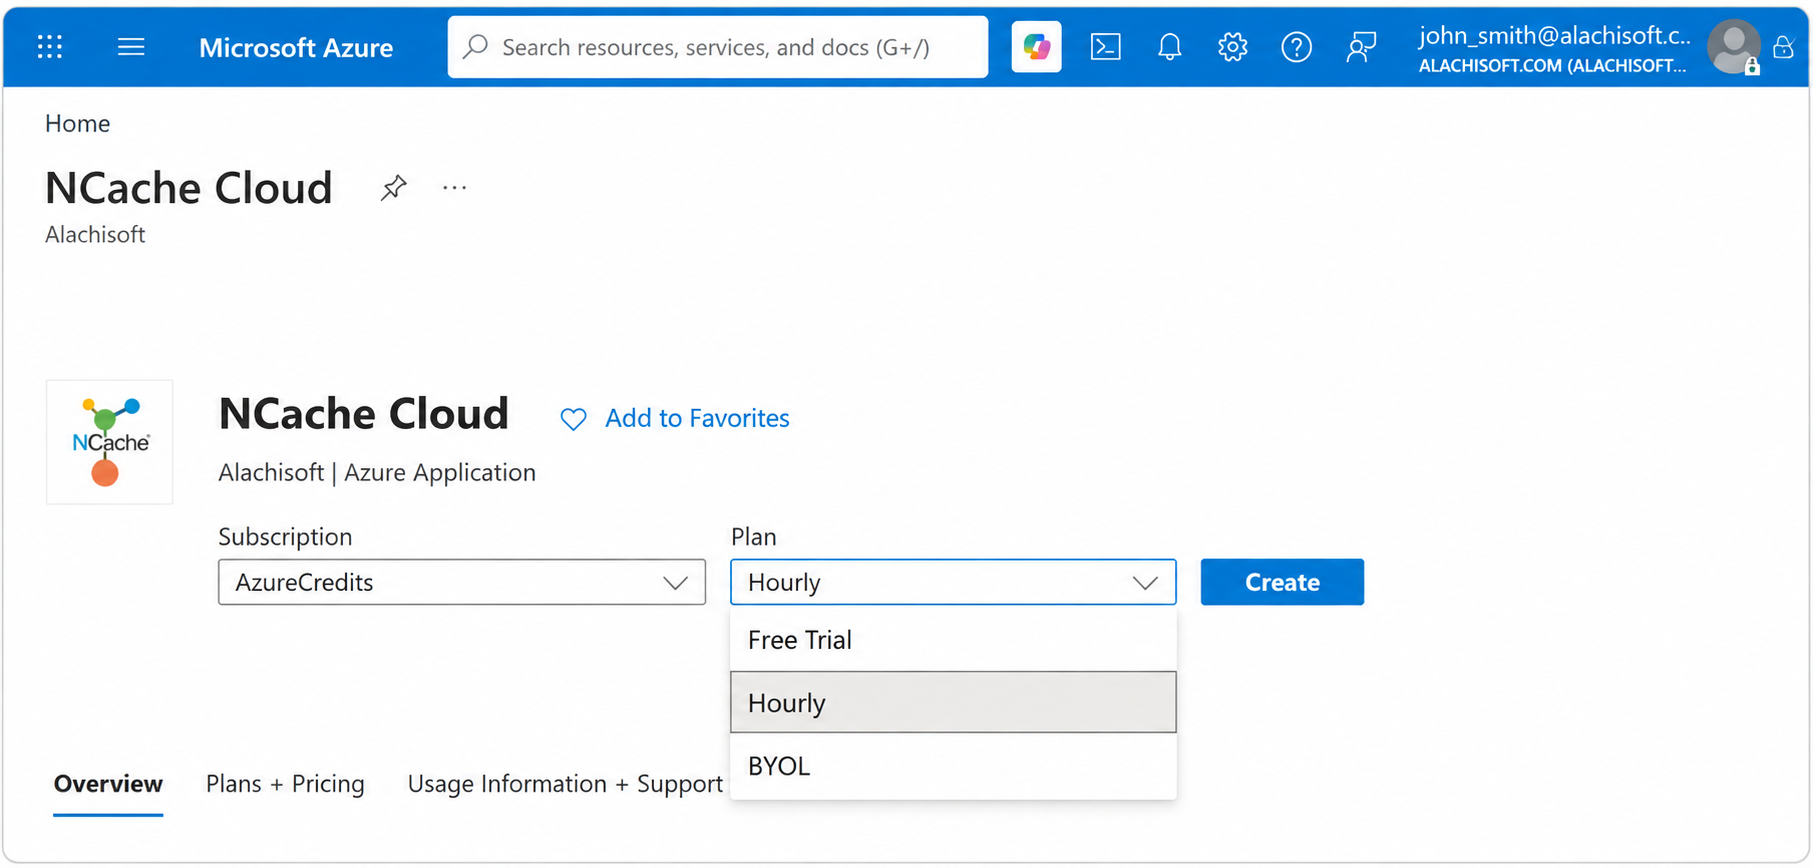
On selecting NCache Cloud Azure application, a new page with Subscription and Plan options will appear. NCache provides following plans
Free Trial (30-days): This plan offers a 30-day free trial on all server plans. In this plan the software is completely free to use, however you have to pay for the underlying Azure infrastructure. The plan is best for Trial users evaluating NCache before purchase.
Hourly: It provides an on-demand, pay-as-you-go approach to distributed caching on Azure offering 4GB, 8GB, 16 GB, 32GB, 64GB and 256GB server plans. Designed for flexibility and rapid deployment, this plan eliminates the need for pre-obtained license keys or manual registration. Each server node automatically registers upon activation, allowing you to scale your cluster up to 10 nodes instantly while ensuring your costs align directly with your hourly usage. The plan is best for production environment or temporary deployments where you want pay-as-you-go billing.
BYOL: This plan offers you to reuse the existing licenses or purchase them separately to deploy NCache. You only pay for the underlying infrastructure, with the option to handle license purchases or renewals directly through the Azure Marketplace. The plan works best for exixting NCache customers who already have licenses.
On this page we will proceed with Hourly server deployment.
Note
For an hourly subscription, you are not required to have an installation or evaluation key beforehand. These machines automatically register themselves upon activation and are charged on an hourly basis.
Step 2: Basics
After clicking Create on your chosen plan, configure the core Azure project parameters:
- Subscription: Select the active Azure subscription for billing and resource allocation.
Important
Please note that your resource group and VNet must be created beforehand.
Resource Group: Identify the group where the NCache resources will be logically organized.
Region: Select the geographical location for your deployment in the instance details section.
Managed Application Details:
Application Name: Assign a unique identifier for the NCache Managed Application.
Managed Resource Group: Specify the name for the resource group that Azure will manage internally to hold the application's infrastructure.
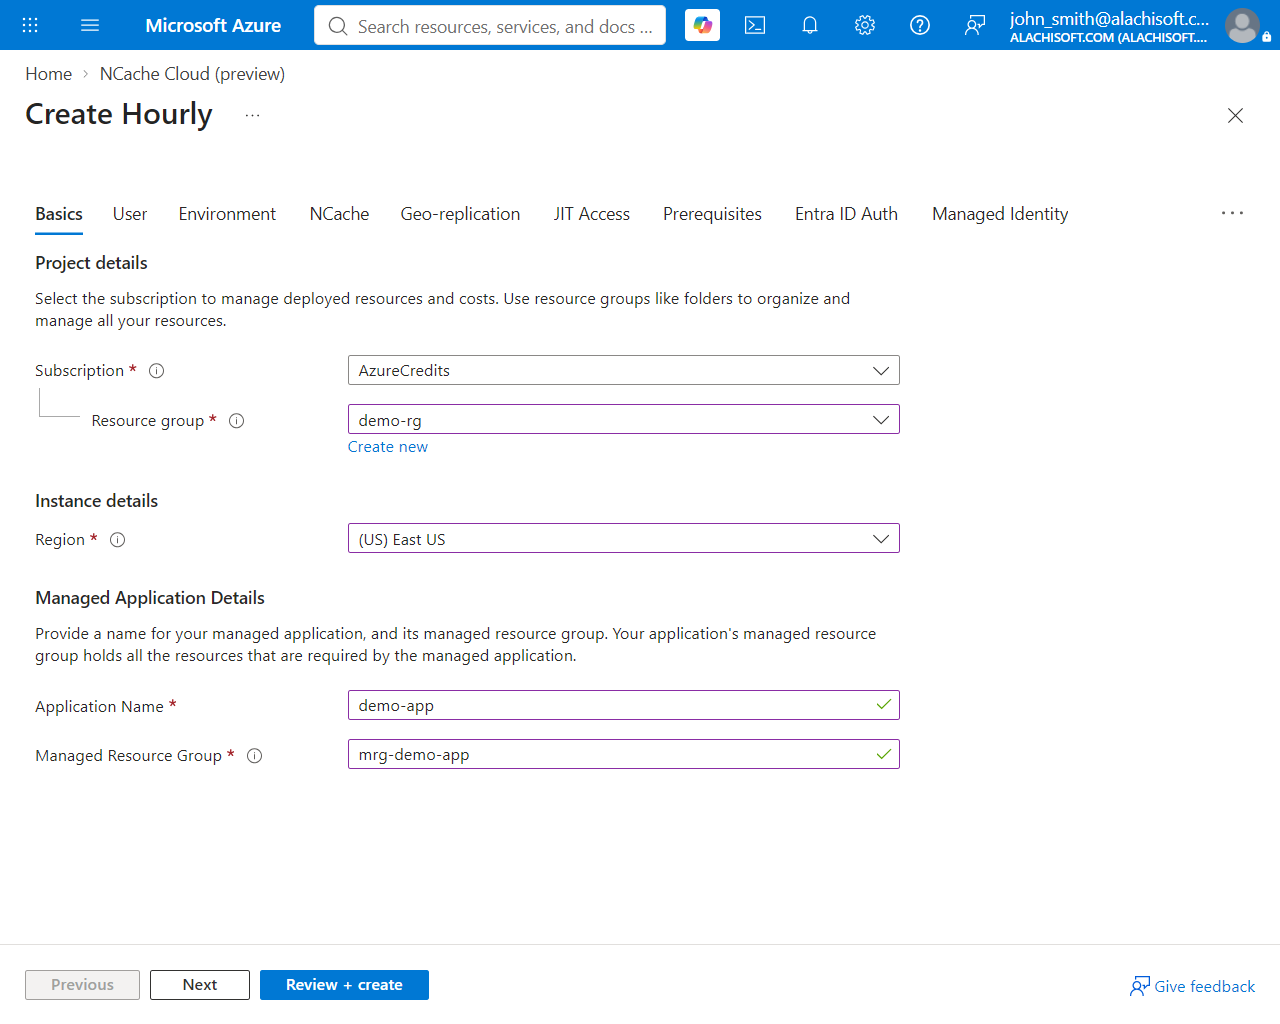
- Click Next, once all parameters have been added.
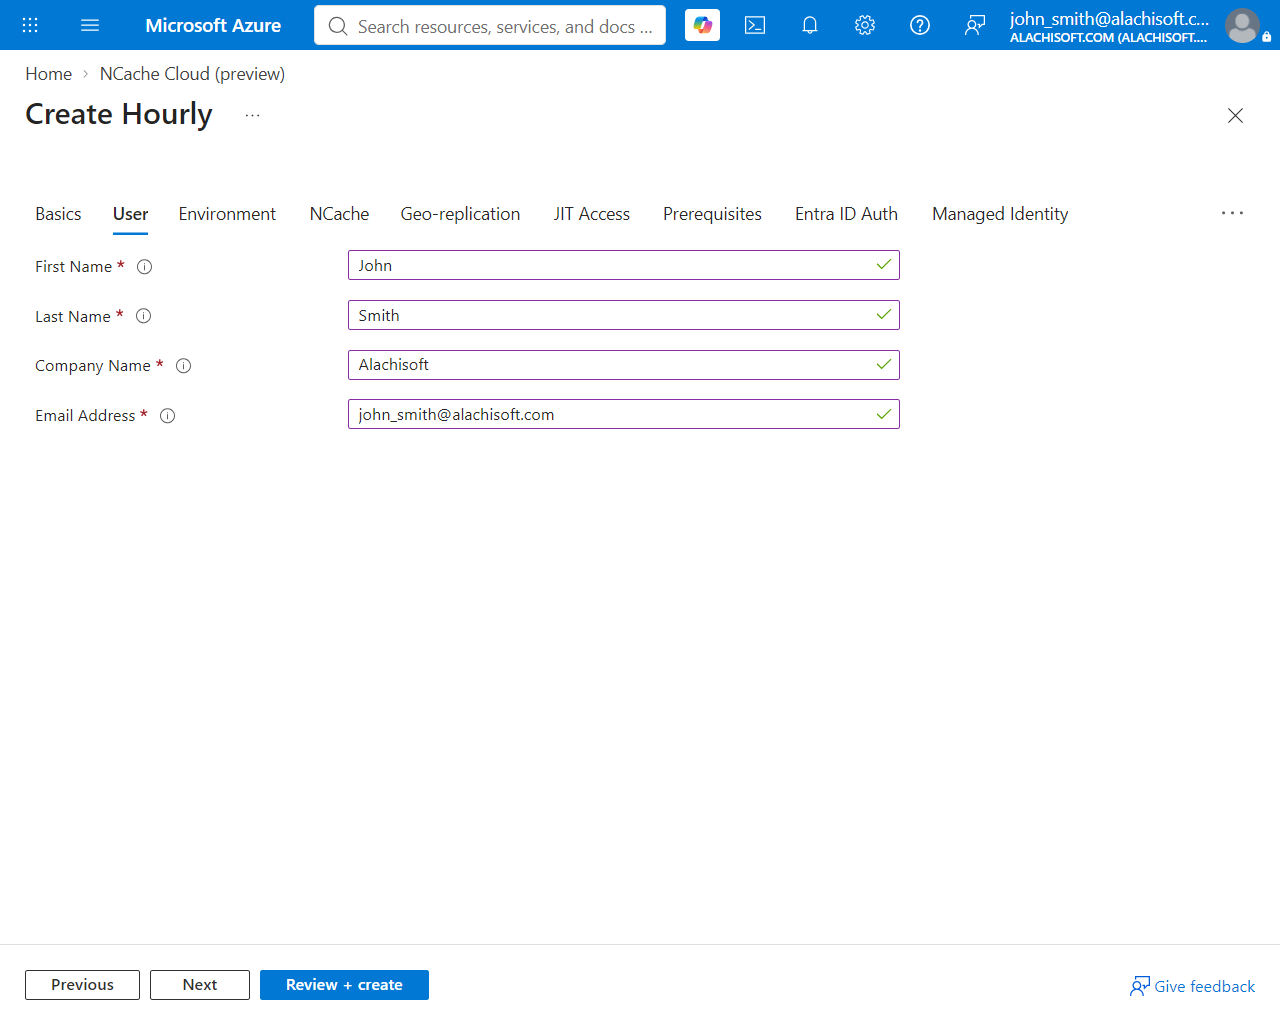
Step 3: User
In the User tab, you need to provide the user information including First Name, Last Name, Company Name, and Email Address for Hourly. However, for Free Trial and BYOL, you just need to provide email address and Install key. Click Next.
Step 4: Environment
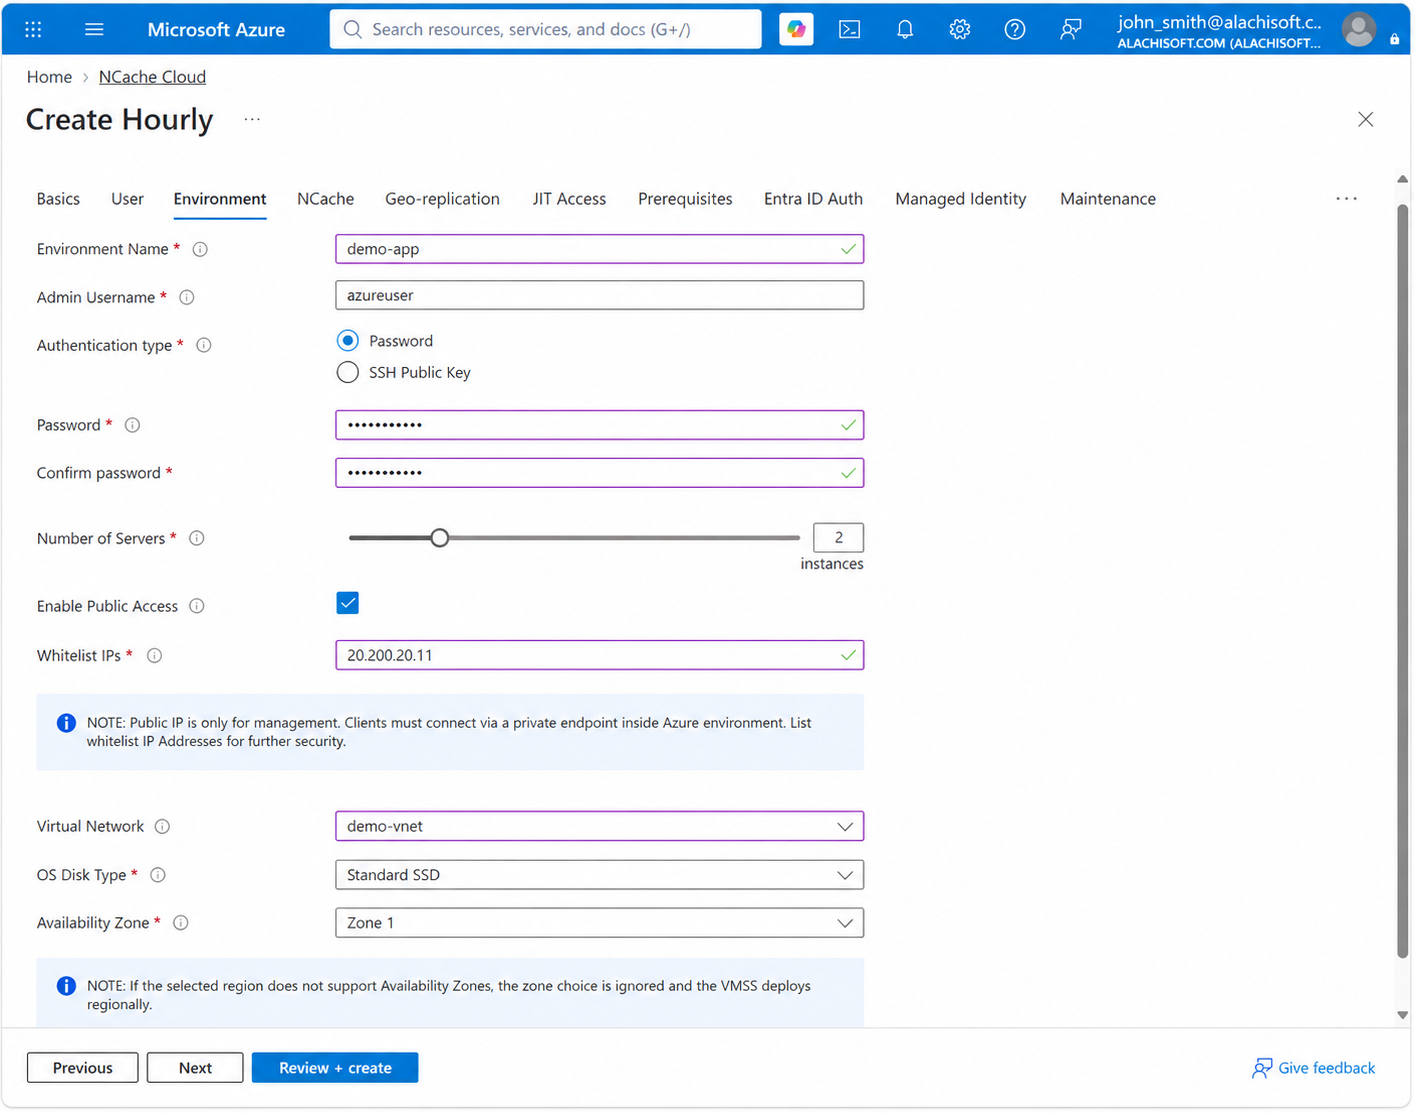
Upon clicking Next, you will land on the Environment page. Provide environment-related details as follows:
Environment Name: Assign an environment name.
Environment Type (for Hourly and BYOL): Provide Environment type, for e.g., Production.
Admin Username: Enter the administrator username for the underlying VM instances (e.g., azureuser). This account is used to log in via SSH or Bastion.
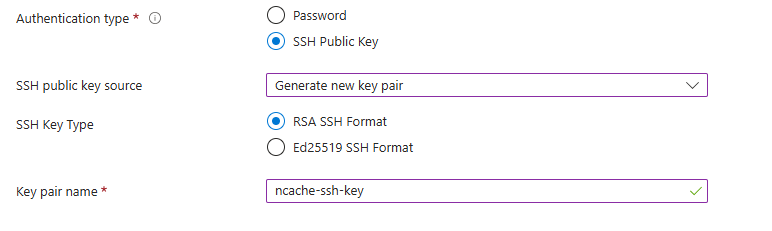
Authentication Type: You can choose either Password or SSH Public Key. The details of each are as below.
Password
If you choose password, you'll need to provide:
- password: Enter a secure password.
- confirm password: Confirm your password.
SSH Public Key
If you choose SSH, you'll need to provide:
SSH Public Key Source: You can either generate a new key pair, use existing key stored in Azure, or use existing public key.
Generate new key pair: Instructs Azure to automatically generate a fresh public/private key pair.
SSH Key Type: Select the cryptographic format for the key pair, choosing either RSA SSH Format (default) or Ed25519 SSH Format.
Key Pair Name: Give any name to the key pair, i.e.,
ncache-ssh-key. Azure will prompt you to download the private key file upon deployment completion.
Use existing key stored in Azure: Reuses an SSH public key already saved within your Azure subscription, letting you select the key from your existing resources.
- Stored Keys: Choose your previously uploaded public key from the dropdown list of keys available in your subscription.
Use existing public key: Allows you to directly paste the raw text of your existing public key into the wizard.
- SSH Public Key: Paste your complete public key text string (starting with
ssh-rsaorssh-ed25519) directly into the input box.
- SSH Public Key: Paste your complete public key text string (starting with
Number of Servers: Set the initial node count. (Up to 10 in the wizard; expandable up to 1000 post-deployment).
Connectivity and Storage: Configure the network infrastructure and storage performance levels to ensure optimal cluster accessibility and data reliability.
Enable Public IP Address: Check this box to enable management access via Azure Front Door. (Applies to management only; client applications connect strictly via private endpoints, and VMs never receive public IPs.)
Whitelist IPs: Comma-separated IPv4/CIDR addresses authorized for management access. This is required when public access is enabled, only these IPs can reach the public management endpoint.
Virtual Network: Select the VNet for deployment. (If not already created, please refer to this link).
OS Disk Type: Select Standard SSD (default) or Premium SSD.
Availability Zone: Select target zone for primary VMSS placement. If the selected region doesn't support Availability Zones, this choice is ignored and the VMSS deploys regionally instead.
Click Next.
Step 5: NCache
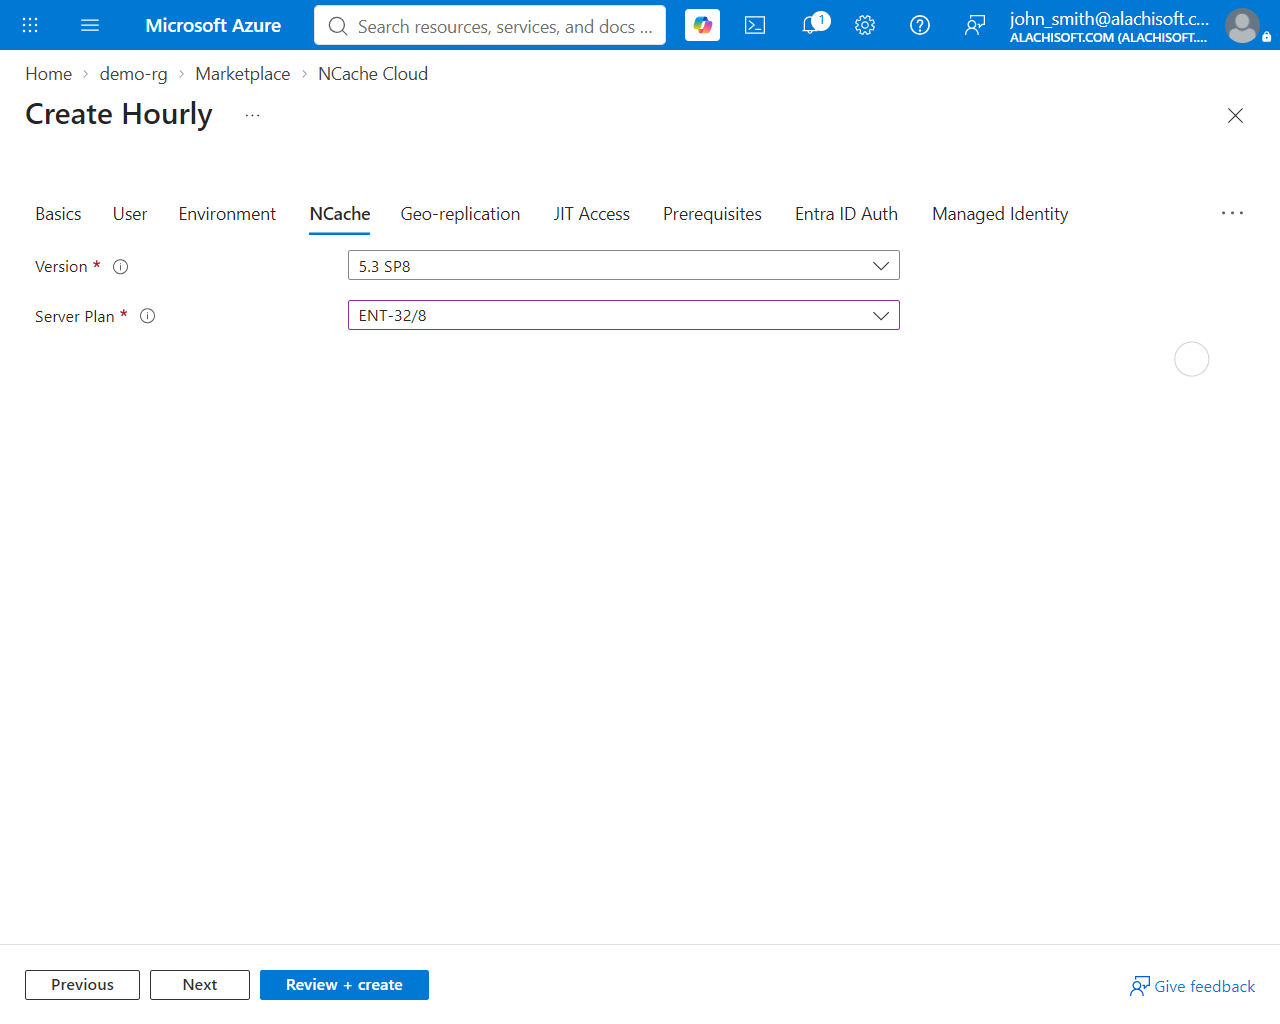
Next, you need to enter NCache specific details, like Version to deploy (e.g., 5.3 SP8) and Server Plan (e.g., ENT-4/2) for the sizing/edition for the cluster nodes.
Step 6: Geo-replication (Multi-Zone and Multi-Region)
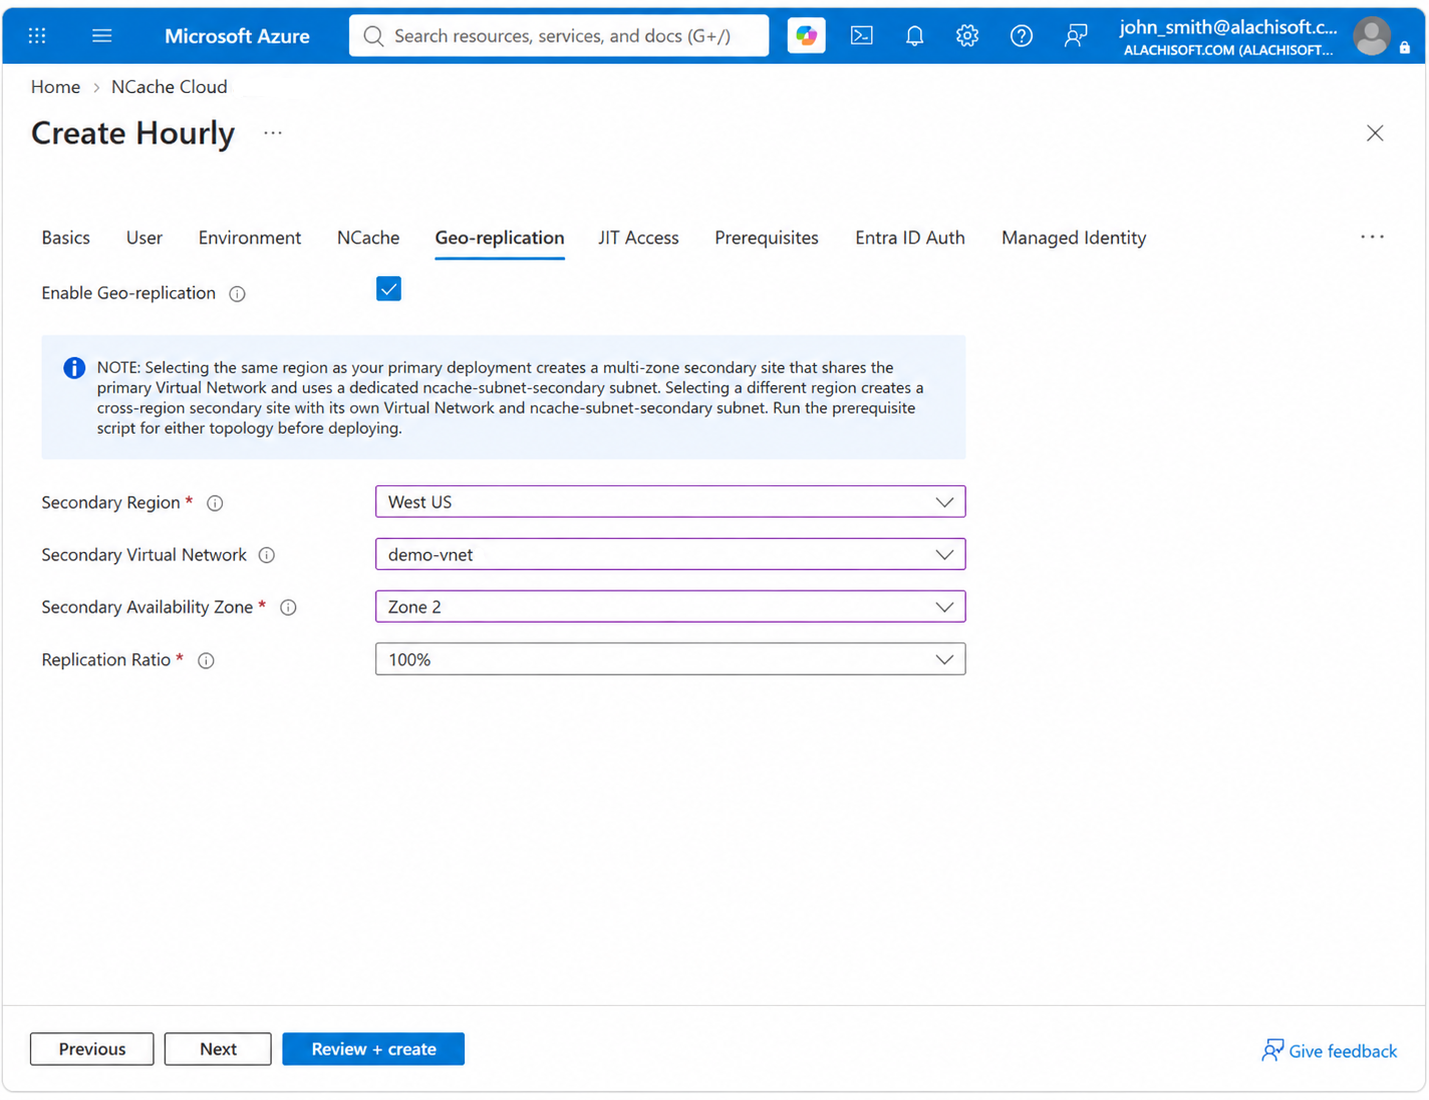
You can also enable Geo-replication to deploy a secondary high-availability disaster recovery site.
Multi-Zone: Both VMSS instances are deployed in the same region but across different availability zones. The primary VMSS uses the primary VNET and subnet, while the secondary VMSS is deployed in a separate availability zone using the ncache-subnet-secondary subnet. Since both VMSS instances use the same VNET and the only difference is the subnet, no VNET peering is required.
Multi-Region: Both VMSS instances are deployed in different regions, with the secondary VMSS using a separate secondary region and VNET. Since the VMSS instances are in different VNETs and regions, automated VNET peering is configured to connect both sites.
Upon enabling Geo-replication, you are asked to provide the following details based on the selected deployment type:
Secondary Region: Select the target region for the secondary deployment. Use either same region for Multi-Zone or a different region for Multi-Region.
Secondary Virtual Network (Only for multi-zone): Select the target virtual network from the dropdown list.
Secondary Availability Zone: Select the target physical zone within the secondary region to host the secondary VMSS instances. This ensures isolated fault tolerance across datacenters. If the selected region does not support Availability Zones, this setting is ignored and the VMSS deploys regionally.
Replication Ratio: Select the replication capacity for the secondary site: 50%, 75%, or 100% (recommended) of the primary. For example, a 4-node primary with a 50% ratio provisions 2 secondary nodes. (By default 100%).
If you set the replication ratio to 50%, you will receive the following warning message:

- Click Next once all the fields have been provided.
Step 7: Tech Support JIT Access
Configures how Alachisoft technical support engineers (the publisher) access the managed NCache Cloud VMSS cluster for troubleshooting and maintenance.
Enable JIT Access: Choose whether publisher access is time-limited or permanent. JIT grants access only to the NCache VMSS cluster, never to your own applications.
Yes: Restricts publisher access to a temporary, just-in-time window that expires automatically after the specified duration.
No: Grants the publisher continuous, permanent access to the managed environment without requiring time-limited activations.
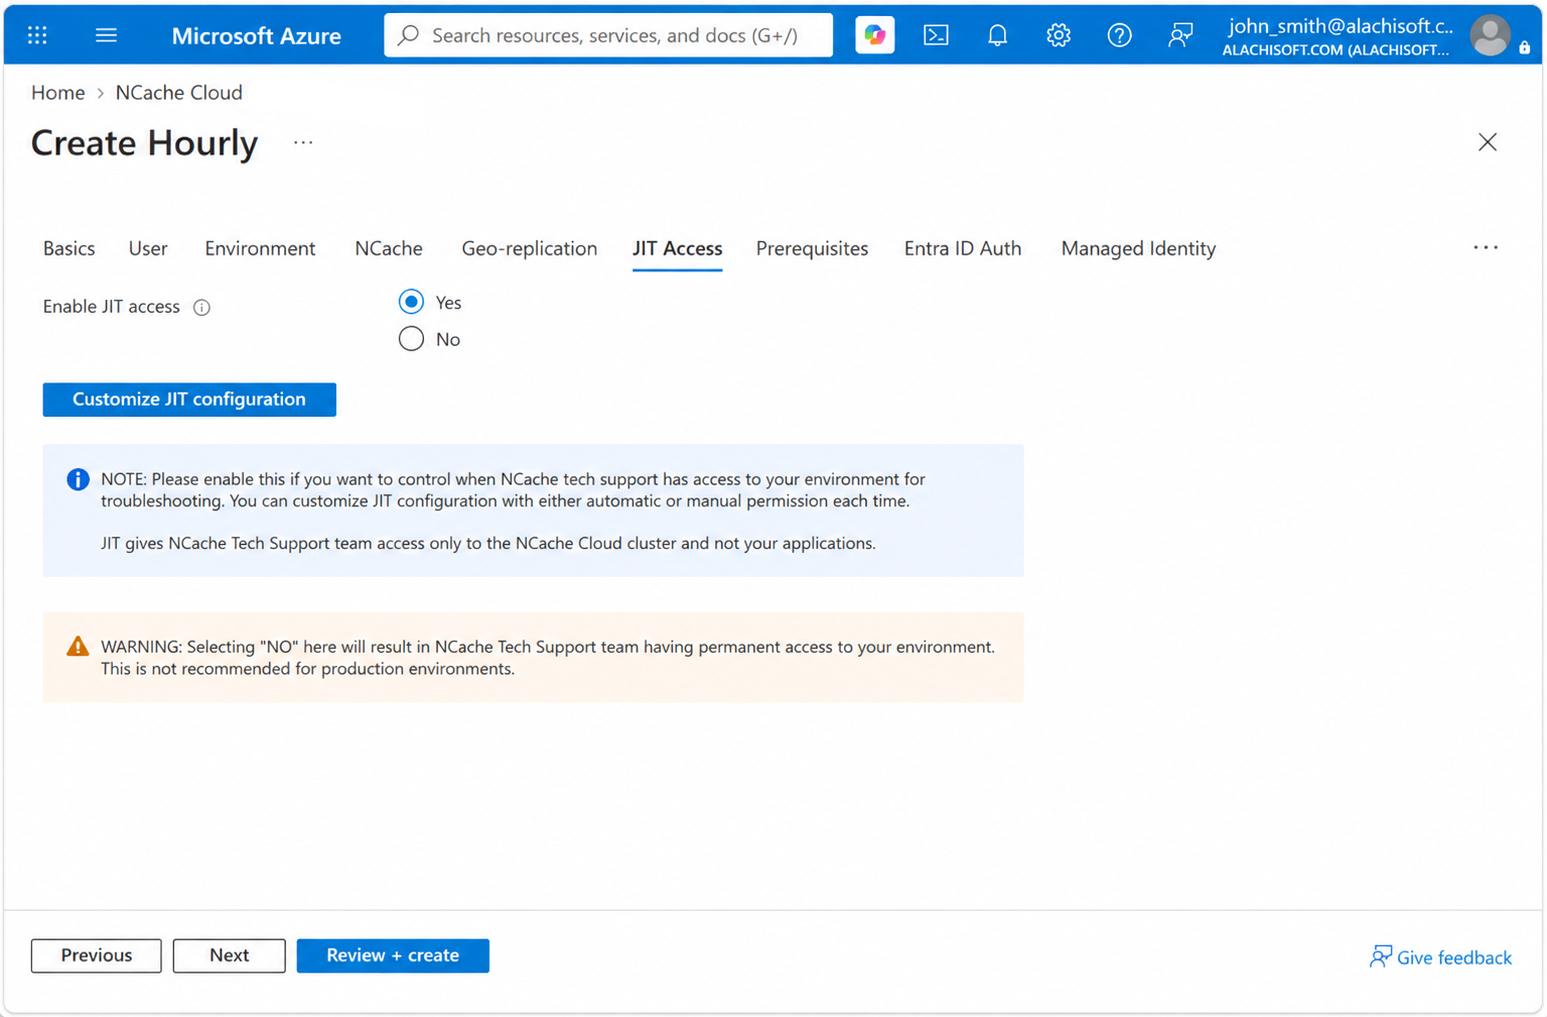
When set to Yes, you can customize the JIT parameters, as follows:
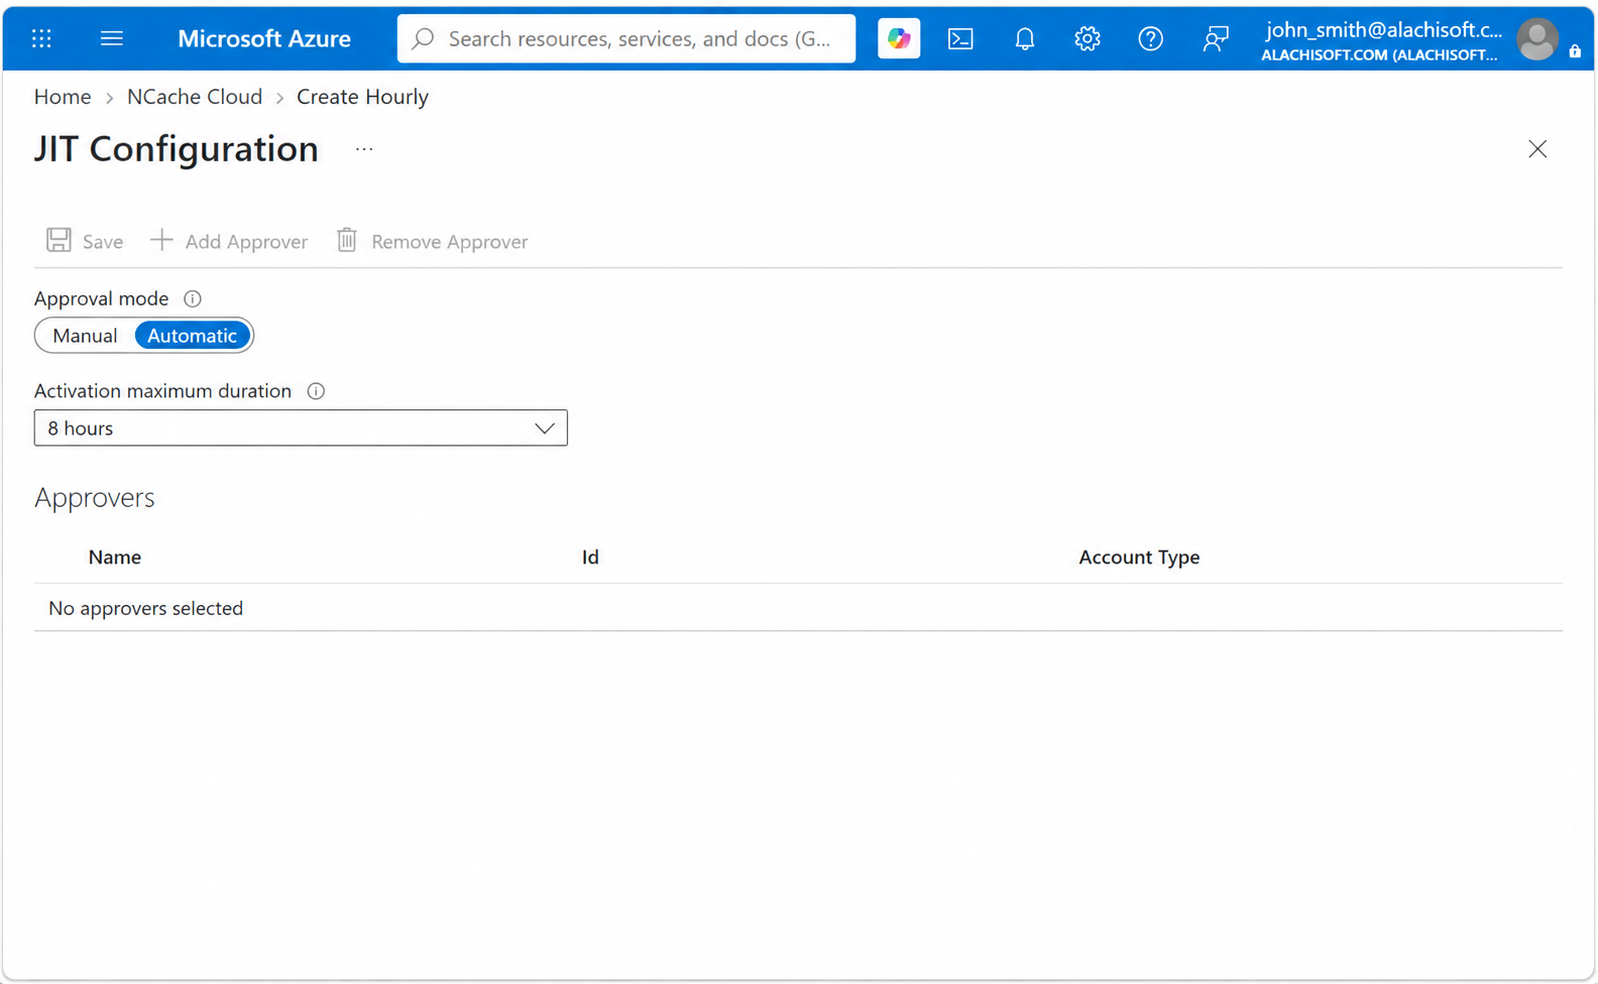
Approval Mode:
Manual: Requires approval from at least one designated customer approver. The Save action is blocked with Approvers list cannot be empty when JIT approval mode is set to 'manual' until you add one.
Automatic: Support access is activated automatically when requested.
Activation Maximum Duration: Defines how long access remains with the NCache technical support once approved. (Default 2 hours)
Approvers: Approvers can be configured during deployment or modified later in Azure by the customers. Added here by name, Id, and account type. (Approvers are your own (customer's) users, not Alachisoft (publisher's) staff.)
Save your configurations by clicking on the Save button at the top and then click Next.
Step 8: Prerequisites
Before continuing to the authentication configuration, you must execute the automated PowerShell prerequisite script provided in the wizard.
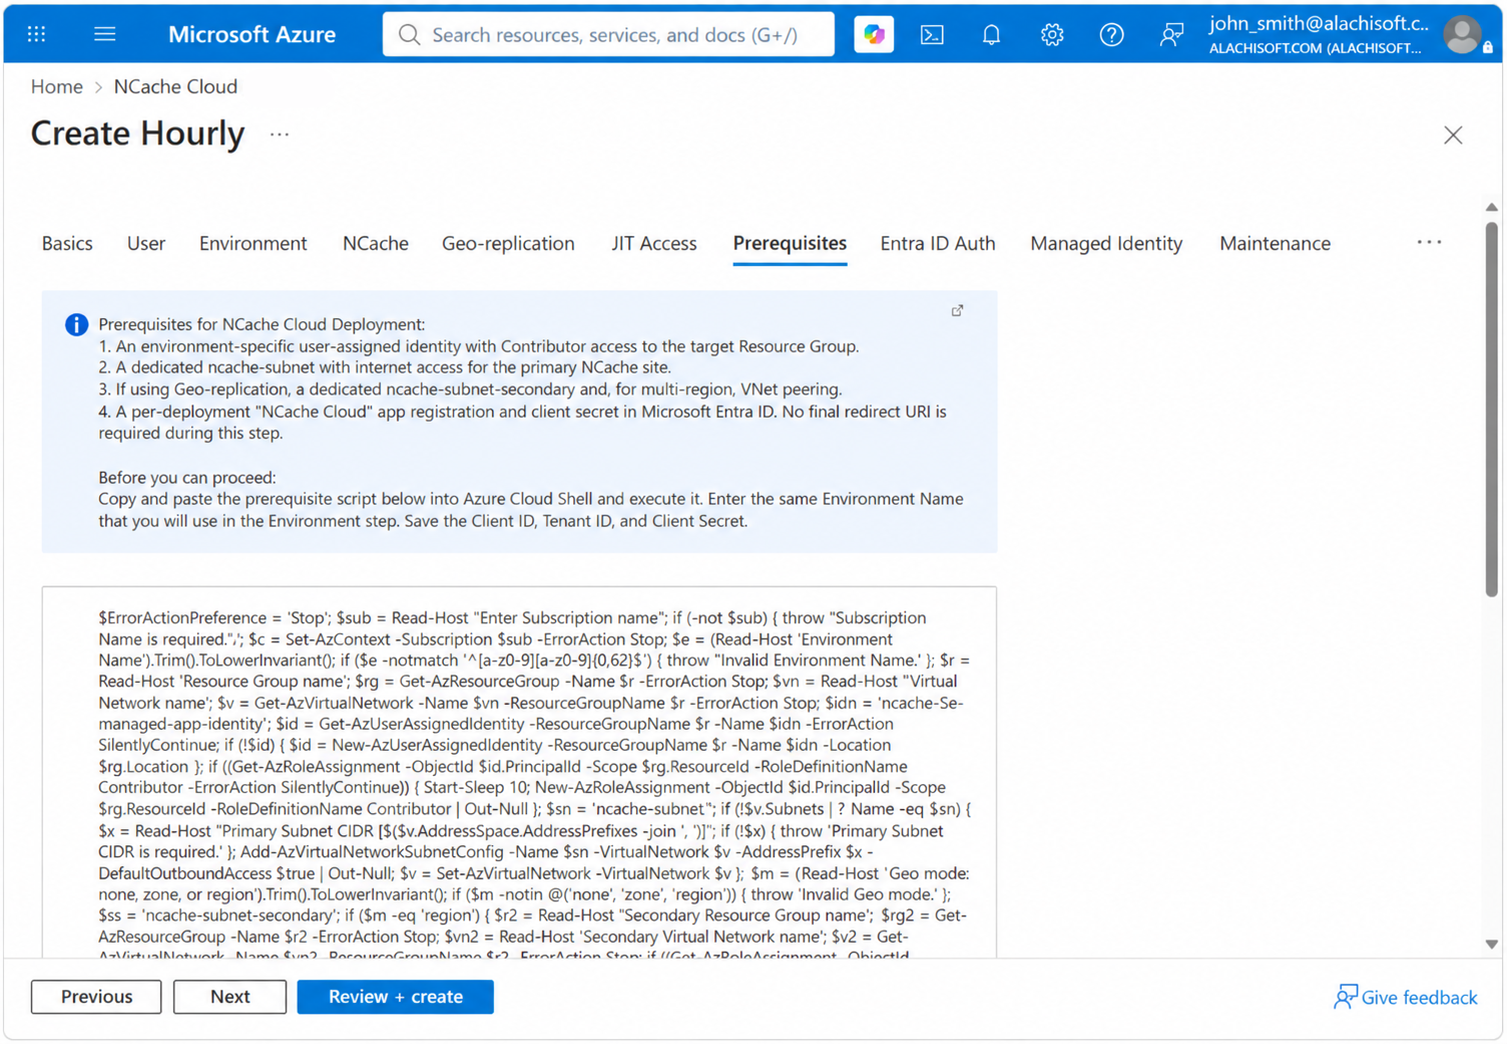
The script automates the creation of network segments, security identities, and directory app registrations directly within your tenant. Understanding what each provisioned component does ensures your infrastructure complies with organizational security and routing policies:
What the Script Provisions and Why It Is Required
User-Assigned Managed Identity (
ncache-<env>-managed-app-identity):Role Assigned:
Contributoron your target Resource Group.Why it is needed: Azure Managed Applications execute actions within your subscription via an associated identity. This identity allows the deployment engine to dynamically provision and link network interfaces, configure storage accounts, attach private DNS zones, and orchestrate scale sets inside your network boundary without requiring global or subscription-wide administrative privileges.
Dedicated Primary Subnet (
ncache-subnet):Configuration: Added to your selected primary VNet with
DefaultOutboundAccess = $true.Why it is needed: NCache VMSS server nodes reside in this dedicated subnet. Default outbound internet connectivity is required so host instances can pull official NCache Docker container images from the container registry, communicate with Azure Resource Manager APIs, and route telemetry to Azure Monitor.
Geo-Replication Network Topology (Conditional):
Multi-Zone (
zone): The script provisions a second subnet namedncache-subnet-secondarywithin the same VNet. This keeps your secondary cluster nodes isolated in their respective availability zone while sharing the overall VNet IP space.Multi-Region (
region): The script provisionsncache-subnet-secondaryinside your secondary disaster recovery VNet and immediately establishes bi-directional Virtual Network Peering (peer-to-<vnet>/peer-to-<vnet2>). This private routing backbone allows NCache Bridge service to replicate cache updates across regions at line rate without data traversing the public internet.
Microsoft Entra ID Application Registration (
NCache Cloud (<env>)):Components Created: App registration, Service Principal, and a 2-year client secret.
Why it is needed: The web-based NCache Cloud Portal uses Microsoft Entra ID as its OpenID Connect / OAuth2 identity provider. Registering the application at this stage enables Single Sign-On (SSO) and role-based access control (RBAC).
Note
Redirect URIs are left unconfigured at this point because Azure Front Door URLs are only known post-deployment. (They are bound during Step 12: Post-deployment).
Running the Prerequisite Script
To run the script:
Copy the PowerShell script displayed in the wizard.
$ErrorActionPreference = 'Stop'

$sub = Read-Host "Enter Subscription name"
if (-not $sub) { throw "Subscription Name is required." }
$c = Set-AzContext -Subscription $sub -ErrorAction Stop

$e = (Read-Host 'Environment Name').Trim().ToLowerInvariant()
if ($e -notmatch '^[a-z0-9][a-z0-9-]{0,62}$') { throw 'Invalid Environment Name.' }

$r = Read-Host 'Resource Group name'
$rg = Get-AzResourceGroup -Name $r -ErrorAction Stop

$vn = Read-Host 'Virtual Network name'
$v = Get-AzVirtualNetwork -Name $vn -ResourceGroupName $r -ErrorAction Stop

$idn = "ncache-$e-managed-app-identity"
$id = Get-AzUserAssignedIdentity -ResourceGroupName $r -Name $idn -ErrorAction SilentlyContinue
if (!$id) {
    $id = New-AzUserAssignedIdentity -ResourceGroupName $r -Name $idn -Location $rg.Location
}

if (!(Get-AzRoleAssignment -ObjectId $id.PrincipalId -Scope $rg.ResourceId -RoleDefinitionName Contributor -ErrorAction SilentlyContinue)) {
    Start-Sleep 10
    New-AzRoleAssignment -ObjectId $id.PrincipalId -Scope $rg.ResourceId -RoleDefinitionName Contributor | Out-Null
}

$sn = 'ncache-subnet'
if (!($v.Subnets | ? Name -eq $sn)) {
    $x = Read-Host "Primary Subnet CIDR [$($v.AddressSpace.AddressPrefixes -join ', ')]"
    if (!$x) { throw 'Primary Subnet CIDR is required.' }
    Add-AzVirtualNetworkSubnetConfig -Name $sn -VirtualNetwork $v -AddressPrefix $x -DefaultOutboundAccess $true | Out-Null
    $v = Set-AzVirtualNetwork -VirtualNetwork $v
}

$m = (Read-Host 'Geo mode: none, zone, or region').Trim().ToLowerInvariant()
if ($m -notin @('none', 'zone', 'region')) { throw 'Invalid Geo mode.' }

$ss = 'ncache-subnet-secondary'
if ($m -eq 'region') {
    $r2 = Read-Host 'Secondary Resource Group name'
    $rg2 = Get-AzResourceGroup -Name $r2 -ErrorAction Stop
    $vn2 = Read-Host 'Secondary Virtual Network name'
    $v2 = Get-AzVirtualNetwork -Name $vn2 -ResourceGroupName $r2 -ErrorAction Stop

    if (!(Get-AzRoleAssignment -ObjectId $id.PrincipalId -Scope $rg2.ResourceId -RoleDefinitionName Contributor -ErrorAction SilentlyContinue)) {
        Start-Sleep 10
        New-AzRoleAssignment -ObjectId $id.PrincipalId -Scope $rg2.ResourceId -RoleDefinitionName Contributor | Out-Null
    }

    if (!($v2.Subnets | ? Name -eq $ss)) {
        $x = Read-Host "Secondary Subnet CIDR [$($v2.AddressSpace.AddressPrefixes -join ', ')]"
        if (!$x) { throw 'Secondary Subnet CIDR is required.' }
        Add-AzVirtualNetworkSubnetConfig -Name $ss -VirtualNetwork $v2 -AddressPrefix $x -DefaultOutboundAccess $true | Out-Null
        $v2 = Set-AzVirtualNetwork -VirtualNetwork $v2
    }

    $pn = "peer-to-$vn2"
    if (!(Get-AzVirtualNetworkPeering -VirtualNetworkName $vn -ResourceGroupName $r -Name $pn -ErrorAction SilentlyContinue)) {
        Add-AzVirtualNetworkPeering -Name $pn -VirtualNetwork $v -RemoteVirtualNetworkId $v2.Id | Out-Null
    }

    $pn = "peer-to-$vn"
    if (!(Get-AzVirtualNetworkPeering -VirtualNetworkName $vn2 -ResourceGroupName $r2 -Name $pn -ErrorAction SilentlyContinue)) {
        Add-AzVirtualNetworkPeering -Name $pn -VirtualNetwork $v2 -RemoteVirtualNetworkId $v.Id | Out-Null
    }
}
elseif ($m -eq 'zone') {
    if (!($v.Subnets | ? Name -eq $ss)) {
        $x = Read-Host "Secondary Subnet CIDR [$($v.AddressSpace.AddressPrefixes -join ', ')]"
        if (!$x) { throw 'Secondary Subnet CIDR is required.' }
        Add-AzVirtualNetworkSubnetConfig -Name $ss -VirtualNetwork $v -AddressPrefix $x -DefaultOutboundAccess $true | Out-Null
        Set-AzVirtualNetwork -VirtualNetwork $v | Out-Null
    }
}

$an = "NCache Cloud ($e)"
$aa = @(Get-AzADApplication -DisplayName $an -ErrorAction SilentlyContinue)
if ($aa.Count -gt 1) { throw "Duplicate Entra apps named '$an'." }
$a = $aa | Select-Object -First 1
if (!$a) { $a = New-AzADApplication -DisplayName $an -SignInAudience AzureADMyOrg }

$s = New-AzADAppCredential -ObjectId $a.Id -EndDate (Get-Date).AddYears(2)

Write-Host "Client ID: $($a.AppId)" -ForegroundColor Green
Write-Host "Tenant ID: $($c.Tenant.Id)" -ForegroundColor Green
Write-Host "Client Secret: $($s.SecretText)" -ForegroundColor Green
Write-Host "Managed Identity: $idn" -ForegroundColor Green
Write-Host 'Save these values. The secret cannot be retrieved later.' -ForegroundColor Yellow
Open Azure Cloud Shell (PowerShell) and execute the script.
Provide the Interactive Parameters:
Subscription name: The display name of your target Azure subscription.
Environment Name: Must match the exact name entered in Step 4: Environment (alphanumeric and hyphens only).
Resource Group name: The existing resource group hosting your VNet.
Virtual Network name: The primary virtual network selected in Step 4.
Primary Subnet CIDR: Specify an available IP prefix for
ncache-subnetwithin your VNet's address space (e.g.,10.0.1.0/24).Geo mode: Enter one of the following based on your selection in Step 6:
none: Single-site deployment (creates only the primary subnet).zone: Multi-zone deployment (prompts for the secondary subnet CIDR within the same VNet).region: Multi-region deployment (prompts for the secondary resource group, secondary VNet, and secondary subnet CIDR, then configures bi-directional VNet peering).
Secondary Subnet CIDR (if Geo mode is
zoneorregion): Enter a second, non-overlapping subnet CIDR block forncache-subnet-secondary(e.g.,10.0.2.0/24).
Note
If region was chosen, the script also prompts for your Secondary Resource Group name and Secondary Virtual Network name prior to entering the secondary CIDR block.
Copy and save the generated shell outputs: Client ID (Application ID), Tenant ID (Directory ID), and Client Secret (App registration secret value - cannot be retrieved later), and Managed Identity (Name of the created user-assigned identity). These credentials are required in the Entra ID Auth step.
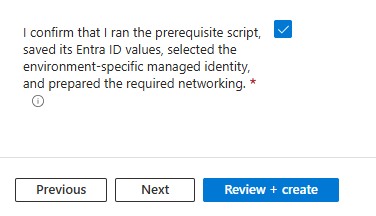
After running the script, return to the wizard, check the box confirming that you have run the script and saved the outputs, and click Next.
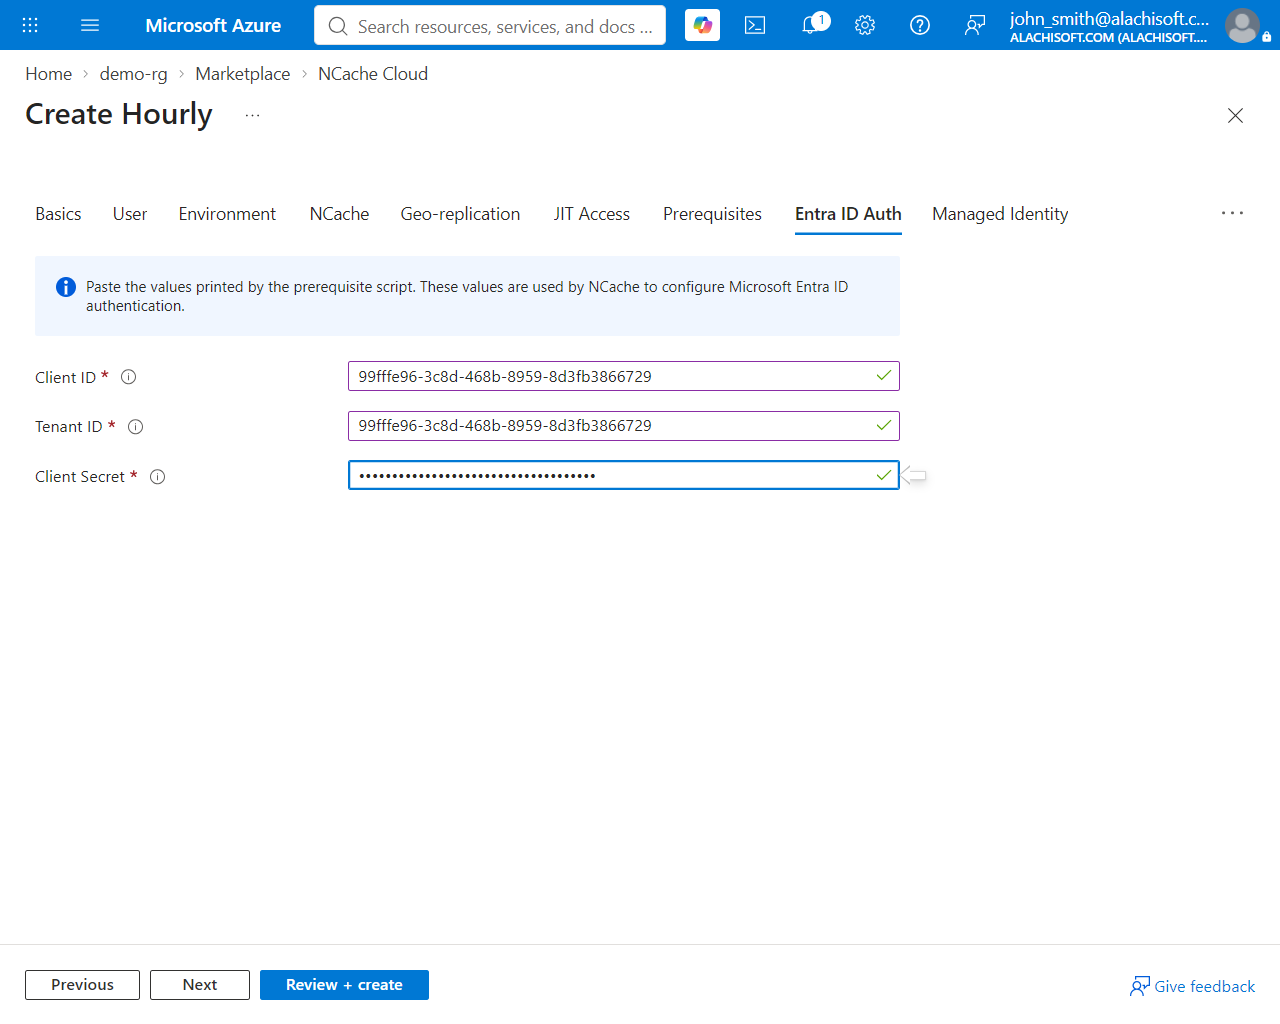
Step 9: Entra ID Auth
Paste the Client ID, Tenant ID, and Client Secret printed by the prerequisite script. These configure Microsoft Entra ID authentication for the NCache Cloud Portal on this deployment.
Step 10: Managed Identity
A user-assigned managed identity is created in the target resource group and associated with the NCache Managed Application. This identity allows the application to perform the required operations on Azure resources on the user's behalf during deployment.
For this, select Add, then choose the user-assigned managed identity the prerequisite script created (named ncache-<environment>-managed-app-identity). This identity is what lets the Managed Application operate within your resource group.
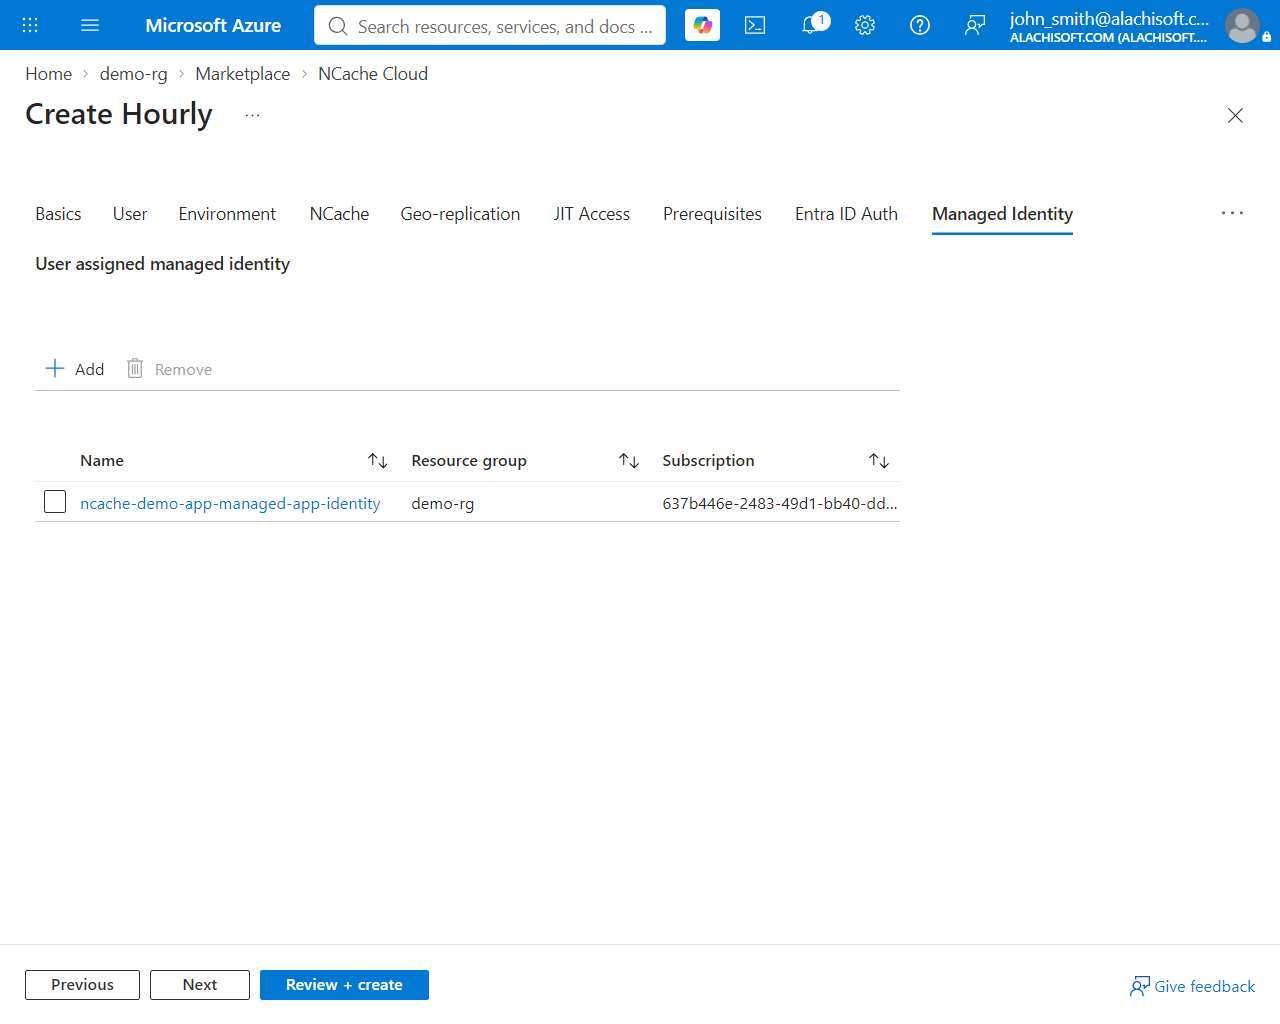
Click Next after selection.
Step 11: Maintenance
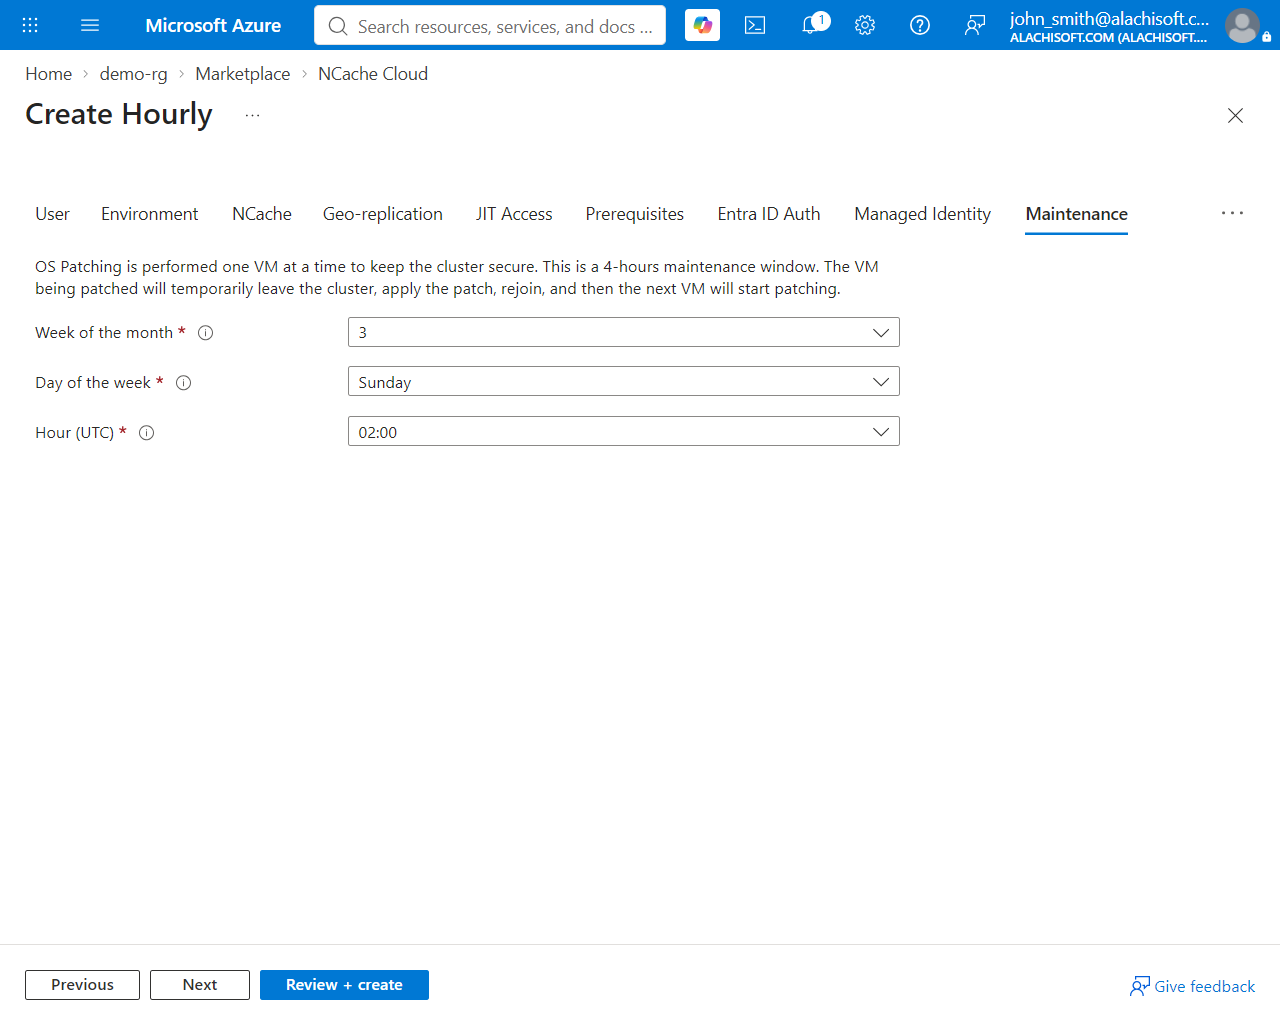
The OS Patch Schedule automates critical security updates for your cluster nodes during designated low-traffic windows. Since patching may involve node reboots and can take up to 4 hours, choose a maintenance window that has minimal impact on your application's users. NCache schedules the maintenance according to the time zone you select. You can configure this as follows:
Week of the Month: Select the specific week (First, Second, Third, Fourth, or Last) during which the maintenance window should occur. This allows you to align patching with your organization's internal maintenance cycles.
Day of the Week: Choose the preferred day (e.g., Sunday or Saturday) to execute the updates. Typically, a day with the lowest recorded application traffic is selected to minimize the impact of brief node reboots on end users.
Hour (UTC): Select the hour when the 4-hour maintenance window should begin. For example, if your application has the lowest traffic between 2:00 AM and 6:00 AM, schedule the maintenance to start at 2:00 AM. Make sure the selected window provides sufficient time for the maintenance and any required node reboots.
Important
Please note larger server sizes would mean a larger maintenance window.
Note
OS patching is applied one VM at a time to keep the cluster available throughout. The patched VM temporarily leaves the cluster, applies its update, rejoins, and only then does the next VM begin. This same schedule can be edited later from the NCache Cloud Portal.
Step 12: Post-deployment
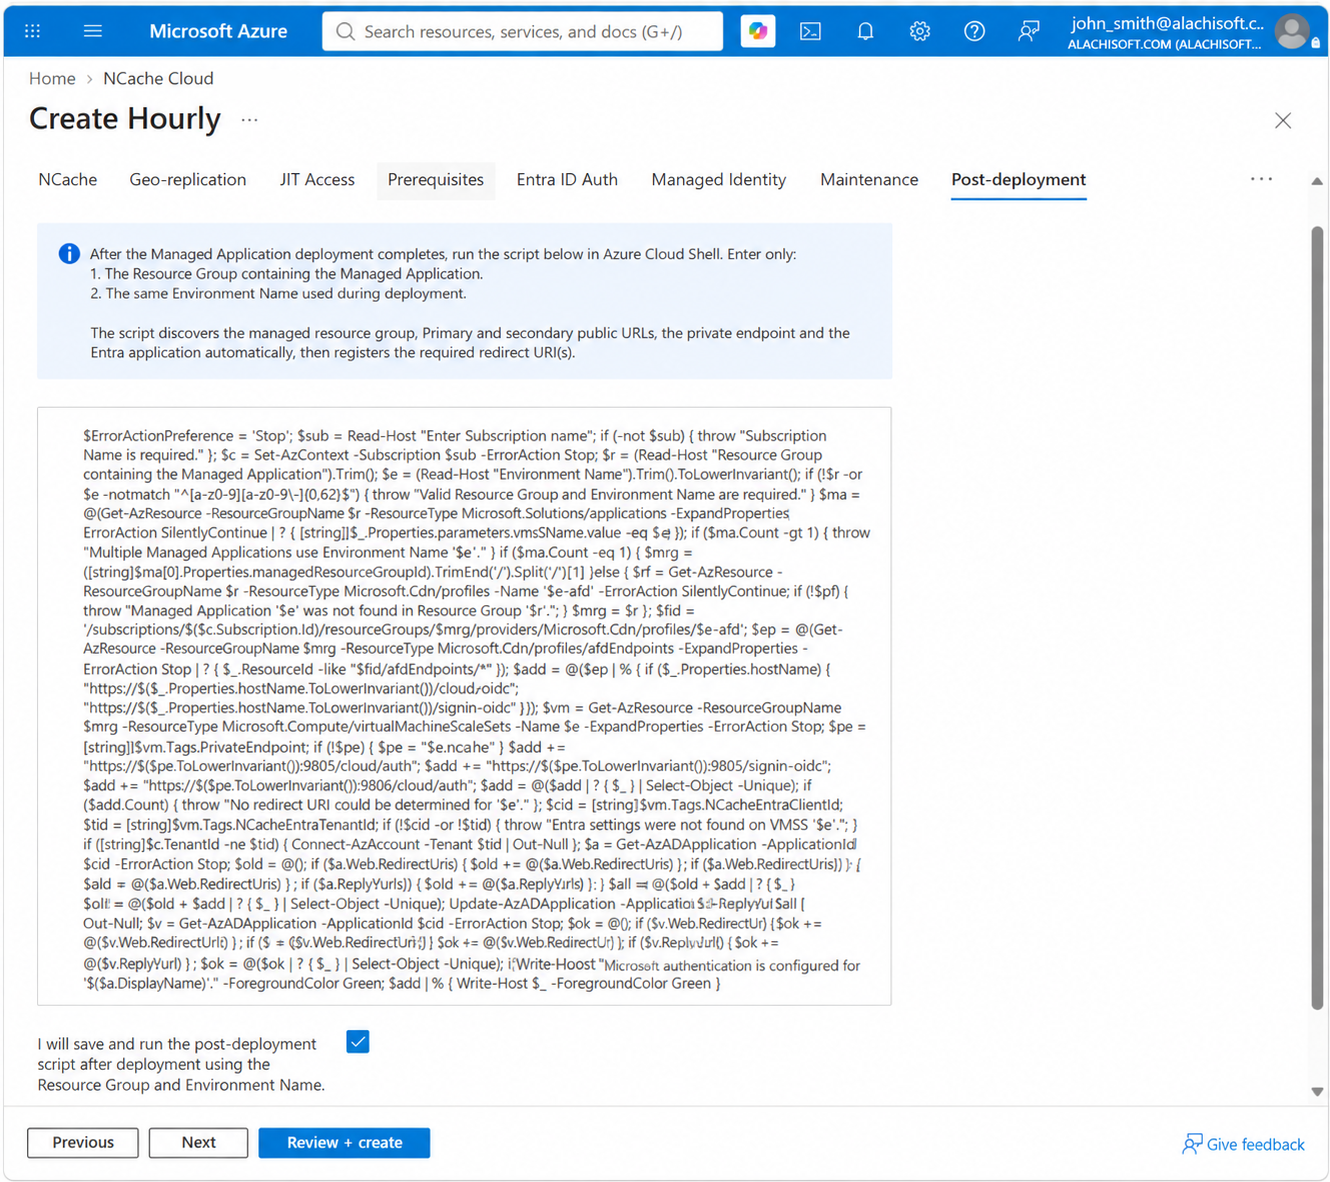
After the deployment is complete, run the post-deployment script in Azure Cloud Shell. The Azure Front Door redirect URLs required for Microsoft Entra ID authentication are generated only after the deployment is completed. This script retrieves the generated URLs and registers them with the Entra ID application.
Warning
If you do not run the post-deployment script, the NCache cluster and its operation are not affected. However, Microsoft Entra ID authentication will not work and ultimately will not be able to use the NCache Cloud Portal until the script is executed and the required redirect URLs are registered.
Post-Deployment Script Instructions
Copy the Script:
Click the copy icon on the script box to save the PowerShell snippet locally.$ErrorActionPreference = 'Stop' $sub = Read-Host "Enter Subscription name" if (-not $sub) { throw "Subscription Name is required." } $c = Set-AzContext -Subscription $sub -ErrorAction Stop $r = (Read-Host 'Resource Group containing the Managed Application').Trim() $e = (Read-Host 'Environment Name').Trim().ToLowerInvariant() if (!$r -or $e -notmatch '^[a-z0-9][a-z0-9-]{0,62}$') { throw 'Valid Resource Group and Environment Name are required.' } $ma = @(Get-AzResource -ResourceGroupName $r -ResourceType Microsoft.Solutions/applications -ExpandProperties -ErrorAction SilentlyContinue | Where-Object { [string]$_.Properties.parameters.vmssName.value -eq $e }) if ($ma.Count -gt 1) { throw "Multiple Managed Applications use Environment Name '$e'." } if ($ma.Count -eq 1) { $mrg = ([string]$ma[0].Properties.managedResourceGroupId).TrimEnd('/').Split('/')[-1] } else { $pf = Get-AzResource -ResourceGroupName $r -ResourceType Microsoft.Cdn/profiles -Name "$e-afd" -ErrorAction SilentlyContinue if (!$pf) { throw "Managed Application '$e' was not found in Resource Group '$r'." } $mrg = $r } $fid = "/subscriptions/$($c.Subscription.Id)/resourceGroups/$mrg/providers/Microsoft.Cdn/profiles/$e-afd" $ep = @(Get-AzResource -ResourceGroupName $mrg -ResourceType Microsoft.Cdn/profiles/afdEndpoints -ExpandProperties -ErrorAction Stop | Where-Object { $_.ResourceId -like "$fid/afdEndpoints/*" }) $add = @($ep | ForEach-Object { if ($_.Properties.hostName) { "https://$($_.Properties.hostName.ToLowerInvariant())/cloud/auth" "https://$($_.Properties.hostName.ToLowerInvariant())/signin-oidc" } }) $vm = Get-AzResource -ResourceGroupName $mrg -ResourceType Microsoft.Compute/virtualMachineScaleSets -Name $e -ExpandProperties -ErrorAction Stop $pe = [string]$vm.Tags.PrivateEndpoint if (!$pe) { $pe = "$e.ncache" } $add += "https://$($pe.ToLowerInvariant()):9805/cloud/auth" $add += "https://$($pe.ToLowerInvariant()):9805/signin-oidc" $add += "https://$($pe.ToLowerInvariant()):9806/cloud/auth" $add = @($add | Where-Object { $_ } | Select-Object -Unique) if (!$add.Count) { throw "No redirect URI could be determined for '$e'." } $cid = [string]$vm.Tags.NCacheEntraClientId $tid = [string]$vm.Tags.NCacheEntraTenantId if (!$cid -or !$tid) { throw "Entra settings were not found on VMSS '$e'." } if ([string]$c.Tenant.Id -ne $tid) { Connect-AzAccount -Tenant $tid | Out-Null } $a = Get-AzADApplication -ApplicationId $cid -ErrorAction Stop $old = @() if ($a.Web.RedirectUri) { $old += @($a.Web.RedirectUri) } if ($a.Web.RedirectUris) { $old += @($a.Web.RedirectUris) } if ($a.ReplyUrl) { $old += @($a.ReplyUrl) } if ($a.ReplyUrls) { $old += @($a.ReplyUrls) } $all = @($old + $add | Where-Object { $_ } | Select-Object -Unique) Update-AzADApplication -ApplicationId $cid -ReplyUrl $all | Out-Null $v = Get-AzADApplication -ApplicationId $cid -ErrorAction Stop $ok = @() if ($v.Web.RedirectUri) { $ok += @($v.Web.RedirectUri) } if ($v.Web.RedirectUris) { $ok += @($v.Web.RedirectUris) } if ($v.ReplyUrl) { $ok += @($v.ReplyUrl) } if ($v.ReplyUrls) { $ok += @($v.ReplyUrls) } $miss = @($add | Where-Object { $_ -notin $ok }) if ($miss.Count) { throw "Redirect URI verification failed: $($miss -join ', ')" } Write-Host "Microsoft Entra authentication is configured for '$($a.DisplayName)'." -ForegroundColor Green $add | ForEach-Object { Write-Host $_ -ForegroundColor Green }Acknowledge and Continue:
Select the mandatory checkbox present below the script:
"I will save and run the post-deployment script after deployment using the Resource Group and Environment Name." Click Review + create (or Next) to proceed.Execute the Script (After Deployment Finishes):
Once the Azure deployment status changes to Your deployment is complete:Open Azure Cloud Shell (PowerShell) and execute the script.
Paste and run the saved script.
Provide the requested inputs:
Enter Subscription name: Your active subscription display name.
Resource Group containing the Managed Application: The resource group name specified in Step 2: Basics.
Environment Name: The exact name used in Step 4.
Verify Output:
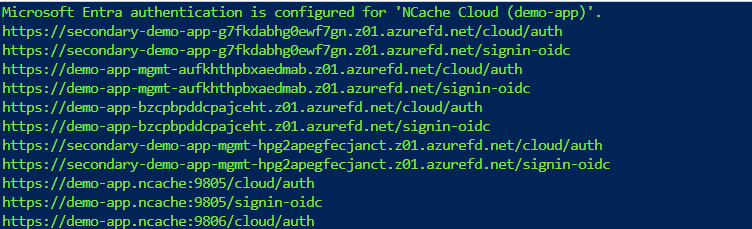
Upon successful registration, the Cloud Shell terminal displays:
Microsoft Entra authentication is configured for 'NCache Cloud(<env>)followed by the registered redirect URLs in green.To verify the registration in the Azure Portal:
Navigate to Microsoft Entra ID -> App registrations -> All applications.
Select your application (named
NCache Cloud (<env>), e.g.,NCache Cloud (demo-app)).In the Overview blade under Essentials, verify that:
Application (client) ID and Directory (tenant) ID match your deployment values.
Redirect URIs reflects the newly registered web endpoints (e.g.,
11 web, 0 spa, 0 public client).State is marked as Activated.
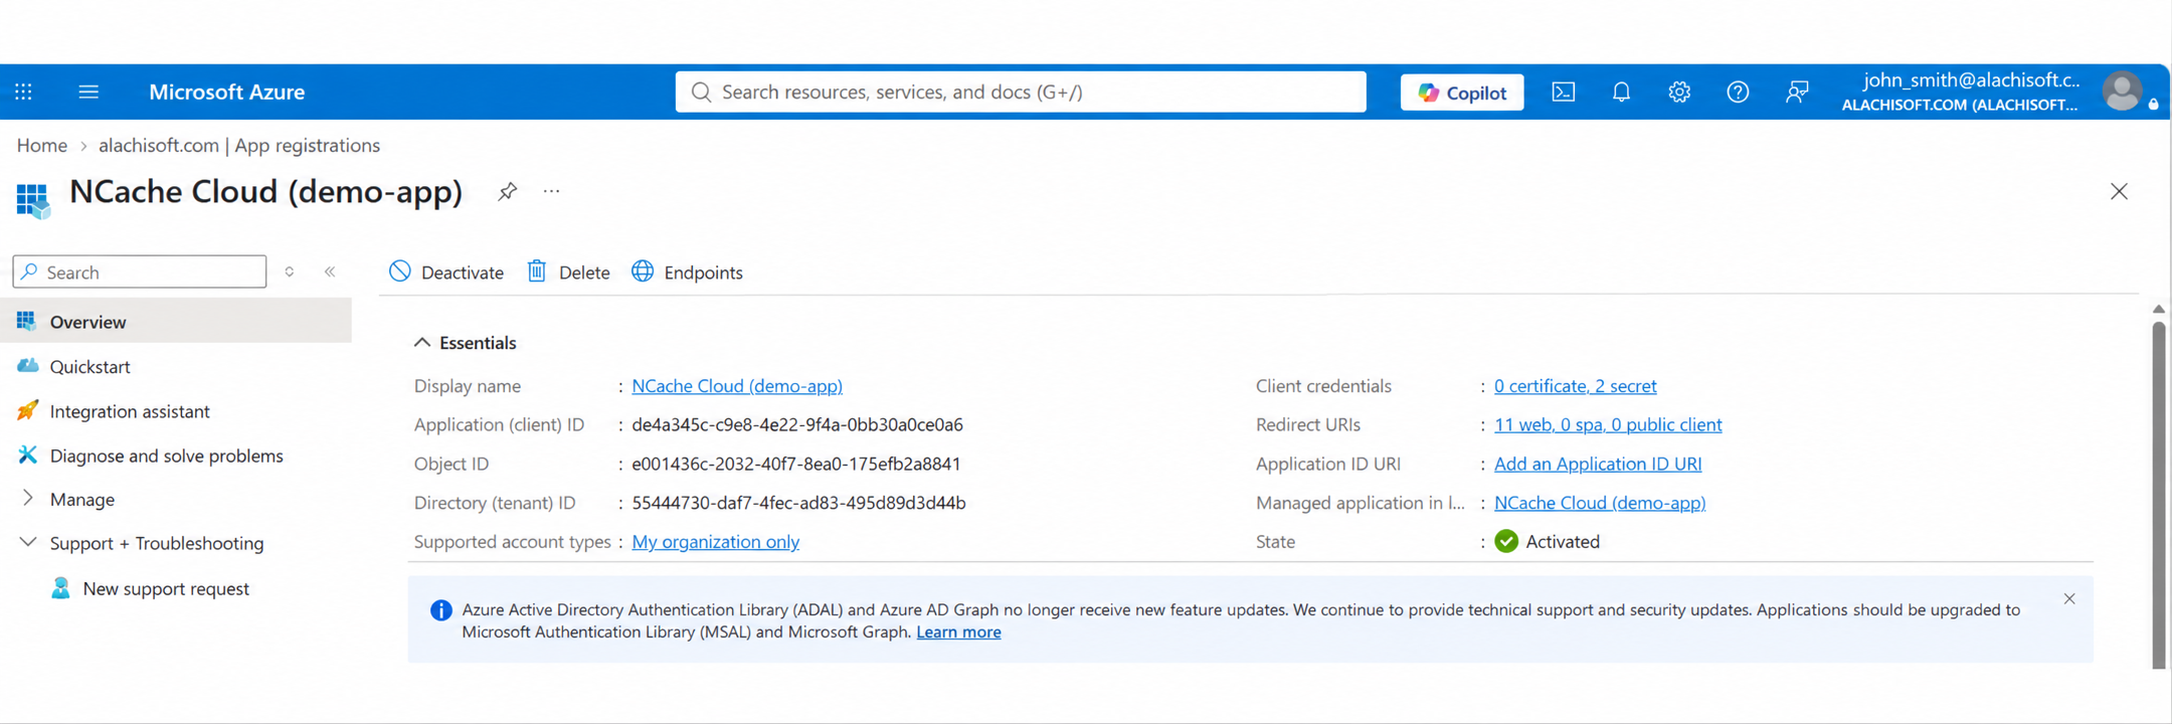
You can now log into the NCache Cloud Portal using your Microsoft Entra ID credentials.
What the Script Does Automatically
When executed, the script inspects the newly deployed resources and automatically configures OAuth authentication:
Discovers the Managed Resource Group: Identifies the internal resource group containing your cluster's infrastructure.
Locates Endpoints:
Scans Azure Front Door profile endpoints (
afdEndpoints) to detect primary and secondary public URLs.Retrieves the VMSS private DNS endpoint tag (e.g.,
<env>.ncache).
Identifies the Entra ID Application: Locates the Microsoft Entra application registered during Step 8: Prerequisites using the client and tenant IDs stored in the VMSS tags.
Registers OAuth Redirect URIs: Compiles and appends all necessary web redirect paths (
/cloud/authand/signin-oidc) across both public Front Door and internal port endpoints (:9805,:9806) to the Entra application registration, verifying that all reply URLs match.
Step 13: Tags (Optional)
You can categorize your resources and view consolidated billing by applying custom tags in the form of name/value pairs to your deployment resources (such as the Virtual machine scale set).
Note
If you create tags and subsequently modify resource settings on preceding tabs, your tags are automatically updated.
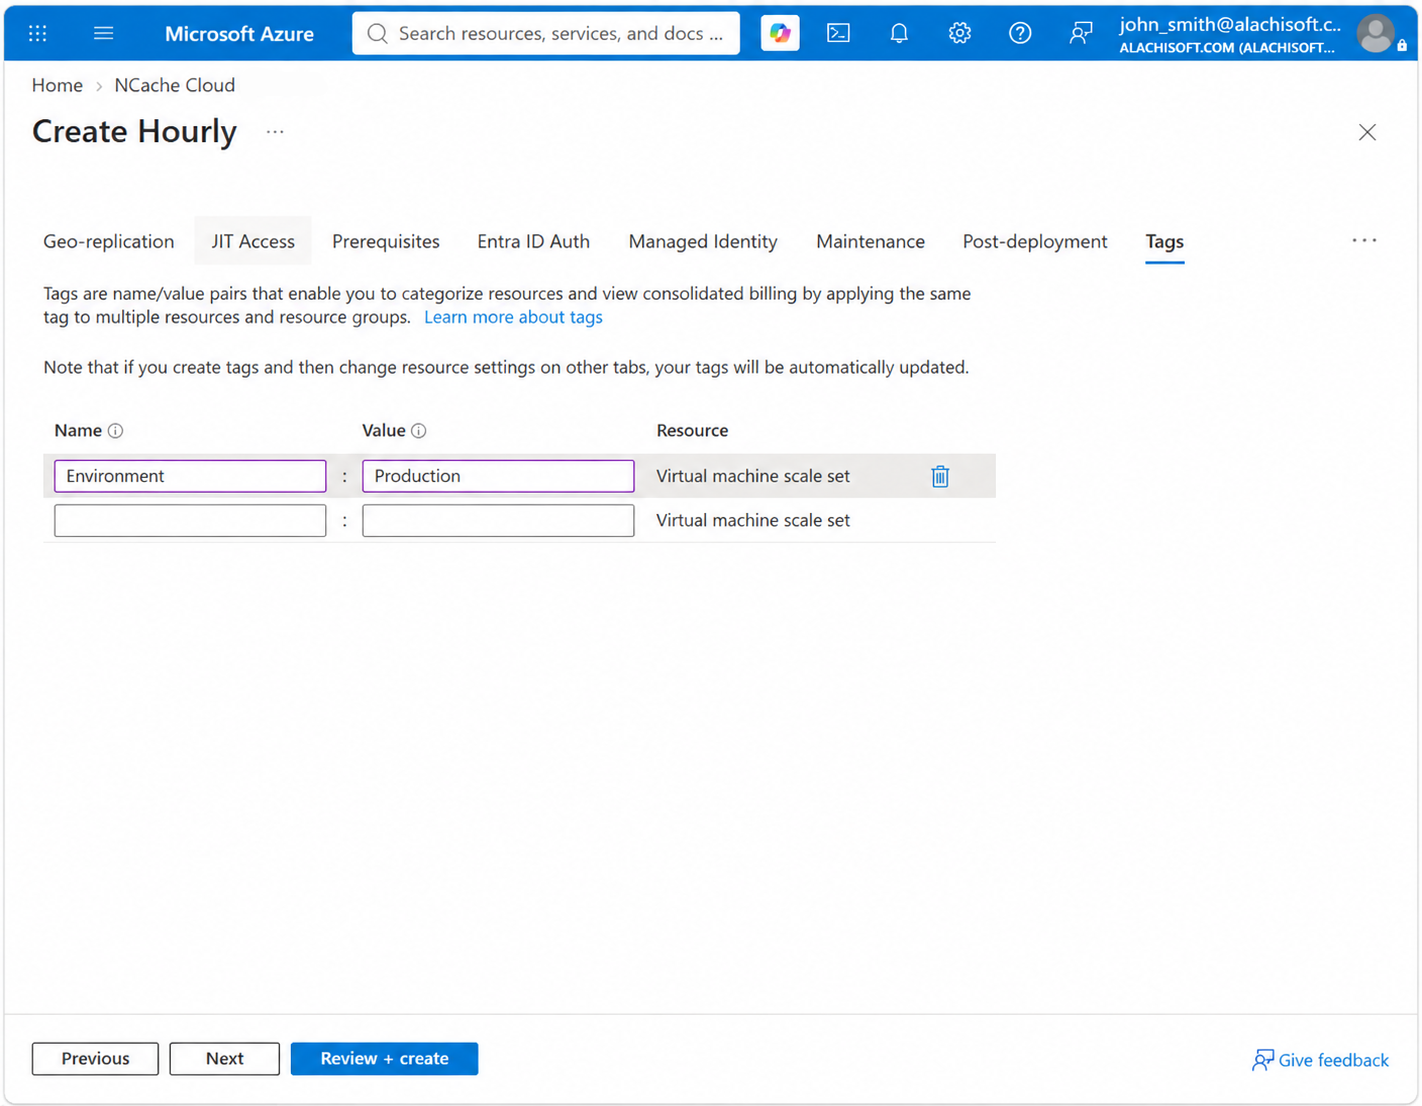
Step 14: Review + create
- On the Review + create tab, verify the provided information on the screen and click Create.
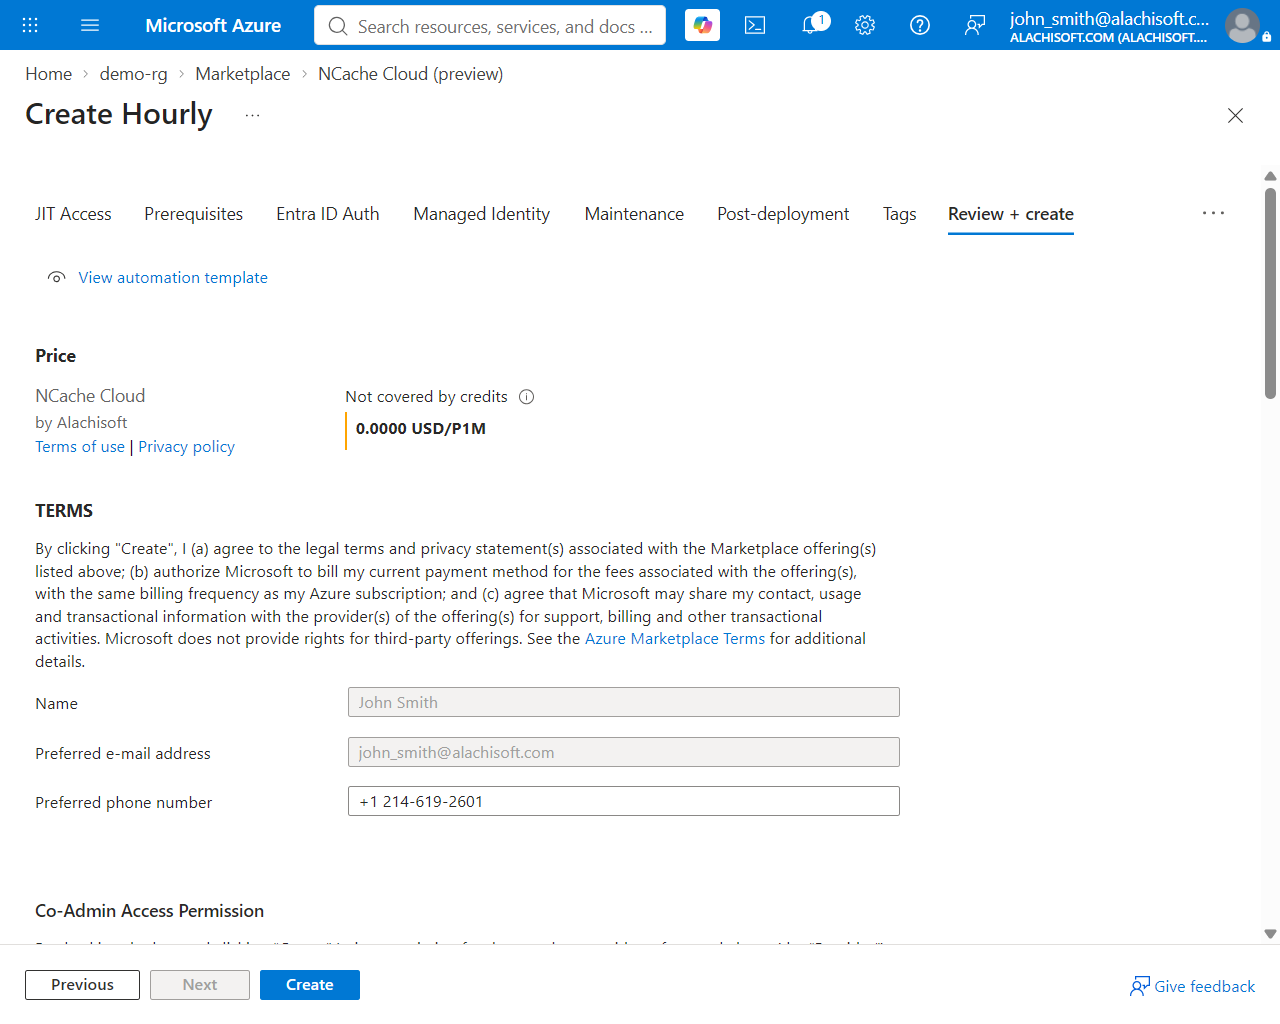
- When you enable JIT Access in earlier steps, Azure automatically displays a Co-Admin Access Permission agreement checkbox on the Review + create tab. You must select this checkbox to acknowledge that the application publisher (Alachisoft Support) will be granted temporary administrative permissions inside the Managed Resource Group whenever a Just-In-Time troubleshooting request is initiated and approved.
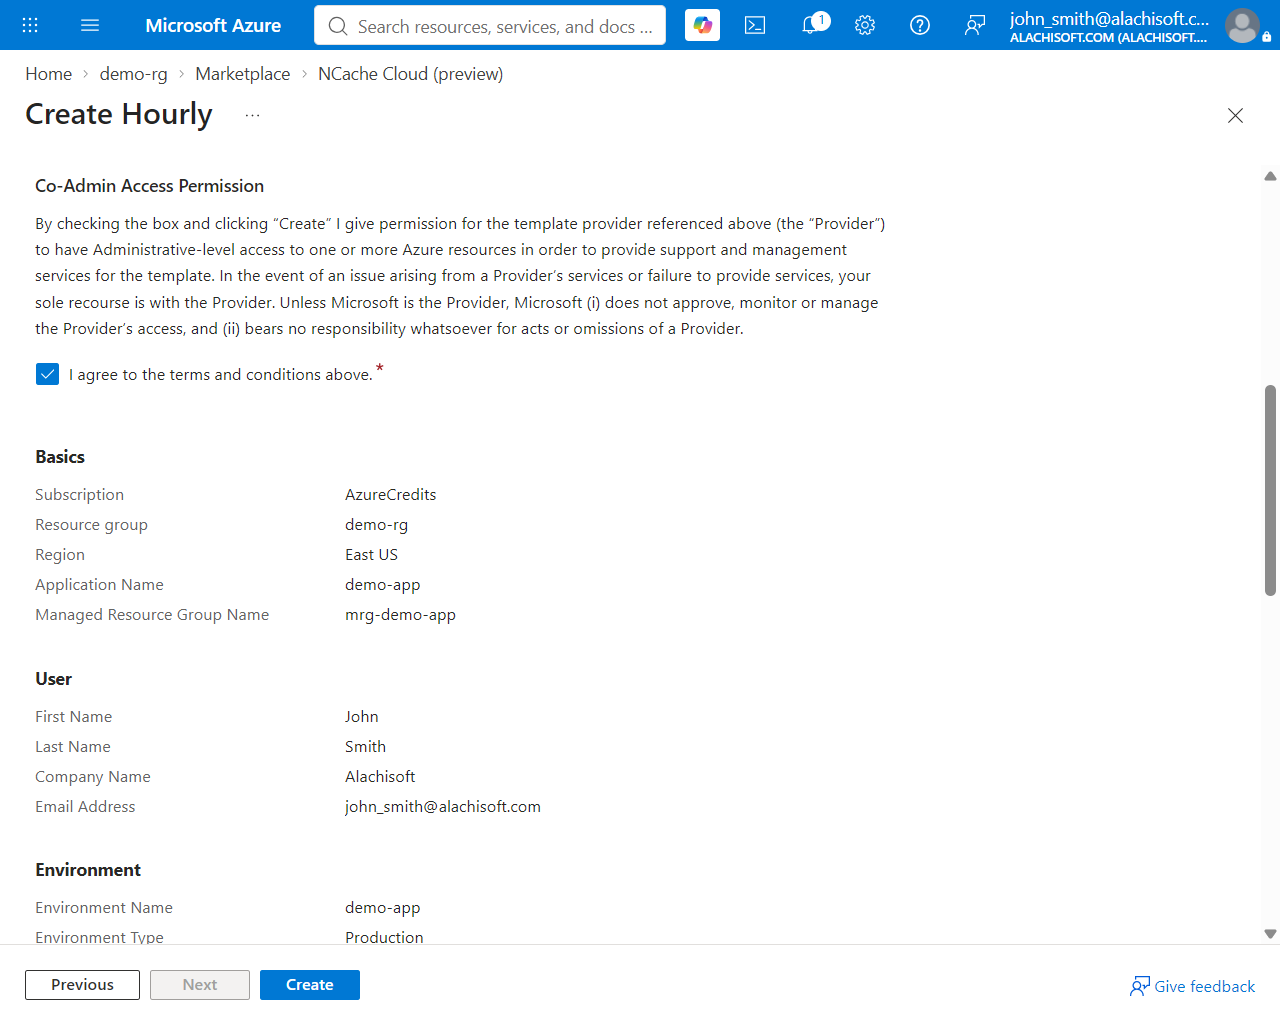
Deployment progress is shown on an Azure "Deployment is in progress" screen; once complete, your Managed Application (and its Managed Resource Group) are ready.
Click on Resource Group if you want to view your managed applications' resources.
You are also able to see the Managed Application Identity that was created by the prerequisites script.
Once deployment succeeds, run the post-deployment script that you saved in Step 12 in Azure Cloud Shell to register the Azure Front Door redirect URLs with Entra ID, completing the OAuth flow.
The post-deployment script asks for your subscription name, resource group containing the managed application, and environment name.
Access the NCache Cloud Portal
Once your deployment is finished and the post-deployment script has successfully configured your Microsoft Entra ID redirect URIs, you can access your NCache environment using the endpoints generated during provisioning:
- In the Azure Portal, open your deployed Managed Application and select Parameters and Outputs under Settings in the left menu.
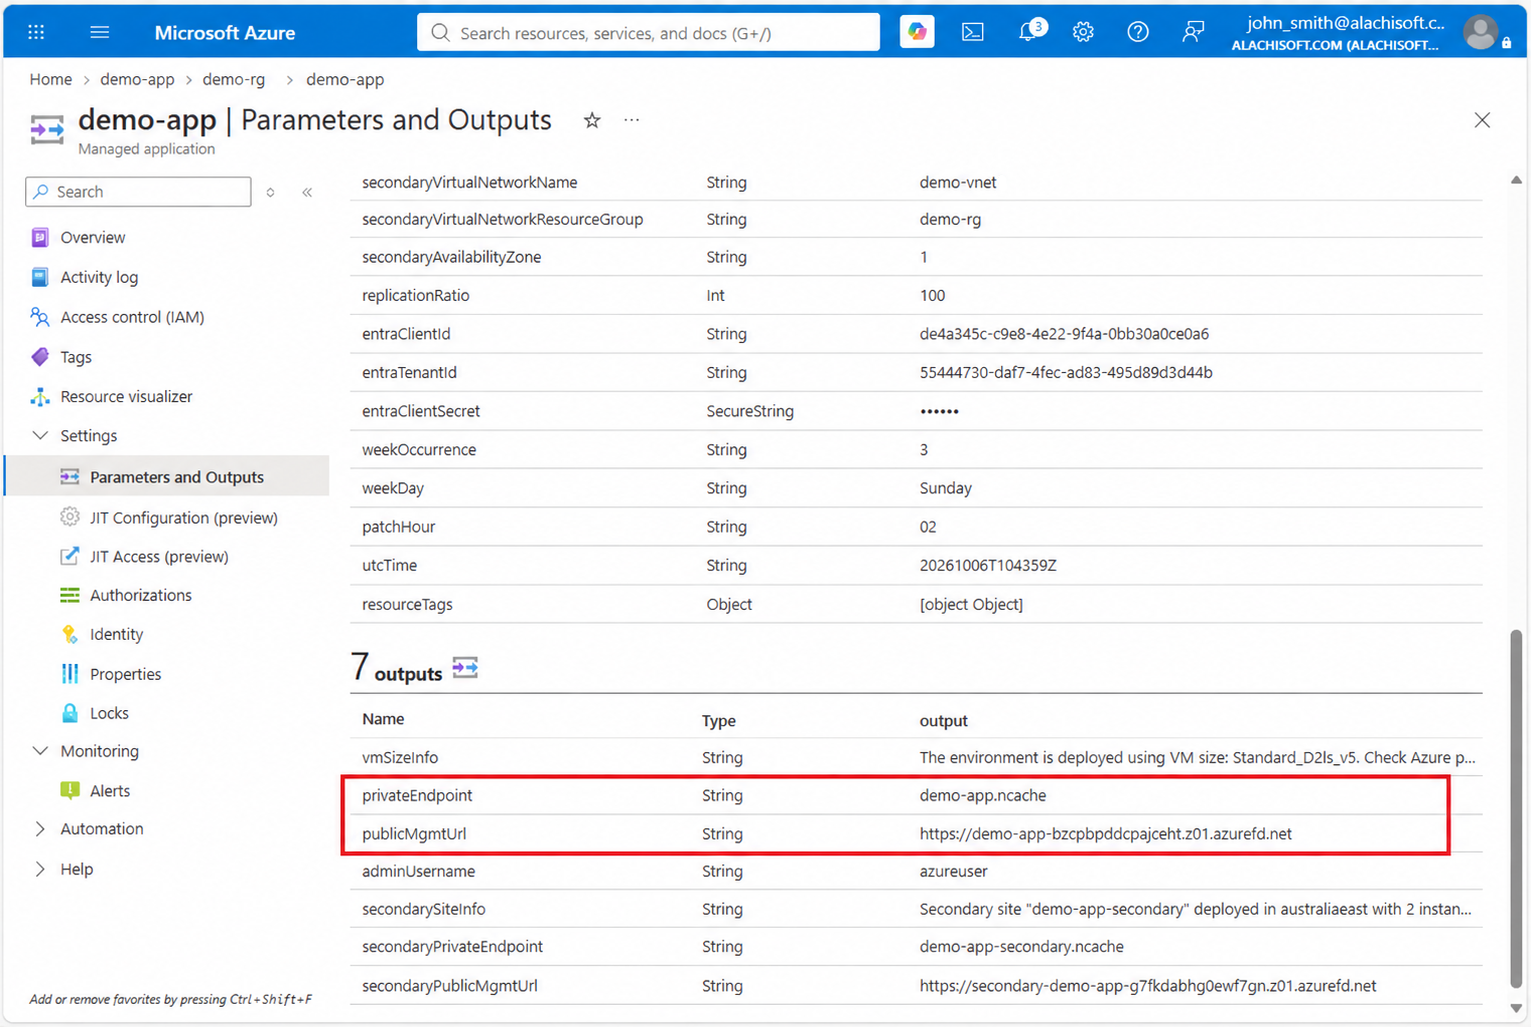
Locate your
publicMgmtUrloutput (the Azure Front Door HTTPS endpoint, e.g.,https://demo-app-bzcpbpddcpajceht.z01.azurefd.net/environment).Open the URL in your browser from an authorized IP address, click Sign in with Microsoft Entra ID, and log in using your credentials to manage your caches.
Upon successful authentication, you land on the NCache Cloud Portal dashboard under the Cloud Environment tab.
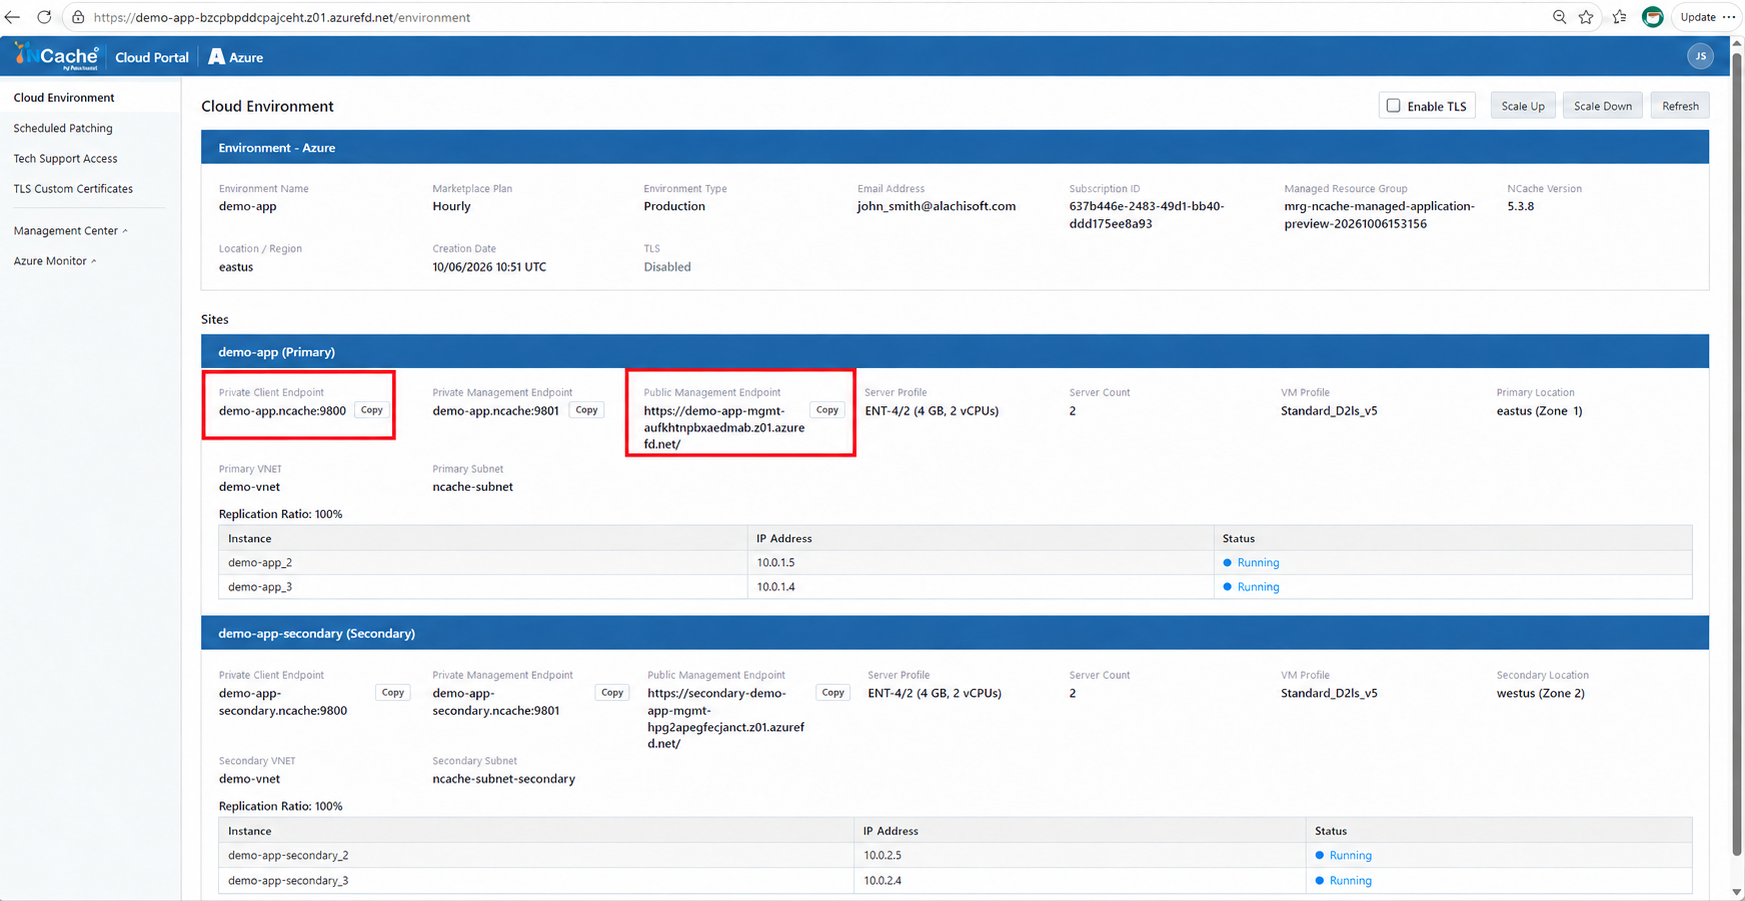
For more information on NCache Cloud Portal, please see NCache Cloud Portal docs
For comprehensive details on managing your cluster, connecting client applications via private endpoints (privateEndpoint:9800), running administrative scripts, and verifying health with the stress test tool, refer to the Azure Resources Created documentation.
