Create Client Cache
This cache exists on the client node (L1) in close proximity to your application, delivering low latency by minimizing or eliminating network trips to the clustered cache (L2). You can create a Client Cache by using the NCache Management Center or the appropriate PowerShell cmdlets. The Client Cache is created using the Optimistic synchronization mode. Depending on your requirements, you can configure it as a Regular or Full-Data Client Cache, and run it in InProc or OutProc mode. If you are using NuGet packages without any NCache client installation, refer to Create Client Cache with NuGet Package Installation.
Important
Ensure that you have an existing client node to create a Client Cache. To add a client node, please refer to the Add Client Node section.
Warning
You cannot create a Client Cache on a Pub/Sub Messaging store.
Using the NCache Management Center
Launch the NCache Management Center by browsing to http://localhost:8251 or
<server-ip>:8251.In the left navigation bar, click on Clustered Caches. Against the Cache Name, click on View Details.
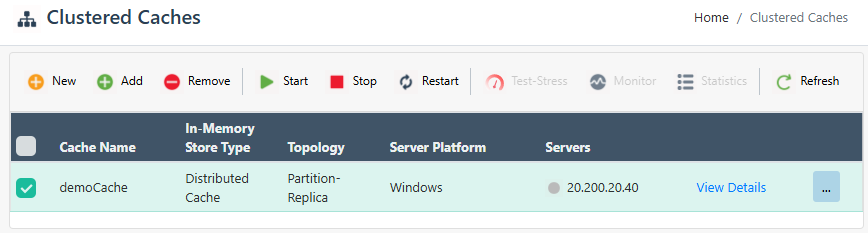
This opens the detailed configuration page for the cache.
In the Client Cache tab, click on the New button.

At this point, the New Client Cache page opens.
Specify the Client Cache name and click Next.

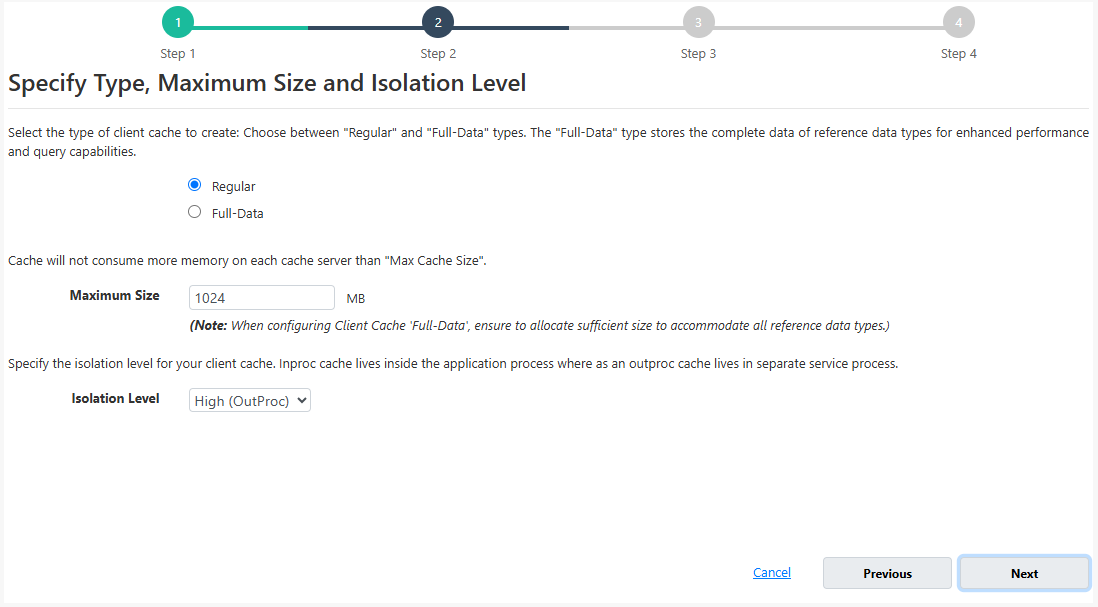
Create a Regular Client Cache
To create a Regular Client Cache, follow the steps mentioned below.
- Specify the type as Regular, choose the Maximum Size and Isolation Level for the Client Cache. The InProc cache lives inside the application process, whereas the OutProc cache lives in a separate service process. Click Next.
In the Advanced Options dialog box, you can configure the following:
You can change the Eviction Policy and Eviction Percentage; items will be evicted from the cache using the selected policy and percentage value, if eviction is enabled.
You can change the Clean Interval value. Its default value is 15 sec.
You can make the cache start automatically after a service restart by selecting the checkbox "Auto start this cache on service startup".
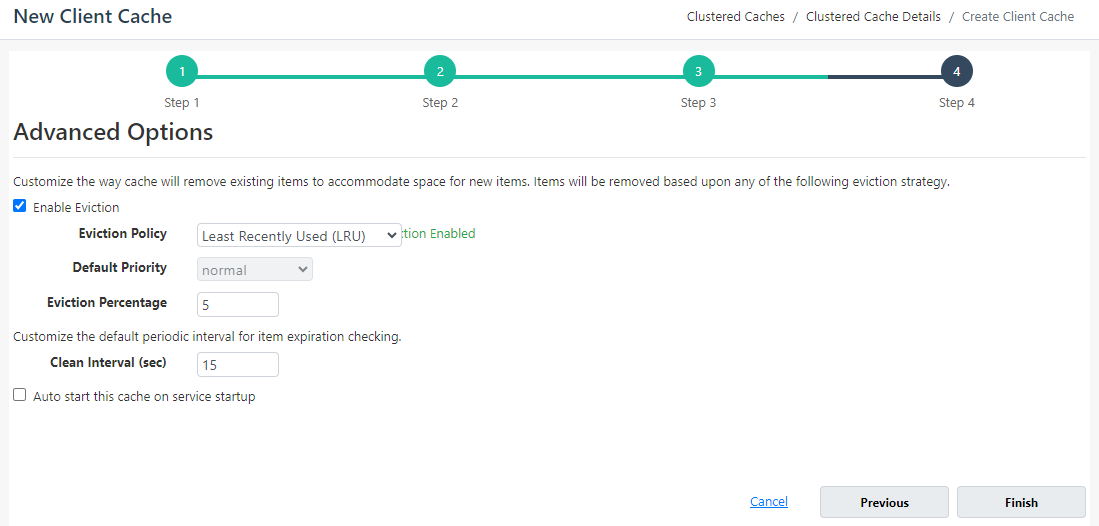
- Click Finish.
Once completed, a Regular Client Cache will be created. This will prompt a success notification and the Client Cache tab will now show options to configure Client Cache settings.
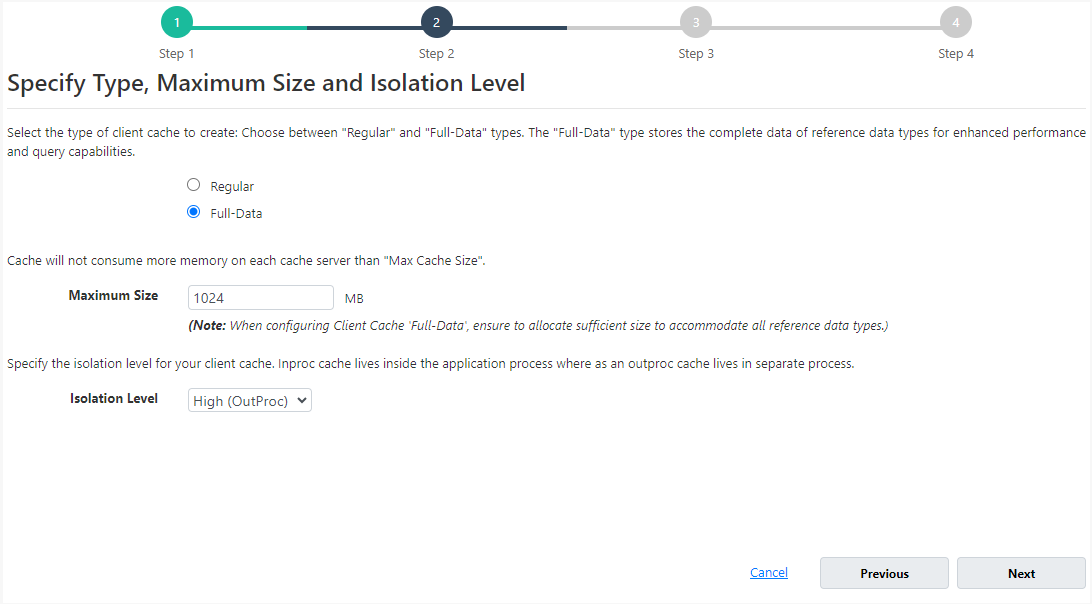
Create a Full-Data Client Cache
To create a Full-Data Client Cache, follow the steps mentioned below.
Important
The Full-Data Client Cache cannot be created and reference data types cannot be added while the clustered cache is running.
- To create a Full-Data Client Cache, select the type as Full-Data, choose the Maximum Size and Isolation Level. Click Next.
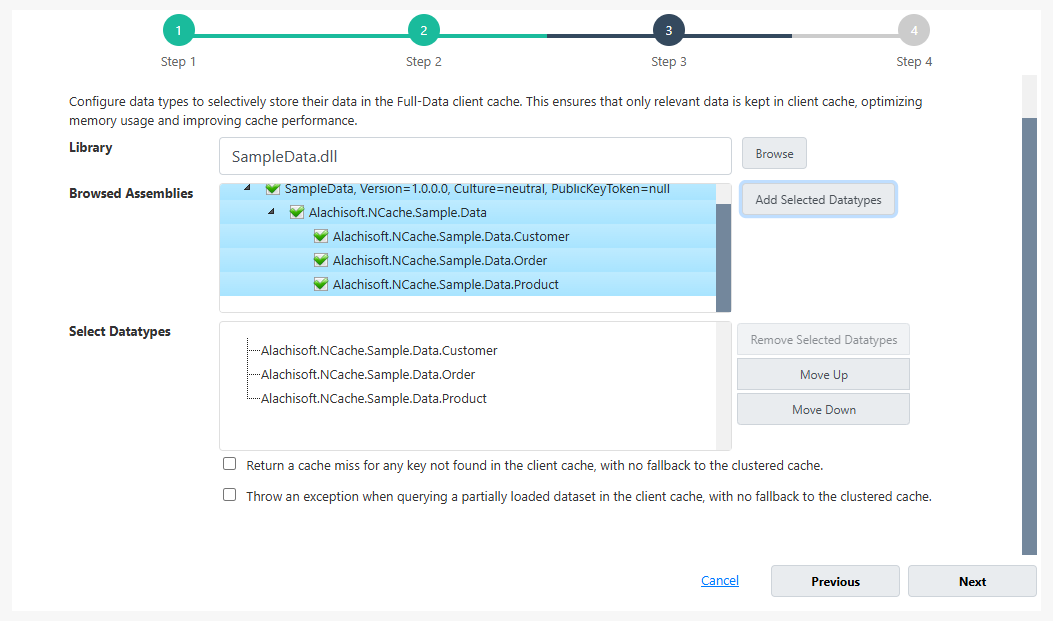
- Add the Reference Data Types to configure the desired reference data types for your Full-Data Client Cache by clicking the Browse button. You cannot create a Full-Data Client Cache without configuring atleast one reference data type.

The selected data types will appear in the Select Datatypes section in the same order you add them. You can also change the order of these types through the Move Up and Move Down buttons. This order will define the Eviction Priority for them, i.e., the data type added at the end will be evicted first.
You can also remove the selected reference data types through the Remove Selected Datatypes button.
Important
Strict Local Reads and Strict Query Enforcement only apply to reference data types that are configured in the Full-Data Client Cache.
In the case of queries, these are executed on the Client Cache first, and will fall back to the clustered cache only if the data is partially loaded in the Client Cache for configured reference data types. However, if you want queries to not fallback to the clustered cache, enable the checkbox "Throw an exception when querying a partially loaded dataset in the client cache, with no fallback to the clustered cache." With this option enabled, the query will not fallback to the clustered cache and will instead fail, throwing the exception: "Unable to execute query on client cache as the type '{queryFQN}' is partially loaded.", thus allowing for Strict Query Enforcement.
By default, all read operations check the Client Cache (L1) first, and if the data isn't found, they fall back to the clustered cache (L2). However, if you want to avoid this fallback and ensure reads are served strictly from the local cache, you can use the Strict Local Reads feature. With this enabled, any key not found in the Client Cache (L1) results in a cache miss, and no request is made to the clustered cache (L2). For this behavior, select the "Return a cache miss for any key not found in the client cache, with no fallback to the clustered cache" checkbox.
Important
If neither checkbox is selected and the data is only partially loaded, the search will fall back to the clustered cache.
Click Next.
In the Advanced Options dialog box, you can configure the following:
You can change the Eviction Policy and Eviction Percentage; items will be evicted from the cache using the selected policy and percentage value.
You can configure the Data Reload Threshold. This specifies the percentage of the total cache size at which the evicted data should be reloaded from clustered cache into Client Cache.
You can make the cache start automatically after a service restart by selecting the checkbox "Auto start this cache on service startup".
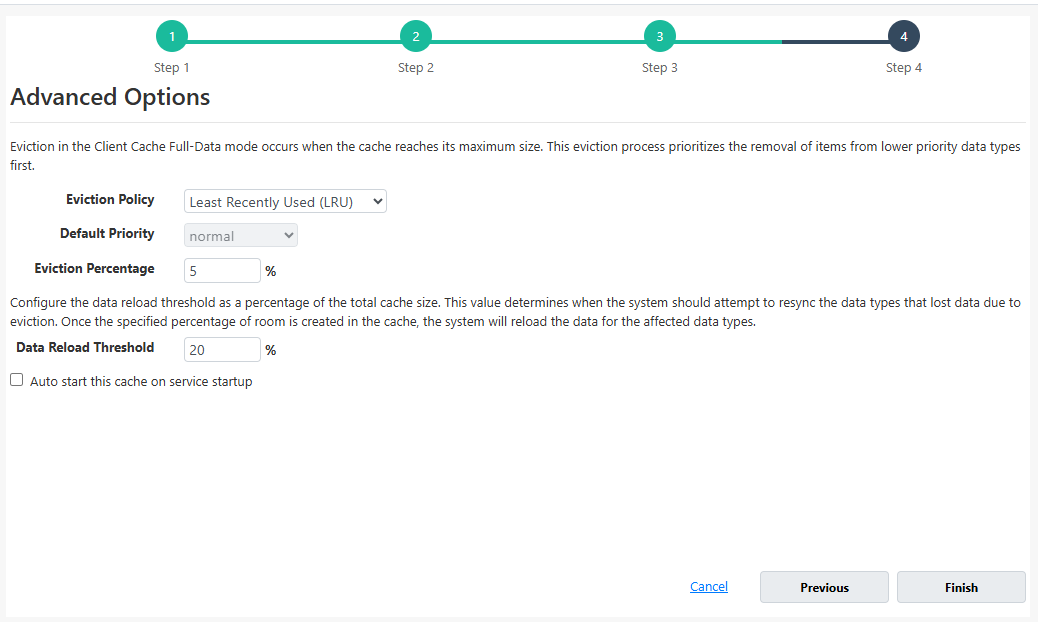
Click Finish.
This will prompt a success notification and the Client Cache tab will now show options to configure Client Cache settings.
Important
If you make any configuration changes to the Full-Data Client Cache, you must restart the Client Cache.
Using PowerShell
You can also create the Client Cache using the PowerShell cmdlets. The following are the PowerShell cmdlets to create the Regular and Full-Data Client Cache respectively.
Regular Client Cache
The New-ClientCache tool enables the user to create a new Client Cache.
- This command creates a Regular Client Cache named democlientCache on client node 20.200.20.12 for an already registered clustered cache on server 20.200.20.11.
Note
If the Type parameter is not specified, a Regular Client Cache will be created by default.
New-ClientCache -CacheName demoCache -ClientCacheName democlientCache \
                -Type Regular -Server 20.200.20.11 \
                -ClientNode 20.200.20.12
- This command also creates a Regular Client Cache named demoClientCache on the 20.200.20.12 client node for an already registered clustered cache on the 20.200.20.11 server. However, the
Pathparameter specifies the path at which the existing exported cache configuration file is placed.
New-ClientCache -CacheName demoCache -ClientCacheName demoClientCache \
                -Type Regular -Server 20.200.20.11 \
                -ClientNode 20.200.20.12 -Path C:\config.xml
- This command creates a Regular Client Cache named demoClientCache on client node 20.200.20.12 for an already registered clustered cache on server 20.200.20.11 having size 1024 MB for simple case using security credentials.
New-ClientCache -CacheName demoCache -ClientCacheName demoClientCache \
                -Server 20.200.20.11 -Size 1024 \
                -ClientNode 20.200.20.12 -Credentials (Get-Credential john_smith)
Full-Data Client Cache
- This command creates a Full-Data Client Cache named demoClientCache on client node 20.200.20.12 for an already registered clustered cache on server 20.200.20.11 having size 1024 MB.
New-ClientCache -CacheName demoCache -ClientCacheName demoClientCache \
                -Type FullData -Server 20.200.20.11 \
                -Size 1024 -ClientNode 20.200.20.12
- This commnad uses the
FailQueryOnPartialDatasetswitch parameter to enforces Strict Query Enforcement and throws an exception if a query is executed on a partially loaded dataset, with no fallback to the clustered cache. TheDisableL2FallbackOnMissswitch parameter enforces Strict Local Reads and returns a cache miss for any key not found in the Client Cache, without attempting to retrieve it from the clustered cache.
New-ClientCache -CacheName demoCache -ClientCacheName democlientCache \
                -Type FullData -Server 20.200.20.11 -Size 1024 \
                -ClientNode 20.200.20.12 -FailQueryOnPartialDataset \
                -DisableL2FallbackOnMiss
To add the required Reference Data Types in Full-Data Client Cache, you can utilize the execute the Add-ClientCacheRefDataType PowerShell cmdlet.
- This command adds the class Data.Customer as a reference data type for the Full-Data Client Cache configured in the specified cache on the local server.
Add-ClientCacheRefDataType -CacheName demoCache -AssemblyPath C:\Data.dll \
                           -DataTypes Data.Customer
- This command similarly adds the classes Data.Customer and Data.Product as reference data types for the Full-Data Client Cache on the specified cache on the server 20.200.20.11.
Add-ClientCacheRefDataType -CacheName demoCache -AssemblyPath C:\Data.dll \
                           -Datatype Data.Customer'$'Data.Product \
                           -Server 20.200.20.11
- This command does the same but the
AssemblyPathpoints to a JSON file.
Add-ClientCacheRefDataType -CacheName demoCache -AssemblyPath C:\data.json \
                           -Datatype Data.Customer'$'Data.Product \
                           -Server 20.200.20.11
- This command adds the class Data.Customer as reference data type for the Full-Data Client Cache using security credentials.
Add-ClientCacheRefDataType -CacheName demoCache -AssemblyPath C:\Data.dll \
                           -Datatype Data.Customer -Credentials(Get-Credential john_smith)
Note
You can change the Client Cache settings/configurations using the Client Cache tab after creating it (where you can configure email alerts, error logging, compression, synchronization, data reload threshold, and more for the Client Cache). You can also choose to View Details for that particular Client Cache from the Local Caches screen by adding it as an existing cache.
See Also
Enable Client Cache on Client Nodes
Disable Client Cache on Client Nodes
Remove Client Cache
Management Operations