Use NCache with Azure Kubernetes (AKS)
Azure Kubernetes Cluster with Docker Containers
Azure Kubernetes Service (AKS) is an open source container application platform by Microsoft based on the Kubernetes container orchestrator for enterprise applications development and deployment.
If you’re working with .NET/.NET Core or Java running in Azure Kubernetes and you want to use NCache to improve its performance and scalability for peak transaction loads, then please rest assured that NCache fully supports this environment.
Watch this video to see how easy it is to deploy NCache for your Azure Kubernetes cluster as a Docker deployment.
AKS is a managed container service that is available on Microsoft Azure public cloud. It is built around Application Containers that are powered by Docker while the orchestration and management services are provided by Kubernetes and today I will show you step-by-step details for deployment and usage of NCache in this platform. Let's quickly get started with this.
NCache Deployment in AKS
First of all, let's review NCache Deployment in AKS.
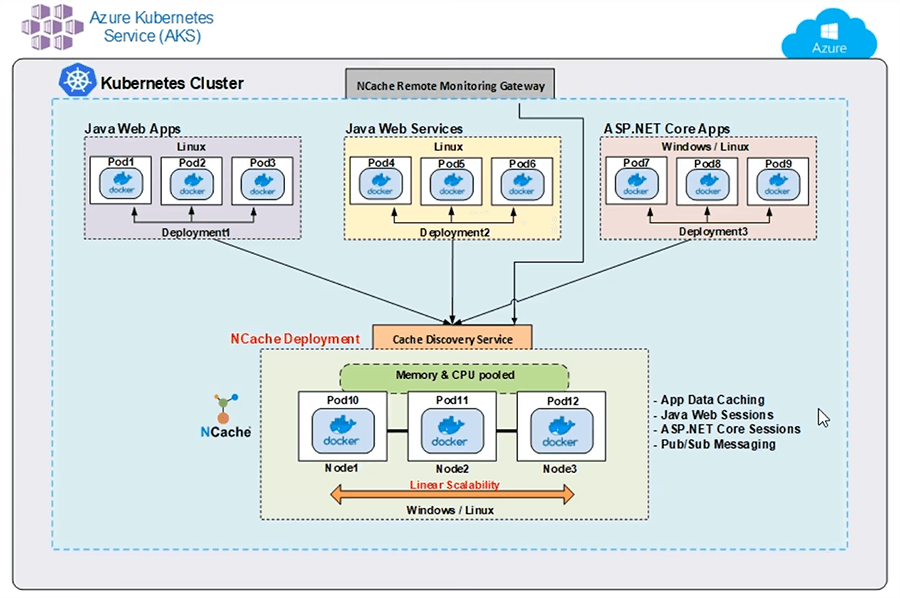
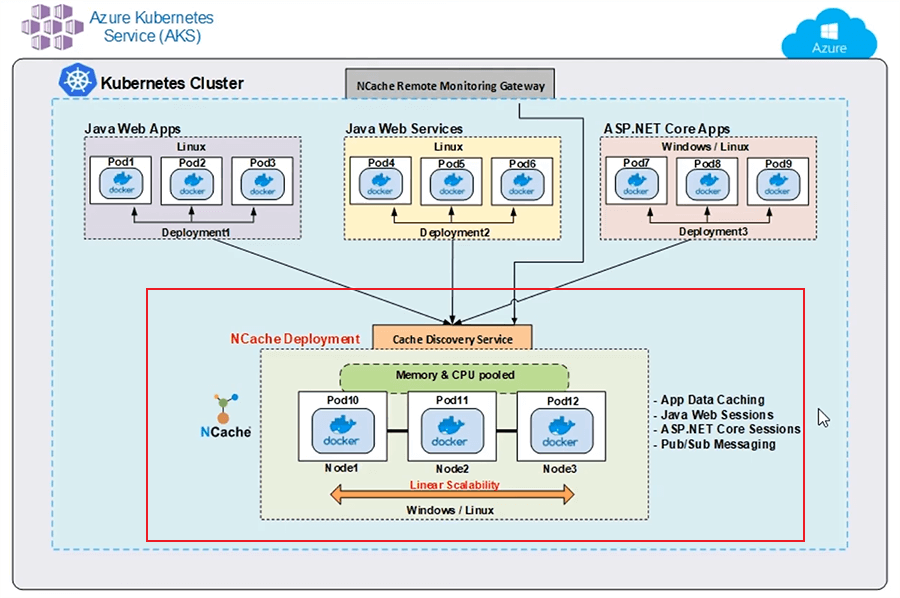
Here is a typical deployment of NCache in AKS. I'm showing a single Kubernetes Cluster with different application deployments as well as NCache Cluster Deployment. I've got a Java Web App using Docker Image on different Pods. I've also got a Java Web Service, again deployed on different Pods and these Java Applications are using Java Client of NCache to connect to my Cache Cluster.
Similarly, I've got an ASP.NET Core Web App deployed on different Pods using Docker Image and these, you know, these instances are using .NET Core installation of NCache to connect my Cache Cluster. My Cache Cluster is also based on Docker Image, which is Linux based Image of NCache, available on our website as well as on Docker Hub and that's what I've used to create a Cache Cluster on different Pods.
Additionally, I've got this NCache Remote Monitoring Gateway. That is a gateway for monitoring and management operations that are performed from outside this Kubernetes Cluster to manage and monitor my Cache Cluster and I've got this Cache Discovery Service. This is a headless service which is named as well and that's where my clients connect and that manages all the kind of server communication with my Cache Cluster. I don't need to know about the IP address of Pod 10, 11 and 12. Client Application only connects to this Discovery Service and that will in turn manage discovery and routing of these commands or these operations to underlying Pods.
I would show you step-by-step details on how to actually create this discovery service and Remote Monitoring Gateway along with Cache Cluster and deployment of these Client Applications, once we get to our hands or portion. But for now, this is a typical deployment of NCache in AKS using a single Kubernetes Cluster.
Demo Environment Setup
Here are details on our demo environment setup.
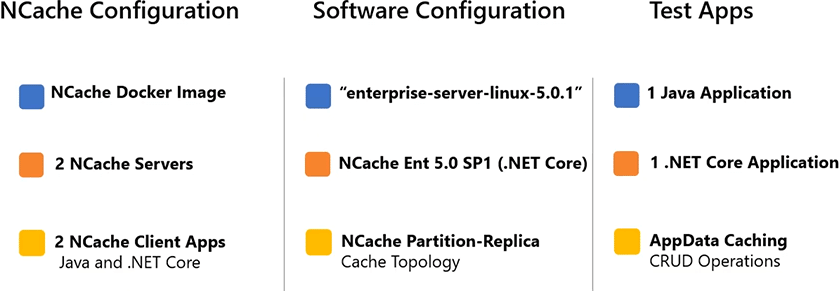
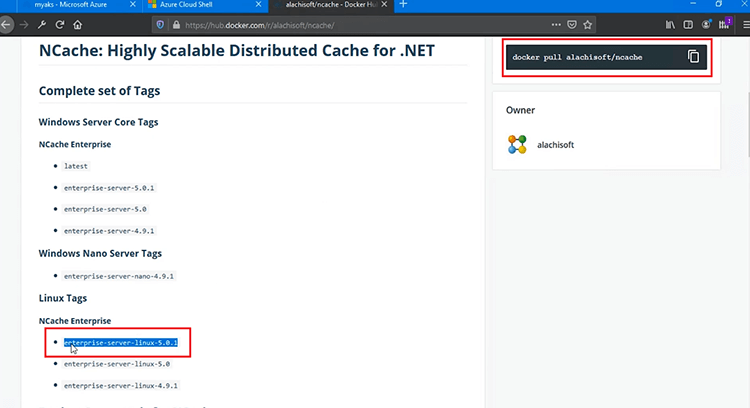
I'm using 2 NCache Servers to host my Cache Cluster and I'll be running 2 Client Applications to connect to this cache. I'm using Linux based Docker Image of NCache for this deployment and it is represented with this tag “enterprise-server-linux-5.0.1” and this tag needs to be part of your Docker Pull Command as well in order to use this Image. I'm using NCache Enterprise 5.0 Service Pack 1 and .NET Core release of it. That you can deploy on Windows as well as on Linux environments, but for deployment in AKS I'm using Linux based Image for this release. I'm using Java Application which is going to use Java Client of NCache and then I'm using 1 .NET Core Application as well which is using .NET Core Client of NCache. Within these applications, I will be using CRUD Operations, that would represent App Data Caching use case for my applications.
Deploy NCache Servers
First step is to Deploy NCache Servers in AKS. So, let's quickly get started with that. Ok, I'm logged into Azure management portal and that's where I'm going to get started with all the deployments.

First thing that I need to do is to create a resource group and after that I would go ahead and with all the deployments, hit ‘Add’ and I'm going to actually get started with this step.
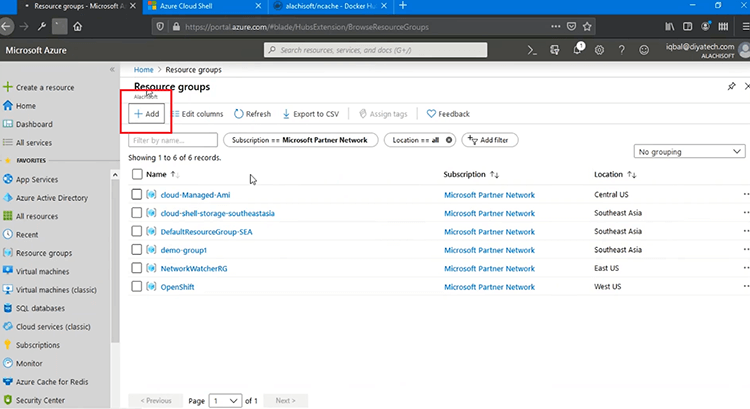
Keep everything simple, ‘Review + create’, hit ‘Create’ and that would go ahead and create a resource group, where I would deploy my Kubernetes Service. So, if I refresh on this. After that we will go ahead and create our Kubernetes Service.
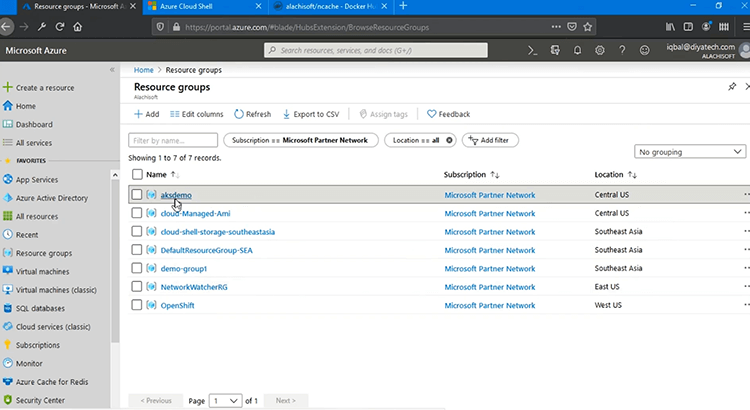
If I click on it I should be able to go see all the deployments within this.
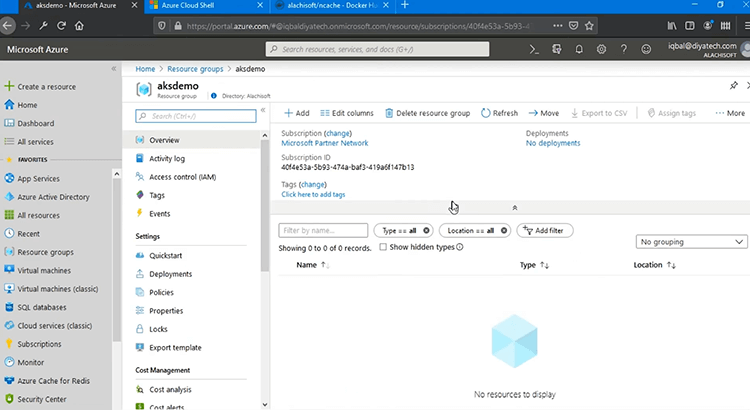
It's empty at the moment and next thing is that we need to create the ‘Kubernetes’, right and I can now create Kubernetes Service.
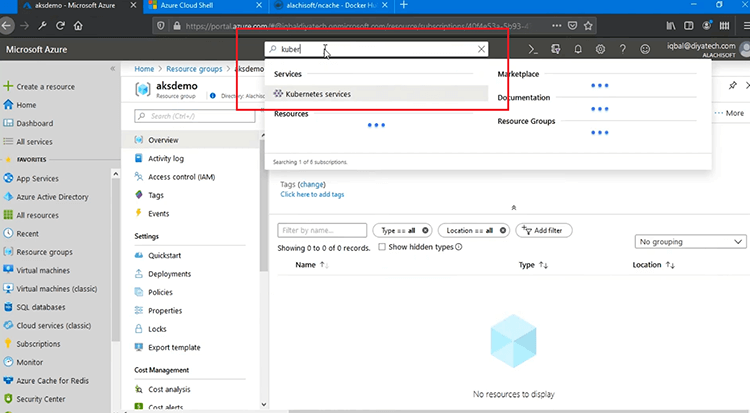
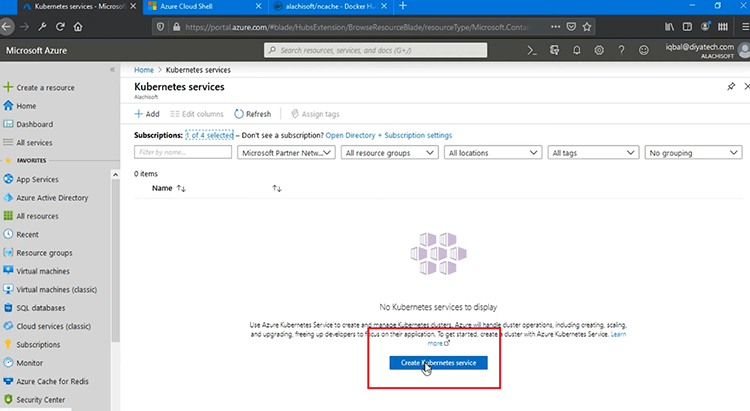
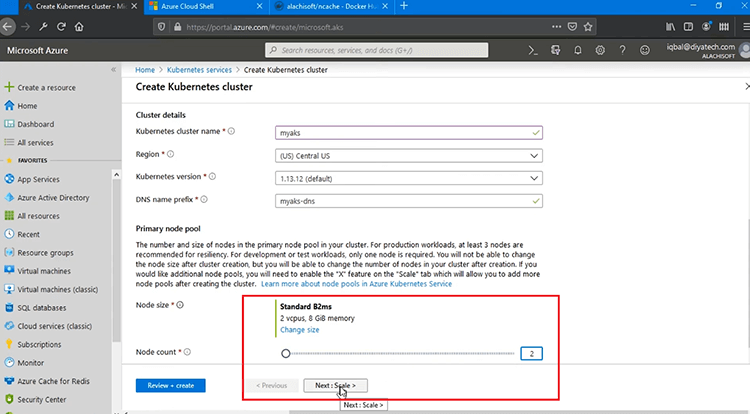
By the way I can do this through Azure Cloud Shell as well, which is right here and ‘Reconnect’. Or I can use the Management Portal which is convenient. So, I'm going to pick my subscription and then resource group needs to be ‘aksdemo’, the one that we recently have created. I'm going to name the Kubernetes Cluster ‘myaks’ and as you can see it automatically prefilled the DNS name as well. I'm going to pick ‘(US) Central US’ as my location. ‘Kubernetes version’ needs to be specified and I am going to go with default, but you can pick any that is desired and rest I would keep everything simple. For ‘Primary node pool’, I need to specify the ‘Node size’ and ‘Node count’. So, you can either pick the standard or you can change the size. This is where your Kubernetes Service is actually going to be hosted, right. So, you need to come up with right you know choice for service with enough Memory, CPU and networking resources.
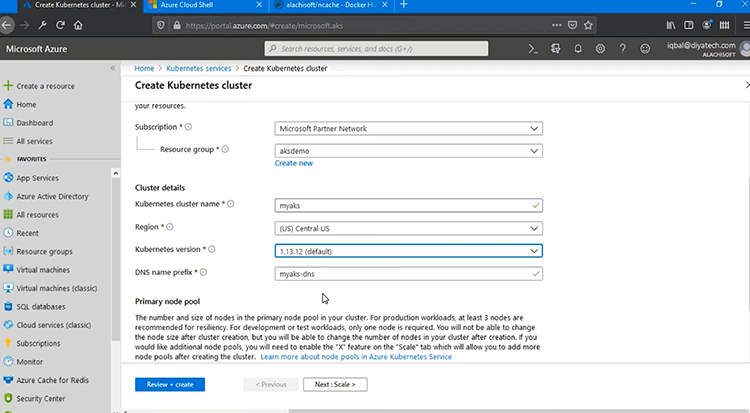
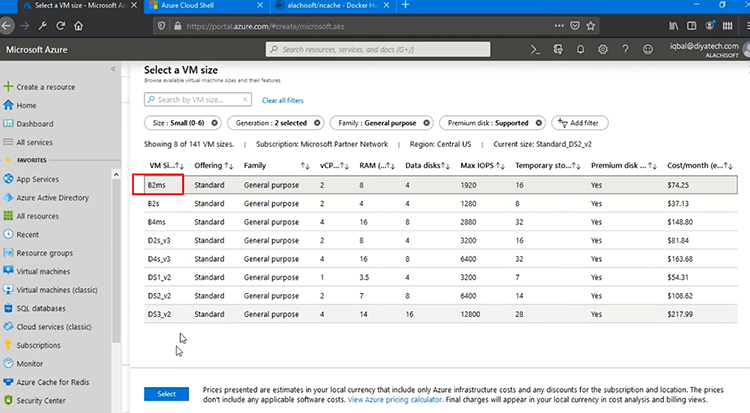
It gives you many options to choose from within VM sizes and then based on different parameters such as RAM, CPU, Disk and other parameters. So, I'm going to pick ‘B2ms’ because that's the minimum, that I can use for this test and ‘Node count’ is going to be 2 for me, but you can come up with any Node counts such as 2 or 3 and that's the number of servers with Kubernetes Cluster is going to be hosted, right.
So, having gone through this, I'm going to choose ‘Review + create’ and that would create my Kubernetes Cluster.
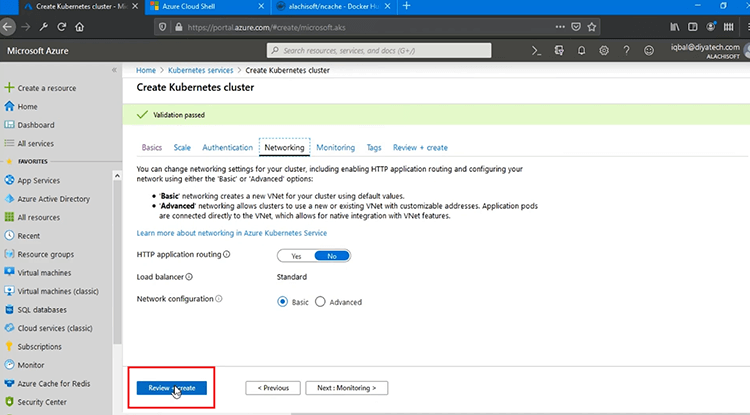
It would perform a bunch of validations in Microsoft Azure, but you can see different settings such as ‘Scale’, ‘Authentication’, ‘Networking’. You can keep everything default or change as needed and you can also see monitoring and if you hit ‘Review + create’, it would get started with the validation process.
So, after final validation is completed, I'm going to hit ‘Create’. It would take 5 to 10 minutes to actually complete this in Microsoft Azure, but after that we should be able to get started with the deployments. As you can see your deployment is underway, once this is done, this would turn the status mark into green, so, I need to pause this video at this point and come back once this is done. It's already done, as you can see.
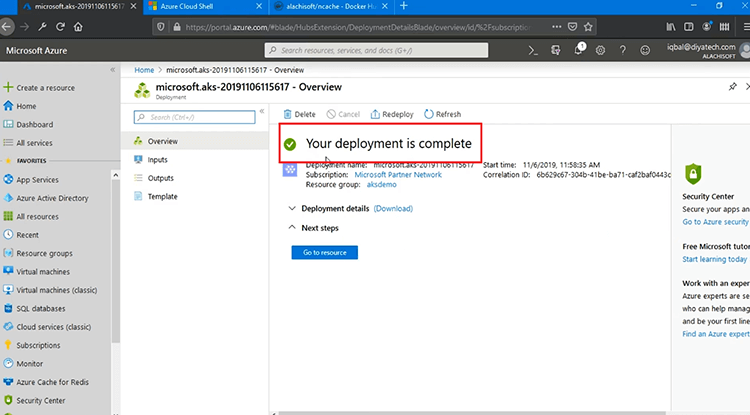
Your deployment is completed after taking 5 to 10 minutes and I can now go to ‘Resources’ and based on this I can see my AKS service, which is ‘myaks’, there you go, successfully created.
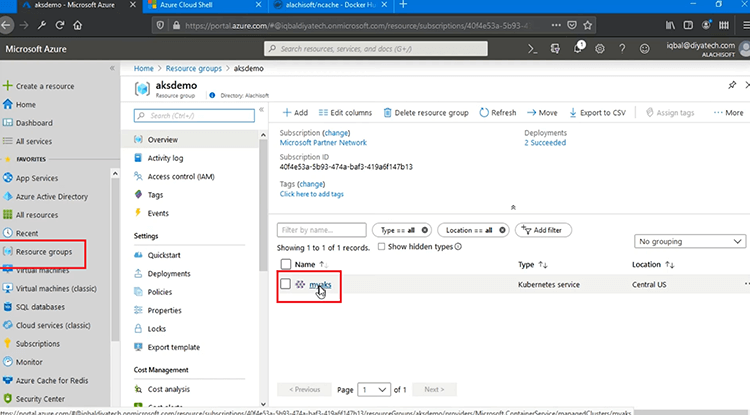
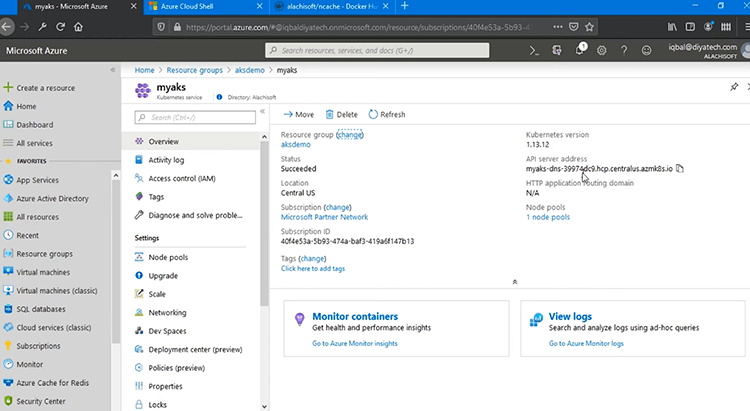
If I click on it, I can see all the deployments details for this service, such as Kubernetes version, the API server address and then its status is succeeded and the location is what we have specified. So, this has completed our Kubernetes Service.
NCache server-side deployment
Coming back to the deployment diagram, our Azure Kubernetes Service is now created in Microsoft Azure, but it's empty at the moment. Next step is to go ahead with NCache server-side deployment to deploy our Cache Cluster. So, let's see how to do that.
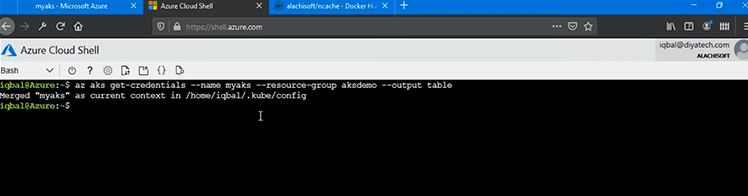
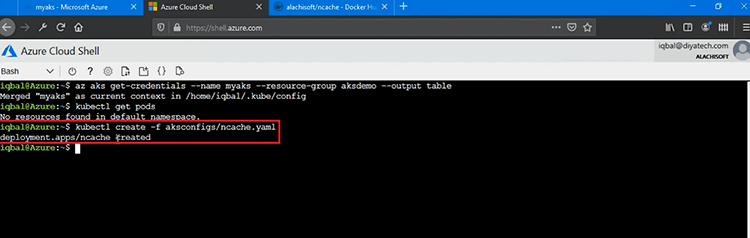
Alright, my AKS cluster is now configured and it's available to be used for deployments. We've used the Azure Management Portal but for next step, for all the deployments, we'll use a Azure Cloud Shell and first thing that we need to do is, point towards the AKS cluster within this shell. So, for that I would run 'az aks get-credentials' command. So, within ‘az aks’ is for Azure Kubernetes Service. ‘get-credentials’ command allows me to, bring the current context to ‘myaks’ which is our AKS Service and within the ‘aksdemo’, that's the name of the resource group where this is created. So, that would allow me to point towards ‘myaks’ Azure Kubernetes Service and I can get started with the management and deployment operations.
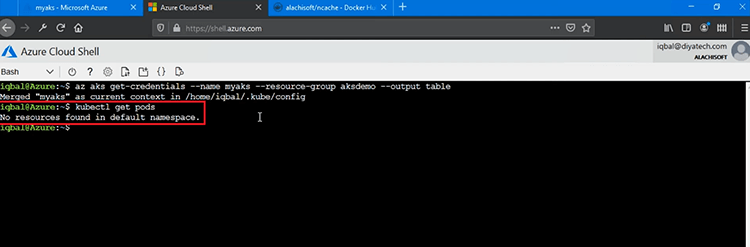
So, first thing that we need to review is, whether there are any existing deployment? So, I would go ahead and run command real quick, which is 'kubectl get pods' and that would give me the existing Pods. So, there are no resources found in default namespace, that suggest there are no deployments as yet.
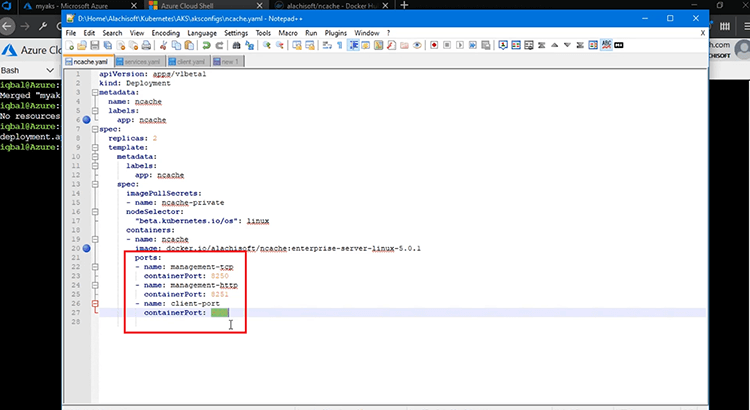
But we need to deploy NCache Servers and for that, I would bring the NCache YAML file and that's what I would use for NCache Server-side deployment. So, kind is chosen to be ‘Deployment’, name is of course ‘ncache’, so, that's what I will be referring going forward for all the server-side deployment of NCache within other services and within the Client Applications as well. The image that we're using is Linux based Docker Image of NCache and I'm using two replicas. Essentially, we have two Pods, where NCache Cluster is going to be deployed to start off and then we can add more Pods at a later stage. The Docker Image, let's talk a little bit more about it. The Docker Image that we're using is Linux 5.0.1 Docker Image, which is available on our Alachisoft Docker Hub page.

We have a ‘docker pull’ command which is by default going to fetch you a Windows Image, but you can also use the Linux, by using this tag right here ‘enterprise-server-linux-5.0.1’ and that would fetch you and that's what I'm using.
So, let's go ahead and add this YAML to get started with NCache Server-side Deployment. So, I'm going to run 'kubectl create -f' and provide this YAML file to get started with NCache server configuration and load NCache Linux based Image in our AKS Cluster. There you go, NCache Deployment is created. It's that simple.
As part of the deployment, this has also opened some Management and Monitoring ports, 8250 & 8251. So, all the Pods would have these ports open for Management and Monitoring and that too from outside this Kubernetes Cluster as well and then we also have the ‘client-port’ which is port 9800 and that is main Client to Server Communication port, that our application would use and connect to this Cache Cluster. At this point, our NCache Server-side Deployment in EKS is completed.
We will create a Discovery and Management Gateway next and then we'll come back and review all these deployments at once.
Cache Discovery Service
Now that our NCache Server Pods are successfully deployed in AKS, next step is to create a Cache Discovery Service, as well as a Management Gateway in AKS. The discovery service would allow my Client Applications to discover and connect and use underlying Pods within the Cache Cluster that we will create and then our Remote Monitoring Gateway would allow any system admins from outside this Kubernetes Cluster to manage and monitor these Pods for the Cache Cluster.
So, let's review all the steps here. Now in order to create these services, I have this ‘services.yaml’ file right here that would allow me to create these services. So, I'm creating two services a gateway as well as a cache discovery service. The gateway is for monitoring and management, whereas discovery service is for client or server communication for, you know, routing and discovery to the underlying Pods within the Cache Cluster.
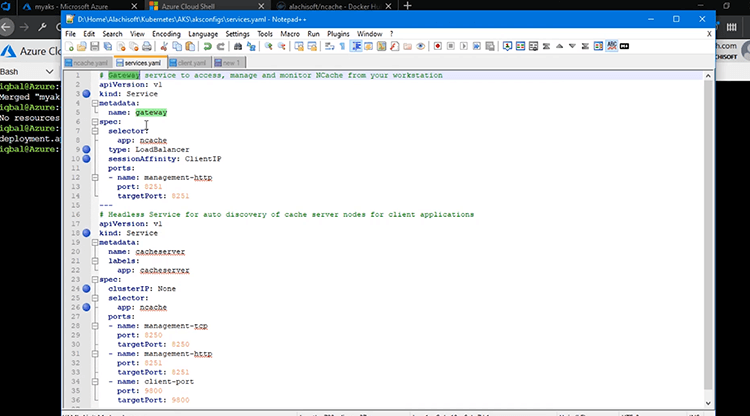
So, first service is our ‘gateway’ service, right here. The kind is chosen to be ‘service’ and it is mapping 8251 port to the underline Pods and this is for outside world to actually be able to connect to the online Pods for Management and Monitoring and this is why I have chosen the type to be ‘LoadBalancer’ and the app selector is ‘ncache’ and ‘sessionAffinity’ is a very important concept. We need to choose it this to be ‘ClientIP’. That’s a mandatory step and that allows my connections to the underlying Pods to be sticky. We are using web based Management tool, to Manage and Monitor NCache Pods. That creates a session, so if, first request goes to Pod one it needs to be sticky to that Pod so, that session remains intact for subsequent calls as well. So, you need to have ‘sessionAffinity’ bit set to ‘ClientIP’ for this gateway service as a must. That's a mandatory step and then you can get started with the deployment of this.
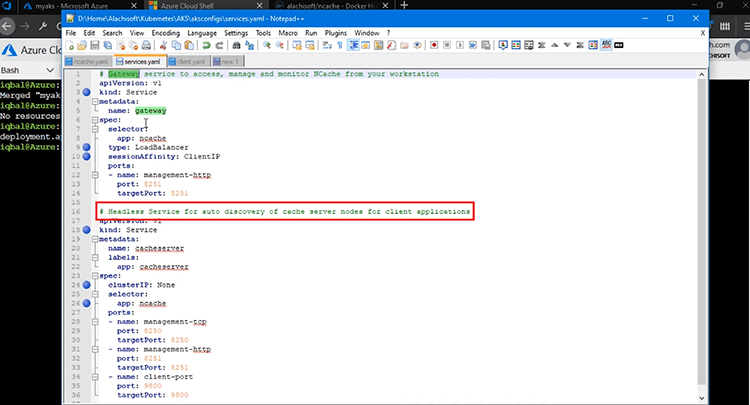
Second service is a headless service for auto-discovery of your Cache Server Nodes for Client to Server communication. I have chosen the name to be ‘cacheserver’. Again, the kind of this is ‘Service’, so, it's again a service, a headless one and what really makes it headless is the ‘clusterIP’, which is chosen to be ‘None’. So, it does not have any IP. It just manages internal discovery and routing of Client Applications to make connections with NCache Pods. And how it connects to NCache Pods? With the help of the selector which is ‘ncache’ and that's what we used for NCache deployment as well when we deployed NCache Server Pods and in this we essentially have mapping for, you know, for this discovery service we have a mapping of 8250 to underlying Pods, 8251 mapping, and then 9800 for Client-Server communication.
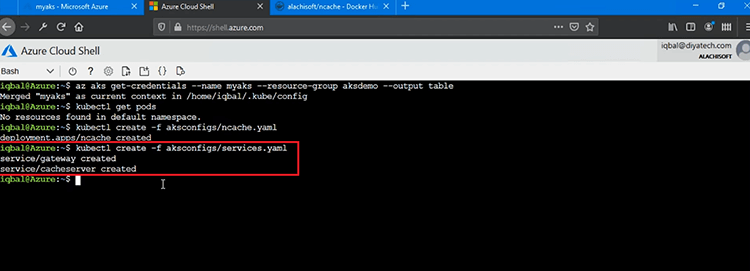
So, we will go ahead and load this YAML file, again using the same 'kubectl create' command with /f and we will deploy these two services in our AKS Cluster. I think there's a typo, ‘aksconfigs/services.yaml’. If I hit enter on this, I should be able to see two services created. A Gateway Service and a Cache Server, which is an auto discovery service for NCache Server Pods.
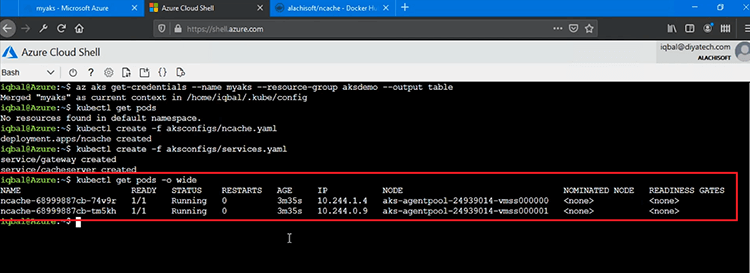
Now, if I quickly show you 'kubectl get pods' command, that would show me, first of all NCache Server Pods, because those are two Pods that are going to have and get Server-side deployment. You can see we have NCache Pods with these IDs and we also have IPS assigned to these as well. They're running and first Pod is running with 10.244.1.4 IP and then we also have the second Pod with .0.9 IP.
I would also show you the 'kubectl get services' you can just say ‘svc’ and that would bring down all the services that we've created. So, we have ‘cacheserver’, which is a headless service and then we also have the ‘gateway’, which also has an IP address which allows us to actually monitor and manage our NCache Pods with the help of port mapping from outside world. So, 8251, you can see is actually open for this as well and the Cache Server is showing no IP, that is essentially a headless service for Client Applications to connect to the Cache Cluster.
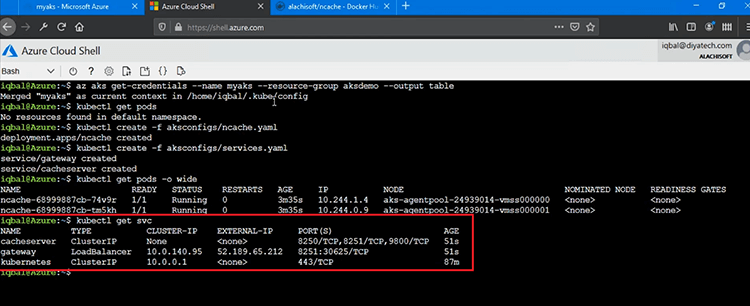
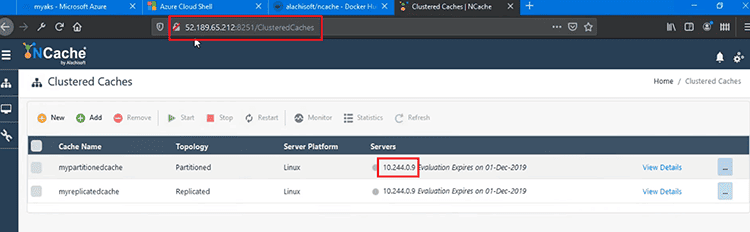
So, using this external IP I should be able to log into the management console. So, I'm launching our web-based management tool using this 8251, I think there is, let me just change it, 8250, yeah, there you go. So, I'm logged into this management tool and I'm as a matter of fact, I'm connected to 10.244.0.9 Server and this ensures that actually ours our services are fully functional. We're able to actually Monitor and Manage NCache, since we were able to open the Management Tool from my machine. Next step is to actually get started with Cache Cluster creation. So, we'll review that. At this point all of our deployments are completed.
Create Cache Cluster
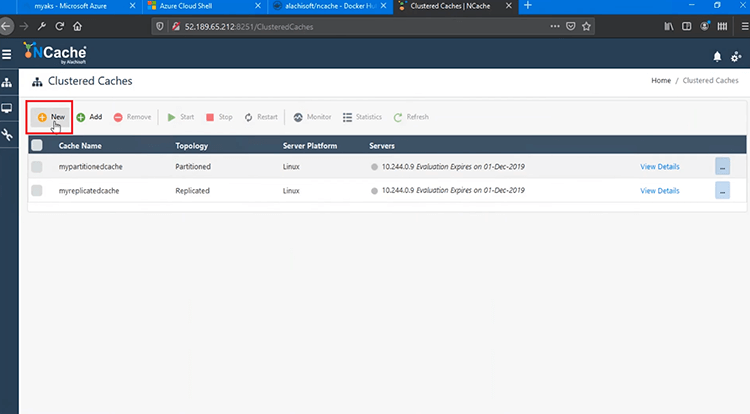
We can now go ahead and create our NCache Cache Cluster next. I will now create a Cache Cluster by clicking on ‘New’, that would open the Cache through creation wizard.
I would just name my Cache Cluster ‘democache’. Keep everything default here. First IP is automatically suggested and second IP is something that I can pick from here 1.4, bring it back here and then I should be able to add this as well and hitting ‘Next’ would go ahead and give me some more parameters. Keep everything default and that's it. My Cache Cluster is now created. If I click on ‘View Details’, I can see that it's fully created.
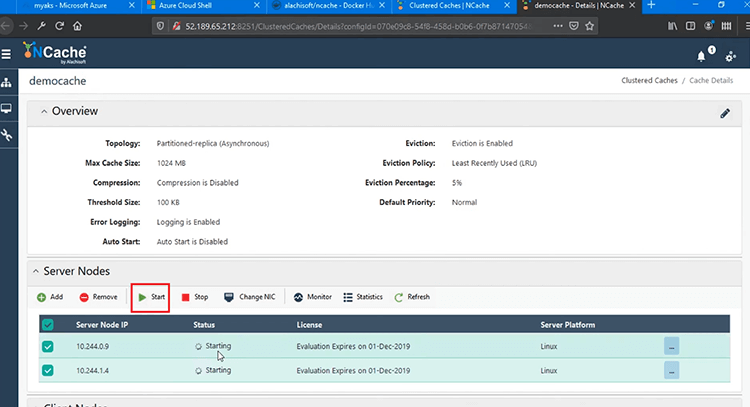
So, I'm going to go ahead and start this Cache Cluster on both Pods and that would start my Cache Cluster and you can see the status message has displayed that Cluster is fully functional and started as well.
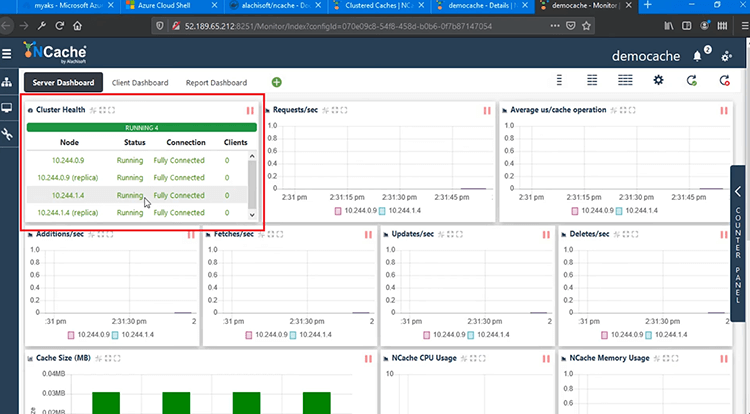
I can now open Monitoring Tool which is again web-based monitoring tool for NCache that will allow me to monitor my service as well as clients and it shows fully connected between these two Pods, that's the fully connected status. So, I'm good to go as far as cluster creation is concerned. A bunch of parameters, no client application is connected at this point but we can actually run that once we deploy and run the client application.
Deploy and Run Client Applications
Next step is to Deploy and Run Client Applications to connect to our Cache Cluster in AKS. Okay, now we need to deploy the Client of deployment as well and for that I have another container which I will deploy and it is a single client container which has both Java and.NET Core Client Applications bundled into it.
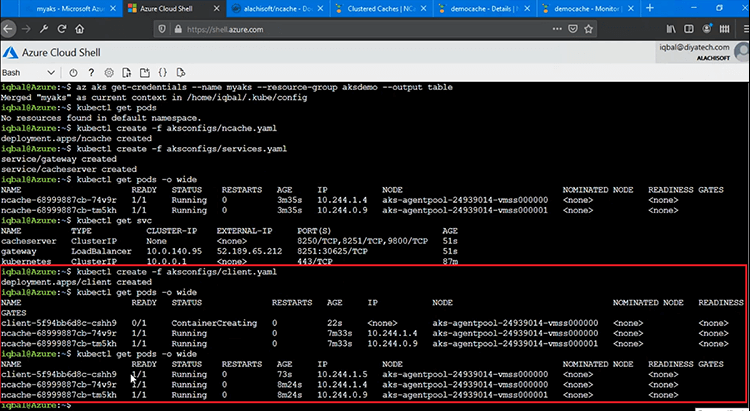
So, I'm going to go ahead and load ‘client.yaml’ file and as soon as this deployment is created I would have my two applications which are going to be ready to be used against my Cache Cluster. In order to verify, whether these are, you know, being deployed properly, I would first of all run 'kubectl get pods' command and that would show me the container is being created, right. So, current status is and I can see an additional container, so, that's a good start.
So, my Client-side Deployment is underway and if you remember we ran this command previously as well the 'kubectl get pods' previously we only had NCache Deployments two Pods in there, but now we have an additional Pod under Client Deployment and it has its own set of parameters and some IPS would be assigned to it. So, if I run this one more time, it's fully functional running and it has its own IP assigned to it with this specific ID, right here.
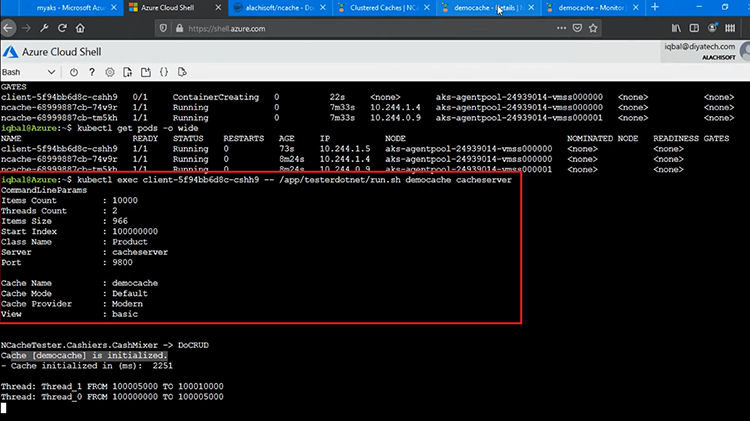
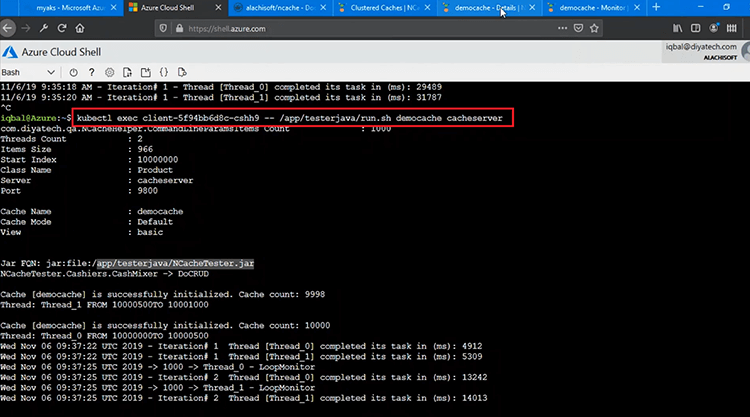
Now in order to run the Client Applications to connect with this Cache Cluster, I would run 'kubectl exec' provide the ID of this Pod and then I would go into directory right here, app/tester and I'm first going to run the .NET Core Client and I would run that run.sh script. That would allow me to spin a .NET Core Application that would connect to my Cache. I additionally need the name of the Cache, ‘democache’ and then I also need the Cache Discovery Service which was ‘cacheserver’. That would allow me to discover and connect to all the Pods within NCache Deployment and that's a feature within NCache Client, that automatically connects to all the Pods if you just specify this discovery service. So, my ‘democache’ has been initialized.
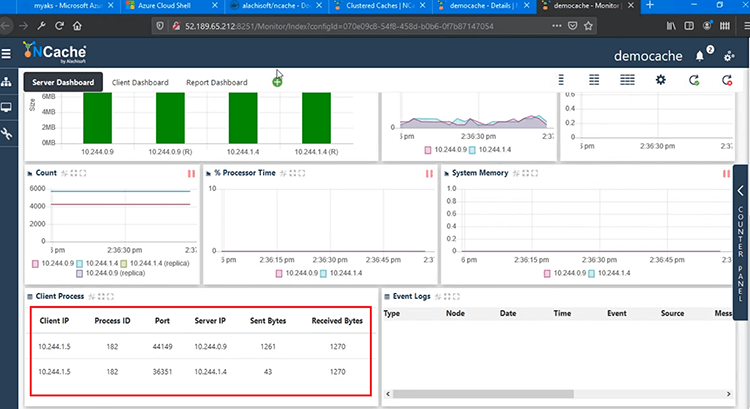
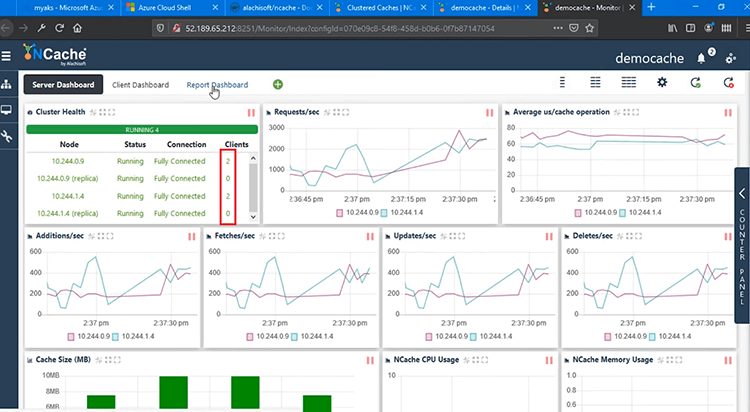
If I come back to the Monitoring Tool, I should see some parameters, some performance matrices. One Client is fully connected to .9 and to .4 as well and we have Requests/second. The Average Microsecond per Cache Operation, Additions, Fetches and Updates, on all counters are showing activity and we have a Client process now showing up, which is 1.5 and that's the IP of our Client Pod, which is connected to both servers. 9 as well as to .4. So, that show that our Client Application Container and .NET Core Application is fully able to connect to our Cache Cluster.
Let's run the Java Application, for that I just need to change ‘dotnet’ to ‘java’ and run it. So, that would just run another script within that and that will run ‘NCacheTester.jar’ file, so, that's Java file that is going to connect and start performing create/read and update/delete operations. So, CRUD Operations are being performed at the moment.
So, if I come back to the monitoring again, I now have two Client Processes. We see four, because there are two servers. So, each client process make connections to all servers but you have two clients running against our Cache Cluster and there are two Pods in the Cache Cluster.
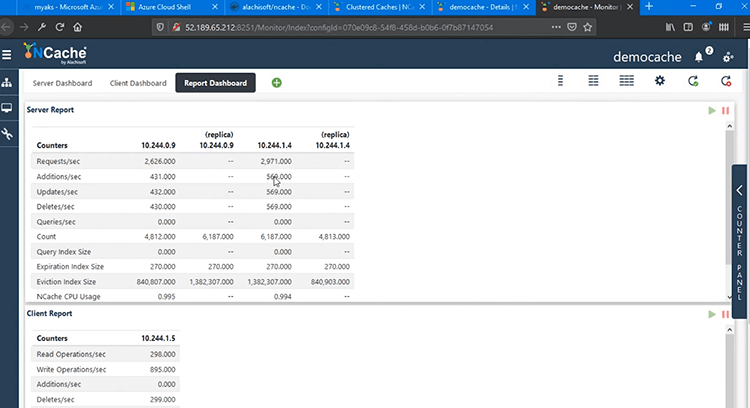
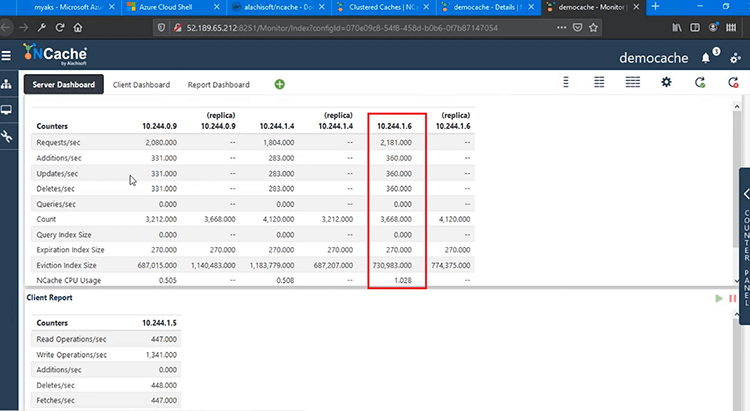
We have some more advanced, you know, ‘Report Dashboard’ such as Server-side Report view that shows me Server-side counters and replicas from both Pods and then we also have the client report, showing the Client-side counters as well. So, within AKS we're able to fully manage and monitor our Client as well as Server deployments, without any issues.
Scaling Out NCache Cluster
Next thing that I will demonstrate is scaling out your NCache Cache Cluster in AKS platform. This will help you increase your request handling capacity for NCache and that too at one time. Let's see all the steps involved here.
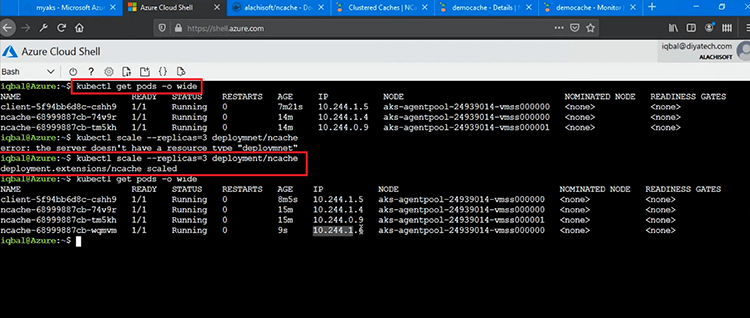
Now in order to scale from 2 nodes to 3 nodes and that too at runtime without stopping the Cache Cluster in AKS or stopping the kind applications we can simply go ahead and demonstrate this. So, first of all I would show you the current deployment. Let's see the current Pods that we have and if you notice we have two Pods in NCache Deployment .4 and .9 IP addresses and then I would need to run this command here, where I set the replicas count to 3 and do it for ‘deployment/ncache’ and that should automatically spin a new Pod and add it to ncache/deployment. I think there is a typo, so, let me just run this by fixing it deployment and that has worked. So, NCache deployment has scaled.
Now we have 3 Pods within NCache Deployment. So, if I run the same command again, I should now see an additional Pod within NCache Deployment. So, previously, we had two deployments for NCache .4 and .9 and now we have a third Pod added. In addition to .4, .9 we have .6 as well. So, that's our third added Pod, which is now fully functional.
I noticed we did not stop the Application or the Cache itself. Now I just need to add this Pod to be Pod of NCache Cache Cluster. So, it was deployed in AKS.
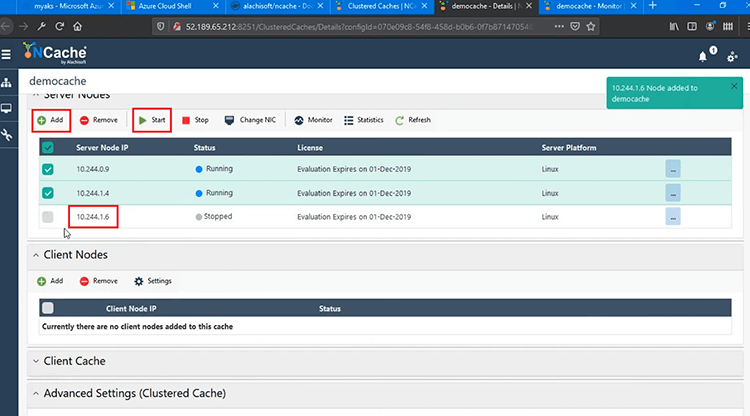
I would add it here and then I would go ahead and ‘Start’ to join the Cache Cluster and this will be done at runtime. So, without any delays, it would join the running Cache Cluster and it's fully functional as well.
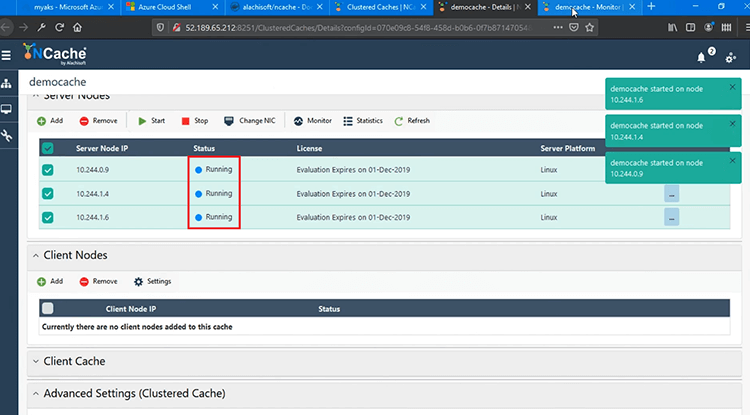
If I quickly come back to the Monitoring Tool, you would now see a third Node joined at runtime. So, .6 is now fully joined. It has all the data. You can see the count and then all the requests are fully distributed to 3 Nodes instead of 2.
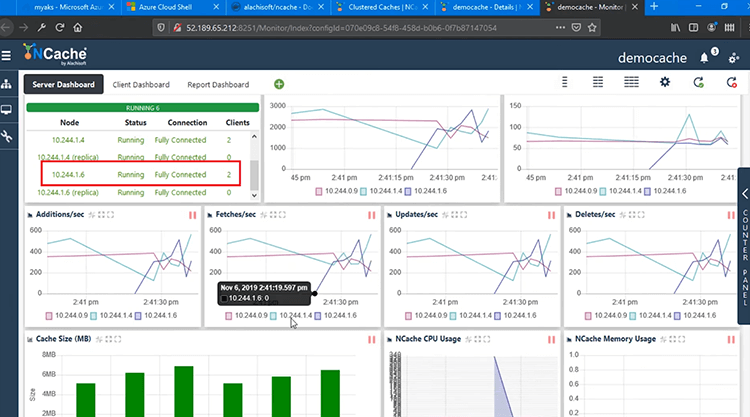
You can also see the cluster status, .6 is fully connected with 2 Clients connected to it as well and we have counters now showing for 3 Servers instead of 2 and client processes are again now connected to all 3 Servers to .6, .4, to .9 as well.
Conclusion
So, that completes the auto-scaling part for AKS, where you can add Pods at runtime and you don't have to stop the Cache or any of the Clients which are connected to it. Everything is done at runtime.
This brings us to the end of our video. We have successfully demonstrated how you can deploy NCache in AKS platform and how easy it is to use NCache from within your Java and .NET Core Applications. We also reviewed how effectively you can Manage and Monitor your NCache deployments in AKS. I hope this was helpful.
Please share your feedback or questions with us at Alachisoft support support@alachisoft.com. Thank you!