Using NCache with Jakarta Web Sessions
Java Web Apps & APIs
Hey guys, my name is Suleman and in this video we're going to see how you can use NCache with your web application and store your session data inside a distributed cache. Now I have a sample project. It utilizes Jakarta web sessions. And as of now my session data is being stored in memory. So what we're going to do is we're going to plug in NCache and I'll show you how the session data will then be stored inside our distributed cache.
NCache Architecture
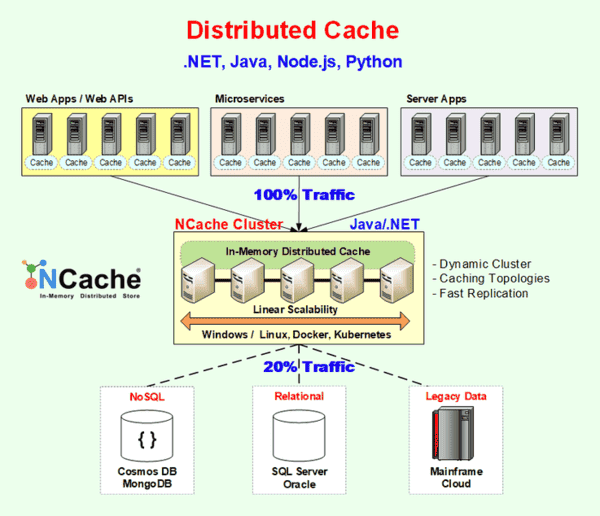
So let's start by taking a look at this diagram. This is typically how NCache is deployed in an enterprise environment. Notice the application tier which is also known as the cache clients. This is where our client application is going to run. Then we have a separate tier for our caching which consists of our cache clusters. And finally we have the database layer below.
NCache Setup for Jakarta Web Sessions
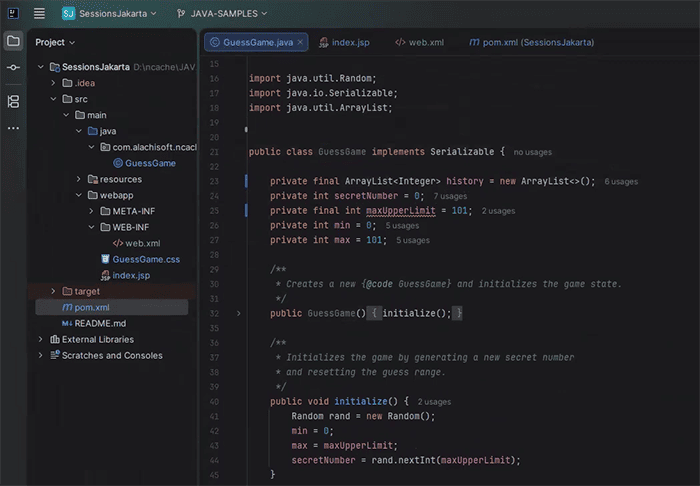
So let's get started with the setup. Let's look at the sample project I have first. You'll see here this is the guess game class. Simply put a user has to guess a number between 0 and 100. They have to guess a random number between zero and 100. You can see within guess game I am storing the history of guesses as well.
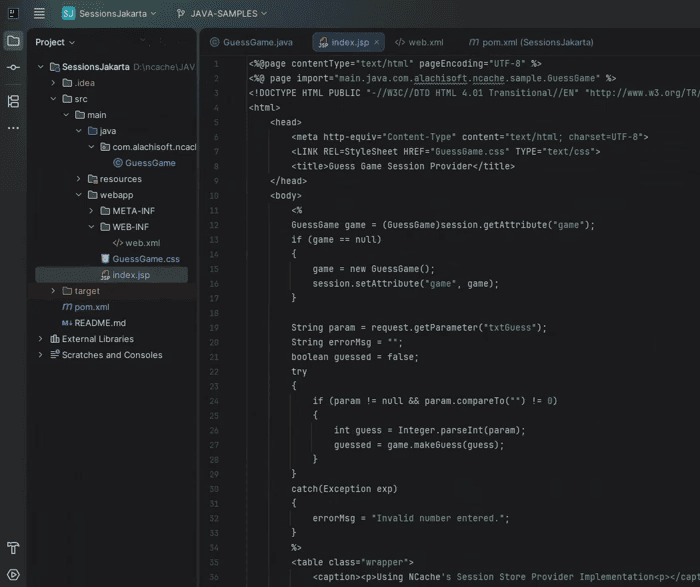
Let's look at the index.jsp page. You'll notice I am storing and retrieving the entire guess game object as a session attribute. In terms of what else is displayed on this JSP page, you can see we're displaying the attempts history, the last guess, previous attempts. So, this is all being retrieved as a session attribute as well.
Within the web.xml file, you can see I do not have any filters defined. So, as part of the NCache setup, we're going to have to define a filter over here. We'll of course cover that in the video. Finally, let's look at the pom.xml file as well. You will notice I am deploying this as a .war file. So we're going to deploy this as a .war file, plug it into our Tomcat server and that's how we're going to run the application.
NCache Management Center
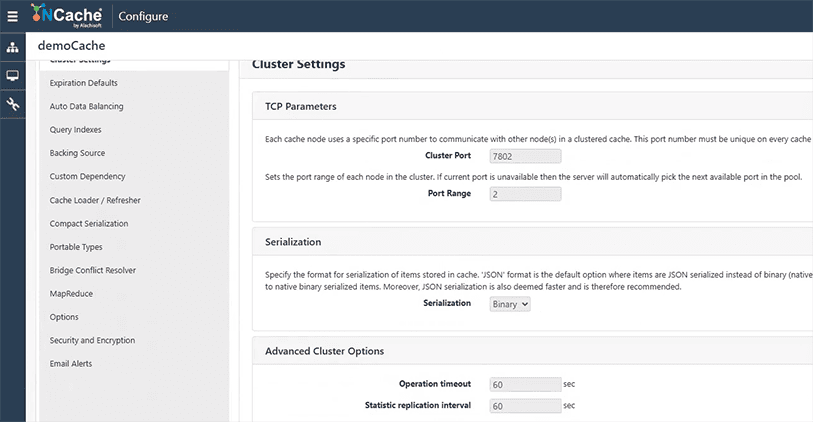
So we've seen our project. Let's also look at the NCache management center. You can see I already have a cache here configured with the name of demoCache. It is a single server node that is deployed on a Docker instance. What I'll do is I'll show you my configuration options as well. You can see my serialization is set to binary, but you can also set it to JSON. And everything else I've pretty much left untouched.
One last thing, I just want to make sure my cache data is currently empty as of now. So you'll see the count is at zero. We're starting with fresh.
Step 1: Add NCache sessions dependency to project
The first step to actually setting this up is to add this NCache session dependency to our project. Okay, so what I'm going to do is I'm going to navigate to the NCache website just so I can show you where to find the specific dependency from. I'm going to go into the Java integration sections and click on the Jakarta Sessions. This will point me to the Maven central repository. You can see the artifactId is ncache-sessions, the version 5.3.6. So, I'm just going to paste this in my pom.xml file, synchronize my Maven changes, and that should download my dependencies. If I check my libraries, you'll see I've got NCache client, NCache runtime, and NCache sessions. Perfect.
<dependency>
    <groupId>com.alachisoft.ncache</groupId>
    <artifactId>ncache-sessions</artifactId>
    <version>5.3.6</version>
</dependency>
Step 2: Add NCache Session Filter to web.xml
So the next step is to create the session filter within our web.xml file. Now if you don't know what the web.xml file is, it is a deployment descriptor for your web application and we need to define this single filter over here so that all of our HTTP requests are intercepted by this filter and then processed by NCache code. So in basic terms this is how our session data is also going to be saved within the distributed cache. So what I'm going to do is within my web.xml file below my session config. I'm going to paste that exact filter. So I'm just going to copy that from here.
<filter>
	<filter-name>NCacheSessionProvider</filter-name>
	<filter-class>com.alachisoft.ncache.web.session.NCacheSessionProvider</filter-class>
		<init-param>
		<description>configPath is used to load the client.ncconf and session.xml files.</description>
		<param-name>configPath</param-name>
		<param-value>C:\Program Files\NCache\config</param-value>
	</init-param>
</filter>
<filter-mapping>
	<filter-name>NCacheSessionProvider</filter-name>
	<url-pattern>/*</url-pattern>
</filter-mapping>
What you'll notice is we're also giving it a configuration path over here. So I've pointed mine to the NCache installation folder. Of course you can structure this however you want but I'm doing this just because when you're deploying it as a .war if you give your configuration paths inside the application directory it can be a little bit difficult to find those files. So that's why I've configured them externally, just for the ease of this video.
Step 3: Specify Session State Provider in session.xml
So our next step guys is going to be to create the session.xml file. This is where you define your cache id or the cache name and your cache properties such as the timeout session. So I'm going to create this file right now using Visual Studio and let me just copy that configuration really quickly. I'm just going to paste this over here.
<servlet-session-config>
   <cache id="demoCache"/>
   <log log-props="log4j.properties"/>
   <locking enable-session-locking="true" retries-count="2" retry-interval="500ms" lock-timeout="36000ms" empty-session-when-locked="false"/>
</servlet-session-config>
We're going to have to save this with the exact same name that is session.xml and I'm just going to really quickly grab that file and then paste it within my NCache installation directory. Just give me one second here. So, that should be our config file set up.
Step 4: Specify Cache Server in client.ncconf
We're missing one more config file which is to actually set up the client.ncconf file. So this is where you specify the cache server IP and the cache properties, additional cache properties, as you can see here.
<configuration>
	<ncache-server connection-retries="3" retry-connection-delay="0" retry-interval="1"
	command-retries="3" command-retry-interval="0.1" client-request-timeout="90"
	connection-timeout="5" port="9800" local-server-ip=""
	enable-keep-alive="False" keep-alive-interval="30"/>

	<cache id="demoCache" client-cache-id="" client-cache-syncmode="optimistic"
	skip-client-cache-if-unavailable="true" reconnect-client-cache-interval="10"
	default-readthru-provider="" default-writethru-provider="" load-balance="false"
	enable-client-logs="false" log-level="info">
		<server name="20.200.20.42"/>
	</cache>
</configuration>
Since I already have NCache installed on my machine, usually in many cases people do not have NCache installed on the client application machine, it's installed externally. But in my case, I do have it installed. So, this file should come preloaded. I'll just show you what it looks like. If I open client.ncconf, you can see it mentions demo cache with the cache server IP. So, this is what it looks like.
Since we already have it configured, I'm just going to leave it as be and we should be good to actually deploy the application at this stage. So now to deploy this application, I first need to run mvn clean package inside my application directory. So I'm just going to wait for that to finish loading. If I double check my target folder, this file should be created. What I'm going to do now is paste this .war file inside my Tomcat installation directory. So there's already an existing game guessgame.war. I'm just going to replace this one, paste a new one. Now we should be good to run our Tomcat server.
So, within my Tomcat server, I believe that's where I am right now. Yes, I'm going to run the .\startup.bat script. This seems to be loading. So while this is loading, I'm going to open my NCache stats. What I want to do is open this side by side with the localhost. So you can see the client has connected. So the application is most probably running. I'm going to refresh this page over here. You can see it has loaded now. So, as of now, you'll notice last guess, there's no attempts history. I'm just going to attempt random guesses over here, and we can see how this behaves. So, the number I guess was smaller. Let's try another guess. This one is also smaller. I'm just going to try another number. You'll notice our attempt history is being saved. Keep in mind this was being stored as a session attribute I showed you in the code earlier. And our cache count has gone up as well. So this count over here '1' which is increased. This is the session data that is being stored on the distributed cache.
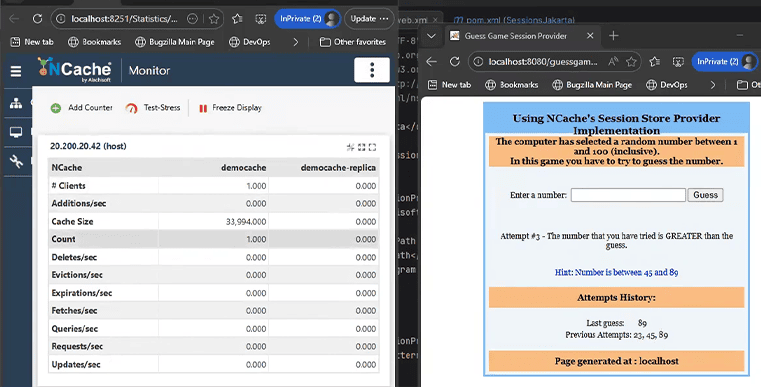
So you can see everything is pretty much working as expected. I just want to quickly open this in a new tab and make sure that our session data will load exactly as expected. Perfect. You can see our session data is over here. So everything works as expected.
Schedule a Demo
Guys, that is it for our demonstration. If you want to learn more about NCache, its features, and how you can incorporate into your application, please contact us to schedule a demo. Thank you very much for watching this video.