Using NCache as a Spring Data Caching
Java Web Apps & APIs
Hey guys, my name is Suleman and in this video we'll explore how to use NCache with Spring Data and improve our application's performance through caching. So I have a sample project. It is a spring boot application. What we're going to do is we're going to start by implementing spring caching first. And we're going to do this using the help of the spring boot cache auto configuration option.
At that point are cached data will be stored in memory. And once we're done with that we're going to plug in NCache, and I'll show you how the cache data is then saved onto the cache server instead.
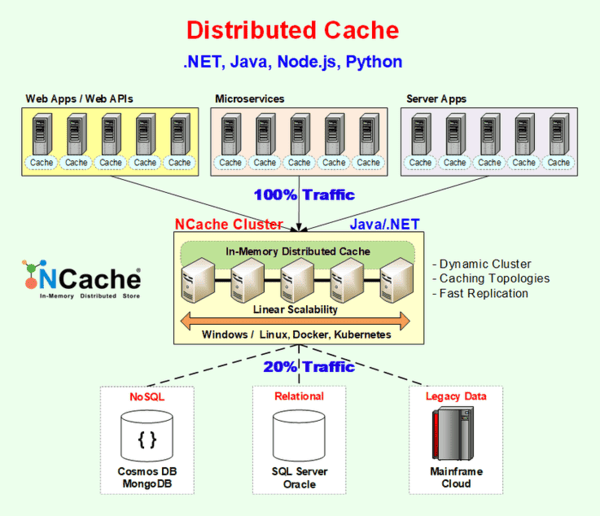
NCache Architecture
So this is typically a when cache is deployed in an enterprise environment. We have a separate tier for application layer. And this is also known as a cache clients. This is also where our client application is going to run. Then notice a separate caching tier as well where we have our cache servers. And finally we have the database layer. So my setup is very similar to the structure.
NCache Setup for Spring Data
And before we move on to the setup, let's just look over the project I have. Like I mentioned it is a spring boot application and simply put it performs CRUD operations on this product object over here.
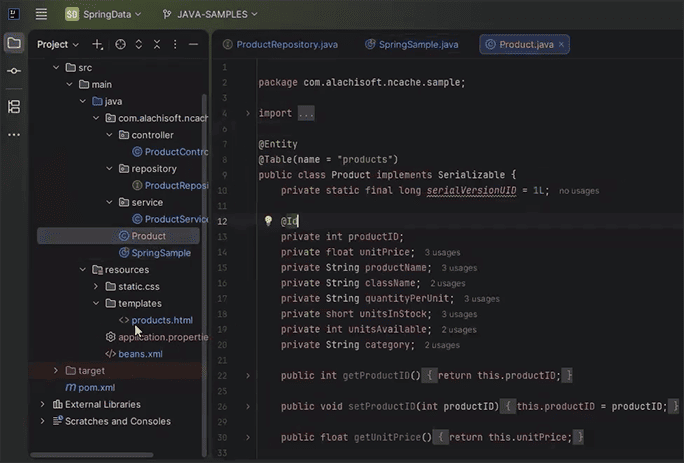
You'll notice I have an HTML page written as well. So we're going to use an user interface to interact with our endpoints. So if I go into the product controller you'll see the endpoints I have defined. There's getProduct(), addProduct() and removeProduct(). And in the service layer what you can see is that I do not have caching implemented. If we look in the repository you'll see I'm utilizing spring data. So as of now the client application is only interacting with the database and not the cache. So we're going to cover that step by step.
Spring Data Cache Annotations
-
Enable Cache
@EnableCaching -
Cache Get
@Cacheable(value="demoCache", key="#id", unless = "#result == null") -
Cache Put
@CachePut(value="demoCache", key="#product.productID") -
Cache Evict
@CacheEvict(value="demoCache", key="#id")
Enable Cache
So the first step and it's really easy simple setup. We just have to add these annotations into our classes. We'll start by adding the @EnableCache annotation. So in my main class I'm going to add this annotation. And if you're pulling in the spring context support dependency which I think comes with spring boot, then you should have access to this annotation.
@EnableCachingCache Get
Once we've done that we're going to go into the service layer and have the cacheable method annotations. I know some people like to do this in the controller class, but it's just a matter of your own requirements. So we're going to do @Cacheable. I'm going to pass in the name of the cache that we have created, or that we want to create. I'm going to pass in the key value here, which in my case is going to be the method parameter that is here, and that is #id. I'm also going to give it a condition that says do not cache null results, unless result is equal to null.
@Cacheable(value = "demoCache", key = "#id", unless = "#result==null")Cache Put
In the case of our product we're going to do @CachePut. I'm going to pass in the same values, except this time the key is going to be different because we don't have an ID. So I'm just going to pass in the reference to the product ID directly. So that's going to be product.productID.
@CachePut(value = "demoCache", key = "#product.productID")You'll notice in my product class product ID is the primary key. So that's why I'm doing that.
Cache Evict
And lastly is, in the case of remove we're going to @CacheEvict. The key is going to be #id over here.
@CacheEvict(value = "demoCache", key = "#id")So that's pretty much it. We just added these annotations. And just keep in mind as of now, we're still working with spring caching. This creates an instance of your cache and saves your cache data in memory. Of course, what we want to do is we want to plug in NCache and save our data on a cache server instead. Now this is being done using annotations.
XML Declaration (optional)
Let me also show you that if you do not want to modify your source code, you can declare your XML tags in an external file and achieve the exact same behavior.
-
Cache Get
<cache:cacheable method="getProduct" key="#id" unless="#result == null"/> -
Cache Put
<cache:cache-put method="addProduct" key="#product.productID"/> -
Cache Evict
<cache:cache-evict method="deleteProduct" key="#id"/>
So as you can see here, there's the Cache Get, Cache Put and Cache Evict XML tags. I'm going to stick to using annotations from my project. But what I want to do is, I just want to show you what the XML setup would look like. So I'm on the NCache website here where we have a guide for the XML setup. I'm going to go into the programmer's guide, which I believe comes from the docs section here. We're going to go to the guide and then I'm going to look for the spring integration option. I believe it comes over here in this section. So you can see the controller class declared here we have our service method with the cache annotations. Then finally we have the XML declaration.
<!-- the service we want to make cacheable -->
<bean id="bookService" class="com.spring.service.BookService"/>

<!-- cache definitions -->
<cache:advice id="booksCacheAdvice" cache-manager="cacheManager">
    <cache:caching cache="demoCache">
        <cache:cacheable method="findBookByIsbn" key="#isbn"/>
    </cache:caching>
</cache:advice>

<app:config>
    <app:advisor advice-ref="booksCacheAdvice" pointcut="execution(* com.spring.service.BookService.*(..))"/>
</app:config>
You can see, it pass in the cache advice tag, give in the cache name, pass in the cacheable methods, the key very similar to what we were doing before. And finally you have to pass in the app config tag to enable the XML caching.
Set up Spring Data NCache
We're going to stick to the annotations like I mentioned. So let's move on to actually setting up NCache, in this integration. But really quickly, while we are here, let's look over the, the NCache cache cluster actually. So I just want to show you already have a cache created with the name of demoCache. It is a single server node, of course in your cluster, you can add several different servers. This is deployed on a Docker instance. That's how I am connected to this.
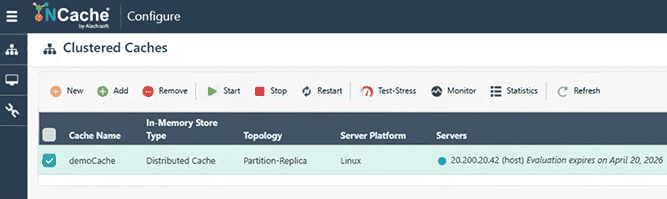
If I just click on my stats I want to make sure there's no data pre-existing. Perfect, So we're starting from fresh, anyway.
Step 1: Add NCache Spring Dependency
So to set up spring data for NCache the first thing you want to do is add this NCache Spring dependency. If you want to know where to find this dependency, I'm going to go back to the NCache website, and I'm going to go into the developer's Java section. So all I'm doing right now is going into the Maven central repository, so I can find the latest version of the dependency. As you can see here NCache spring 5.3.6 is the latest version.
<dependency>
    <groupId>com.alachisoft.ncache</groupId>
    <artifactId>ncache-spring</artifactId>
    <version>5.3.6</version>
</dependency>
I'm just going to copy this into my pom.xml file. I'm going to synchronize our Maven changes. And I'll double check my libraries. You can see I have NCache client, NCache run time and NCache spring, perfect.
Step 2: Specify Cache Configurations
The next step is to specify the cache configuration in the ncache-spring.xml file. So simply put we need to define either one or multiple caches within this file. And this is going to be used by the application to create an instance of the cache. So I'm going to define this under the resources folder. For the XML layout of this file I'm going to go back to the NCache website because we do have a guide for this. And if I go to this section here, you'll see we have to configure cache policies. And this is already using the demoCache as a name. So I'm just going to copy this as it is.
<application-config default-cache-name="demoCache">
    <caches>
        <cache name="demoCache" ncacheid-instance="democache" priority="normal" expiration-type="absolute" expiration-period="200"/>
    </caches>
</application-config>
And you can see there's a couple of other options here as well, such as the item priority level, the expression type which can be absolute, sliding, or none. And the expiration period which is in seconds. So if I set this 200 then I expect after this time my cache items should expire.
Step 3: Configure CacheManager Bean
- Java based annotation (recommended)
- XML based configuration
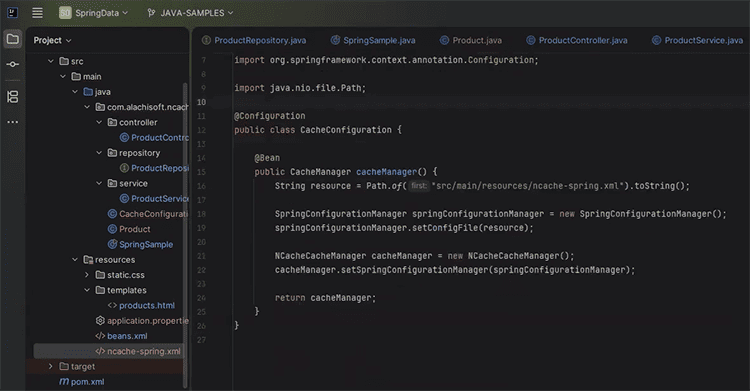
Let's leave this as it is and move on to the next step, which is the most important step. We need to configure the cache manager bean. So as of now, since we're using the Spring Boot auto configuration option, spring will create its own cache manager instance. What we want to do is create our own cache manager instance injected into spring, to complete the integration.
Java Based Annotation
Now you can do this in two ways. You can use the annotations or you can do this in the XML. So for the annotations I'm just going to create a class and name it cache configuration. The name doesn't matter. We'll mark this as a spring component. And we're going to declare a single method over here that returns a cache manager instance. Keep in mind this has to be the spring framework import. And I'm just going to annotate this as a bean as well. I'm going to define a resource that points to our newly created file, which is the ncache-spring.xml file. Copy this from the source folder. Next I'm going to define a Spring configuration manager. This has part of the NCache code. I'm going to associate this with the resource that we just defined. So all we're doing is just wiring everything together. And I'm going to define the NCache cache manager instance. This is going to be the cache manager instance that we returned in this method. I'm going to associate this to the spring configuration manager. Finally return the cache manager instance. That's the setup complete in annotations.
XML Based Configuration
Now in case you want to do this in XML, we don't need to define this class. We just need to define two single beans in our XML file. One with the name of the cache manager. So I'm just going to copy the cache manager bean here. And you'll notice this looks for a spring configuration manager object. So we do have to define this as a separate bean. I'm going to also paste this bean here. The NCache configuration manager obviously has to point to the ncache-spring.xml file. So it's the exact same thing we did before. Just in XML.
<bean id="cacheManager" class="com.alachisoft.integrations.spring.NCacheCacheManager">
   <property name="springConfigurationManager" ref="NCacheConfigurationManager"/>
   <property name="logFilePath" value="C:\Program Files\NCache\log-files\CustomerDBSpringLogs"/>
</bean>
<bean id="NCacheConfigurationManager" class="com.alachisoft.integrations.spring.configuration.SpringConfigurationManager">
<property name="configFile" value="ncache-spring.xml">
</bean>Step 4: Specify Cache Server
So, let's comment this out for now since we're using annotations and move on to the last step, which is to specify the cache server in client.ncconf. So we're just going to define the cache server IPs and configuration options in this file. Now, if you have NCache installed on the machine where you are running your client application, then this file should exist already. So in my case, since I do have NCache installed, I do have an NCache installation folder, as you can see here, we should have this file pre existing. I'll show you what it looks like as well. So you can see it just specifies your caches and the cache server IPs and few options as well.
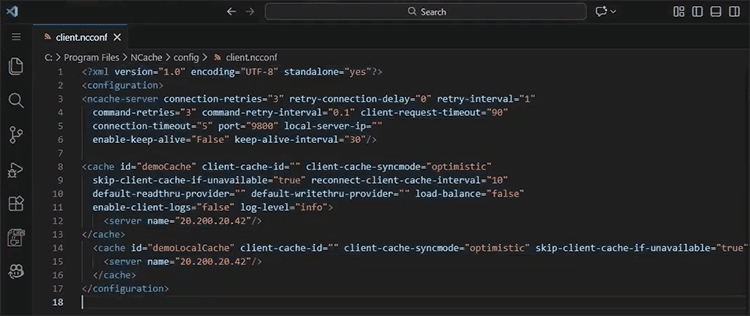
In the case you do not have NCache installed on your machine where you are in the client application, we're going to have to create this ourselves. So in that case I just copied over those contents and I'm going to define a new file here with the same name. The location doesn't really matter. We're just going to paste our contents here. The only thing we need to do now is to point NCache to this as the config file. So, it's a single piece of code we need to add. I'm going to add it in the cache configuration. It looks something like cache manager. Using the NCache client import .setConfigPath and we're going to point this to the resources folder here. And that's all you have to do. In case you do not have the client file in your NCache installation folder, since I do, I'm going to comment this out. But I just want to explain quickly. The reason we do this is because by default NCache will look for that client file in the installation folder. If you don't have the installation folder, you need to override this behavior. I think there's one more thing we're missing, which is to disable the cache auto configuration option. So I'm just going to do exclude CacheAutoConfiguration.class, perfect. We're good to run the application as of now.
So while this is starting up I'm just going to take a quick look in my database to make sure there's no data and perfect, it's empty. While this is loading, let's open up our, stats page. I'm just going to try and open this side by side with localhost. So the application is up and running now, perfect, you can see it here. So you can see you can add a product, you can get products, you can delete products. It's just following the same endpoints we've already defined. We're going to access all these endpoints and test the cache server out. So, let me just by example add three different products. I'm going to add random values over here. So notice the first request takes a little bit of time just because it tries to, connect to the cache. And you can see the cache count is gone up by one. And I'm going to add one more product here. And you can see the count of the cache is reflecting this behavior, that's perfect. If we take a quick look in the database I expect to see, it reflect this behavior as well. You can see the three items added over here.
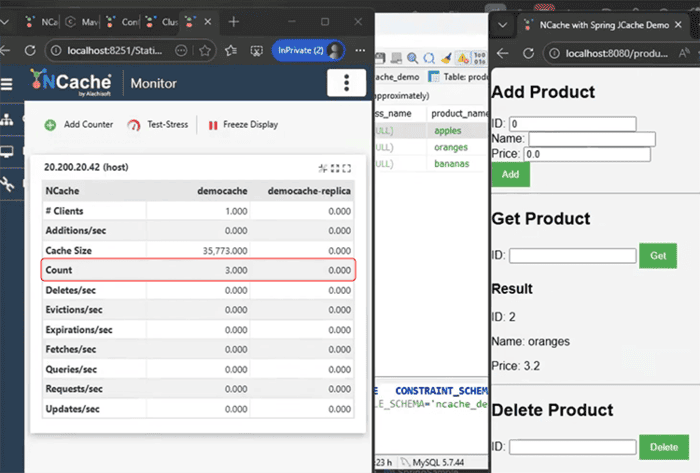
Now, if I get item number two, I expect to retrieve this value from the cache and not the database. So you can see I've got my value here. And that triggers the fetches per second option from the cache. So it's working as expected. If I get item number three it does the exact same thing. Now if I delete ID number one, I expect for it to be deleted both from the database and from the cache server. And as you can see here, the count goes down in the cache. And if I refresh my database I expect to see the exact same behavior. Perfect.
Schedule a Demo
So guys, that's it for our demonstration. If you want to learn more about NCache, its features and how you can incorporate it into your application, please contact us to schedule a demo. Thank you very much for watching this video.