Install and Configure NCache for Staging and Production
Recorded webinar
By Ron Hussain
NCache is a powerful distributed cache for .NET and improves your application performance and scalability. This webinar shows you approaches to deploy NCache in staging and production with best practices to fine-tune the system.
Delivered by our Senior Solutions Architect, the agenda includes:
- Overview of NCache deployment options in staging and production environments
- Introduction to NCache GUI and command line installation and cache configuration options
- Important configurations and best practices
- Hands-on examples and demonstrations throughout
Hi everyone, my name is Ron Hussain and I'll be your presenter for today's webinar. Thank you very much for joining. It's a webinar which is focused on NCache installation and configuration and today I'll show you different approaches to go about it, so once again thank you very much for joining it's going to be a hands-on webinar. So, I'll be covering different aspects of the product, different installation options and configuration options and I'll show you those in regards to two different environments. So, I will quickly get started since there is still some time. So, I'll use that to cover some details about the more of this webinar.
So, this is going to be a listen-only webinar, where I’ll be doing most of the talking but you can always participate, you could use the questions and answer tab, that's something that you could find on the go to meeting panel and please use that and post as many questions as you need to and I'll keep an eye on it and I'll be very happy to answer all your questions in regards to that. So, just give me a moment, let me quickly set up the environment and we'll quickly get started in the meantime for those of you, who have already joined in please use the questions tab and confirm that you can see my screen and you can hear me fine. That was nice. I think we're good. So, I can I've got a confirmation from a few of you that everything looks fine, so that's good. Let me just quickly make sure that I have all the environment, where you will set up and we'll get started with this. Okay very good. So, I think, it's time so, without further wait let's quickly get started with this.
The topic that we've chosen today is called install and configure NCache for your staging and production environment. As I mentioned earlier, this is strictly a hands-on webinar and we're going to do a series of such webinars, where I'll cover different aspects of the product, different features, different approaches that you can go about but this is the first webinar within the series, where i talk about the first and the very basic step of installation and configuration of NCache. So that's what I have in agenda but I'll actually cover it in such a way, that I'll talk about two different environments.
Overview of Both Environments
Will first of all, cover our staging environment and then we'll cover production environment and I'll have two different approaches to go about those, and I'll also share some best practices along the way while I'm presenting and then giving you the demo of these. So, let's quickly get started with this.
Staging Environment
First of all, staging environment is, I'm pretty sure most of you already know that. It's a pre-production, user access testing, performance testing or any other QA environment which provides you the true basis of production environment testing. So, it's an environment just before production, it's a mirror of production environment. So, exact same configurations are made available here as well but it's not exposed to your end users as yet, it’s final base of testing and after that where your application is released, if everything is signed off properly.
Production Environment
And then we have production environment, that's actually your released applications actual users use it and there isn't any room of testing the product anymore but you could still debug some bugs, issues but that's very rare in a production environment, you would always walk on a new-build and go through dev, QA and then staging environment cycles. So, in regards to NCache deployment, you may be deploying NCache in your staging because it becomes part of your staging environment and at the same time once, you roll out to production, NCache deployment also becomes very important in that aspect.
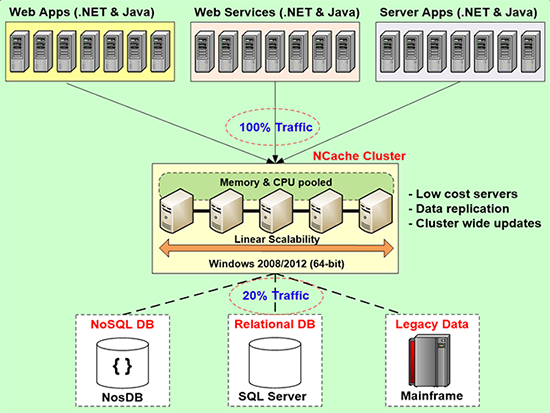
I'll talk a little bit more about NCache deployment, you could see on the screen there is a server-side deployment where NCache server installation is performed and then you could have two-three servers or more dependent upon your use case and then you have your web app tiers. It could be web applications, web services or any other server applications, where you need NCache client portion. So, we'll cover this particular deployment in two different environments as I mentioned. So, I'll show you the server installation as well as client installation and talk about differences as well.
NCache System Requirements
Quickly this is another slide that I wanted to cover that, what are the system requirements? So, the cache server is at the minimum, it is recommended that you have eight cores or more so, that you have good processing power. Memory is based on your usage, 16 GB box well to start off and then you can add more RAM as you as your use case goes, where you need to add more and more data in the cache and then you could also have 1-10 Gbit network interface card. One is good enough but if you could manage to have two, there is a feature where you could utilize two network interface cards together for NCache communications. And then it's certified for Windows 2012 but you can run on any Windows environment, such as 2016 or 2008. Only prereq for NCache is .NET 4.0 or later and that's the minimum that you need on the servers.
Remote clients, where your application is running and you need NCache client portion to be available. You need .NET 4.0 or later that's something which we recommend but there isn’t any requirement of any specific .NET framework. It can be 4.6.1, 4.6.2, it can be 2.0 as well as 3.5 as needed. Guys, if there are any questions please feel free to use the question-and-answer tab. I'm keeping an eye on it. So, if as soon as you would post a question, I'll quickly jump and answer right. So, let's keep this session interactive one, where you ask questions and I'm answering all those questions in the meantime.
Installation and Configurations in Staging (Manual)
Okay, as I mentioned this is a hands-on webinar, so I'm not going to spend more time on talking. I'm actually going to show you actual product in action. So, I'm going to first show you installation and configuration in your staging environment. I have an environment set up, for some reason my terminal was not working. So, I had to revert to actual remote desktop, so I've opened up few clients. I'm going to pick a few staging environment servers and then I'm quickly going to use the client and server installation. I'm good to give you a demo of installation and this environment because staging you have leverage of making changes, as you as you're testing it, you can install, you have time to for installation and you could change configurations experiment with it and come back and change it. So, I'm going to go through GUI base approach for this environment. So, let's get started with this.
So, we have a server which has one of the servers and I have uninstalled NCache from this box. This is the server, that I'll be using for installation of NCache. So, first step is that you download NCache from our website, you sign up for it and download a fully working 30-Day trial of the product and get the Installer in your hands and then use that installer and perform installation on all your server and client deployments. So, I'm going to I've already downloaded this. I'm going to use this installer and I'm going to quickly install NCache on one of the server machines. So, I'm going to spawn the command prompt with run as administrator.
This is just for making sure that the installer runs with explicit admin privileges and the next thing is, that since we have the installer copied on this server already. I'm just going to verify that and this is the Installer available. So, it's fully working 30-Day trial. I'm going to just give the path of this Installer and run a quick command and I'm pretty sure you should be familiar with this.
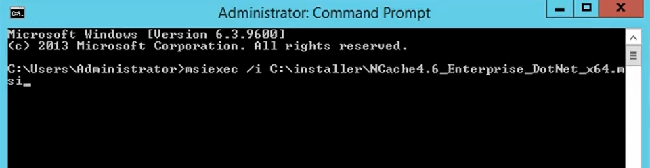
This is msiexec and then it takes the installer path and it would spawn the Installer with explicit run as admin option and then admin privileges are explicitly provided for that. You could double click on it as well right. So, the double click would also spawn the installers, that's fine but since we have the msiexec tool. So, I can explicitly do run it through administrator that's what I've done.
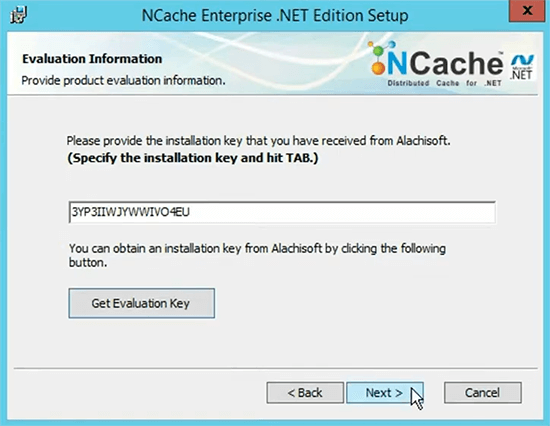
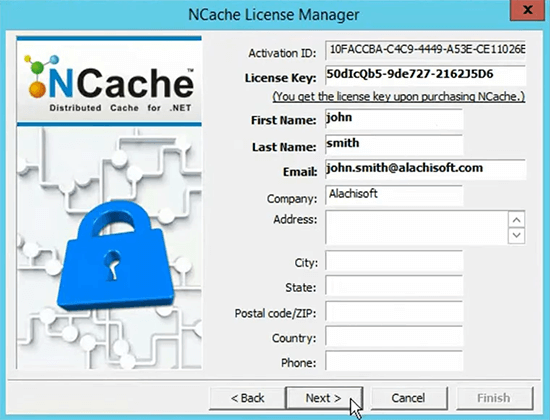
Next thing that you might need is let me just bring this up front here, let me just get hold of installation key as soon as you download the installer, the installation key is something that gets emailed to you. Since I have it available locally, so, I'll just use that and with the installation options. So, I'm just going to run the installer one more time, choose next. Go through the installation steps one by one and then walk you through, what you would find and what are different options which come into play when you actually install NCache. So, I accept the license agreement after reading it of course.
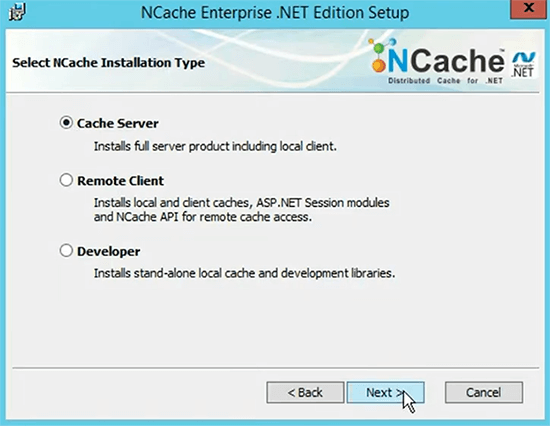
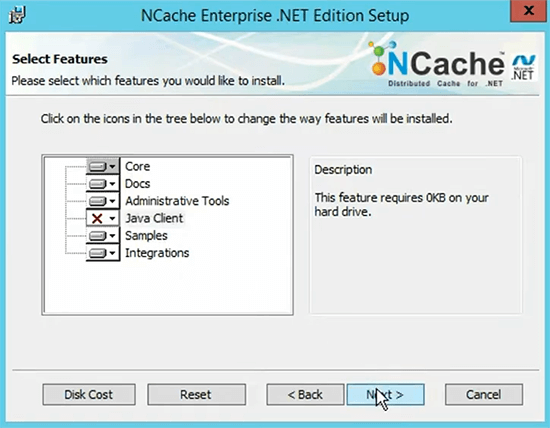
There are three installations and I wanted to cover some details around these. I've already explained NCache deployment architecture and if I bring this back, we have the server layer which is a dedicated cache tier, cache server tier where you could have multiple servers, that's where you need NCache server installation. It's a fully working product and it gives you clustering capability and at the same time you can run a local client to go with it. Which means you can run applications on the servers themselves and then we have our application tier, where you needed a more client installation. It gives you a local caching so, a local stand-alone cache can be created in the remote client. It does not come with clustering and it allows you to connect to a remote cache as well and the third option that we have that is basically, the developer installation and that's where your developers can use. They can install it for their local development. It does not come with clustering, it does not access allow you to access to more caches but it does give you a local cache and you could develop locally on that and it does not expire as well. So, it stays there, it does not need any perpetual licenses of any matter.
So, I'm going to go add with cache server.
Provide the installation key, I hope I've copied it. Yes, I did and then hit the tab key. Choose next.
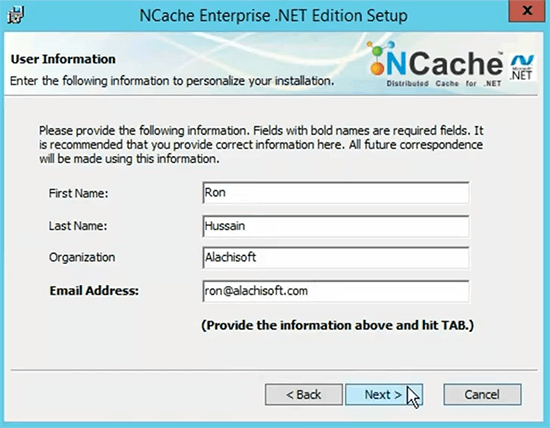
Hereby specify my details, email address. Since everything is manual so, you will be doing everything manually yourself.
It's an attendant install, where you go through GUI options and choose between different options yourself and like I mentioned in production environment, I'll just make this automated. Where I'll show you different approaches where you could complete the same task but you don't have to be involved. You set up some scripts, set up these options and everything would be done automatically using those scripts. You could choose what gets installed. So, I'm going to go through these, I don't need a Java client of the server at this point but I can keep everything as for now and then choose next and hit install and this would complete installation on my cache servers as well as on my clients.
So, that's how simple it is for NCache installation as far as server and client installation is concerned. For remote clients, you just need to follow the same approach and cover the installation. These just to show you because my terminal is not working for some reason but I have these servers. So, one two and three these are going to be cache servers and client one two and three, these are going to be the remote clients. I've just installed NCache on 89 but these other servers already installed with NCache. In order to save time, I'm actually going to move ahead and actually work on the configurations but the installation process remains the same. Please let me know, if there any questions at this point?
Next thing that I'm going to do is, I'm going to bring this up front, just give me a moment and then since I have my one of the staging clients and the IP of that is, let me just copy the IP from here.
Next thing is that, actually installation is complete, now we'll move on to the configuration part and we've done the installation on 3 NCache servers to remote clients. So, that's what I'm going to use for coming section, where I'll show you these three servers having different caches configured and this is what I have in mind.
Configure Caches in Staging
I'll have three different caches, I'll have one object cache that is for database objects. I will not create a client cache with it because client cache is for more reads that writes. The agenda of this cache is that it would have database objects but the type of operations of those objects would be read as well as write. So, client cache would not really give me that benefit that it's supposed to be. So, I just keep object cache and I'll set up some configurations for that.
Then second cache would be sessions cache, that is for ASP.NET sessions and that's generally a no code change option. When you plan on using NCache, it does not require any code change and I will have some specific settings for session cache.
And then, we'll have a third kind of cache which is a static cache. I'll create a client cache with that as well because this is going to deal with more reads than writes. So, the data which is more of a reference nature, I'll push that data into the client cache and I'll show you some configurations which are listed here.
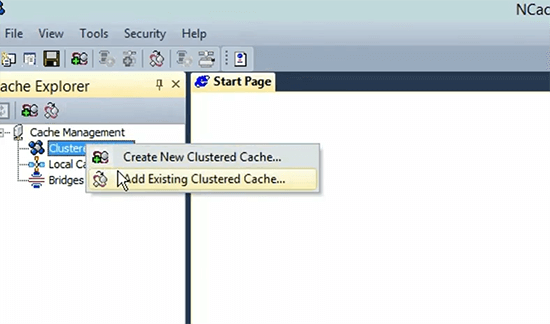
Create Clustered Caches
So, let's get started with this. Let me just check the IP so, that's the server. Since my servers are ready. I’ll quickly start NCache manager tool. It's right here. So, this is the main management tool, GUI based tool which comes install with NCache and let you manage and configure everything from one central point and I'll be using this tool for all of the configurations and again, it's a manual step. It's your system admins logging, on to the server's, experimenting with different configurations. So, this is, what is a preferred approach for staging environment and again, once we move on to our production environment, even this bit can be scripted and I'll show you a demo of that and guys please let me know, if there are any questions. Please type into the question-and-answer tab. So, that if there are any questions, I can tackle those.
So, first of all, I'll just save this project. This is our sampleproj and get started with creation of our first cache and I'll just name it, objectcache as shown in the slide as well and these are, this is a visit which actually creates a new clustered cache. So, I'll walk you through some of the important settings which come into play. I'll keep the data format binary because I would like to use the serialized data, which can be shared across applications but there's an object format as well and this object format should only be chosen, if you're interested in using the grid compute features of NCache, such as MapReduce, entry processor stuff like that. So, I'll keep the binary format now. Choose next.
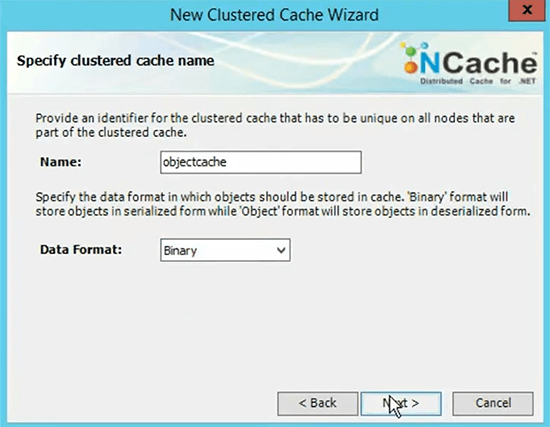
And there are four caching topologies that you can choose from. We have partitioned replica cache, partition cache, mirrored and replicated cache. Partitioned replica caches are the most popular one. So, I'm going to go ahead with that, keep the operation timeout and replication interval to be 600. This is statistic replication and time between two server nodes. So, I just keep these for the default values because these are already tuned and should work fine. So, I'm going to go ahead with that.
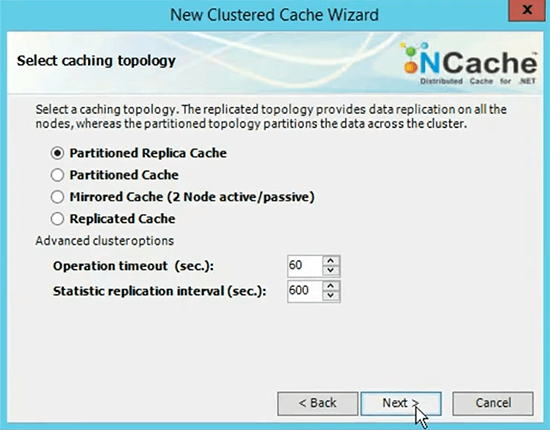
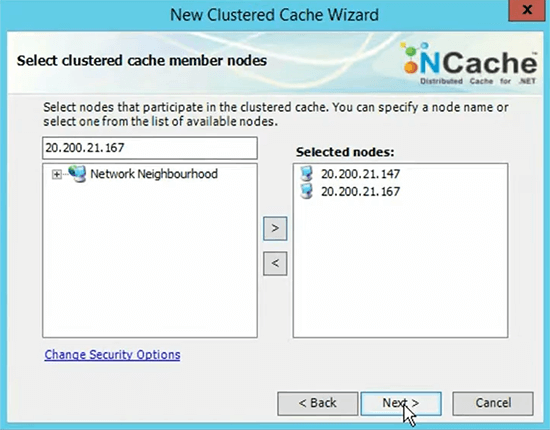
I choose the mode of replication and that's a specific setting for partitioned replica cache to be asynchronous. By the way we cover our caching topologies in deep details in our regular demo. So, the scope of this webinar is to show you different configuration options. So, I'll focus more on the configurations. I’ll keep the asynchronous, this is the active server partition copying is data to the backup and that's not asynchronously on request per request basis. So, I'm going to choose asynchronous. It's faster and here, I'm going to specify the servers which are going to host my cache. I have 147 as my first server, I also have 167 as my second server. There's a third server as well but I will not add it at this point. I want to show you that you can add servers on the fly on a running cache cluster as well. So, I'll wait once the cache is started and then add the third server as needed. So, at this point you could add additional number of servers and based on your load, if your application needs more servers to handle the increase load in order to accommodate that, you could add more number of servers at a later stage as well.
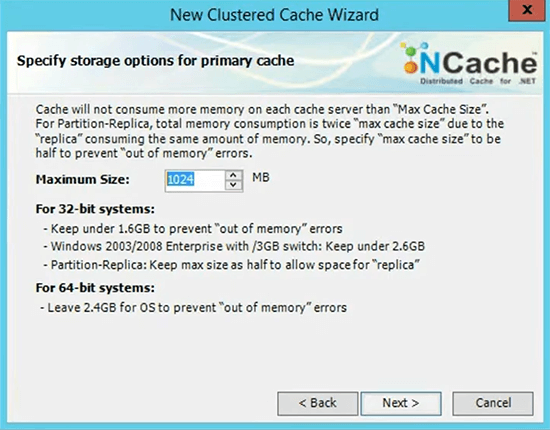
TCP port, each cache runs on a port in partition replica, each cache uses two ports. One for active and one for the backup on the same box. So, 7802 & 7803 will be chosen for this cache and you can change it as well. Whenever you change the port, it would always pick two ports for this topology. So, I keep the default because I would like to have 7802 and then increment from that point onwards for next caches. So, I choose next on this, size of the cache cluster and that's where your memory requirements come into play, where you would choose the physical memory of the servers accordingly based on your application requirements.
There’s a question. So, let me just tackle that, okay there's a question. Can you send me your deployment sample scripts? Absolutely, that's the whole point of this webinar, where we'll actually show you the scripts and towards the end of the webinar. If someone needs the scripts, we’ll actually ship those scripts to the customers as well.
There is another question, can the manager be used on a local machine? Yeah, it can be used on the local machine, where it could be one of the caching servers but it can also be a remote server as well and that's what I have in mind as well. I actually set up the production environment but without even logging into the production servers, I'll use one server which will be the manager server, which will be used for monitoring and management of the caches. So, that's a good question please stay tuned and hopefully all these questions would be answered but please keep them coming, it's good to have these questions posted from you guys.
Okay, the next is the memory. So, memory is based on usage, for example, this cache if you can expect that it would take two gigs or one gig of ram per server, you should allocate accordingly and based on number of servers, you should plan the size of the cache in order to accommodate all the load from your application. So, I'm going to choose 1024 one gig and it would use two gigs, one gig proactive and one gig for the backup of the same box and again based on partition replica cache topology.
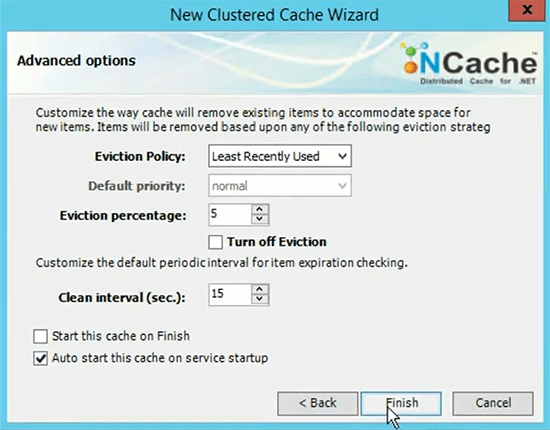
The last configuration for this cache would be the caching topology. So, I'll choose the eviction policy. I'm sorry. Evictions come into play only, when your cache becomes full on that node. So, if you are allocated one gig of size example right here and if you exceeded the allocated amount, you've completed the one gig space. What happens next? So, your cache becomes full. So, there are two options. Option number one is that you're existing updates, existing data would be readable but you're not allowed to add more data in the cache or you can turn on evictions. By default, evictions are turn on. I can use least recently used eviction. There are two other algorithms as well, least frequent and priority and automatically it would remove 5% of the items, when your cache becomes full and it automatically remove the new items. So, your cache keeps running for adds as well as for updates and at the same time it's available for reads.
And then Clean interval is the last setting, which actually does some background clean-up tops for example, items which are expired database dependencies get invoke and there are some server level tasks which are performed. Allow auto start this cache as well, which means that each time your server gets restarted or even the service gets restarted, the cache should start automatically on the start. I choose finish and that's it.
This has completed my cache and if I click on it in the right pane, there are all the settings which are related of this cache. There's a question let me just quickly tackle that. There's a question, is there some help documents or for installation configuration of NCache available software? Yes of course. So, basically, we've done the installation as a matter of fact, this is the installation option that we covered and then we would have the command line installation, which I'll show you at a later stage but this is our regular installation. So, yes everything is available on our website thank you for asking that.
Add Client Nodes
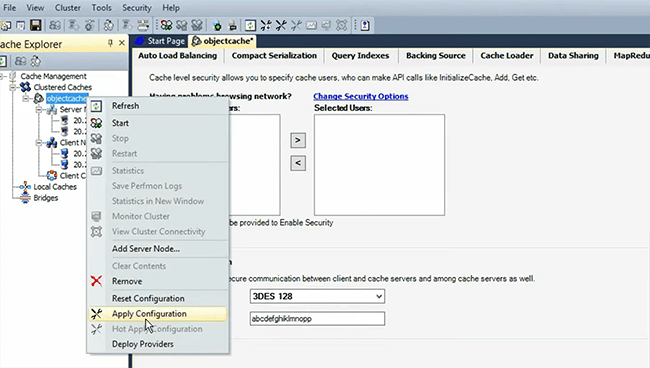
Now next thing is, that you need to add the client nodes and the client nodes are the one, where from you run your applications from. So, I'll quickly pick the IP addresses of two client machines and I have one server that I need to add. So, I just had the idea of this client, there you go I got added, and by the way, let's add all the clients and talk about what happens when you add the client. What happens in the background? So, I have actually, the IP is 169. This is one of the servers, so I need to get rid of it, it's not added as a client and then the second client is 155, let's do that. Okay, in the right pane there all the settings that are related with this. So, let's make some changes for example, let's provide the port to be 7804 and right click and choose apply configuration that would apply at the configurations on a running cache cluster. So, actually did not apply, so I think I missed up the line configuration and what happens? By the way whenever you make a change there's a back-end configuration file which gets updated and that hosts all the configurations of the cache as well. So, if we go to the config.ncconf, edit it you should see a cache by now, which has object cache and if you look at the port of it, it's now 7804. So, this config.ncconf host all the cache configurations that you've configured in your environment and there's a question.
Is every server should have the same config? Yes, it's automatically going to be updated. Its updated on server 1 and it's also updated on server 2 and every server independently hosts their own configurations. It's unlike a centralized server, which is managing all the configuration, each server is 100 percent peer-to-peer architecture and it has its own set of configurations.
So, that's where the server configurations are hosted. I added the client node. So, if I go to 155 let me just look at the 4095 points towards 155. So, that's the IP, if I go to the client node, I added this as a client. So, this client machine now has configurations to connect to this cache and that's what your application uses that run time and you now have object cache. So, 147 and 167 are the IP of the server. So, it will spend some good time on this particular server.
Configure Encryption and Compression
I'll quickly set up a few more configurations, such as I turn on encryption let’s keep the default. Okay, so three DES encryptions can be used and this is the encryption key, which will be used for encryption, also client encrypts and decrypt data. Since, all the settings are related to this cache. I need to right-click and choose apply configurations and that's it.
And then, we have compression. Okay, there's a question. Your client and server can be the same machine? Absolutely, so 147 and 167 I'm get all to be client machines that's absolutely correct.
Okay. So, now encryption is set up for this cache. I also want to set up compression. So, that we show you that these are the settings, that you can choose and then the same settings will be mapped into the production environment using the scripting support, apply configurations and that's it and now if I show you the configurations one more time, real quick now this should have encryption tag and this should also have compression somewhere. So, please trust me for that, I'll show you when we move on to the production, it's hard to actually find the compression tag within the tag. So, having done that I'll quickly start and by now the configuration part is complete for this cache. So, object cache has auto start feature setup, it has compression setup, it has security setup, by security I mean encryption. So, that your data is secure and now this cache has client setup as well and it's ready to be used by the applications. Any questions so far?
Will quickly perform a few more things. I'll add a running, I'll add a new node to this cache how to add a running node and that's something that I have in mind. So, I have another server right here, just copy the IP of that and that's add another server node there. It's not started but you could start it in a running cache cluster. So, look how easy it is to actually install, configure and add new nodes and make configuration changes. There are a few configurations, that you can change on the fly as well for example, I can change the cache size to be 2048 and choose apply, hot apply configurations actually, it takes two times for some reason I think, I need to get that checked and it applied on already cache but I'll just keep 1024 for now. So, you can apply changes on a running cache cluster, we have three servers, all having configurations clients are ready you could quickly test whether this cache is fully connected. Yes. So, I close this and move on to the next cache that we have in mind and that's where ASP.NET sessions.
Create an ASP.NET Session Cache
So, I'll quickly create session cache because we’re running short on time as well, I hope I did not make any typo keep everything the same because it's essentially the same cache, let me just look at the IP addresses 147, 167. As i mentioned, you could add all servers at once as well and that's what I'm going to do for this particular cache. I think it was 89 yeah, let's choose the port 7806 or automatically suggested two ports ahead of first 7804, 5 is for first cache 706 and 7 would be for second cache, size again and on this cache the only difference is I'll keep everything the same but I'll turn off evictions and let me explain why? This is for ASP.NET sessions, now session is a very important kind of data and you need extreme reliability for session, even if your cache becomes full your existing users are very important and you wouldn't want to lose them at any given point. So, evictions actually make room from the cache by removing some items from the cache. So, you wouldn't want to lose your existing sessions in order to accommodate new sessions. So, in that case you come up with the cache size which is big enough, so your cache never becomes full. So, keep that in mind turn off evictions and choose finish.
Then I can add the client nodes. I have my first client which is 169 and I can add the second client which is 155. I want to cover this bit in first 30 minutes because I wanted to focus more on the scripting side. So, I'll just quickly show you, so this cache is configured and you could see all the settings would not actually turn on encryption or compression for this cache. Keep in default and move on to our third cache which is static cache.
Create a Static Cache
So, quickly naming staticcache and you could create as many caches as needed, partition replicas and here, I'm going to specify the server's 147 is fine, 167 and then we have 89. It automatically picks 7808 which is fine. So, I'm going to go next, provide the size and for this I'll keep the eviction. let's use the least recently and also set up the auto stop feature. Now please keep track of all these settings, auto starter set, compression is set, encryption is set for the first cache, second cache the evictions are off but everything is same except the encryption compression and then this cache would have client cache as well and I'll explain how to do that. Will quickly add nodes, the client nodes, same configurations that we've done, 169 and then the other client node is 155.
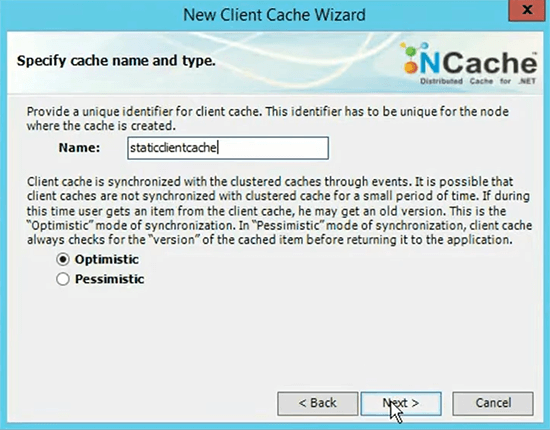
Create a Client Cache
So, this completes the basic settings for this cache but we need to add a client cache. Client cache is a local cache which runs on your application box but it saves your trips across the network to the remote cache. So, if your data is more reads than writes the operations are such, you would like to data to be available in the client cache, so and you use client cache for subsequent requests without having go to the server cache. So, I just create a client cache real quick, name it.

And keep the optimistic mode because that's more recommended.
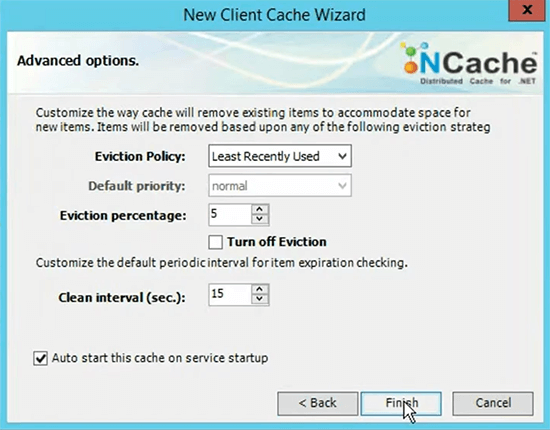
Choose High (OutProc), size of this cache to be 512 because it's a subset of this data. It does not need an auto start this cache as well and choose finish.
So, our caches are configured. Now I can start these one by one and then the next thing is that I'll quickly show you how to test this? Now you must have noticed that, it took me quite some time and I was paying quite a lot of attention on every single bit of feature, every option. So, I had to be pick every server and then go through all the configuration. So, it makes the overall task quite difficult and there is a, it's prone to errors as well and this is something that you can afford to have in your staging environment but you don't have the same kind of leverage in your production environment. It's specifically, when you're pushing a new release this would just maximize your downtime because you're busy setting up the caches and then waiting for different servers to be available in those. Service settings need to be tuned as you tune them in the production in the staging environment. So, this is exactly what we'll avoid in our production environment.
Now that we've configured everything in the staging, will apply the same settings, object cache, session cache and static cache. All the settings since, these are captured in the config.ncconf. So, we'll use those settings that xml is available and we'll map those settings on to the production environment automatically. So, that's the agenda. It's a very sophisticated approach that will follow and it's based on the existing features of NCache. So, stay tuned. I'll show you how that works?
Start Caches
I'm quickly actually starting the caches 147, 167. So, it's one by one starting the caches. I think we're good. I'll quickly show you statistics of object cache. So, everything looks fine on this.
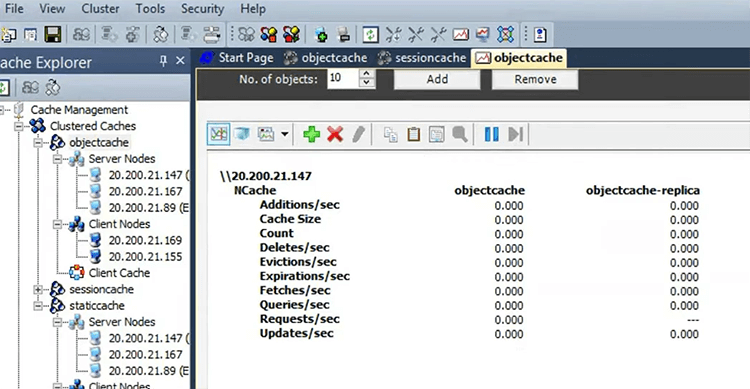
Session cache statistics now we open another window. So, this looks fine as well.
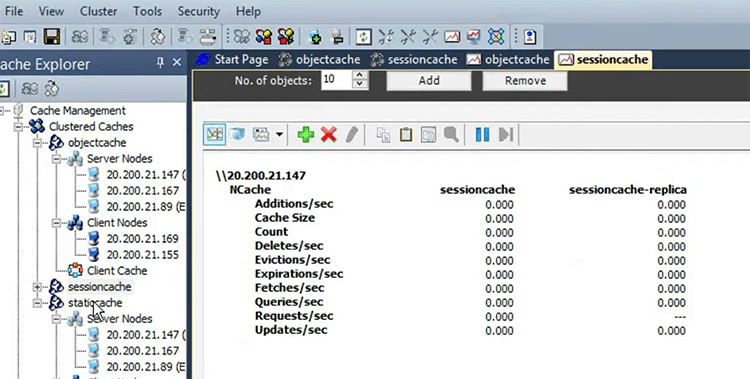
Static cache statistics as well.

Simulate Stress and Monitor Cache Statistics
I just need to run a stress testing tool application, which comes installed with NCache and running for object cache.
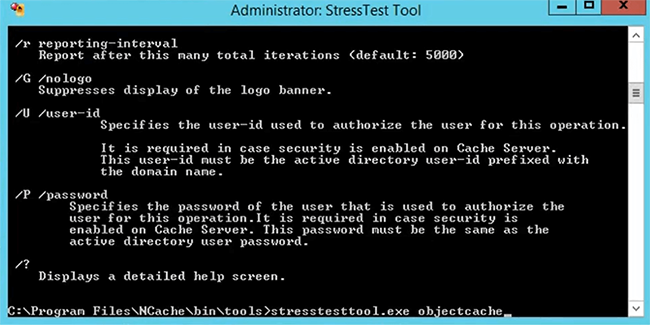
And now, you would see the activity can be coming for object cache from this client. They’re you go, now all servers are getting hits. I'm going to open monitor cluster for this as well, just for the sake of demonstration and then, I'll take you to one other client which is right here, I hope I added it under yeah, I did. Let me just do a list cache on this. So, that I could see the client cache, actually it's one of the servers. So, I need to move on to the client. So, let's actually pick 169. You could see that there's another tool which is available for object cache, it's showing you some monitoring capabilities of NCache as well. So, 169 is the other client. So, 4109 is the port, there you go. So, I just do a stress test tool and show you the client cache as well. You could see that the client cache is not running, so let's just do that. ok so, you have to manually do this right. So, each time you configure that and this is exactly what we'll avoid in our production environment. So, once this gets started. Okay so, you're licensing producing alright so, this point is something which is expired. So, should have checked out let me pick another client real quick. Please bear with me. So, let's pick 4095, let's first verify the license. Yes, it's good. let's run the listcaches as well. Yeah, it's good.
So, I think we could use this and run it for staticcache and notice, this has a client cache configured but we're using the static cache and I'll show you the client cache counters and at the same time, I'll show you the server counters. So, real quick, I think Microsoft needs to provide a search feature on this because you need to go through all the caches, all the instances. So, there you go. So, client cache is being used automatically, so that proves that everything is configured fine. You could see the statistics here, so this looks as fine as well and you can monitor cluster. So, these are monitoring tools and we verified that all our caches are looking good at this point. They have client’s connectivity in short and all the configurations are same and then they're working absolutely fine and we could verify that by running different tools here as well. So, that confirms this bit now. Any questions at this point? We’ve covered a lot of details and I'm glad we did, we configure everything through manual approach, started them manually and then tested them manually as well.
Installation and Configurations Production (Scripts)
Now comes the important bit and we have about 20-25 minutes. So, I think I should be able to cover the installation and configuration in production through scripts and for that, let's quickly go to our demo environment. So, this is the same kind of environment. We have prods over 1, 2, 3. These are going to be two servers and two points or three servers two points, let's use that and then I'll use a remote server for monitoring purposes. I would not actually use these production servers, the cache servers or clients for any kind of monitoring. I just use the remote box for that. So, let's quickly go through the installation script first. So that's our first bit here and before actually doing that, if you must have noticed that we have this command line installation option here. So, I'm using this one command right here, for server installation this is exactly what I'm using and if you notice, I'm passing all the parameters username, first name, last name, company, installation directory and all sort of different features.
Okay. There's a question. How to stop and start the client cache? This is exactly, what I'm going to show you. You can use the manager or you could use the scripting approach and that's something that I have lined up, so please stay tuned.
Modify the Installation Script
So, first bit is installation is NCache and we need to script it. The task here, is that we need to script in such a way that we do it without human intervention. It is automated, we should be able to do it simultaneously and that for multiple service remote installation as well. So, I'm using this one command right here for server and then this one command right here, for NCache clients and then I'm logging on to the server and let me give you a quick insight into the scripts. This is our installation script, so it has installation on the server. So, it calls the server, it fills all the parameters such as key, where is the setup, installation directory, server edition and some user details and then it's running the same command, which I've shown you here and then we have a client installation script, which gets all the parameters but it says there are more client as the addition and then it runs this command here but this would install NCache on a given server, not on multiple servers and not on remote servers.
Use PsExec for Remote Execution
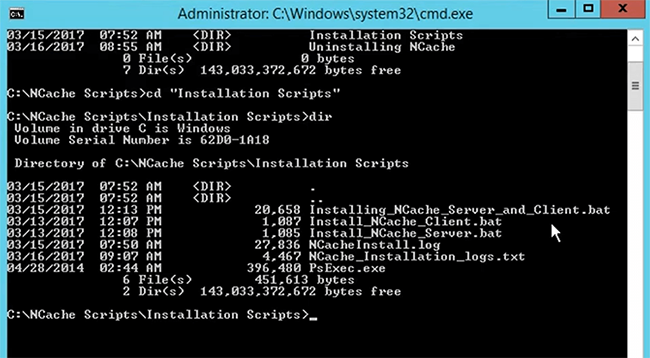
So, for that we are using PsExec, that is a utility which actually lets you run bat files or commands remotely by logging onto them using PsExec. So, this script right here, it takes some username and password, these are this is a dummy password. It takes server and client bats that's one of the parameters and then it takes list of all the servers and list of all the remote clients. So, I've just created 107,108,117. It has three NCache servers and then I have two remote clients, which I'll be using for installation and this script if you look right here, it's actually installing the server bat install server bat right here, using the PsExec. Server one, username, password and server bat and then it's doing the same for server two as well. Server two, username, password and it's Iterating to all the servers one by one and then calling the server bat remotely using the PsExec and then same story on the client side as well because we're taking the client parameters as well just calling the PsExec remote server install that, it should have been actually that's let's here remote client.bat. let me just find it here. Yeah, client_install.bat. So, that's what this script is doing. So, let's quickly run it. We have the actual scripts available here, I showed you the demo copy because there are username and password. So, I wanted to hide those. Okay, very good. So, let me just quickly spawned the command prompt, do a quick dir. So, we have a bunch of scripts. So, then in the script folder, I'm interested in installation script dir to show you the contents. We have installed NCache server, clients which does that remotely, then we have client install and server install which are internally called by that and then we have PsExec as well.
Review Log Files
There are some log files, which are also being maintained. So, towards the end to the completion, will actually review the log files and take it from there. So, this is the script which actually installs NCache server and client on all the boxes. So, it's started execution on 107, it would move to 108 then 117 the server installation would complete and then we install NCache client on 101 and 102. So, it will take some time, it's working behind the scenes, they are not being updated.
Activate NCache
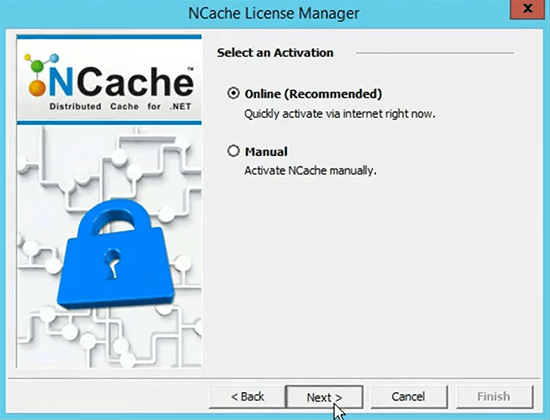
I'll quickly move on to our next script and that is the activation script and for that let me come back to the demo again. I don't want to show some personal information related to a user. So, I just show you the activation bat. So, this is also working in the same fashion, this is the activation command which runs and activate normally you would do this in such a way, that you would call and activate tool and you would do this license activation through GUI base and that's a very important step, each time you install NCache you can simply activate it.
There's a question. Let me just quickly get that. You mentioned client cache is used to for read intensive scenario, if it's a write intensive scenario, should I exclude client caches? Yes, that's correct assumption and this is exactly what we've done for object in session cache because there could be more writes than reads or equal number of writes and reads. This is why we did not turn on the client cache.
a. GUI based Activation
So, coming back to the activation because we have 10 more minutes. So, I want to cover this and I should be able to cover it. Activate purchased license key, choose next.

And you provide the method and then go through details choose next and then activate.
b. Command Line Activation
So, all this can be scripted using this command right here and this is the script, that I will be running next and this is the script, which actually cause the individual activity script for multiple servers and again I'm giving this server IPs and client IPs and using the PsExec individually on each server. So, let's have a look at this. It has already installed NCache on 107, it shows the server and it's running a trial 59 of 90, then 108, it returned without error codes that's running fine as well and then 117 is done as well. So, two more servers are left 101 and 102.

So, again I've used this time and show you one more script, if you remember we had configured some caches right here, right I want to copy these configurations and move on to the production. I don't want to go through configurations again and again myself and for that, I have this config.ncconf which has all the configurations in the source. So, I just use this as an example. Right, for example, let's pick my partition cache that's one of the caches which come install with NCache and copy it here. You can copy this config section, move on to the production environment and there you can simply let's come back here and create a new one actually, this was done yesterday. So, let me just samplecache, let me just rename it to xml. So, you need to do this as part of your deployment, that you create a copy of your existing staging configurations from the config.ncconf, put it in a sample xml, it could be any name, cache config give it the name and just copy everything. You don't worry about anything else and then there is a command and now will actually show you the create cache and some of the commands, which come into play and there's a command which comes install with NCache called create cache and let me just show you here, which I'll be using next.
So, ideally it takes the name of the cache, the server it needs to create, the caching topology, the port, the size, everything can be provided individually but that's not the agenda. Today, we want to use the staging configuration to be mapped on the production, everything went fine, the release is signed off, we need exact same configurations, we just need to get hold the configurations from the staging environment and for that we have the for ‘/T’ switch. It takes the xml path and maps all the configurations from that xml onto our cache and I'll show you next, how that is done.
Let's come back to the installation. So, our installation is complete on 102, 101 let's have a look at some log files, let's see if everything went fine. So, our command executed at this point completed on 107, its running trial completed on 108, running trial 117 is fine, so is 101 and 102. No errors are reported, everything looks good. So, I think we can move on to the next script, where we'll simply activate NCache using the other script that we have.
c. NCache Activation Script
So, we'll go to the activation script and run the activate server inline. So, this is going to call the activation script on all servers and clients one by one. It's going to be real quick because its uses the PsExec. So, first server is done. Okay. So, that's okay let me see, if I must have specified one IP here. Yeah. So, that was it, so let's provide 107, so it actually ran this command on only one server whereas I needed more servers to be available here. So, let's do that one more time and that's the beauty of these scripts, that you could simply update the IPS and now we skipped 108, it's only using 107. Complete the activation on it and then it will move on to 101 and 102. So, all the deployments are going to be activated, I missed one client here, so I think I did 117 as well, which I'll do next because I can update the Ips. So, I can quickly do that as well, now 117 is done. Unfortunately, the logs get overwritten but we should be able to see the logs of the last activation. So, you could see that this started on 117 and it's successfully activated.
So, that completes our installation configuration on all boxes through scripted and if you look at it, we just use one command for Installation, one command for activation and we were able to do everything remotely.
Configure Caches
Now coming back to the cache creation and configuration right. So, now that we have copied the sample XML right here, right sample cache XML2. So, it has configurations from an existing cache, how to use these and create a new cache. So, let's quickly do that, create cache and I've mentioned that it takes all the parameters in the script but since, we have the cache or we can figure, so I don't want to even do that. I want to use a ‘/T’ switch and create a cache according to an already available cacheconfig, which we have copied in the exhibit.
So, I just use createcache, give it democache123, I've been playing with democaches. It needs a server IP as must 20.200.20.107. It needs the next thing, it needs is the ‘/T’ switch and it needs the path of that xml file. So, which is right here. So, I will showcase that, that you can simply samplecache.xml one and samplecache2.xml that we copied. So, now it will create the cache configuration of the same existing cache that you already have. So, that's what I'm going to use and this is exact command that I'm going to use for the cache creation for different caches and if I show you right here, we have cache creation scripts and it has all the object cache xml, which has all these configurations of object, auto start to encryption set and compression already set as well and then we have session cache xml as well, which has auto start set but evictions turned off and then we have the static cache, which has a client cache as well. So, we already have these that was using, I will be using create cache or ‘/T’ to create the same caches of these environments as well.
The next command that I want to showcase is admin, how to add server node to an existing cache? Let’s do that, it takes the name of the cache, which is democache123, it needs an existing server where cache already is created. So, we just created the cache on 107 and it also needs a new server which takes. So, let's provide the 108 and that's it. So, it would add a new server is not specified so, I think there's a space. So, it adds a 108 to the existing cache 107. So, that's pretty straightforward.
Then the next thing is that you might want to add the client nodes. So, add client node and again you need a democache, the name of the cache, you need a server name as well, where the cache exists, 107 and then you need the client node, which is my box right here and it would add a client to the existing cache and real quick, I want to show you the actual script as well. If I need to show you this cache configuration, I can load this cache now and you'd see the exact same configuration that we did. We have the partition cache 107, 108 at the server and client 101 is added and this exact approach is utilized in our scripts here as well, where we have create_objectcache, which is using servers to call createcache with ‘/T’ and it takes a config path, that is specified right here. So, there's a config path specific right there. So, object cache config is provided and then it uses the other servers to call add node and it also uses that client node and then it also creates client cache.
There is a script, which says there's a command, which says createclientcache and it takes some parameters where you specify the server’s name, the cache name and client name and it will automatically do that and then we have one script, which actually calls all these scripts at once, so all the caches get created.
Start Caches and Test
So, let's do that and next, I'll show you how to start these caches and tests as well? So, we're not going to do anything manually this as promised. So, I need to go to the cachecreationscript and then the script that I'm interested in, let's actually clear the screen first, is to create_all_caches is not bad and that's it. It has completed the object cache configuration on 107, now was successful now it's adding server nodes to it, which is 108 that's what I provided. The second server that is adding is 117 and then we have client nodes added 101 and 102 configurations are complete on this. Then it moves on to the session cache 107, it creates it as 108 to it as planned 117 would be added next.
So, everything is being done and there's a log file, which is being maintained at the back of this one. So, any errors, those would be reported. So, you could go through those and now it's having 101 and 102 as client nodes and then static cache, which also you mix uses of the client cache and this is the command that I'm printing. So, please keep an eye on that, createcache, staticcacheserver and this the staticcache.xml. Now 108 is added, 117 is added and on this one, it would add 101 and 102 as clients would also create client caches on these because that's what the security configuration was. So, I use the createclientcache command line for that. So, it was successful, everything looks good.
Now, I just need to make sure that these caches are configured fine. They are started and I'm good to go in terms of starting that as well. So, there is another set of tools, which actually starts my cache, example lets use the StressTest Tool for now. let's do that. So, startcache actually takes a name of the cache, democache123 and I would actually start it on the local servers and you could also give it ‘/S’ switch where it can start it on a remote server as well. So, this is exactly, what this script is doing. It is one by one calling, the first one is checking the status of the caches and it's starting caches on 107,108,117. It's also starting the client caches and there was a question around it. How to start client caches? So, we have 4 minutes left. So, I'm going to quickly run this script right here.
So, first of all, it listed my cache status of 107, democache123 and democacahes are running otherwise all the other caches are stopped, static object session and client caches are also stopped. So, you could see on that static cache has stop, session cache to stop, object cache stop. On the first one since, we created democache and democache123. So, these are my other caches, democaches started here as well, so you could ignore these. client caches are also stopped. So, in production you would need some handling to start your caches and be able to test them as well and this is exactly what would be. Next, it will start all caches one by one and you would see that session cache on 107 got started. It would do the same on 108 and 117 as well. Any questions so far? Please type into the question-and-answer tab, if there are any questions.
And you will see that the script will get complete and the only thing left for me would be to quickly validate that actually, these caches are configured fine and then be able to test them in a remote machine, and for that I just use this server right here. So, it will take some time obviously it's starting caches. So, 117 is started, static cache is getting started now, 108 and then 117 and you would notice that it will also start the client caches as well and that's the most important bit because you wouldn't want to miss your client caches to be started right so, you make sure that you start there and there you go. It's starting the client cache on 101 and it's doing the same on 102 as well and as a matter of fact, it would actually test this cache as well putting some dummy data into it and give us feedback. So, that's the beauty of scripting and then I want to highlight. So, that's the last bit I think object cache is the last one in the list and after that all the caches have started and let me quickly show you this the log files which get created.
So, there are activation scripts, cache creation and then we have the logs here as well. So, everything is being logged here, successful status and if there is an error, it would be printing here. So, you can go back and check these at a later stage. So, this is done and now verification of clustered caches, it's showing me that we have object cache, six items there, six servers, active backups, session cache is fine, static cache is fine and we have on the clients 101, we have running status of client cache and on 102 we have a running status and if I just do this it would add some dummy data to test this cache as well.
And I think now is the time that I can use to actually add the caches in a remote box and I don't need to actually log onto the server anymore, this means we switch the box to team and use this I can show you the same configurations showing up in the manager and now you would load the caches and then your production environment set up is complete. I'll take five more minutes and then I think we should be able to conclude it. New project and add the cluster cache and IP of the other box.

There you go. So, we have demo cache, that's not needed by the way. So, let me just get rid of it, this was something that I created for testing. So, it's there but I'll quickly show you the other three caches and I think we're going to conclude the session. If there are any questions in any of the approaches, that I've covered. Please feel free to type into the question-and-answer tab. I'll be very happy to answer all your questions with that. There you go. So, I think let me just quickly do that. So, that's the IP of one of the servers. Since, I can do the remote management, session cache should be added and I want to highlight the configurations, which were done. Now, let's have a look at the object cache, auto start is set up, compression is set up with 50 kilobyte and security is enabled and then on this, we had the policies which is turn on the session cache, auto start was set up and the evictions were turned off. So, that's what you see and this we have the auto start set up and we have the client cache. So, everything is intact you could monitor cluster and you could monitor these caches in a remote manner from this particular server and everything should work fine without issues.
Please let me know, if there are any questions at this point because we're already above our regular allocated time. So, I would like to conclude it really quick but if there are any questions please feel free to type into the question answer tab. Yes, the recording of this webinar would be available along with the scripts, if those scripts are needed please send us a request and we'll share those scripts free. Any other questions?
I hope this was pretty straightforward, convenient just to summarize, we performed deployment and configuration of staging environment and the production environment and we had the GUI base approach as well as the scripting approach. In the GUI base approach, we had to make sure of every option ourselves. So, we went through every option manually but scripting, we use the existing configuration from the staging environment and replicated the same settings, NCache settings into the production environment and everything worked without issues. So, just give me your feedback, let me know how did you like the presentation? How was the product in general? How was the capability in regards to scripting and share your feedback with us? Let us know if there are any questions and we can take it from there. I'm going to conclude this because of time. So, if there are any questions please send us an email at support@alachisoft.com.