Configure Eviction in NCache
When you create a cache you also allocate its size (subject to the available memory on your machine). However, there are chances that this allocated size at some point in time becomes full. When this happens, you will not be able to perform any write operations on this cache, but you’ll still be able to perform read operations.
To deal with this problem, NCache allows you to enable eviction on your cache cluster. This feature automatically removes data from the cache cluster based on the three available algorithms (explained later in this tip). But, you shouldn’t enable eviction in the following scenarios:
- Your cache contains sensitive data that can’t and shouldn’t be removed.
- Your cache contains user data (e.g session data).
In these scenarios, instead of eviction, the best option that you have is to increase the size of your cache which can be done at runtime, and you can also get notified when the cache becomes full. There are two ways to enable eviction for your cache cluster, they are described below:
Enable Eviction at Cache Creation
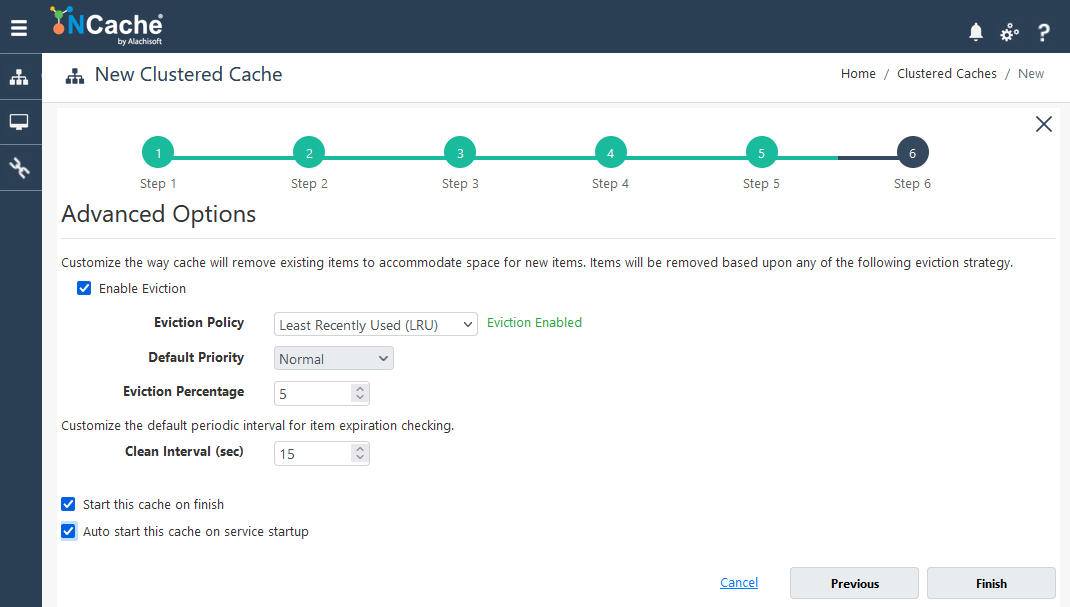
You can enable eviction for your cache at the time of cache creation using the NCache Web Manager. Just follow the steps below:
- Launch the NCache Web Manager and Create a cache.
- At the 6th step, check the box next to Enable Eviction to enable the eviction.
- Set the other options (Eviction Policy, Default Priority, and Eviction Percentage) as per your liking.
- Click Finish.
Enable Eviction for Created Caches
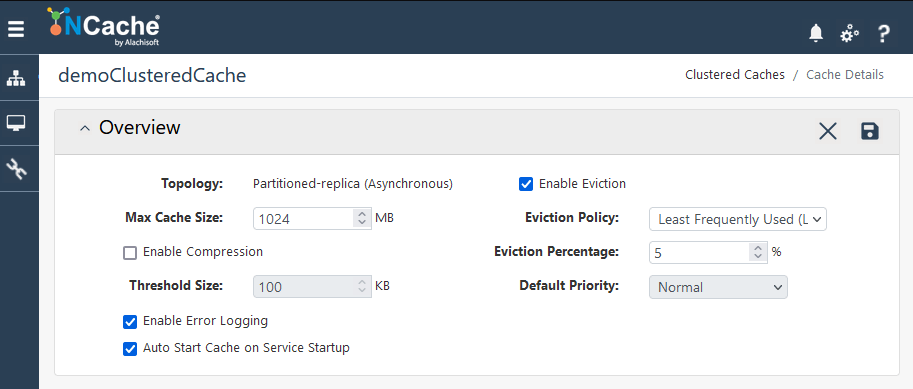
You can also enable eviction for a cache that has already been created using the NCache Web Manager. Make sure your cache(s) is stopped. To enable eviction for already created caches, just follow the steps below:
- Launch the NCache Web Manager and click on View Details against your cache.
- In the Overview section, click on
- Check the Enable Eviction box to enable eviction on your cache.
- Set the other options (Eviction Policy, Default Priority, and Eviction Percentage) as per your liking.
- Once done, click on
Eviction Policies
NCache provides three eviction policies for you to choose from. They are explained below:
LRU (Least Recently Used)
This eviction policy puts a timestamp on the cached objects. The timestamp is updated each time the object is accessed. When evicting, objects with the oldest timestamp are chosen. In a case where two objects have the same timestamp, a random selection between the two will be made. By default, items are evicted on Least Recently Used basis.
LFU (Least Frequently Used)
This policy uses a counter that counts the number of times an object is accessed. At the time of eviction, objects with the lowest access count will be evicted first. In this policy, too, a random selection will be made between the two objects with the same count value.
Priority Based
This eviction policy has an eviction mechanism that is similar to that of the LFU eviction policy but with the addition of a priority associated with an object. The priority of an object is determined by you at the time of caching this object. Objects with a lower priority are removed first and the objects with higher priority are removed later. In this eviction policy, you have an option of choosing from the following eviction priorities:
- Low
- Below Normal
- Normal
- Above Normal
- High
Note: When a priority is not selected, Normal priority will be used as default.