Use NCache with Amazon Kubernetes (EKS)
Elastic Kubernetes Cluster with Docker Containers
AWS Elastic Kubernetes Service (EKS) is an Amazon Web Services (AWS)-managed Kubernetes service that lets you set up your Kubernetes cluster together with all the latest patches and upgrades to the underlying infrastructure supporting it.
If you’re working with .NET/.NET Core or Java applications running in EKS and you want to use NCache to improve their performance and scalability during peak transaction loads, then rest assured that NCache fully supports this environment.
Watch this video to see how easy it is to deploy NCache into your Amazon Elastic Kubernetes cluster.
NCache Deployment in EKS
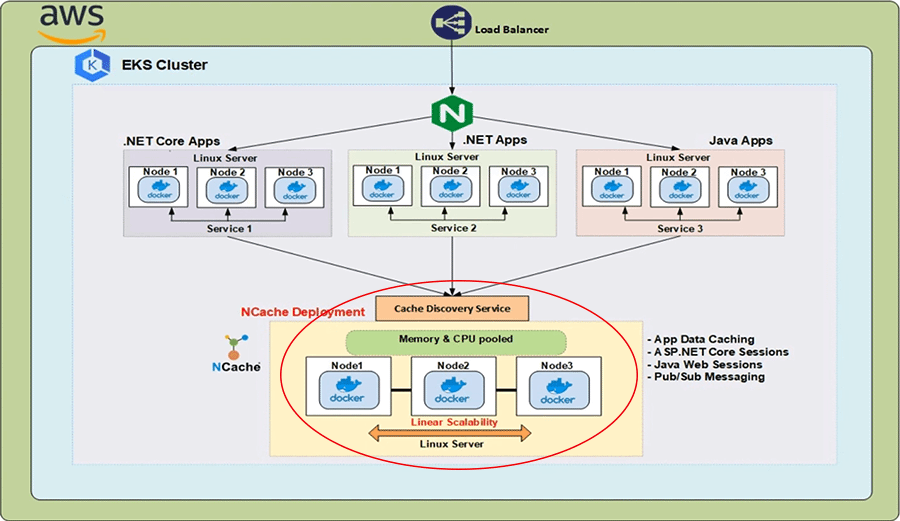
In the AWS Cloud we have a classic load balancer in front of an Ingress Controller, that is running within the Kubernetes Cluster. The Kubernetes Ingress resource that is implemented by this Ingress Controller, routes the HTTP requests coming from the load balancer to the different services running within the cluster. Now in any such distributed application environments, we need to have a distributed caching solution as well, that provides scalability, reliability and high availability, when performing fast read operations and that is where NCache comes in.
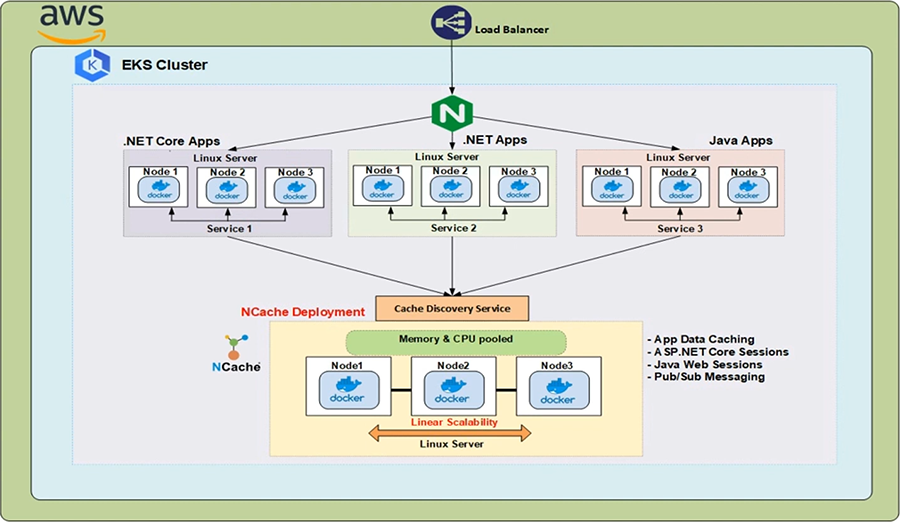
NCache can be deployed into your EKS cluster as NCache servers that are running in Linux Containers and these containers are host within the Kubernetes Pods. The IP addresses of these NCache servers are resolved by the Cache Discovery Service, which is a Kubernetes headless service and the IP addresses from there are used by the client applications to create cache handles with which they can connect to the NCache cluster and start performing management and CRUD operations.
The following are the important parameters of the demonstration that we will be conducting today. The NCache Servers that will be deployed to the EKS Cluster will use the following Docker Image 'alachisoft/ncache' with a tag of 'enterprise-server-linux-5.0.2'.
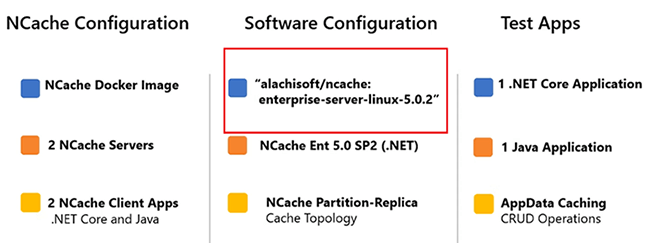
To get all the images that NCache provides, let me come over to the Alachisoft website. Select the ‘Download’ tab and then click on 'NCache'. This will bring you to the NCache download center. Scrolling down to the 'Docker Hub' section, I can simply click the second entry from the top and this will direct me to the Docker Hub page of Alachisoft NCache. Here you can see all the images that NCache provides. Coming back to the parameters, the image that will be used has the NCache Enterprise 5.0 SP2 Edition with a .NET Core installation. The clustered cache that we will be creating, will use the Partition of Replica Topology. The two test applications that will be used are as follows. We have one .NET Core Application and one Java Application and, in both cases, we will be showing the App Data Caching aspect of NCache. We will start off with 2 NCache servers and then increase that number to 3. To demonstrate that, we can make dynamic changes in the NCache cluster state without effecting client performance.
Create EKS Cluster
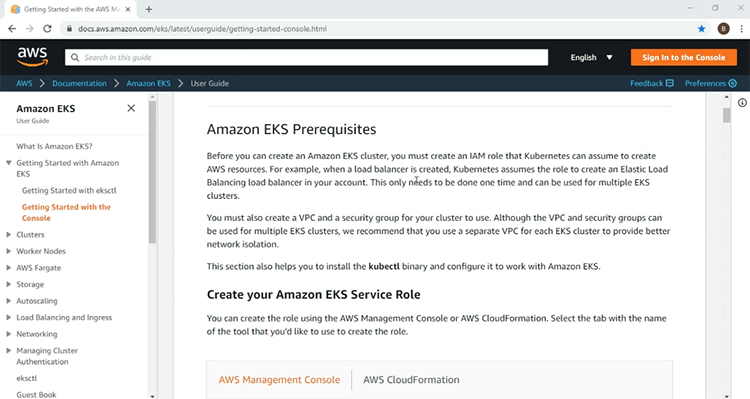
We are now ready to start our demonstration. The first thing to do of course is to set up the EKS infrastructure on which we will be deploying our NCache server and client resources. Here, I am on the AWS getting started page for the EKS Service. Here you will find all the information required to get your first EKS Cluster up and running. The information includes the prerequisites such as, the IAM role and policies that are required.
Furthermore, it goes into the details about creating a VPC, on which you will deploy your EKS cluster.
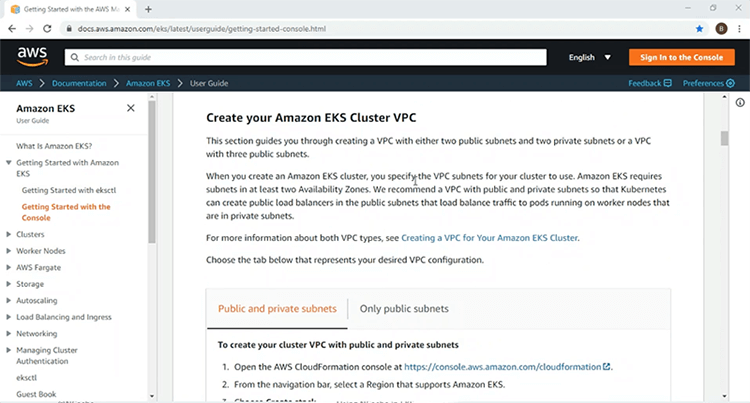
Further down below you will find information about the installation and usage of the AWS CLI and ‘kubectlc’ command line utilities for access and management of the Kubernetes cluster.
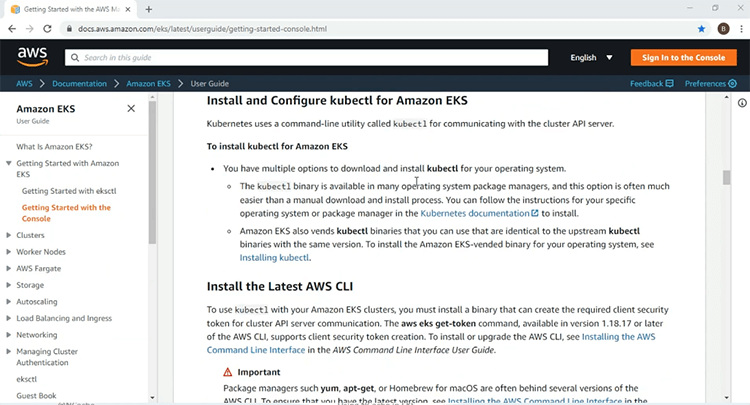
Also included, is information about the Kubernetes managed Node Group, that will provide the worker nodes, on which you will deploy your Kubernetes resources. I will use the information given here to create an EKS Cluster on a VPC with 2 public and 2 private subnets and once my EKS cluster is up and running, I will then proceed with the rest of the demonstration.
Using these steps given in the getting started page, I have already created the IAM roles and the VPC infrastructure for my EKS cluster. Now, I'm going to go through these steps of creating the EKS infrastructure.

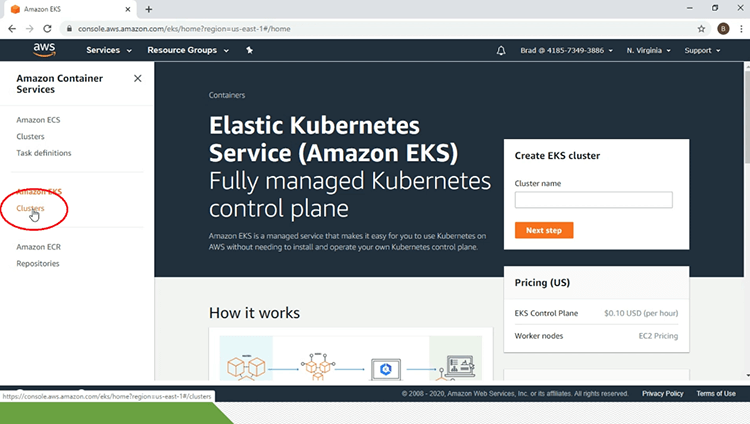
So, for that, I am on my AWS management console and I'm going to click on the Elastic Kubernetes Service link. This will bring me to the main page of the EKS service. Below the ‘Amazon EKS’ heading on the left-hand pane of the page, I'm going to click on the ‘Clusters’ link.
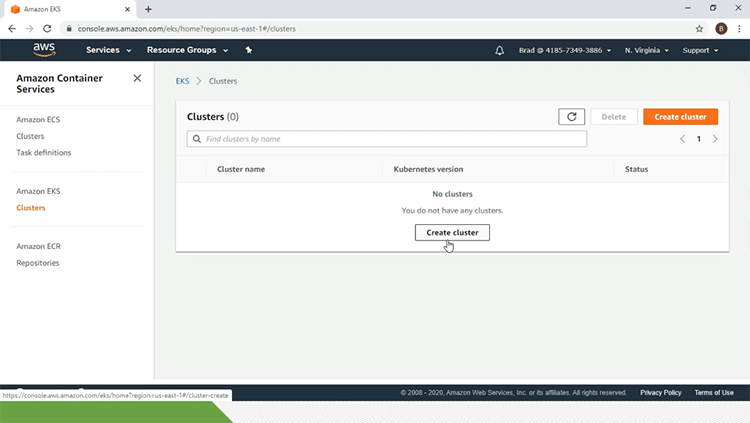
Right now, I don't have any EKS cluster. For that I'm going to click the ‘create cluster’ link.
Over here I'm going to give in the configuration parameters. So, I'm going to start off with the name of the EKS cluster which is ‘eks-ncache’. I'm going to select ‘1.14’ for ‘Kubernetes version’. I'm going to select the ‘IAM role’ and the ‘VPC’ as well. I'm going to select the security group and everything else will be kept default and I'm going to give a tag for the EKS cluster and once all this is done, I'm going to click the ‘create’ button.
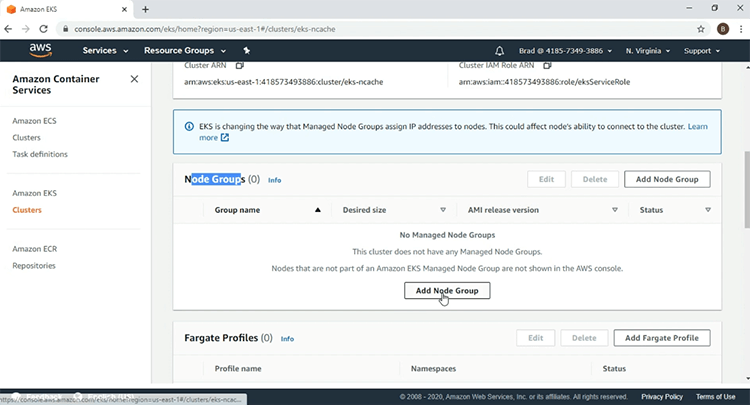
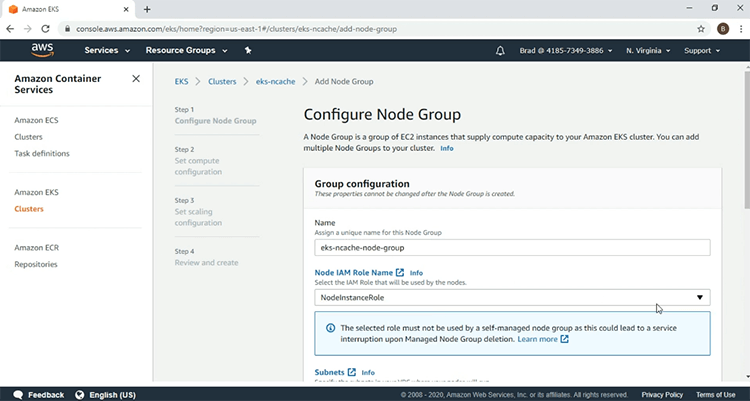
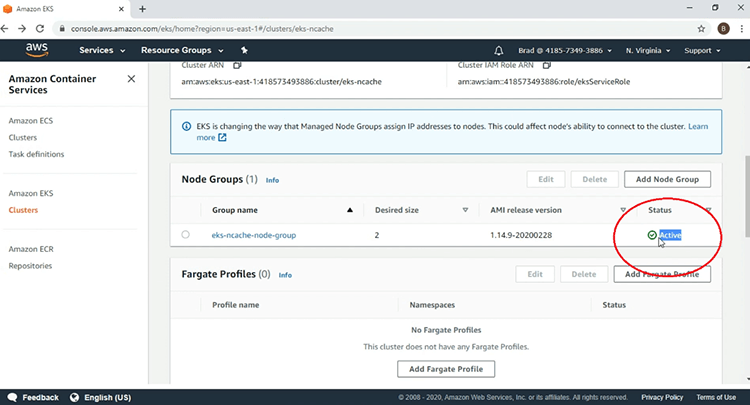
Now that the EKS cluster is being created, I'm going to pause the video, because this is going to take some time. On my EKS cluster’s page I can see that ‘eks-ncache’ is ‘Active’. The second step is to create the manage Node Group and for that I'm going to scroll down to the ‘Node Groups’ section and I'm going to click on the ‘Add Node Group’ button.
I'm going to give in the parameters starting off with the name of the Node Group and I'm going to select the ‘IAM role’.
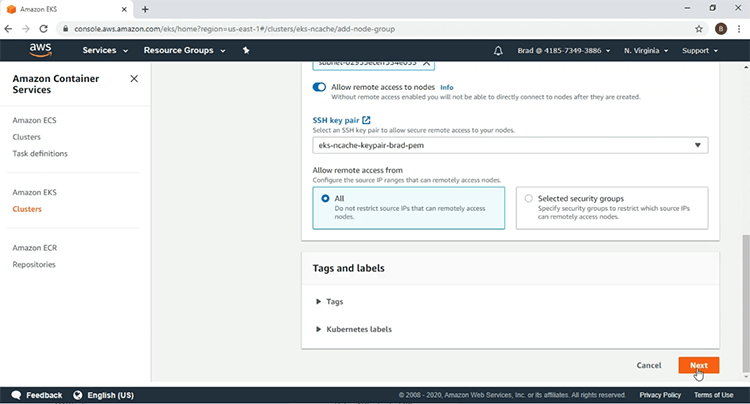
I'm going to select the ‘SSH key pair’, click ‘Next’.
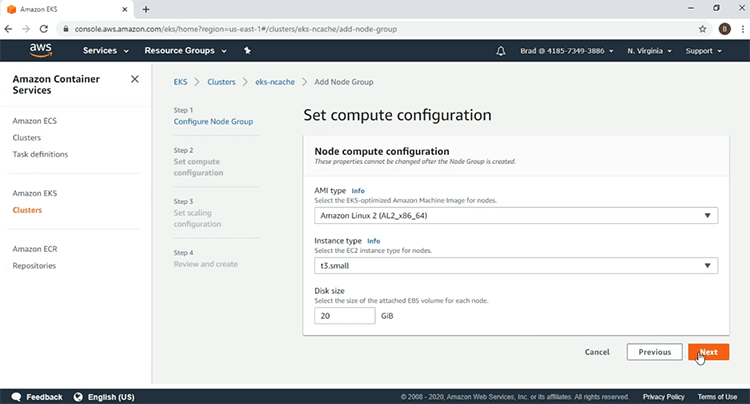
Here I'm going to use the following ‘AMI type’ and for the ‘Instance type’, I will use ‘t3.small’. After this I'm going to click ‘Next’.
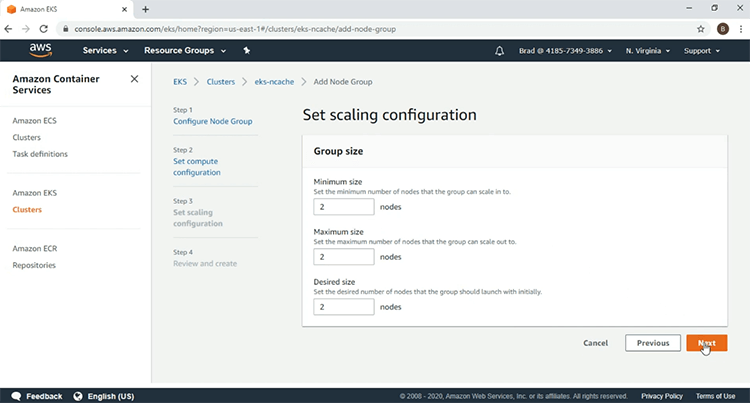
I'm going to select 2 worker nodes, click ‘Next’.
And here after looking at the parameters, I am going to click ‘Create’ to start the creation of my Node Group. We see here that the Node Group is in the creating status right now so, I'm going to pause the video. We see here now that my EKS Node Group is 'Active' and the creation of my EKS infrastructure is complete.
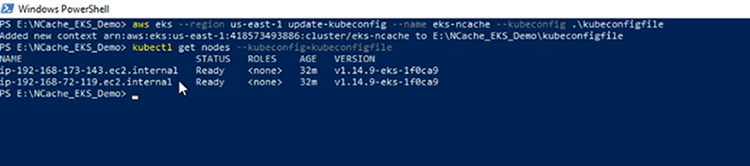
In the PowerShell terminal of my client machine, I am going to use the AWS CLI, to create my ‘kubeconfig’ file, to get access to the EKS cluster and the ‘kubeconfig’ file has been created. Now, I am going to confirm my connection to the EKS cluster and we see the two worker Nodes that are included in the EKS managed Node Group.
Deploy Ingress Controller
The first thing I'm going to do is deploy the Kubernetes resources required for the Ingress Controller. Coming over to the architecture diagram, the Ingress Controller shown over here will be used to implement the Ingress resource that we will deploy later on.
In our demonstration, we are using the NGINX Ingress controller because of its popularity. First of all, we are going to deploy the mandatory resources required to get the NGINX Ingress Controller running in any Kubernetes environment and afterwards we are going to deploy the AWS specific resources, that will spin up a classic load balancer in front of the NGINX Ingress Controller and allow the NGINX Ingress Controller to receive HTTP requests from outside the Kubernetes cluster via this classic load balancer.
I am going to now deploy the mandatory resources required for the NGINX Ingress Controller. The definitions of those resources can be found by following the URL that is given in the highlighted section. So, without further, let's get started and the mandatory resources have been deployed. Here I have the YAML file open, that I will use to deploy two resources related to the NGINX Ingress controller.
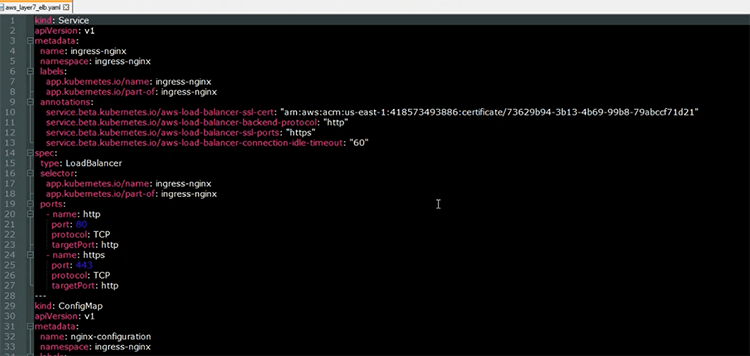
The first resource is the load balancer service that will be used to spin up a classic load balancer in front of the NGINX Ingress Controller. As we can see from the annotation section, the load balancer will be operating at layer 7 routing HTTP requests to the NGINX Ingress Controller. Coming down the other resource we will deploy is the ‘ConfigMap’ resource, that contains the configuration parameters for how the NGINX Ingress Controller will behave within the Kubernetes Cluster.
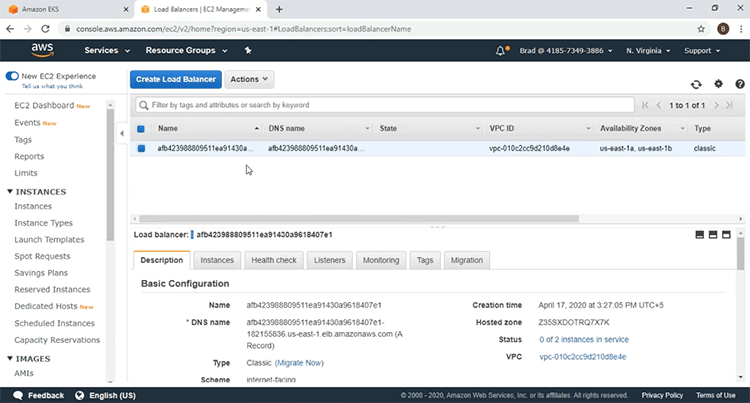
I am now going to deploy those resources using the ‘kubectl apply’ command and the resources have been deployed. Let me come over to my EC2 dashboard and confirm that the load balancer has been spun up. If I refresh this page, you will see a new load balancer introduced. Let me click on the ‘load balancers’ link and here is the load balancer in front of the NGINX Ingress Controller.
Deploy NCache Servers
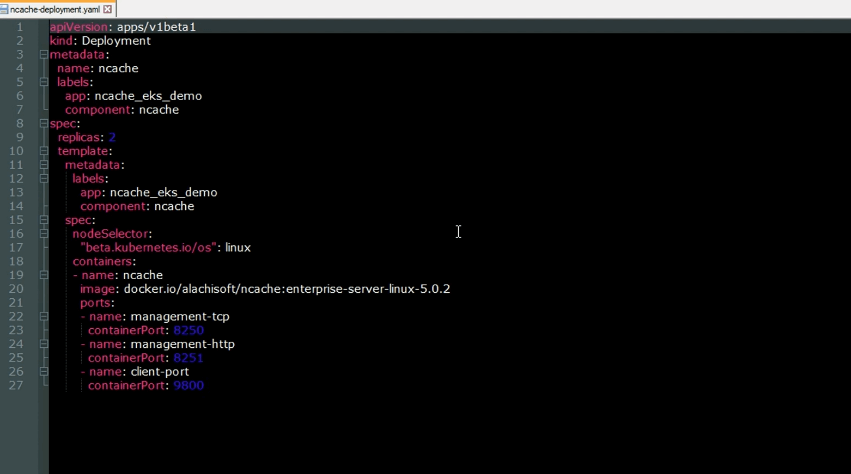
We will now deploy NCache Servers to the EKS Cluster. Coming over to the architecture diagram again, these NCache servers are used to create the Clustered cache within the EKS cluster. Here is the YAML file for deploying the NCache servers to the Kubernetes cluster. As we can see, this is a deployment resource that will spin up to NCache servers within the EKS cluster. The following are the ports on which the NCache servers will be listening. We have the ‘management-tcp’ port with a value of 8250, on which the NCache servers will be listening for client connection requests. We have the ‘management-http’ port with a value of 8251 on which the NCache web manager will be listening and then we have the ‘client-port’ with a value of 9800, on which the NCache servers will be listening for client CRUD operation requests.
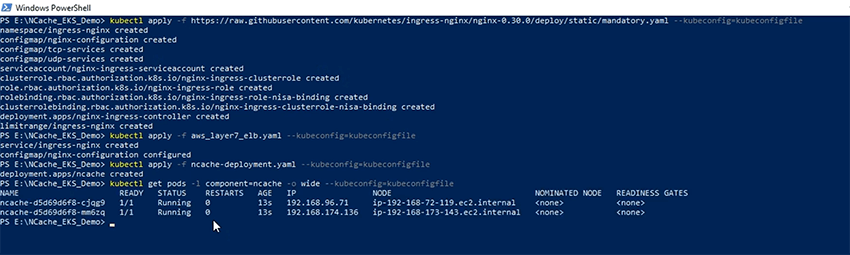
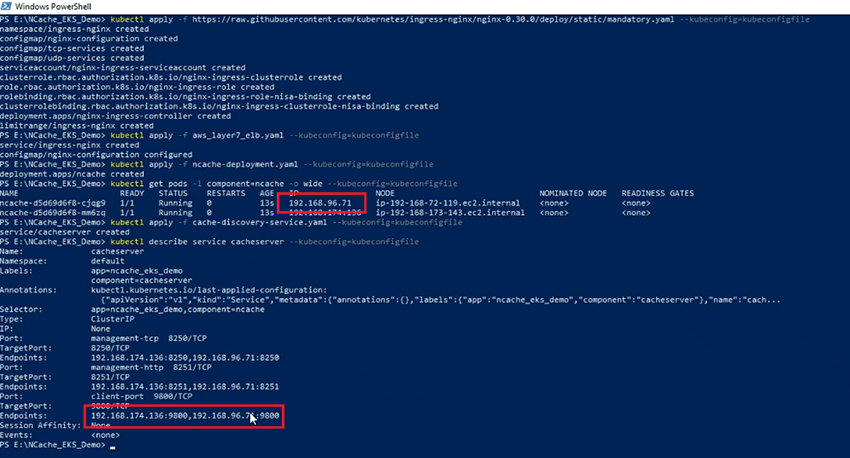
Using the ‘kubectl apply’ command, I am going to now create the NCache server Pods on my EKS cluster and now let's check the status of the Pods. The Pods are running. We have 2 NCache Servers with the IP addresses shown over here.
NCache Discovery Service
We will now deploy the NCache Discovery Service. The Cache Discovery Service is a headless service that is running on top of the NCache server Pods. Its function is to resolve the IP addresses that will be used by the client applications, when they want to connect with the clustered Cache.
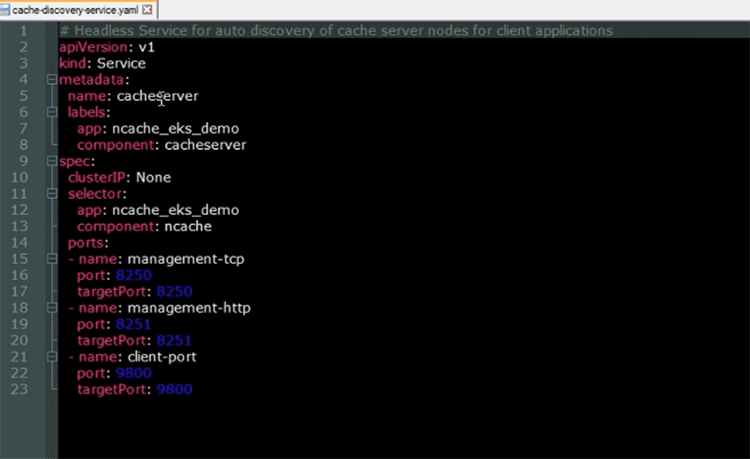
Here is the YAML file for the Kubernetes headless service. As we can see the name of the service is going to be ‘cacheserver’. Looking at the ‘selector’ and ‘ports’ sections, we see that this service is going to be running on top of the NCache Server Pods.
I am now going to create the Cache Discovery Service resource in my EKS cluster using the ‘kubectl apply’ command. Now that the service has been created, let's look at the description of it. We can see that the ‘Endpoints’ that the service resolves to contain the IP addresses of the NCache servers, with the IP addresses shown in the highlighted section, being the same as the IP addresses shown over here.
NCache Manager Service
We are going to be using the NCache Web Manager, to create our clustered cache and add nodes to it. To expose the NCache Web Manager we are going to deploy another Kubernetes service resource. Here is the YAML file for the Kubernetes service, that will expose the NCache web manager
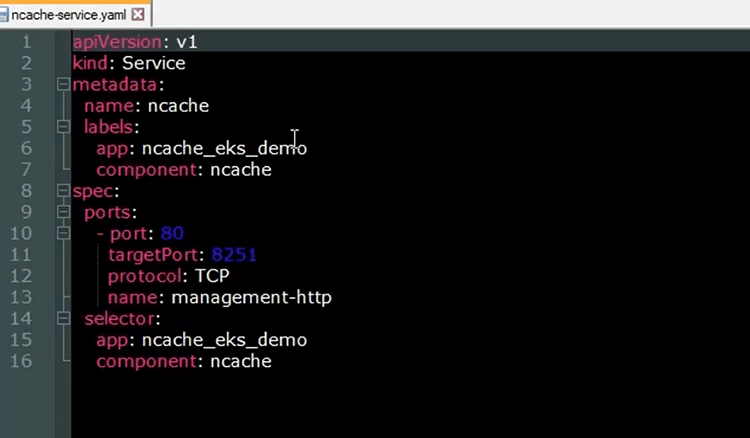
As we can see the ‘name’ of the service is going to be ‘ncache’ and from the ‘ports’ section, we see that the port of 80 is going to map to the target port of 8251, on which the NCache Web Manager will be listening. Looking at the ‘selector’ section, we see that the service is going to be running on top of the NCache Server Pods. This service is going to be registered on the backend of the Ingress resource that we will deploy later and from there we will be able to access the web manager from our browser.
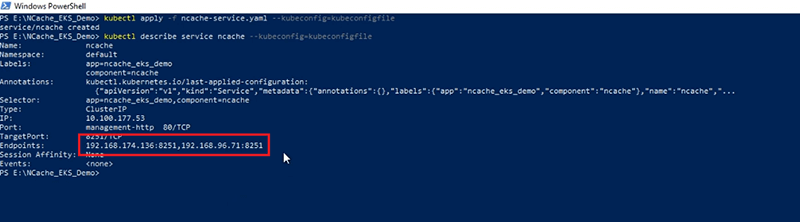
I am now going to create the NCache service resource in my EKS cluster using the ‘kubectl apply’ command. Now that the service has been created let's look at the description again and we see here that the ‘Endpoints’ that the NCache service resolves to, are the IP addresses of the NCache servers.
NCache Ingress
We will now deploy the Kubernetes Ingress resource that will expose the NCache Web Manager from our browser. The Ingress resource is going to be implemented by the NGINX Ingress controller. The NCache service that is going to be registered on the backend of the Ingress, will allow the HTTP requests coming through the load balancer, to be routed to the NCache Web Manager for NCache management purposes. Here is the YAML file for the Ingress resource that we will be deploying to the EKS cluster.
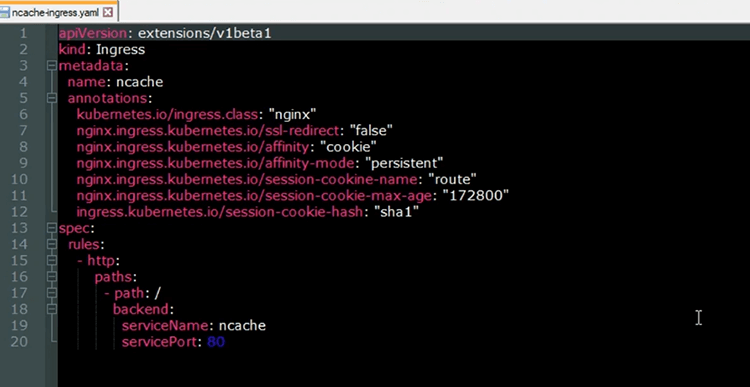
The ‘name’ of the Ingress is ‘ncache’ and from the annotations, we can see that, it will be implemented with the NGINX Ingress controller. Furthermore, these annotations show that we will be using sticky sessions with the NCache Web Manager. So, as to not be bouncing around the different web manager instances running on the different NCache servers and we are easily able to create our clustered cache and add Nodes to it within the same session. From the rules section, we see that the root path of the URL, is going to map to the NCache service, that exposes the NCache Web Manager.
We are now going to create the Ingress resource on our EKS Cluster. Now that the Ingress has been created let's check on the status of it. We see now that the Ingress is up and running. Let us check the URL of the Ingress. The URL is given in the ‘Address’ section. If I copy this URL on my browser, I will be able to access my Web Manager. So, coming over to my browser, clicking over here and pasting the URL and now we have successfully accessed the NCache Web Manager from within the Kubernetes cluster.
Create Cache Cluster
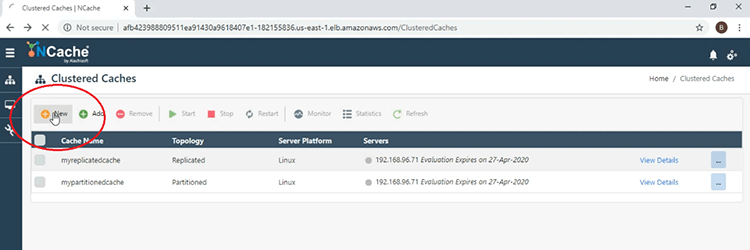
We are now going to create our clustered cache. I am now going to go through the steps of creating a clustered cache using the NCache Web Manager. So, to start off with, click the 'New' button shown here.
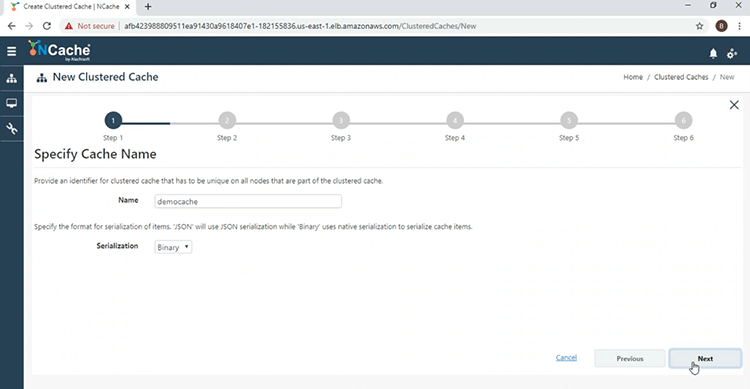
Now we are going to give the clustered cache a name, ‘democache’, click ‘Next’.
We are going to use the partition of Replica topology, in ‘Asynchronous’ mode.

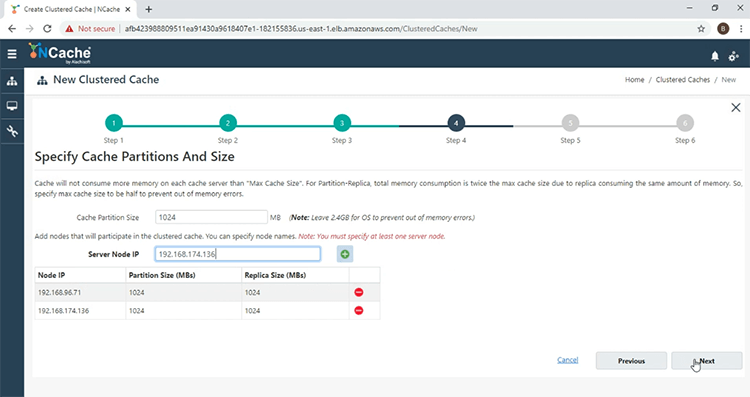
And now I am going to add the NCache servers to the clustered cache. So, clicking the ‘+’ button and adding the other server as well. With both servers added, click ‘Next’.
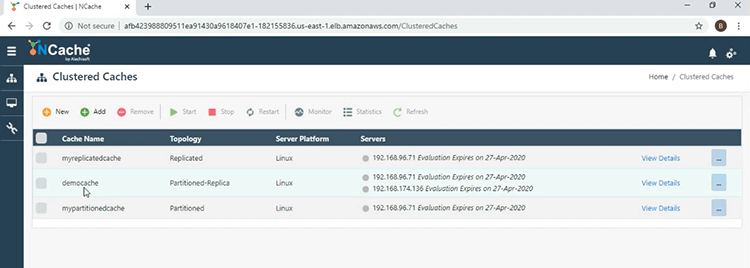
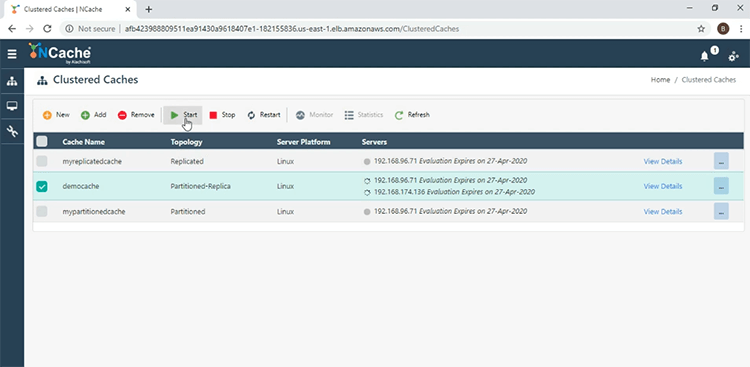
Keep everything default and at the end click ‘Finish’. We see here now on the main window that the ‘democache’ has been successfully created.
To start it, tick the check box next to the name of the cache and press ‘Start’.
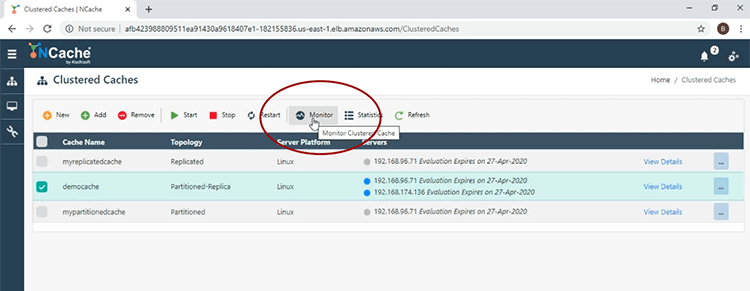
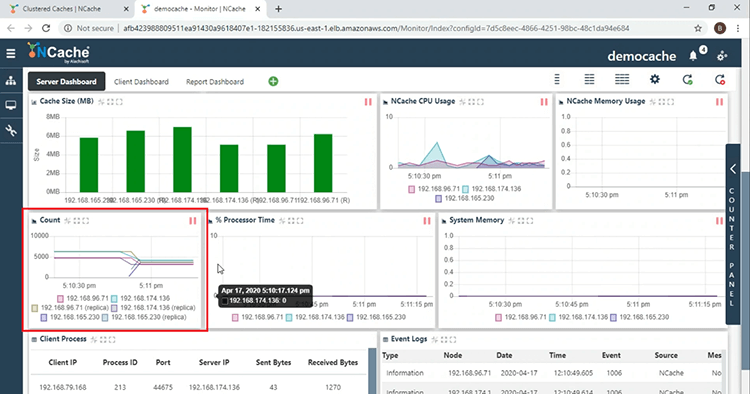
The cache has been successfully started. I am now going to click on the ‘Monitor’ tab to open the NCache monitoring tool.
First of all, from the ‘Cluster Health’ section, we see that the clustered cache is fully connected.
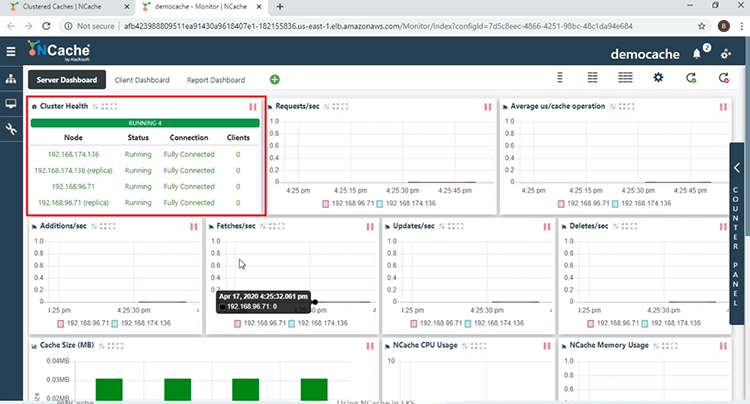
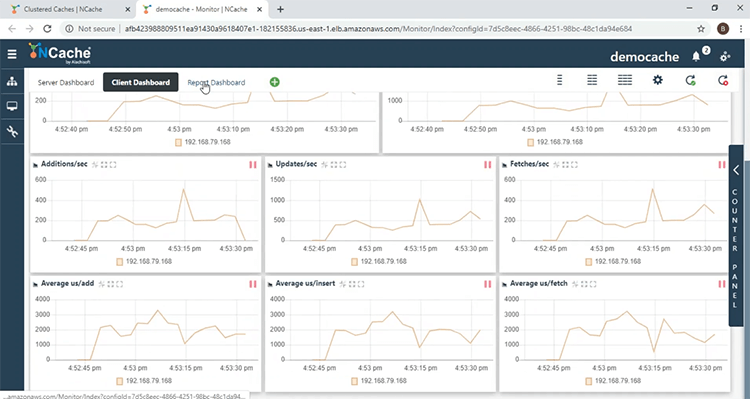
We see different server-side performance counters here. In the ‘Count’ section, we see that the account is 0, because we have not started any client applications. Coming over to the ‘Client Dashboard’, here you will be able to monitor the NCache client-side performance counters.
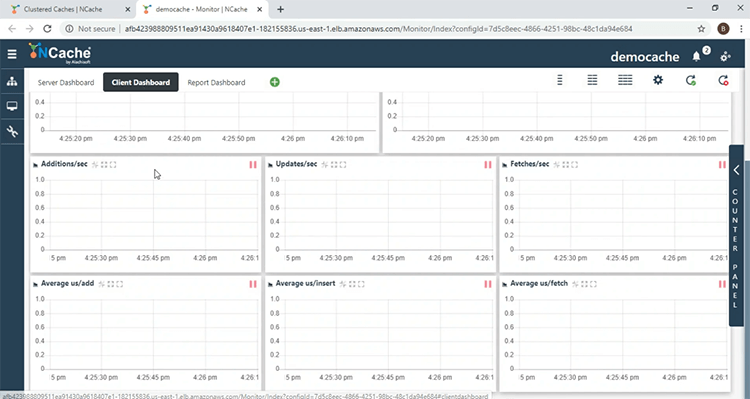
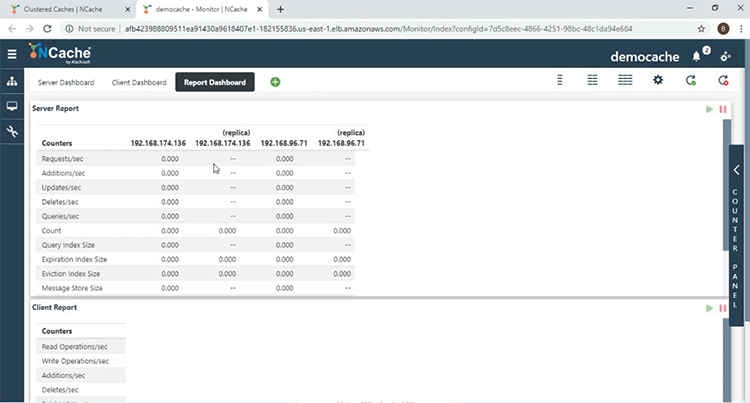
In the ‘Report Dashboard’, you get an overall view of both the server-side and the client-side counters.
Deploy & Run Client Applications
With the clustered cache created, we will now run our client applications. Here is the YAML file, that will be used to deploy the client applications to the EKS cluster.
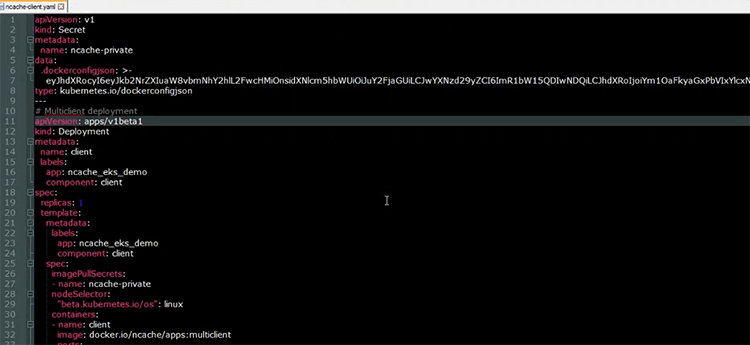
As can be seen from the deployment resource, which has the name of client, we will have one Pod, on which the client applications will be running. The ‘image’ used is shown over here, this contains both the .NET Core and Java applications as well as the NCache client installation, so that we can collect the client-side NCache performance counters. I am now going to deploy my client resources to the EKS cluster. Now that the resources have been created. Let's check on the status of the Client Pod. The first thing we will do is start the .NET Core Application. Within the Client Pod, I am going to run the following Shell command, "/app/testerdotmet/run.sh democache cacheserver" that takes two parameters, namely the name of the cache, which is ‘democache’ and the name of the headless service, which is ‘cacheserver’.

And we see now that the .NET Core application is running. Coming over to the NCache Monitor, we see in the ‘Cluster Health’ section that we have 1 client and we see an uptake in the counter activity. The count is increasing, since the .NET Core application is dumping data into the cache and over in the ‘Client Process’ section here is the IP of the Pod on which the .NET Core application is running, as well as the process ID of the application. Coming to the ‘Client Dashboard’, we see here that we have client-side counters, coming from the client Pod.
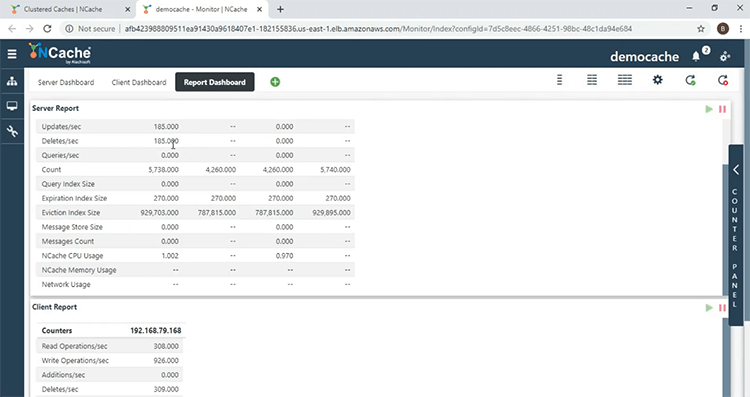
In the ‘Report Dashboard’, we get an overall view of both these server and client-side performance counters.
Now that the .NET Core application is running, we are now going to start the Java application. Just as with the .NET Core application, within the client Pod, I am going to run the following shell command, that takes the same parameters as the .NET Core application, namely the name of the cache and the name of the headless service.

And we see here, that the Java application is running. Coming back to the NCache monitor, we see here now that there are 2 clients and coming down to the ‘Client Process’ section, we see another entry for the client process, that is related to the Java application. So, with this we have been able to confirm that applications can connect with the NCache servers running on the same Kubernetes cluster.
Scaling Out NCache Cluster
We are now going to Scale Out our NCache Cluster. The first thing I am going to do is to scale out the NCache deployment to 3, so that I have another server to add to the cache cluster. Now that the deployment has been scaled, let's look at the server Pod IP addresses and here we see another NCache server added to the Kubernetes cluster.

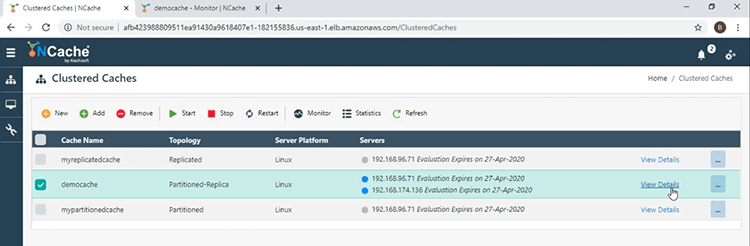
And to add the new cache server I'm going to click the ‘View Details’ link, in front of the name of the cache.
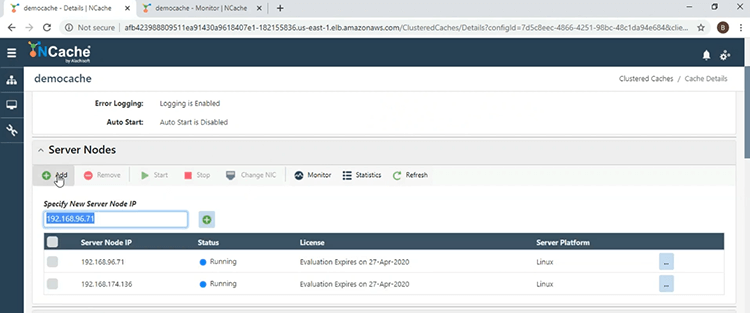
Coming down to the ‘Server Nodes’ section, I'm going to click the ‘Add’ button and give in the IP address of the 3rd Server.
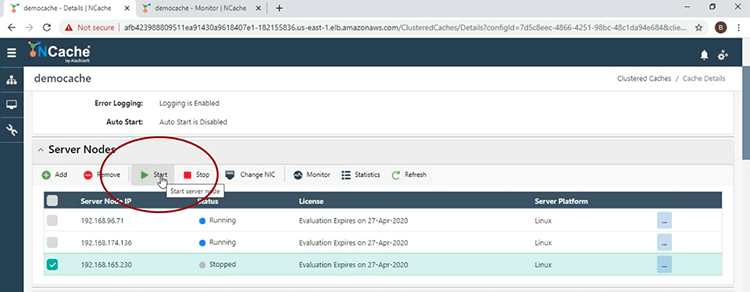
Now that the server has been added, I am going to start it and for that I'm going to tick the checkbox next to the IP address and click ‘Start’.
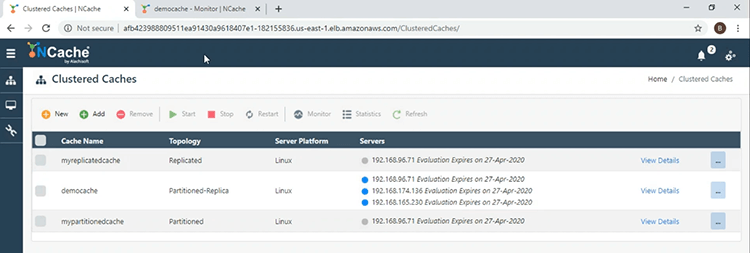
Now that the cache server has started, let's go back to the main window and over here we see 3 servers for the ‘democache’.
Coming to the monitor window and in the ‘Count’ section, the count per node has dropped because of the load balancing strategy that is in effect.
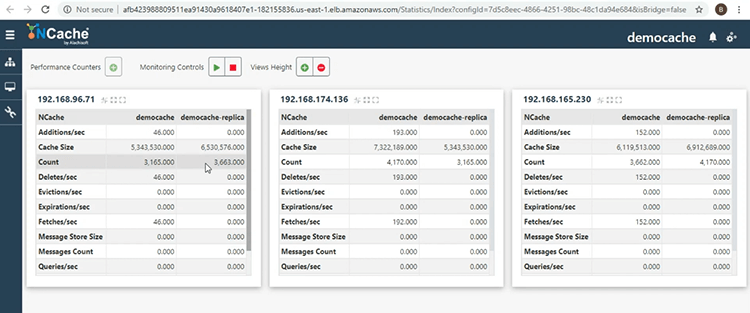
Coming back to the main window, I'm going to click the ellipsis button next to the name of the cache and then select ‘Show Statistics’, so, that I can get another view of the cache cluster. Here we see the Active and the Replica Partitions, providing reliability, by having the data in 1 server Node, backed up by another server Node, within the same cache cluster.
This brings us to the end of this presentation. If you have any questions about the demonstration that was performed today, or want to know more about the different features that NCache provides, please don't hesitate in contacting us at support@alachisoft.com. Thank you.