Containerization has revolutionized application deployment by ensuring consistency across various computing environments. Amazon EKS offers a fully managed Kubernetes service, simplifying the orchestration of such containerized applications. By deploying NCache within EKS, you can achieve improved performance and reduced latency for your .NET applications.
NCache Deployment Architecture in EKS
The integration of NCache into your EKS cluster involves several key components:
- Load Balancer: An AWS Load Balancer routes traffic to the NGINX Ingress Controller within the EKS cluster.
- Pods: These are the fundamental units in Kubernetes, running instances of the NCache server.
- Gateway Service: Utilizing the NGINX Ingress Controller, it manages routing and load balancing to NCache server pods.
- Applications: Client applications connect to the NCache cluster through the Cache Discovery Service, facilitating efficient data caching and retrieval.
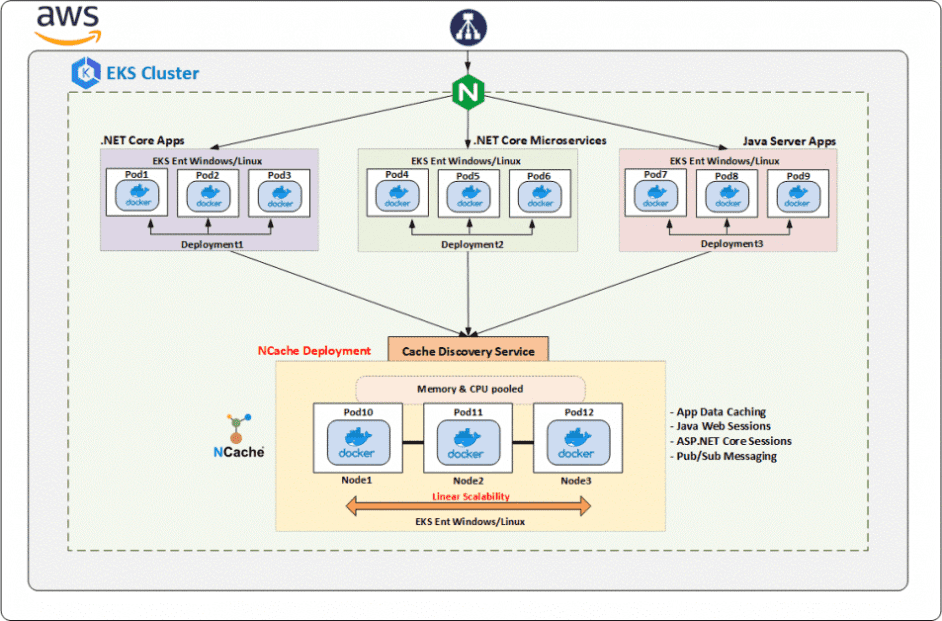
Figure: Deploying NCache in Elastic Kubernetes Service (EKS).
Steps to Deploy NCache in Your EKS Cluster
Following are the steps to deploy NCache in your EKS cluster:
- Step 1: Create NCache Resources
Deploy NCache resources within EKS using YAML configuration files. These files define the deployment specifications, including the number of replicas, container images, and necessary ports.
Example NCache Deployment YAML:
|
1 2 3 4 5 6 7 8 9 10 11 12 13 14 15 16 17 18 19 20 21 22 23 24 25 26 |
apiVersion: apps/v1 kind: Deployment metadata: name: ncache-deployment labels: app: ncache spec: replicas: 3 selector: matchLabels: app: ncache template: metadata: labels: app: ncache spec: containers: - name: ncache image: docker.io/alachisoft/ncache:5.3.4 ports: - containerPort: 8250 name: management-tcp - containerPort: 8251 name: management-http - containerPort: 9800 name: client-port |
Deploy the resources using the command below:
|
1 |
kubectl apply -f ncache-deployment.yaml |
- Step 2: Create NCache Discovery Service
To facilitate communication between client applications and NCache servers, set up a headless discovery service. This service exposes the IP addresses of NCache server pods to clients within the cluster.
Example Cache Discovery Service YAML:
|
1 2 3 4 5 6 7 8 9 10 11 12 13 14 15 16 17 18 19 20 |
apiVersion: v1 kind: Service metadata: name: ncache-discovery labels: app: ncache spec: clusterIP: None selector: app: ncache ports: - name: management-tcp port: 8250 targetPort: 8250 - name: management-http port: 8251 targetPort: 8251 - name: client-port port: 9800 targetPort: 9800 |
Apply the service configuration as shown below:
|
1 |
kubectl apply -f ncache-discovery.yaml |
Deploy the NGINX Ingress Controller to manage external access to NCache services. This controller handles routing and load balancing, ensuring secure and efficient communication.
Example NGINX Ingress YAML:
|
1 2 3 4 5 6 7 8 9 10 11 12 13 14 15 16 17 18 19 |
apiVersion: networking.k8s.io/v1 kind: Ingress metadata: name: ncache-ingress annotations: nginx.ingress.kubernetes.io/ssl-redirect: "false" nginx.ingress.kubernetes.io/backend-protocol: "HTTP" spec: rules: - host: ncache.example.com http: paths: - path: / pathType: Prefix backend: service: name: ncache-discovery port: number: 8251 |
Deploy the ingress resource:
|
1 |
kubectl apply -f ncache-ingress.yaml |
You can now proceed to initialize the clustered cache using either the NCache Management Center or CLI tools; create a distributed cache with multiple cache servers for high availability and performance; then configure cluster settings for replication, partitioning, and client connection strategies to integrate seamlessly with your .NET applications.
- Step 5: Deploy Client Applications
Next, containerize your .NET applications and deploy them within the EKS cluster. Ensure that these applications are configured to interact with the NCache cluster for optimized caching operations.
- Step 6: Monitor the NCache Cluster
Utilize NCache’s monitoring tools to oversee cluster health and performance. Features like real-time monitoring and detailed statistics provide insights into cache operations and help in proactive management.
- Step 7: Scale the NCache Cluster
NCache allows you to add or remove cache servers based on application demand. This flexibility ensures that your caching layer can handle varying workloads efficiently.
Conclusion
Integrating NCache into your Amazon EKS environment presents a strong opportunity for enhancement in terms of performance and scalability for your .NET applications. Following this more enhanced deployment guide, you can use the latest features of both NCache and EKS to construct a highly available and performant cache infrastructure.