Use NCache with Red Hat OpenShift
Kubernetes Cluster, Docker, and Linux
Learn how to deploy NCache in Red Hat OpenShift with a Kubernetes cluster and using Docker pods with Red Hat Enterprise Linux. You can do this for both Java and .NET Core applications.
OpenShift is an open source container application platform by Red Hat based on the Kubernetes container orchestrator for enterprise app development and deployment.
If your application is Java and/or .NET Core running on Red Hat Enterprise Linux and OpenShift and you want to use NCache to improve its performance and scalability for peak transaction loads, then please rest assured that NCache fully supports this environment.
Watch this video to see how easy it is to deploy NCache as part of your Red Hat OpenShift Kubernetes cluster as a Docker deployment.
Today, I will demonstrate how you can use NCache in Red Hat OpenShift container platform. As you are aware, OpenShift is a container Platform offered by Red Hat and it is built around application containers that are powered by Docker while the orchestration and management services are provided by Kubernetes.
It is based on Red Hat Enterprise Linux and today, I will show you step-by-step details for deployment and usage of NCache in this platform. So, let's quickly get started with this.
NCache Deployment
First of all, let's review NCache deployment in Red Hat OpenShift container platform. Here is a typical deployment of NCache in Red Hat OpenShift container platform. I'm showing a single Kubernetes cluster with different application deployments as well as NCache cluster deployment.
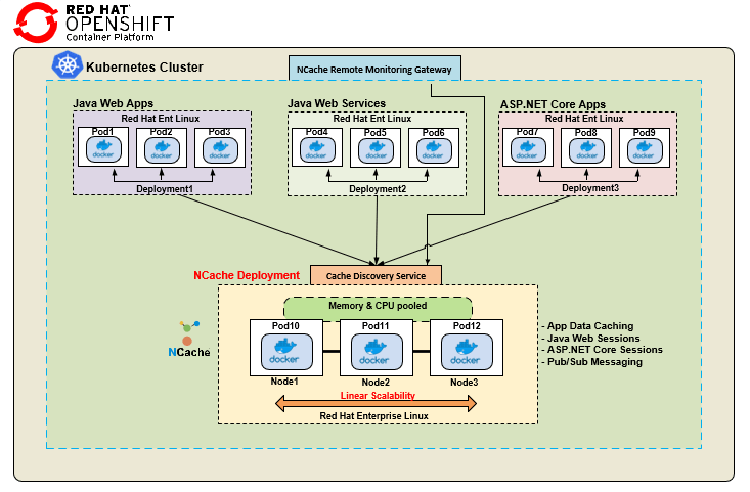
We have a Java Web App, which is again a Docker Image deployed on different Pods. I have a Java Web Service again shown by different Pods. These Java applications are using Java client of NCache, whereas I have a separate deployment for ASP.NET Core applications, again using a Docker Image on Linux but this is using the .NET Core client for NCache communication. As far as server-side deployment is concerned, it is using Linux basedDocker Image for NCache, which is available on our website and you know, you can use it on Red Hat Enterprise Linux as shown right here and you know, you create a cache cluster of using different Docker NCache Images made available in this platform and then I have this Cache Discovery Service and NCache Remote Monitoring Gateway.
So, this Discovery Service is a headless service within Kubernetes, that you can create within OpenShift and this allows all the client applications to you know simply connect to itself and then this would manage the routing and discovery to all the resources which are part of the cache cluster. For example, I don't need to know about the IP addresses or any of the details about Pod 10, 11 or 12, I simply connect to this Discovery Service, which is a Named Service and that would in turn route me to all the resources within NCache cache cluster. Similarly, a Remote Monitoring Gateway also connects to this Discovery Service to allow Monitoring and Management Operations to be performed outside this Kubernetes cluster by any system admins and I will give you hands-on demonstration on these two how to actually, go about and create these. So, this is a typical deployment where we would have different kinds of applications connecting to NCache in a single Kubernetes cluster.
Here are details on our demo environment setup.
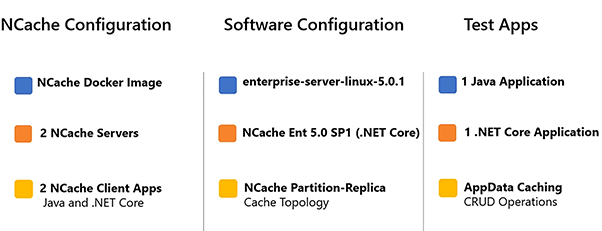
I'm using 2 NCache servers to formulate a cluster and I will use 2 client applications to connect to this cache. The server-side NCache Docker Image is represented with this tag ‘enterprise-server-linux-5.0.1’.
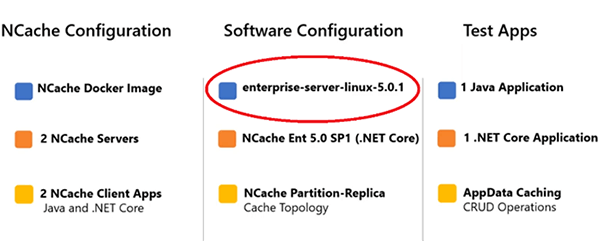
This is available on our website as well as on Docker Hub. It is our latest 5.0 SP1 release .NET Core version, so that you can use it on Windows as well as on Linux but for this demonstration we'll be using Linux. The Java application is using Java client of NCache and .NET Core application is going to use .NET Core client of NCache and I'm using CRUD Operations to represent App Data Caching use case within these applications.
Deploy NCache Servers
First step is to Deploy NCache Servers in OpenShift. So, let's quickly get started with that. I'm logged in to Red Hat OpenShift web console and first thing that we need to do is to create a project.
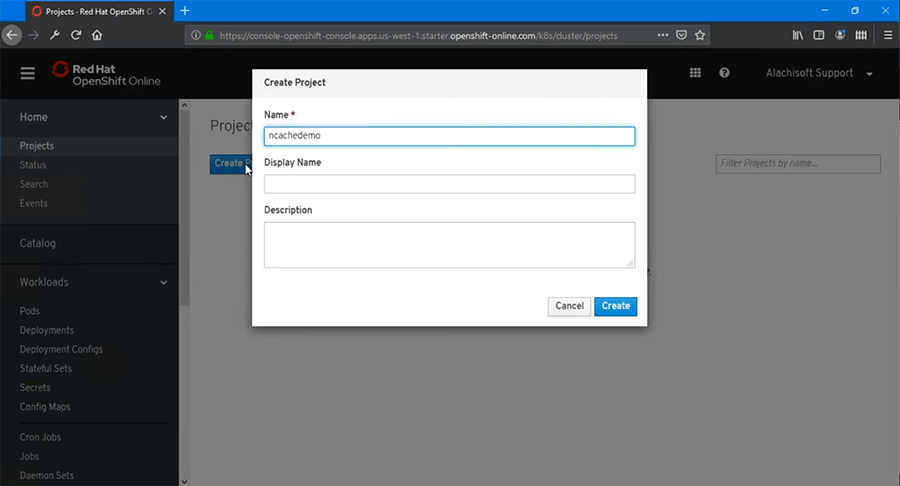
So, let's create an empty project. Let’s name it ‘ncachedemo’ and choose ‘Create’ and after that we'll just create an empty project.
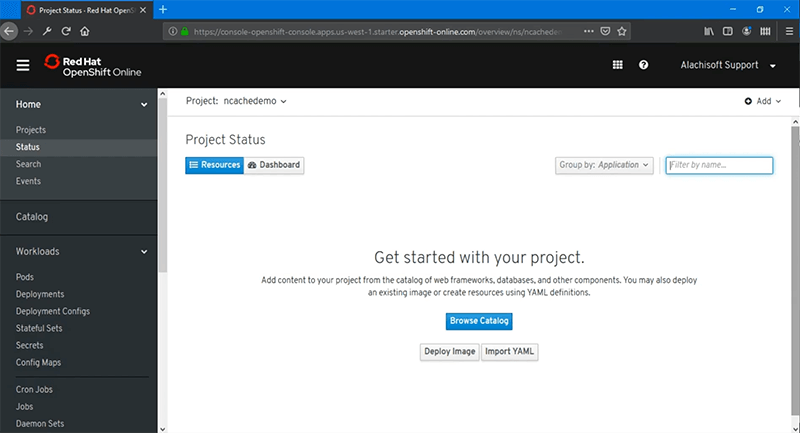
There are no deployments at this point in this. So, we need to start deployment of NCache servers and for that I can browse the catalog or I can use a pre-configured YAML file which you should have for production already use cases and you can import that YAML file. So, let's actually do that and I already have a YAML file that I would use for NCache server-side Deployment. Here it is. So, it is the deployment type right, the ‘kind’ is ‘Deployment’, ‘name’ is chosen to be ‘ncache’. I will use two Replicas and then I have some container Image details right here. So, the main thing that I want to highlight is the Docker Image, that I'm using right here.

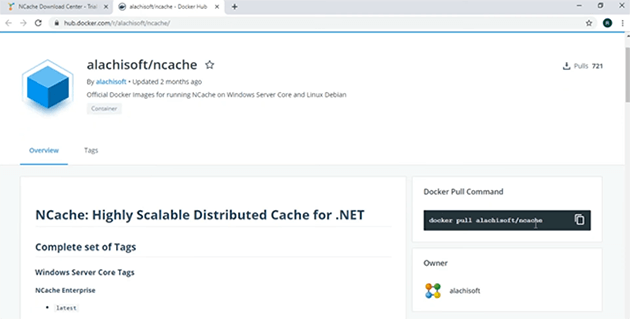
This is NCache Enterprise Server Linux Docker Image, which is available on Docker Hub and you can also get a reference of this from our download page as well. So, if you go to NCache the download page you should be able to see this image right here. The cache server Linux Image which is available on Docker Hub. If I click on this, this would take me directly to Docker Hub and that's where you can pull this Image from. So, there is a general Pull Command ‘docker pull alachisoft/ncache’ and the tag that we're specifically looking for is Enterprise Server Linux 5.0.1, and that's our main .NET Core Linux release that we'll be using for this demonstration.
Next thing is the number of replicas, that defines the number of ports, there's going to be 2 and these are details on all the ports that I'm using for my NCache containers, that I need to be open at the minimum.
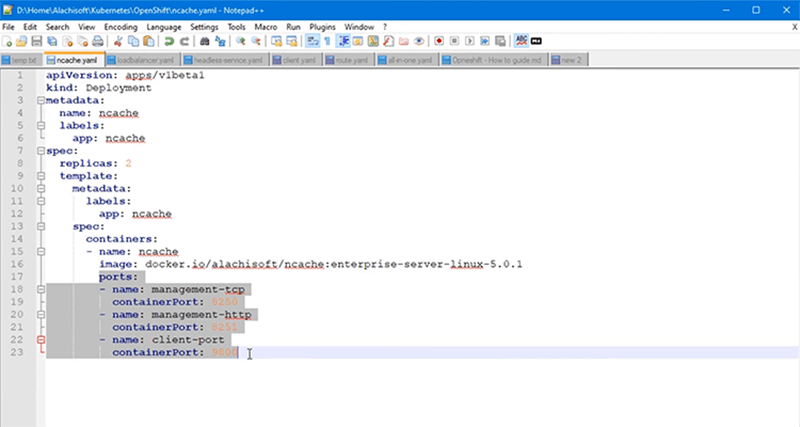
These are management and client connection ports for NCache communication. So, I have this YAML, which I would go ahead and import and then hit ‘Create’ and that would automatically you know start my deployment of NCache servers.
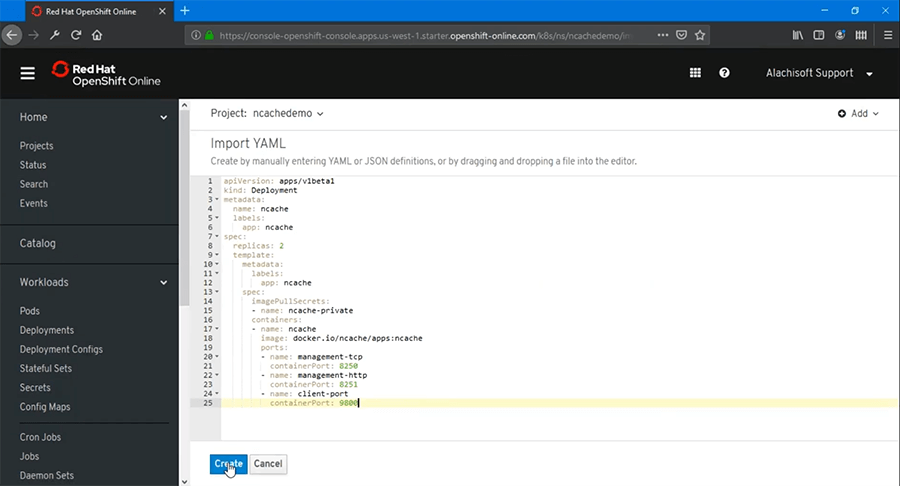
As you can already see, inside Deployments I have ‘ncache’ deployment and I have ‘2 pods’ which are being created and I can further see the status of these Pods, whether they're running or not by clicking on the ‘Pods’ and then after that it should show me the current status which shows them running and they're ready as well.
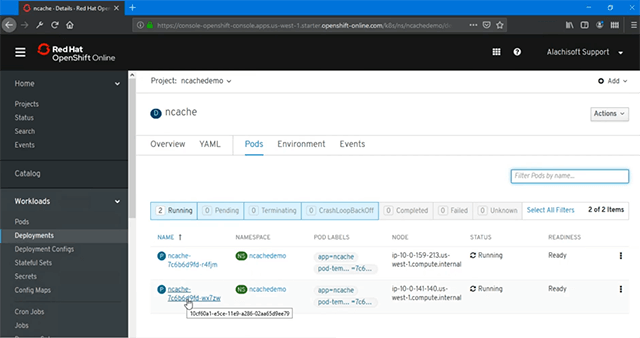
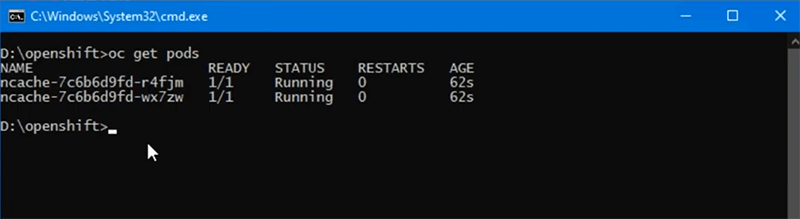
So, there are two deployments of NCache which are made available. By the way, all of this can be done through web console as shown right now or you can also run the command line tools to further see the status of your running Pods and for that you need to run the command ‘oc get pods’ and that will list down all the Pods which are deployed right here and you can match the names as well ‘r4f’ and ‘wx7’ are the same Pods which we've just created.
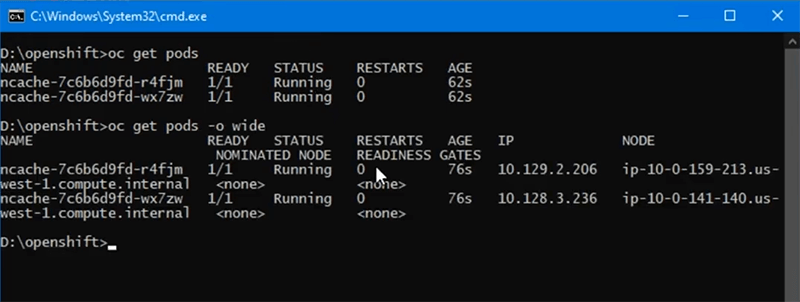
If I further want to see the IP addresses, I can also use ‘get pods -o wide’ switch and that would give me further details of the IPs of these Pods as well. So, we have .206 and .236 as two Pods running with NCache server Image deployed on them.
Cache Discovery Service
We will create a cache discovery service that will help us route all NCache communication to underlying Pods and this was discussed as part of our deployment as well, where we had a headless service to manage all client to server communication for NCache and we will also use this for Management and Monitoring options for this cache cluster and that too outside the Kubernetes cluster that we have.
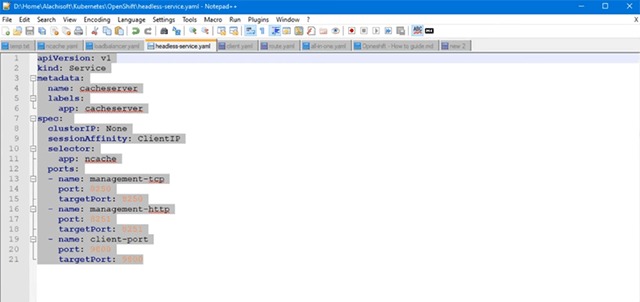
So, let's see how to create this cache discovery service. Now in order to create the cache discovery service, we again need a YAML file, which I have right here and if we have to go through the contents of this service, it's the type ‘Service’, I have named it ‘cacheserver’. You can come up with any name. SessionAffinity has to be set to ‘ClientIP’. This is to ensure that the management and monitoring operations outside the Kubernetes cluster are sticky to one of the Pods at any given time. So, that's a mandatory step, that you need to set up and then it simply has a mapping from this named service to the underlying Pods. For example, we have 8250 port mapped from service 2 Pods and the deployment that I've chosen is NCache so this would cover all NCache Pods which we already have deployed and then we have 8251 and then port 9800. So, first two ports are for management and monitoring options and port 9800 is for client to server communication between the client applications connecting to NCache.
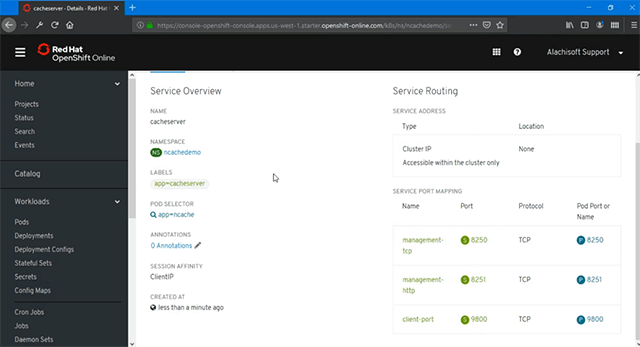
Okay now, let's import this YAML, through our wizard and then after that I would hit ‘Add’ it, hit ‘Create’ and this would automatically create my cache discovery service. As you can see, the ‘POD SELECTOR’ is ‘ncache’. So, this is for NCache Pods and Service to Port Mapping suggest that we have 8250, 8251 and 9800 successfully mapped between our cache discovery service and all NCache Pods. So, that completes the set up for cache discovery service here.
Create Management Gateway
Next step is to create a Management and Monitoring Gateway for NCache deployments and that would allow us to manage and monitor NCache deployments outside this Kubernetes cluster as well and the way it would work is that any management operation performed would to be routed through this gateway to this cache discovery service and that would in turn help you manage and monitor all the underlying Pods as well.
So, let's see how to quickly set up this gateway. Now in order to create the Management Gateway, I need to go under ‘Networking’ and inside there we have ‘Routes’.
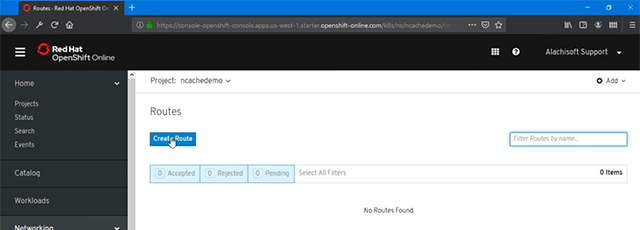
So, I'm just going to go ahead and create our route to this headless service. So, if I click on it, you can just name it anything and based on that you just need to select the service and, in this case, the ‘cacheserver’ service created in previous step has to be selected. It would just list all the services here and you just need to provide the target port for Management and Monitoring.
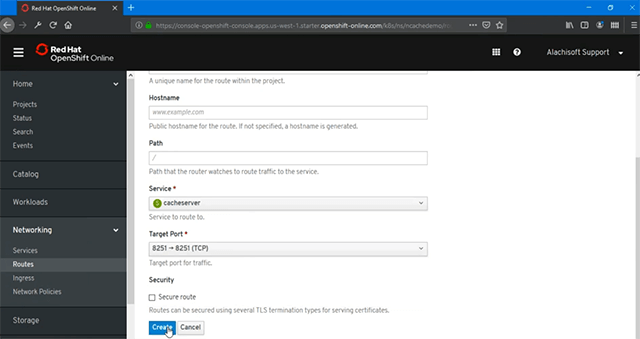
At this point I'm just going to use 8251 and hit ‘Create’ because that's the one which would allow me to create, you know, manage and monitor NCache outside this Kubernetes cluster as well and this is the location from where I can just click and that would automatically open the NCache Web Management access to one of the Pods within NCache deployment and as you can see, I have .3.236 IP showing up.
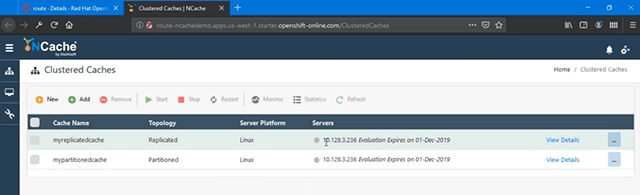
These are some pre-configured caches and if you notice this is one of the Pods from within my deployment, where I got connected. So, I'm able to fully access the underlying Pod and I'm able to manage them. One thing I want to showcase right here is the you know, the session Affinity aspect, that's a mandatory step. This is again to ensure that if you open a Pod for management purpose you need to be sticky. The management commands has to be sticky to that Pod right. So, for that you need to set this value to ‘ClientIP’ and this is one of the mandatory steps that you need to set up.
Having gone through this, if I come back on the management portal I can clearly see that I am connected to .236 and from here I can perform all kinds of management and monitoring operations for NCache.
Create Cache Cluster
At this point, our OpenShift environment setup for NCache is completed and we can now go ahead and Create a cache cluster next. Okay, within this management tool, I'm going to click on ‘New’ and that will open a cache creation wizard for me.
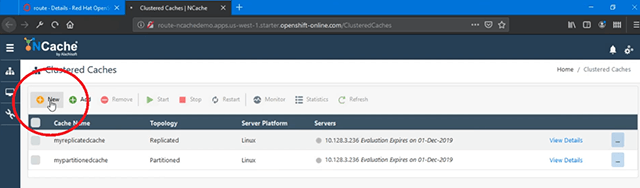
I'm going to name my cache, let's name it ‘democache’. I'll keep everything default here, ‘Partition of Replica’ and provide the first IP which is automatically given and I need the IP of the second Pod which I can copy from here and then paste it here and then choose on this click on this plus (+) sign and that would specify the second Pod. Again, keep everything default on this. Parameters are same and then I ‘Start this cache on finish’ and choose ‘Finish’ and that would go ahead and create my cache cluster. So, with these two Pods, using the NCache Web Management tool, I am now able to create a cache cluster and using the Web Manager from my own box right here. If I click on details here, I can also see some more details as far as monitoring aspects are concerned and I can see the statistics of this cache cluster as well. So, as soon as it loads, you can see there are different parameters. We can see ‘Cluster Health’, which is fully connected and we can see some other graphs here as well.
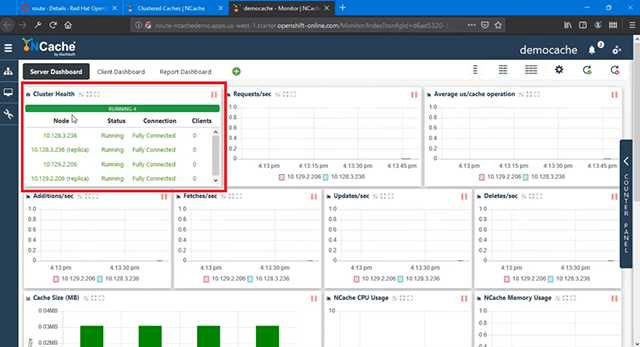
There is no client connected at this point, so I'm not seeing any client processes or any of the clients shown in the cluster health but as soon as I would deploy and run my client applications, I would actually see client processes, once they connect to NCache under here, as well as on the other side as well. Our NCache Cache cluster is created and ready to be utilized.
Deploy and Run Client Applications
Next step is to Deploy and Run client applications in OpenShift, that will use this cache cluster. Again, I'm going to load the YAML file for client deployment and here we have it, where we have a label as ‘multiclient’ and again its a separate deployment.
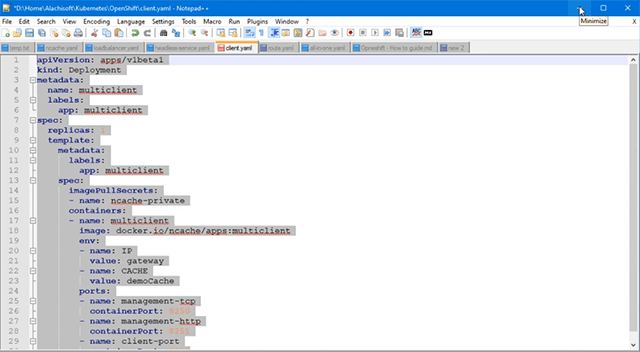
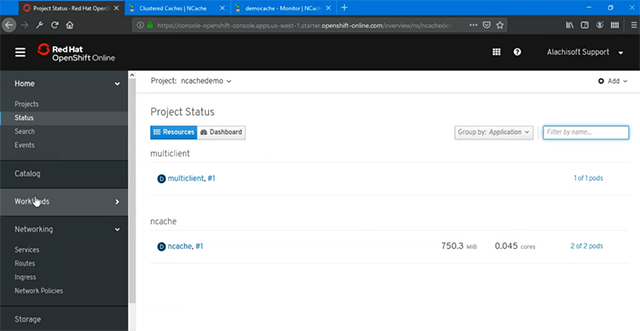
I have a Docker Image which would have a .NET Core as well as Java application running inside this container. So, I've used one container to host two different applications but you can have separate containers here as well. So, within my same project, if I click here, I have NCache with two Pods and if I click on ‘Add’ and import my client deployment YAML, I can go ahead and create this and this would automatically create a separate container, separate deployment for my client applications. If I come back to projects and now, we have two different deployments we have ‘multiclient’ with 1 Pod and we have ‘ncache’ with 2 Pods, which we did as part of NCache server-side setup.
So, if I go to the Pods, again I have the status container creating and then if I run this command again, this would give me the list of all the Pods along with their IP addresses. Previously we had 236 and 206 and we had now have 47 added as well, right. So, that's the client deployment pod and here is the ID of this. Now, if I quickly see if there are any currently running applications in this deployment in this pod, if I run this command real quick, all I would see is the NCache Service Daemon, ‘startup.sh’ for this container. Alachisoft.NCache.Daemon.dll starts with NCache Service Process and that we have a Web Manager Process.
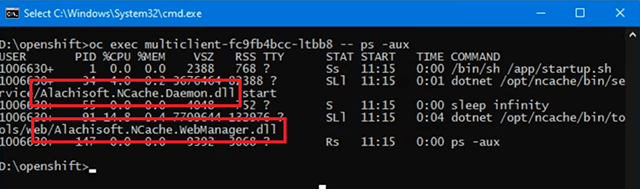
So, no client application is being run at this point from within this container and this is same that you can see from here as well where we don't have any client connected. So, let's go ahead and run a Java application from within this client. I'm going to run this. I'm running the name of the cache which is ‘democache’, that's the name in order to connect.
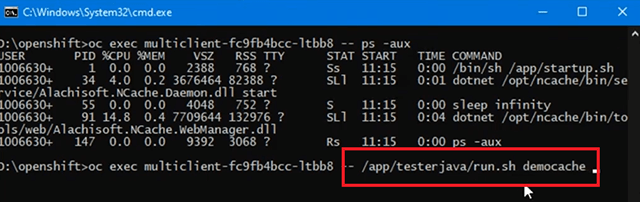
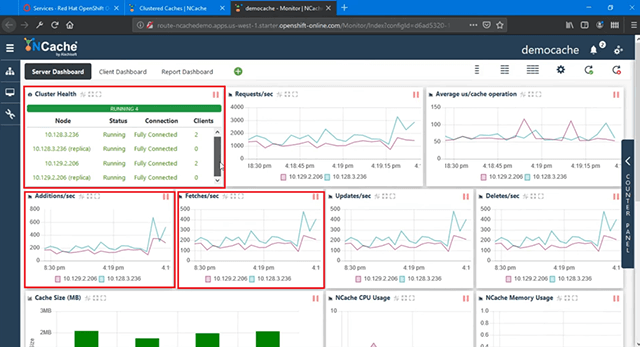
I don't need any IP addresses here instead I need the headless service for discovery. Remember we created a Discovery Service, so I need to go back to ‘services’, get the name and the name was ‘cacheserver’ and it had the port mapping from this service to all the underlying Pods. With NCache client, we have this built-in logic where it talks to this named service and from that service it automatically discovers all the underlying Pods within the OpenShift Kubernetes Platform. So, if I specify the name of this service, our NCache client is intelligent enough and would automatically connect and formulate fully connected client to server Setup with NCache cluster. So, this application is now being run and if I bring back the monitoring aspect of this, I can now see a fully connected cluster with one client added and you can already see client activity shown up on additions/sec and we have activity within the console as well and we can see that CRUD Operations are being performed on my cache cluster within OpenShift.
Now if I look at the client processes, I have a 47 IP's shown, which is connected to 236 as well as to 206. So, with the headless service, the discovery was successful and it was able to connect to all underlying Pods without any issues.

Right, so and you can also see the monitoring and management aspects are also working absolutely fine. Now, if I run the same command one more time, where I show the running processes within this client deployment on this Pod. So, if I copy this, now you should see a Java application using NCache Java client running as part of this as well. So, other than NCache Service in Web Manager, now we have a Java application running which is using this ‘democache’ with the ‘cacheserver’ as the server parameter for connection.
So, that's how simple it is to run a Java application with NCache all in Kubernetes using OpenShift Platform.
Next step is to run the .NET Core application and for that I would just go ahead and run the .NET Core client, which is part of the same container on the client Side.
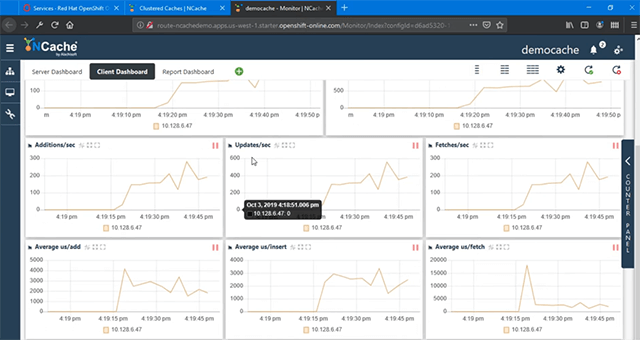
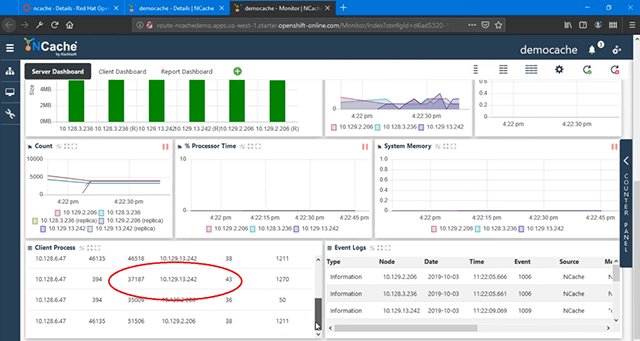
So, steps are same for me and if I run this real quick, this would launch our .NET Core client for connection with NCache and again I need ‘democache’ and ‘cacheserver’ which is the headless discovery service for connection to underlying Pods. So, second client would run and you would see client processes increasing there you go. Now we have a separate client process connected to NCache and if I come back here, we have 2 clients connected and we have all the parameters, all the counters showing activity, which is increased in its, you know, capacity right. So, we have more Additions/second. Fetches/second have also increased.
Updates/second have increased, right. So, all the values are increased with the newly added load and you can see ‘Client Dashboard’, where we have clients showing all the activity.
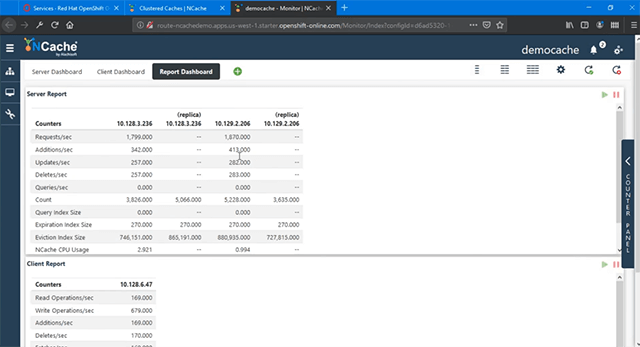
So, NCache Management and Monitoring is working absolutely fine even for client deployments, you just need to open the ports, as we did for the NCache servers and here's a report view of the same, where we have server-side Counters in report and then we have the client-side Counters from our client deployment Pods.
Scaling Out NCache Cluster
Next thing that I will demonstrate is ‘Scaling Out your NCache cache cluster’ in OpenShift Platform. This will help you increase request handling capacity in NCache and that too at runtime.
Let's review how to do this. Now in order to increase capacity, add more Pods to this deployment. I'm going to go to ‘Deployments’.
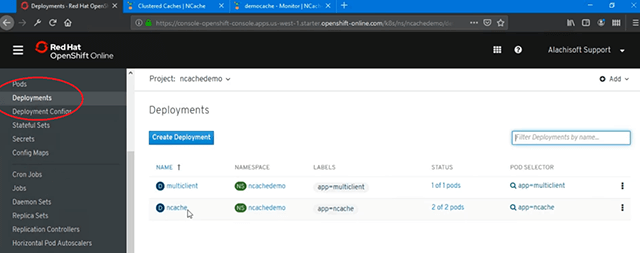
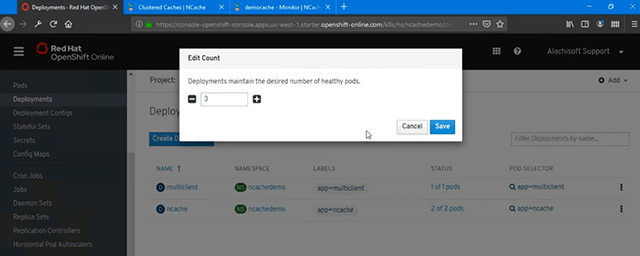
There are multiple ways you can do this. As you can see currently, we have 2 Pods for NCache. So, in order to add another instance to this, I have one option to ‘Edit’ the count increase it to 3 and then ‘Save’ this and that would automatically create it. So, that's the easiest one.
Other option is that you ‘Edit’ your deployment and it would give you the YAML file and increase the ‘replicas’ count that we initially set it to ‘2’, increase it to 3 and then reload it and that would automatically deploy it or just save it, it would just go ahead and do it.

You can also use command line, so I'm going to use this for now and choose ‘Save’ and that should be enough to create another Pod using the Docker container Image that I have and now I should see another Replica of this container being created and it's fully running. It's very quick within OpenShift and if I run the ‘oc get pods’ command I should be able to see another IP address added to it, it's 13.242. So, I have client deployment to existing NCache server Pod deployments and then within that deployment I have 242 added as well. So, my OpenShift Pod is available, I just need to come back to the ‘Management’ and then add that in my cache cluster as well because Web Manager is available. So, I just need to copy that IP address, choose ‘Add’ and this will allow me to add that IP and choose to be added in the cache, there you go. It's added and then if I ‘right click’ and choose ‘Start’ this would join the cache cluster at run time. I don't need to interrupt any client applications, I don't need to stop the running cache at all. So, my running cache cluster has joined this node and there you go it has already started seeing activity as well because the applications were still kept running, so I have active and backups created within NCache cluster and 242 is fully joined in the cache cluster and participating in request handling.
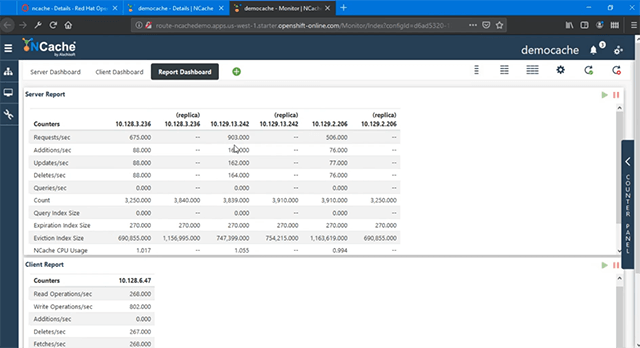
So, my request handling capacity has been increased because now we have 3 servers hosting the cache in OpenShift instead of 2. It's fully connected. You can see Requests/sec, 242 is joined in all, you know, operations and it's showing full activity and if we come back to the ‘Client Processes’ those are also connected to 242 because again it’s using the headless service for discovery.
So, whatever you add within that deployment, that service is going to match, you know the route for that. So, we have all these servers fully joined in and working absolutely fine. So, that's how easy it is to scale out your cache cluster in OpenShift Platform and with Red Hat it gives you the support so you can utilize NCache as part of that.
This brings us to the end of our video. We have successfully demonstrated how you can deploy NCache in Red Hat OpenShift Platform and how easy it is to use NCache from within your Java and .NET Core applications. We also reviewed how effectively you can Manage and Monitor your NCache Deployments in OpenShift. I hope this was helpful. Please share your feedback or questions with us at Alachisoft support support@alachisoft.com. Thank you!