Docker is an open platform for developing, shipping, and running applications, reducing the delay between writing code and deploying it to production with its lightweight containers. Likewise, NCache, an extremely fast in-memory distributed cache, offers Docker Images for both Windows and Linux servers. This blog will explain how you can configure and use these images to start using NCache with Docker.
NCache in Docker
Docker Images are self-contained with everything required to run the application included as part of the container within them. The user just has to pull these images, create containers, and use them. This also applies to the NCache Docker Images, by using NCache with Docker, you save yourself the usual hassle of installation.
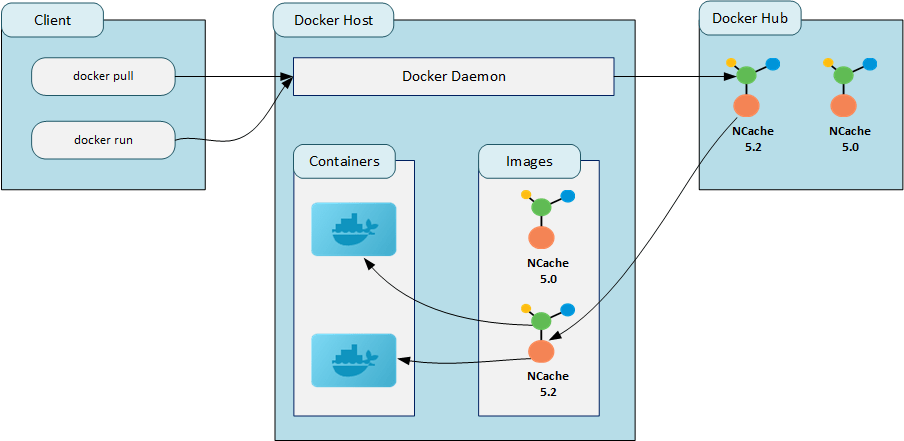
Figure 1: A diagram depicting the working of NCache with Docker.
NCache also provides Dockerfiles to create Docker Images for Windows and Linux. You can modify these DockerFiles as per your requirements to create a custom NCache Docker Image and package your application within it.
Deploying NCache Docker Image
As previously mentioned, deploying NCache Docker Image(s) is a pretty straightforward process as detailed below.
Step 1: Configure Network
First, you need to create a custom network in Docker to assign static IP addresses to your containers. This helps to tackle the problem of your containers changing their addresses after you or the host machine restarts them. The following command creates a custom Docker network with an IP range and the name nbrg.
|
1 |
sudo docker network create --subnet=172.19.0.0/16 --gateway=172.19.0.1 nbrg |
Step 2: Pull Image and Create Containers
After you have configured the network, you need to pull the NCache Docker Image from the Docker Hub repository. Execute the following command to pull this image:
|
1 |
docker pull alachisoft/ncache:enterprise-server-linux-latest |
Once you have created a custom Docker network and pulled the NCache Docker Image, you’ll have to create containers that host NCache. The docker run or docker create commands create these containers. The docker run command creates and starts the containers while the docker create command only creates them. Depending on your Docker Container Deployment Scenario, the process of creating and running your containers will vary. In this scenario, your containers and host both are Linux-based.
The following two commands create and start the containers named ncache-ent-server-01 and ncache-ent-server-02 with the custom Docker network nbrg that we created in the previous step. A static IP address is also assigned to each container.
|
1 2 3 |
docker run --name ncache-ent-server-01 --net nbrg --ip 172.19.0.11 -itd alachisoft/ncache:enterprise-server-linux-latest docker run --name ncache-ent-server-02 --net nbrg --ip 172.19.0.12 -itd alachisoft/ncache:enterprise-server-linux-latest |
Step 3: Connect to the Container
Now you have to connect to the containers that you created to start working with them. The following command connect you to the running container named ncache-ent-server-01 and opens a PowerShell instance within it.
|
1 |
docker exec -it ncache-ent-server-01 pwsh |
Step 4: Activate License
The NCache Docker containers are not activated by default. So, to use these containers, you’ll either have to register/activate them using a license key (obtained from sales@alachisoft.com) or you’ll have to register them for evaluation by using an evaluation key. To use the NCache PowerShell cmdlets, you need to import the NCache PowerShell module. The following command imports the NCache PowerShell module inside the container ncache-ent-server-01.
|
1 |
Import-Module /opt/ncache/bin/tools/ncacheps/ |
Once you have imported the NCache PowerShell module inside the container ncache-ent-server-01, you can use the NCache PowerShell cmdlets to register NCache. The following command does so using the activation key with the environment set to production and the number of clients set to 4 inside the container ncache-ent-server-01.
|
1 |
Register-NCache -Key xxxxxxxx-xxxxxx-xxxxxxxx -FirstName John -LastName Smith -Email john@yourdomain.com -Company your_company_name -Environment production -Clients 4 |
If you want to evaluate NCache before purchasing a license for it, you try register NCache for evaluation using an evaluation key. The following command registers NCache for evaluation with the evaluation key inside the container ncache-ent-server-01.
|
1 |
Register-NCacheEvaluation -Key xxxxxxxxx-xxxxxx-xxxxxxxx -FirstName your_first_name -LastName your_last_name -Email yourdomain@yourdomain.com -Company your_company_name |
Step 5: Use NCache in Docker
Now that your container has been activated, you can use NCache by executing the supported PowerShell commands or using the NCache Management Center. For example, the following command creates a cache named demoClusteredCache with two server nodes (172.19.0.11 and 172.19.0.12) with the topology set to PartitionReplica, inside the container ncache-ent-server-01.
|
1 |
New-Cache -Name demoClusteredCache -Server "172.19.0.11,172.19.0.12" -Topology PartitionedofReplica -Size 1024 |
Using the NCache Management Center
The NCache Management Center is a very powerful tool that provides a GUI to manage and monitor your caches. Since we have configured our NCache Docker containers to be accessible by the host, we can use it through the host’s web browser to manage our caches. To access the NCache Management Center of the container ncache-ent-server01, go to http://localhost:8251/ via your host machine’s web browser.
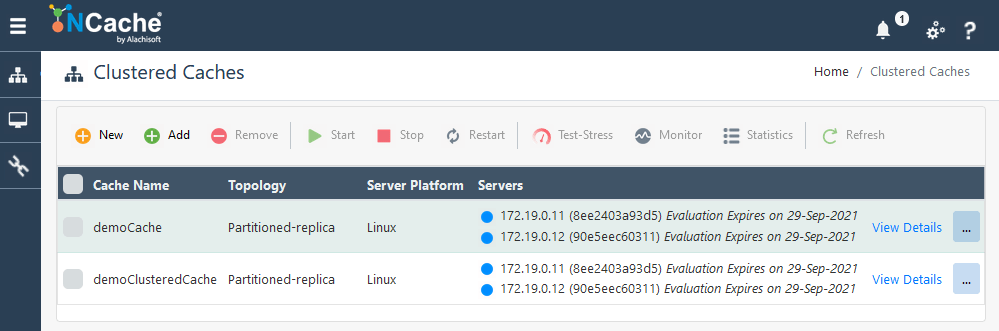
Figure 2: NCache Web Manager Interface
Connecting a Client Application
Once you have created your NCache containers, activated them, and created your clustered cache(s), you can proceed to connect your client applications to these clustered cache(s). Depending on where your client application is deployed (the application can be containerized within the same network as the servers or present on the host machine, etc.), you may have to make some additional configurations.
Once you have connected your application, you can reap the benefits of the feature-rich NCache API.
Conclusion
The Docker Images of NCache save the users time by providing every dependency and configuration of NCache within them. Users no longer have to install each and everything required by NCache just to run it. If you want to use NCache with Docker, you are just a pull away from the vast API, tools, and features provided by NCache. So, what are you waiting for? Use NCache now!