With every application under the sun providing its users with some sort of cloud deployment, it is natural to question why? Quiet simply put, cloud computing applications offer these developers the easiest approach for testing and developing products. This approach focuses on effectiveness and avoids the pitfalls associated with more traditional methods, like time-intensive builds, infrastructure expenses, etc. Not to mention, the scalability and flexibility it provides them and their users. With all this in mind, is it any wonder that NCache offers their users the same convenience with NCache Enterprise Cloud? With a free 60-day trial, no less.
What is NCache Cloud Enterprise?
NCache Enterprise Cloud is a Software as a Service (SaaS), accessible on the Azure and AWS Marketplaces to properly take advantage of their massive global cloud infrastructures. It spins NCache servers, so that if you have a subscription to the aforementioned platforms, you can quickly use NCache via cloud free for 60 days (so you can fully explore the standard wealth of features provided by NCache Enterprise), without having to install NCache as part of your infrastructure.
Essentially, NCache Cloud Enterprise spins NCache server VM’s within your own subscription, based on the number of servers you require. Therefore, it avoids the hassle of having to download and install the software. Once you have access to these pre-installed VM’s all you have to do is create a cluster and get started with operations. This blog will focus on the latter, i.e., AWS.
Different Methods of NCache Server VMs Deployment
While such a cloud installation is without hassle it is not without choices, and among the most important is your choice of deployment for your AWS cloud installation. The NCache Cloud Portal supports two kinds of deployment methods; Automatic and Manual.
The former requires access rights over your cloud subscription to spin the relevant VM’s as discussed previously, the latter does not. The latter case usually occurs when you are not ready to provide these rights due to security concerns. Here you are provided with generated PowerShell Scripts to run instead. In this blog, we guide you through AWS Automatic Deployment.
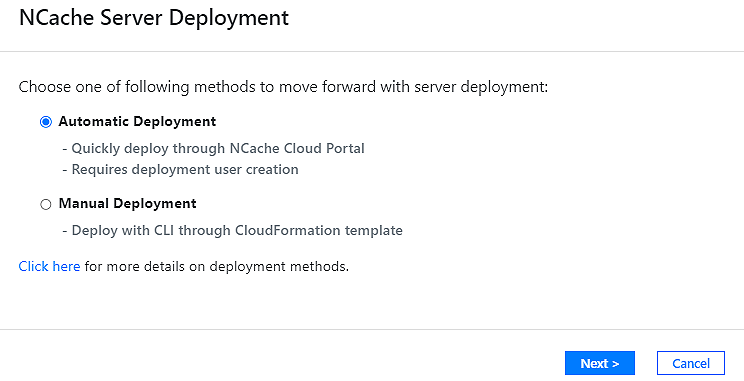
Figure 1: NCache Enterprise Cloud AWS Deployment Methods.
What is Automatic Deployment?
By selecting Automatic Deployment, you give the NCache Cloud Portal the authority to oversee server deployment on its own. It effectively necessitates the creation of a Deployment User with access to your AWS subscription. In only a few clicks, you can complete such user creation and permission assignment through the NCache Cloud Portal.
After the initial set-up, admittedly, Manual Deployment allows you to retain more control. However, more control nearly always means more work (manually running scripts, etc.) – losing some of the convenience most users turn to cloud installations for in the first place. It also has the disadvantage of limited access to management operations (starting, stopping, adding and removing VMs) and specifically the NCache Manager. Basically, if you are looking for the NCache Cloud experience with the most ease of use, you should opt for Automatic Deployment.
How to Automatically Deploy NCache Cloud Enterprise?
After registering your account and making the appropriate deployment choice, you can proceed with the following steps.
Step 1: Create Deployment User
First and foremost, you must create a new IAM (Identity and Access Management) Deployment User in AWS to provide the relevant resources. To do so, copy the script generated on the relevant page, run it through the AWS CLI, and copy the resulting access and secret keys. Of these keys, the AWS access key is a type of one-of-a-kind user/account identifier. The secret key, on the other hand, is a private key. After doing so, you may proceed with the process, provided you verify that you’ve done so.

Figure 2: Creating an IAM Deployment User in AWS.
Step 2: Authorize Deployment User
The authorization process is simple. You merely need to enter the keys you’ve copied in the appropriate sections and request authorization, at which point you’ll be ready to move on to the next step. Please ensure you do not lose these keys, as you will have to delete the current Deployment User and begin from the start.
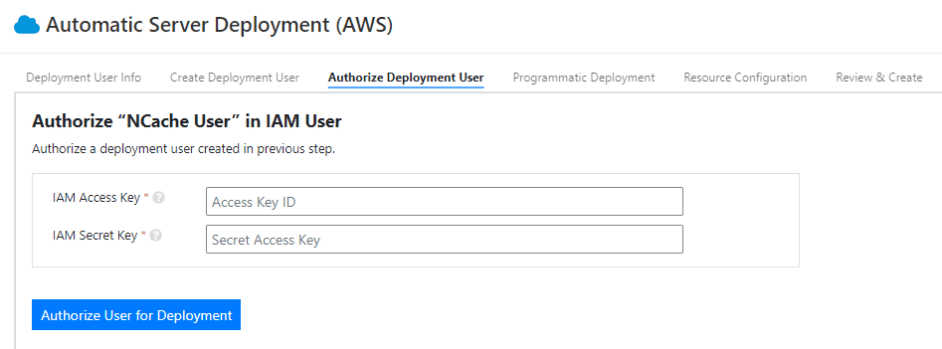
Figure 3: Authorizing a Deployment User in AWS.
You use these URLs to subscribe to the NCache Enterprise Cloud software in a separate tab. Upon choosing to subscribe you’ll be asked to provide permission to configure and launch the product in succession – it’s as simple as clicking a button both times. Although, you will have to set your Fulfillment Option, Software Version, and Region for the latter. After this, you return to the original tab, verify you’ve done so, and continue.
Step 3: Enable Programmatic Deployment
To deploy resources automatically, you must subscribe to the corresponding NCache AMI (Amazon Machine Image) offers in the AWS marketplace. The relevant URLs are provided within the process, as shown below.
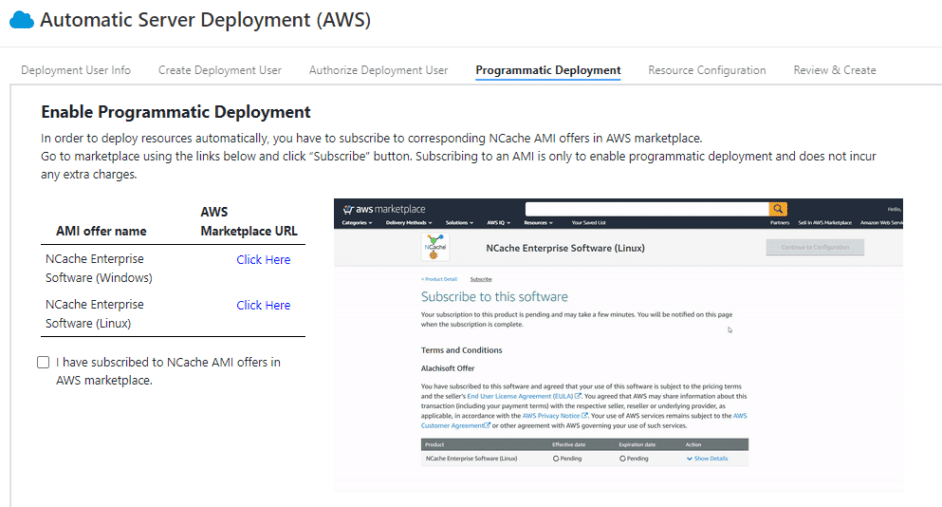
Figure 4: Enabling Programmatic Deployment in AWS.
You use these URLs to subscribe to the NCache Enterprise Cloud software in a separate tab. Upon choosing to subscribe you’ll be asked to provide permission to configure and launch the product in succession – it’s as simple as clicking a button both times. Although, you will have to set your Fulfillment Option, Software Version, and Region for the latter. After this, you return to the original tab, verify you’ve done so, and continue.
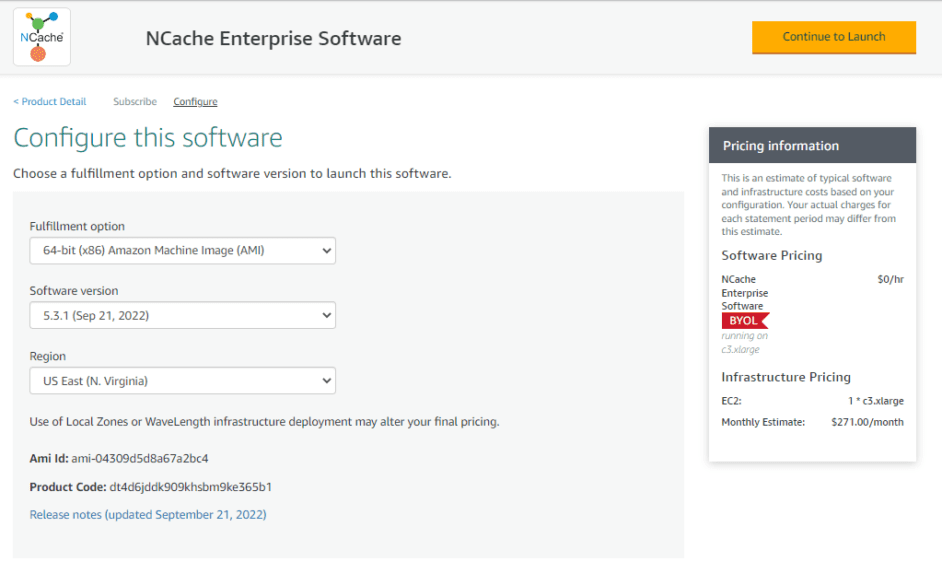
Figure 5: Configuring the NCache Enterprise Cloud Software as part of its AMI subscription process.
Step 4: Resource Configuration
In this section, we will configure the parameters for the VMs which we will deploy. This includes the selection of the virtual machine size, login credentials, and vendor-specific information (region, VPC, VNET, and Subnets). Additionally, it’s where you specify the NCache Version you want, i.e., Windows or Linux, based on your application requirements. Further, ensure you enable the appropriate action if you want public access to the NCache Manger, before reviewing, creating, and deploying your servers.
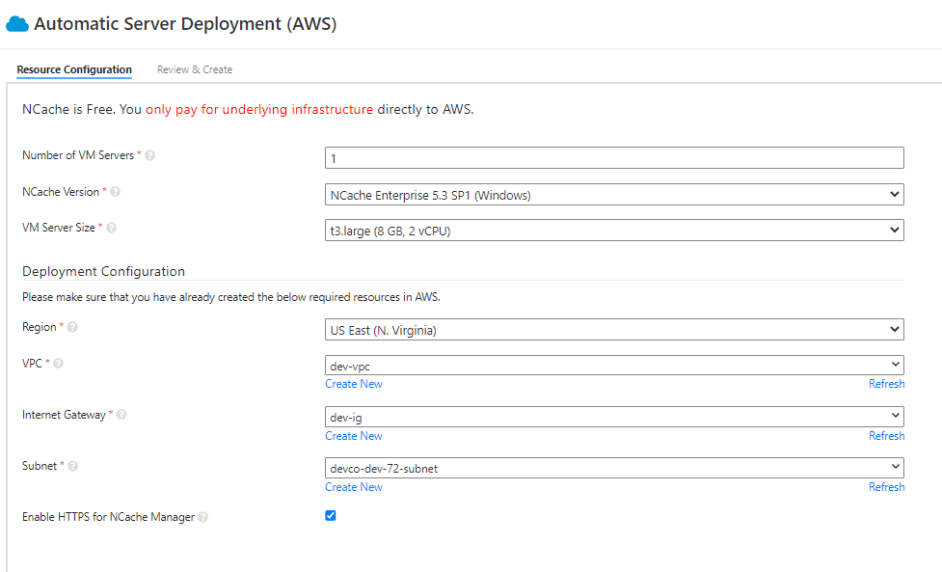
Figure 6: Resource configuration in AWS.
Conclusion
Clearly, if you are an AWS subscriber looking to take your distributed caching solution to the next level and do it as comfortably as possible, the NCache Enterprise Cloud’s Automatic Deployment is just the thing for you! Register and get started with your free trial today!